
 Lessons: 7Length: 47 minutes
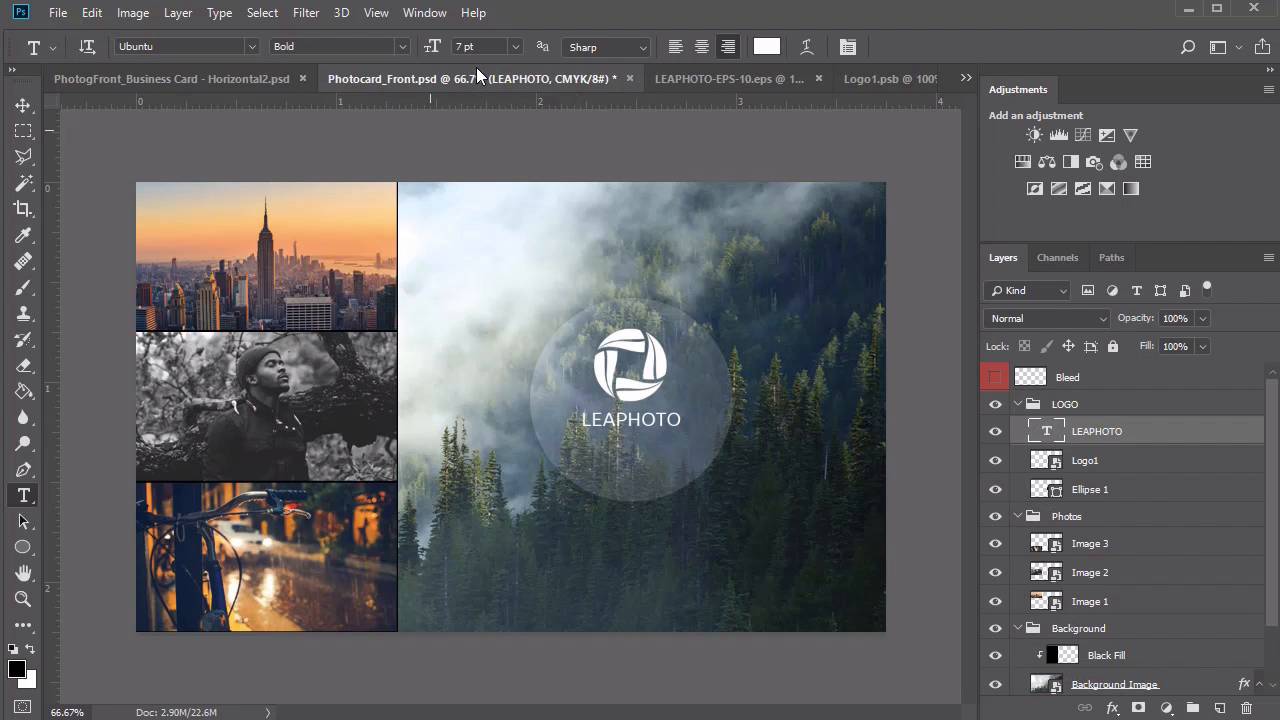
- Overview
- Transcript
2.4 Photography Business Card Design
Our second business card design is inspired by stunning photography portfolios, but it can also be used across many creative industries. In this lesson, we'll learn how to build this photography business card using helpful smart objects and high-quality stocks.
Related Links
2.4 Photography Business Card Design
Hello, everyone, and welcome back to this course. Next up, we'll be creating this cool business card, inspired by photographers and creatives, so let's jump right in. Create a new document in Photoshop using out previous dimensions. Luckily, Photoshop keeps them saved in your recent items. So create a new 3.75 by 2.25 inches card at 300 PPI and the CMYK format. Move on to the bleed lines. Create a new layer and name it Bleed, then right-click the Visibility icon and change the layer color to red. Now, set up a new set of guides. Go to View > New Guide, setting a vertical guide at .125 inches. Then go to View > New Guide again, setting a horizontal guide at .125 inches. Repeat this process for the last two. Go to View > New Guide, and create a horizontal guide at 2.125 inches, then finish up with the last vertical guide at 3.625 inches. To mark this bleed, select the Rectangular Marquee Tool, and make a selection. Right-click to stroke the selection with a black stroke of two pixels. If it's too distracting, feel free to hide this layer, and use the blue guidelines instead as your reference. Next, add a new group for the background, then select the Rectangle Tool, and create a black rectangle that fills up the entire document. This is where we'll place our mountain background image. So right-click this layer and convert it to a Smart Object, then go to the mountain forest image and hold Ctrl+A to select it. Copy and paste it onto a new layer within the Smart Object. Resize it by holding Ctrl+T so that it fits well within the document. Let's flip this image. Go to Edit > Transform > Flip Horizontal, then save the Smart Object, making sure it's positioned exactly how you want it. Now, create a new group for the photos. Although this card is dedicated to photographers, you can also use it for other creative industries, and to show off your portfolio. Select the Rectangle Tool and click the canvas. Create a black rectangle at 391 by 223 pixels, and position it in the top-left corner. Make two more copies of this shape. Stack these copies one on top of the other until the left side is completely filled. You may need to use the Move Tool and arrow keys to position them at the perfect distance from one another. Then right-click each one and convert them all to Smart Objects. Now, we can update them with amazing stock photos. I'll be using these beautiful images from Envato Elements, but you can definitely use your own pictures instead. Let's start with the city. Copy and paste the city image onto a new layer within the first Smart Object. Resize the image, then save it right away. You may notice that some details spill off into the danger zone past the bleed lines, so feel free to use your own discretion when positioning each image. Now, double-click the second Smart Object, and copy and paste the black and white portrait onto a new layer. Resize the portrait. Move onto the last Smart Object. Copy and paste this rainy day picture onto a new layer, and resize it to fit before saving the Smart Object. In this case, the bike doesn't really have to be aligned with the other pictures. We've chosen colors that still match the top city image, and the bits of green within it go so well with our mountain picture. Now, we'll add a few more details to complete the look. Select layer for the background image and right-click to go to Blending Options. Add a black color overlay that's set to Color Dodge, and an opacity of 25%. This subtle change adds just a little more contrast to the mountain picture. Then create a new layer above it, and right-click to set it as a Clipping Mask. You may have noticed we have some gaps between these images we need to fill, so select the Rectangular Marquee Tool and make a selection. Fill the selection with the color black, then use your arrow keys to tap it over to the left if it's sticking out too much. Now, create a new group for the logo, then, create a new layer and rename it. Select the Ellipse Tool and click on the canvas to create a black circle at 305 by 305 pixels. Position it towards the center of the mountain, then set the layer blend mode to Screen. For this design, we'll be using this Leaphoto logo template, but I'll just need to change the color. Create a quick copy, and go to Image > Adjustments > Hue/Saturation. Set the Hue to 0, the Saturation to 25, and the Lightness to 100 for a completely white logo. Now, make a selection around just the symbol, and copy and paste it onto the logo layer. Resize it with the Free Transform Tool before converting it to a Smart Object. This design really looks best with a white logo, but if you still want your normal color, just update the Smart Object with a resized version of the original logo. Here is what it would look like. Now, let's add the company name. I'll go back to the white logo for this step. Because the name is a part of the logo, I won't be creating a separate group. So just use the Text Tool to write LEAPHOTO in the Ubuntu font, at a size of 10 point and a bolded style. This is the original font from the logo template, so we'll just go ahead and use what already works. Now, we'll add the word photography in Ubuntu Regular, with a size of 7 point. When you're happy with the card, make sure to color code each group in the template however you see fit. Here is the final front design. Let's move on by making a cool design for the back. Just like our previous card, we'll use our little file trick to help us retain the same dimensions and some of our details. So save a copy of this card, but rename it as the Back. Now, delete the photo group, since that's the only one we won't need. We get to start the back design with the exact same background as before, and since we just copied the file, the images should still line up pretty perfectly. Let's move this logo. Select the entire logo group and resize it, make it much smaller, and place it in the top-right corner, right where it meets the bleed lines. You don't want your logo to get cut off in the final printing, so if anything, make sure this singular detail stays away from those edges. Now, create a new group below it for the shape layers. Select the Rectangle Tool and create a white rectangle at 521 by 614 pixels. This shape will hold our contact information, so place it on the left-hand side. Now, create two new groups for the icons and text. Add the card holder's name to the text group in the same Ubuntu font as before. This time, we'll write the name Jack S Wyatt, with a Bold Italic style at a size of 15 point. You should always want your name to stand out the most for business cards. So just beneath it, we'll add the job title at a size of 6 point in Ubuntu Light. There are many parts of your work experience you can add to your card. I would suggest adding certain details that can either wow people, or show them that you are a recognized expert in your field. In this instance, I'll write 2020's Best Photographer at a size of 7 point right at the top. We'll also change it to this nice blueish-green color to match the green landscape in the background. I'll go with the Enrique Light Round font for a nice result. Let's write Pix Magazine, since it is a photographer's card, after all, in the Ubuntu Regular font at a size of 4 point. Next, we'll add some horizontal lines to separate our work specialty. Select the shape group, then grab the Line Tool and create a horizontal light gray line with a weight of 1 pixel. Adjust the width to 330 pixels, then center the line. Hold Control+J to create a copy of this layer, bringing the second line down so we can add some text to the middle. We'll write the words Portraits, Weddings, & Events, and set it to Ubuntu Light for some slight emphasis on this area, then lower the font size to 5 point. If you really wanna make sure your text matches the background, just select the text color and use the Eye Dropper Tool to pick the best color from the photo. I'll go with this grayish-green color since you can still see it on the card. Now, let's add our contact details, starting with the website address. Select the Rectangle Tool and create a rectangle at 261 by 43 pixels. Center it towards the bottom, then add your website address in the middle. Write the URL for leaphoto.com in white, making sure to set the font to Ubuntu Regular at 6 point. Let's add the icons. Open your business icons into Photoshop. I'll be using one from this minimalist set. Select the contact icons, then copy and paste them onto new layers one after the other. Before we move on, use the Magic Wand to select the white areas within the envelope icon. Hit the Delete key so we can remove these parts and re-color them more easily. Now, select each icon layer and hold Ctrl+T to scale all three down in size. Feel free to include only the information you're comfortable with. I'll add a mock phone number, email, and street address, all in Ubuntu Regular with a size of 5 point. You can also keep the same font color as the top quote for more color harmony. To change the colors of the icons, right-click the layer and go to Blending Options. Create a color overlay with a slightly darker color than our font, then copy the layer style and paste it onto the other icon layers. Once you're finished, all you have to do now is color code the groups for more organization. Here are the final front and back designs of our card. For a custom look, feel free to use adjustment layers to change the color scheme to black and white, or even consider updating the back of the card with a different graphic. Here is how it would look with the other photos from the front of our card, from the city, to the portrait, and finally, the nighttime scene. Which one is your favorite? Now that we've completed this design, we just have one more card to go. So let's tackle that project in our next lesson ,where we'll learn how to make an artist-themed business card.


