
 Lessons: 8Length: 42 minutes
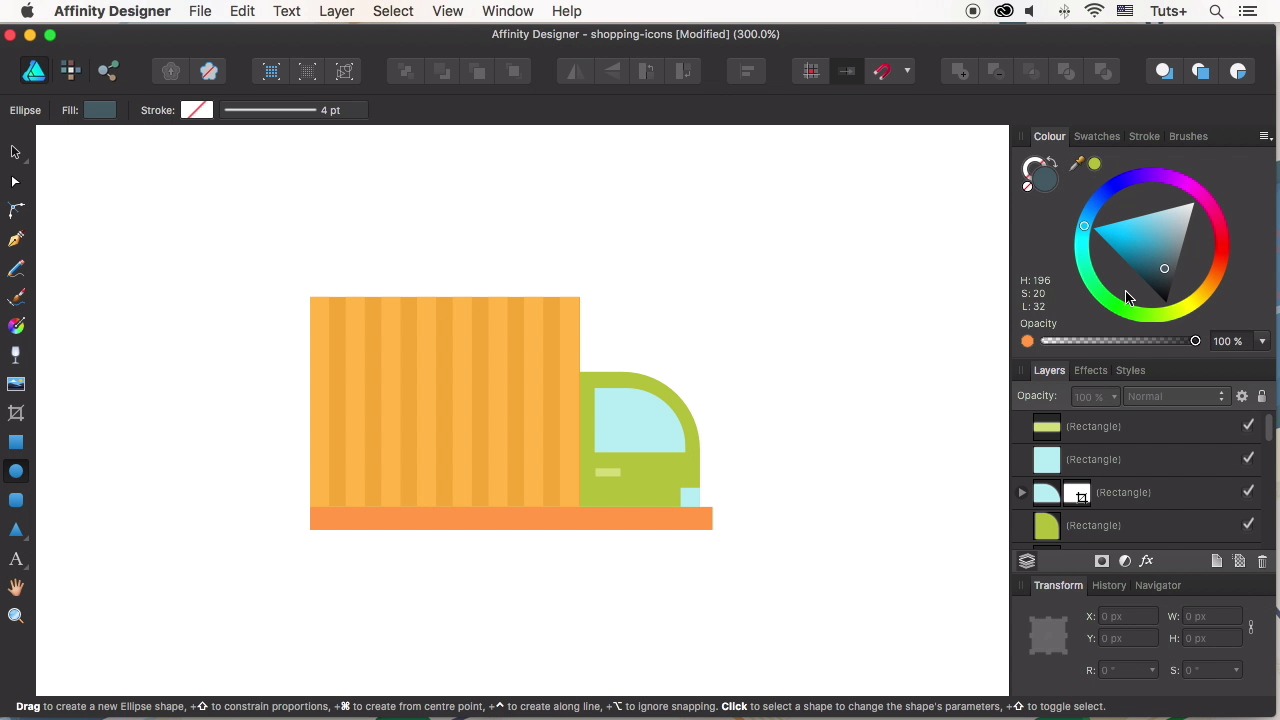
- Overview
- Transcript
2.6 Cargo Truck Icon
In this video we’ll be drawing our last and most detailed icon: a cargo truck! We’ll apply the techniques that we already used in order to fix the result and discover new tips and tricks that will improve our skills.
1.Introduction
1.1Introduction01:17
2.Creating Flat Shopping Icons
2.1Shopping Bag Icon07:13
2.2Discount Badge Icon07:01
2.3Hanger Icon05:21
2.4Shopping Basket Icon06:07
2.5Dress Icon05:33
2.6Cargo Truck Icon07:41
3.Conclusion
3.1Conclusion01:36
2.6 Cargo Truck Icon
Hi all, and welcome to How to Design Flood Icons in Affinity Designer Course with US at tutsplus. In this lesson, we'll be drawing our last and most detailed icon, a cargo track. We'll apply the techniques that we already used in order to fix the result and discover new tips and tricks that will improve our skills. Let's start. Set the field color to a nice tint of orange in the car panel. Take the rectangle tool and make a 70 by 90 pixel shape for the box of the track. Its cargo area. Let's go by the shape and paste it. Now, drag the left side of the shape to flip it. Resize the copy, making it smaller to form the truck cabin And change the color to green. Let's make one of the upper corners of the cap rounded. Remove the single radius dig in the control tool bar on top. Set the DL option to rounded, with 65% radius value. Let's duplicate the cabin Hold common shift and make a shape little bit smaller. Change the color of the shape to light blue, depicting the glass. Let's take the vector crop tool and trim the car glass. Now, let's select the box and press control C, control V to duplicate the shape. Drag the top edge of the shape down to form the bottom of the car. Make a narrow stripe and stretch it to the right. Use the rectangle two to add a tiny shape in front of the cabin for the headlights. Select both the cabin and the headlights, and align the shapes to the right side. And a handle for the door of the car. Use the color picker to pick the color from the green cap, apply to the handle and make it a bit lighter Duplicate the cargo box and squash the rectangle to make a narrow stripe on the left edge of the box. Make the shape a bit lighter. Hold Option Shift and drag the shape to the right, making a copy. Press Control J multiple times, add in stripes. Let's select all the stripes and click the cargo box to deselected, keeping only the stripes selected. Open the Arrange panel and click Space Horizontally to make the gaps between the stripes even. Change the color of the bottom of the car to darker orange. Now let's shape the wheels. Select a dark grey color for the tires. Use the ellipse tool to make a 25 by 25 pixel circle for the back wheel. And add a small circle of light grey color on top Group the elements. Press Option Shift and direct the right. Making the front wheel. Let's add some more elements to the box. Those can be any elements to your liking. Duplicate the box. Make the copy smaller, and filled with lighter orange color by picking it from the stripes. Play with the size. Here, you'll notice that we haven't aligned the right stripe to the edge of the box. So I decide to fix it by aligning the shapes to the right. Then I use the space horizontal function of the arrange panel again. To align the stripes as we already did before. Make the stripe wider. And let's open the list of the custom shapes. Take the Arrow Tool. Set its left end to none in the control panel about and make an arrow on top of the cargo box. Pick a bright orange color from the bottom of the car. Use the align function to center the arrow Group to elements of the truck. Duplicate the circle I can base from any of our previous icons. Make the truck bigger to make it feed the icon. Let's make the icon blue, so that the elements look contrast and harmonic. Change the color of the shadow to blue as well. Make the shadow to fit the truck by resizing it. And moving the nodes with the help of the node tool. Make some minor adjustments of the color and size if needed. And that's it. The last icon of our shopping side is ready. Amazing job guys. We finished our foot icon set in Affinity Designer and learned some simple yet very useful tips and tricks. In our next video, we'll sum up the results and see what we learned so far. So, stay tuned.


