
 Lessons: 10Length: 1.6 hours
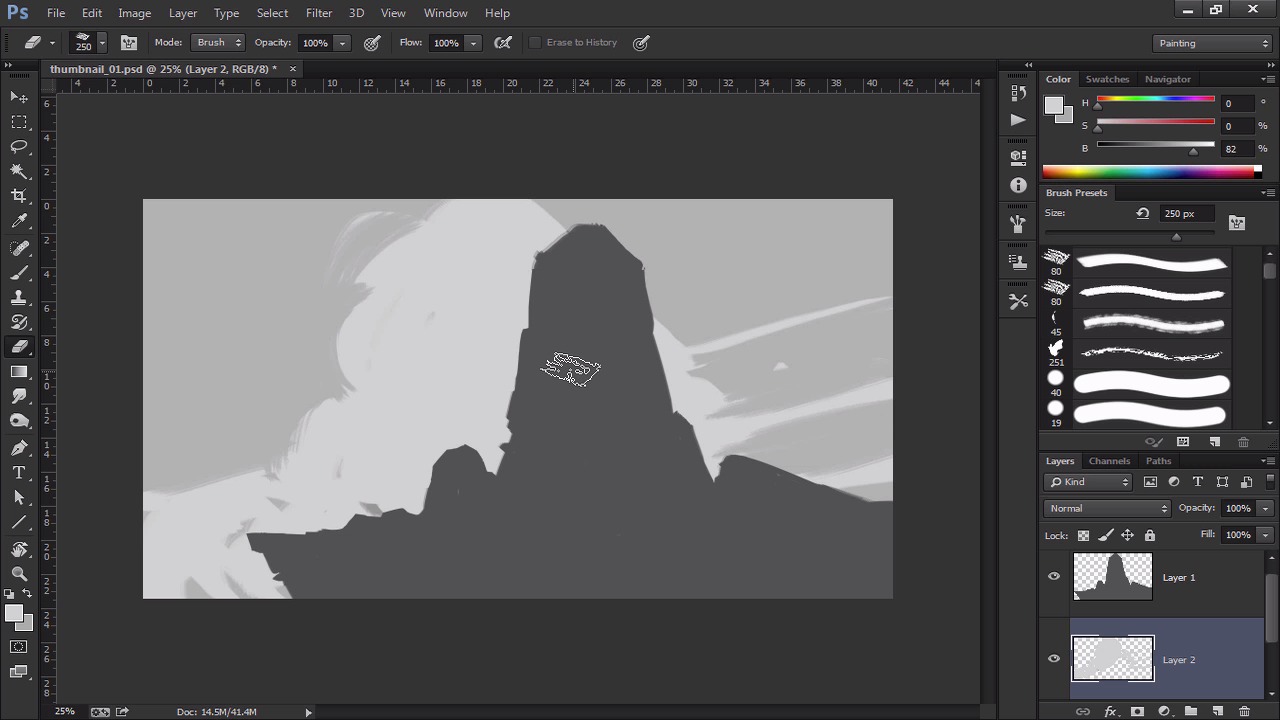
- Overview
- Transcript
2.1 Thumbnail Number 1
So now we can begin to paint the first sketch in Adobe Photoshop using rough values. As our hand and imagination are now warmed up, we can start make a more presentable environment sketch. We will also talk a little bit about the tools of Photoshop.
1.Introduction
1.1Introduction01:13
1.2Benefits of Thumbnail Sketching07:49
1.3Gathering References/Inspiration06:30
1.4Exploration Sketching11:22
2.Thumbnail Sketching in Adobe Photoshop
2.1Thumbnail Number 115:00
2.2Thumbnail Number 214:56
2.3Thumbnail Number 315:01
2.4Evaluation/Finishing Touches15:12
2.5Presentation04:49
3.Conclusion
3.1Overview01:43
2.1 Thumbnail Number 1
All right, so before we get painting, let's talk about Photoshop. Real quickly, let's just talk about our image parameters. So what I'm doing worked for production, if we just go to image, go to image size. It's also alt control i I'm working at 3,000 by 1688. It's a pretty standard size. It should be 1280 by 720. If you wanna make it lower. So I just kind of bring it up to 3,000. And then luckily it adjusts it with the little, the keep the aspect. Ratio, and we keep it at 72. The reason why we're keeping it at 72 is cuz we're not gonna print it, so I'm just gonna imagine that we're just sending this to a client via email, something like that. But if you wanted to print out your work, you'd wanna work at 300. So again, 3000 by 1688, and the resolution is 72, okay? So let's get started there. Okay. Soo, what I'm gonna do first, is I'm just gonna unlock the background by double clicking because you want to change that color. Probably gonna make make it like a neutral gray, just like that. So a little more to work with. I don't like working with pure white so like a light gray is kind of nice. Probably on the thirty or forty percent here. And yes, since we are gonna be doing it, you know what, we are working in a gray-scale tone. Let's go to R.G.B. color, just because, these are going to be in black and white, but you know, just in case you want to do color. I just like to see the H.S.B. slider so I'll just be kind of moving this back and forth as I go. And let's start painting, so I'm gonna make a new layer, and I'm just gonna start figuring out what I want to do. And luckily, because we did all those sketches before. This should be straightforward here in terms of kind of figuring out some ideas. And this is kind of the fun part, and because like we've had so much planning. And so what that ends up doing is it ends up to me creating a little bit more confidence in myself to understand that I can actually, you know, knock out a decent painting, as opposed to just coming in with no plan with which is what most people do sometimes. They come with no plan no sketches or anything and then and they get lost very quickly. But because we did all that pre-planning in the beginning, we got reference for understanding that the use of doing. You know, thumbnail sketches for environments, it makes our life that much easier. When we want to go and try to create you know production, production painting. So this would be kind of a pain that I would probably show a client. And say, hey this is kind of the idea I'm thinking of. What do you guys think? And so, the point of this is a try to make this as quick and efficient as possible. So we're not really too much about all the crazy rendering and stuff like that. It's just you know to communicate an idea. And so you're going to see me switch between the eraser tool and the brush too a lot. That tool is F or not F but E, and then the brush tool is B, that's the hotkey for it. So you won't see me click on it right here, it's because I'm switching to the hotkey a lot so just to keep that in mind. Okay, so I'm just trying to get the overall composition down here. I don't see how that works. Just erase that. Okay. And so you can go to Edit, or, no, actually, Image. Here we go, Image. Image Rotation. F1 flip cameras horizontally. Mine's F1, so I sell the F1 button so I can flip it. And that will kind of help me figure out, you know. This will help me figure out the composition. Sometimes just flipping the canvas can kind of help you get a fresh eye on things. And looking at it now, I can see obviously that there are some issues with that, so you can do something like that. And sometimes what I like to do too, is if I'm having trouble figuring out the overall lay of the land, I can always kinda take this. I can make it a little bit darker, so I'm gonna do a layer right there, and I'm just gonna fill it, and I'm just gonna actually Warp it right now. So go to distort, actually distort, take that back, to distort. And this will kind of help me figure out a ground plan a little bit, with perspective in mind, so that kind of helps me figure out that edge right there. So again I'll do that one more time. What I did is I made a new layer right there. I locked the transparency, that's also the backslash button. And all that does is that when you lock the transparency in a layer that means you can't paint outside of it. So just kinda remember that cuz we're gonna be doing that a lot in this tutorial. That way I can get like cleaner edges, and then Ctrl+T is the transform button. If you want to do that manually and you can go to edit and go to transform right there. And then you can do it right there. But hot keys are very, very important in Photoshop so I highly recommend you take some time to kind of invest in that because any point in time, you know you want to be as efficient as possible Well there we go. And then again I can always fill like that and then. And that helps me kind of understand that edge a little bit better. So that's kind of what I'm looking for. And I can erase. And then when I'm done, I'll just right click, merge it down. And then I'll go back. And I think that's where I want to be. No, maybe I wanna. Yeah. I think that's where it'd be a little bit nicer. So maybe I want to see the top of this, actually. One thing I'm gonna use right now, too, is the lasso tool. The free lasso tool. And just gonna cut in some shapes here. And I'm just making the shape then I'm just erasing, hitting the delete button. And that kind of helps me figure out some better shapes here, so I'm just trying to get that silhouette right. And so sometimes if I'm not getting that right, I'll actually kind of make a new layer, and I'll skip ahead to something else. So I know I wanted there to be clouds. So let's just work on the clouds a little bit. Let's figure that part out. And will go from there. And granted we're going to work on a bunch of these, so we are going to come back and do some like some kind of final touch ups on each one someone going to spend. You know my time on each one. And that's kind of a good thing too just because you don't always want spend too much time on one drawing. Especially if you know you have to do a bunch more, so if I know if I have to do three cuz I'm gonna do three today. I'm not gonna sit there and work on a one and get super, super emotionally tied to one because next thing you know, you the end of the day is approaching, and then you only finished one. So sometimes like skipping around can be very, very very, very helpful to you so that way you don't get too caught up on one. You know, you don't get too emotionally invested. So, at the end of probably like 15 minutes we're gonna move to the next one regardless. And so we'll kind of let that simmer. And then we'll go from there and we'll figure it out. And so that's actually a really good way to, just to kind of make sure that you're planning your time effectively is so you kind of set yourself little timers. And you say, okay 15 minutes for this one and then no matter where I am we go to the next one. And then after that you go to the next one. And after that you kind of do changes to all three of them. Okay, so that kind of helped me out a little bit. So, let's actually start working on this guy. So what I'm gonna do, is I'm gonna make a new layer. If you go in-between these layers and you hold down alt. You can notice, if you look at my little cursor here, which is the hand. Now that's how it turns into this little arrow in the square. What that means that's going to clip the mask to it, so it's kind of the exact same thing as locking the transparency only I'm doing it non-destructively. So now if I paint inside of this guy, notice how it's not going outside the pixels. It's locked to the transparency of the layer below it, so if I hit Alt again and get rid of it see how it kind of expands past the pixels. But if I lock it to it, it does that. So that's kind of what we're going to be doing here. And so we're actually going to be painting the shadows. So that's kind of an important things, so I'm gonna erase that I didn't erase everything for some reason. And I'm gonna be thinking about the shadows, to some degree. And I'll make it a little bit darker. So this is where using the distort button can really really help. As I erase from it. So I kind of want to have that nice little loop, so compositionally it kind of goes like that, from one end to the other. So that's kind of what I'm aiming for here. And let's see if we can get that to some degree. So I don't want this to be, going to be pretty flat. I don't want to be able to see the top of the sky very much. Yeah I think that works out. And just kind of painting that in. And the cool part is I could make another layer. Again, I'll link it. And you know, use Photoshop to your advantage, you know? So I could make a bunch of little marks like this. I can then, again, distort that. And that will help kind of create little bit of like texture in there. You can see what's happening there. And now it kind of creates the correct distance that I'm looking for. And that's exactly what I'm looking for. And then I can always merge it down, and then I can keep painting. So that's kind of what I'm looking to do right now. So, using the shadows is effective, because you can begin to kind of figure out what do you want to put forward, and what do you want to put back. So. And so you'll see me kind of do this thing where I kind of go back and forth with the design, so it's design, edit, design, edit. And so I'm figuring out, you know. How how far do I want to go over? Do I want this completely in shadow, all this kind of stuff. And so again all those things that we were thinking about in those previous sketches have now been almost problem solved for me, I figured that problem out. So now I don't have to worry about it. And that's kind of the beauty of doing all these sketches. If I was doing this before, just straight up, you know, top of the dome freestyle. That would kind of, I might mess up. And so, for, doing the tutorial for you guys, obviously don't want to mess up. So I wanna show you guys how I plan stuff. And this is very much how I do stuff, too. In my client work. When I do work professionally. You know. You wanna to eliminate mistakes. And so this is really, really, really important for me that I'm able to communicate my idea to a client as efficiently and as quickly as possible. So if I can't and then that's a problem. So look at this right here and I'm like okay, I need to give myself more ground to work with here. So I didn't see that coming and so, yeah. So anyone could probably do a good painting if you spend enough time on it. But doing good paintings consistently. You know that's, that's kind of the hard part. That's the part that no one really tells you about. That can really be quite daunting. And really be very, very hard just to do that stuff consistently day in and day out. So I'm just gonna. So I'm kind of adding to it a little bit. So that way, it's a little bit easier for myself. And. So I wanna get some of the smaller details in there. And this is important to me too just because all these smaller details are gonna show that distance. So the more I kind of have of these little ridges and stuff like that, the more will appear that it's really far away, and we'll keep going. So we're almost kind of running into time here so I'm going to try to do my best to get this clear. Because I wanna limit myself here. This is kind of important that I limit myself to little bit of time that way, cuz sometimes, and granted, you don't have to do that. I understand that sometimes you get in the flow of something. And you're just like man I really wanna just finish this off. Because I'm like, I'm in the flow. And that's totally up to you. So you do not have to like stop at a certain time. Like give yourself a timer. Or this is kind of a friendly reminder, you know what I mean? You don't wanna, you just don't want to get too caught up in the thing. But I understand sometimes you're just feeling it, you know. And you are just like you know, I really want to go for that, I really want to finish it and then, you know, so you kind of break your own rules. So I wouldn't necessarily call them rules, but they're kind of guidelines as healthy reminders to help you kind of be like, hey man you know time is coming up, you know? Do you have the stuff done yet? And you want to be able to kind of. confidently answer that question and be like, okay, yeah. I got this done, we got this. And I'm just gonna add a little bit of a. And these can be whatever. They can be rocks, little shadows. So I've already kind of established that my light source is coming from the right side. So don't have to worry about that too much. But, again, the shadow layer, right? See how much different that makes when you put in that stuff? And again, all solved, by reference, and by doing the sketches first. So we got that. Okay, so got a little bit time left so let's actually add a little bit of a texture here. Just before we end this, I'm just gonna make a layer underneath it. And I wanna see if I can add a little bit of texture To the sky. And I think it's not too bad. I'm gonna lock the transparency here. So I can help with that. And we'll probably add some finishing touches later. Okay. So that's one thumbnail. So we will save that one out. And we got that one going. Hit OK. And let's work on the next one. Okay? I'll see you then.


