
 Lessons: 10Length: 1.6 hours
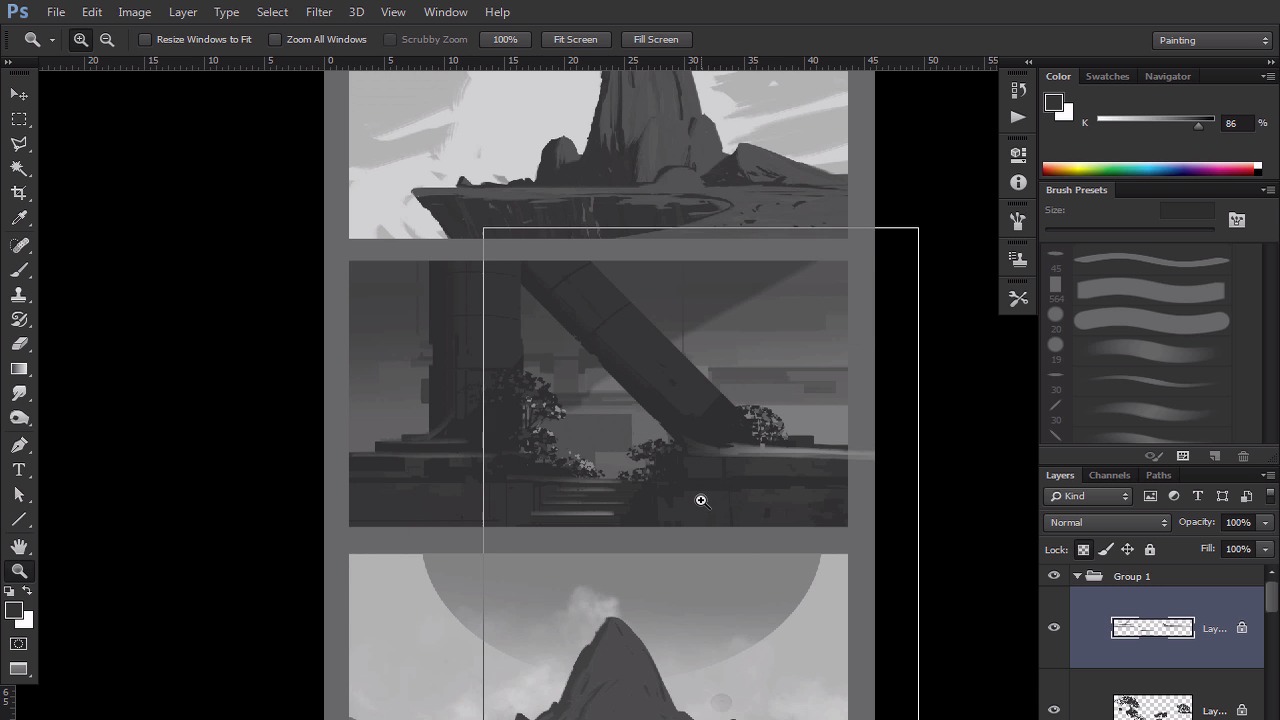
- Overview
- Transcript
2.4 Evaluation/Finishing Touches
Now that all three are painted, we can now put them together and see if there any finishing touches we need to add to the thumbnail sketches. We want to make sure that each thumbnail has the same level of detail.
1.Introduction
1.1Introduction01:13
1.2Benefits of Thumbnail Sketching07:49
1.3Gathering References/Inspiration06:30
1.4Exploration Sketching11:22
2.Thumbnail Sketching in Adobe Photoshop
2.1Thumbnail Number 115:00
2.2Thumbnail Number 214:56
2.3Thumbnail Number 315:01
2.4Evaluation/Finishing Touches15:12
2.5Presentation04:49
3.Conclusion
3.1Overview01:43
2.4 Evaluation/Finishing Touches
Okay, so, now that we have three thumbnails, let's talk about getting the finishing touches. And so, the thing that I like to do, when I do this, I like to put them all on one page, and so that way I see them all as a whole and figure out what we need to do to fix each one. So let's do that. So I'm gonna group everything together. And you just kinda foot all the layers of control G, and now I have a nice little group right here. So that's what I'm looking for. I can drag this little guy right here. And what I'm gonna do is I'm gonna drag this guy over here. And bam. So now we have one thumbnail. And then we'll exit out, like so, we'll go here. We shall take from number two, we're gonna go here. The line art, I guess we'll keep the line art, just in case we need it later. But we're gonna group that and the next one, bam. And then we'll keep that one. All right, cool. And we'll X out of this one. And let's actually zoom out and see what we're working with. We may need more space and that can and will happen. So if you need more space all you have to do is hit the Crop Tool, which is C. Just drag it down. And it will fill with the background color has so you just hit Enter. So let me just get the right spacing here between the two. And we'll just hit OK. That's good. Hit Enter. And then it will crop it. So we can actually take this one right here and move it down. This one has a similar feel to this one, so I actually wanna move that down a little bit. And then we'll take this guy right here and we'll group that one together. And we'll bring this over as well, and we'll just move that in there. Boom, there you go. Not bad, huh. All right, we'll exit out. So this is our presentation so we're gonna get this going, and so we'll talk about presentation a little bit later. This is what we're gonna be looking at as a whole. This would be kinda something that you would go to a client, but it's still not finished yet, and we wanna get those finishing touches. But this is gonna be like the client presentation mode here. I want this to be a little bit closer. So I want this to be a bit more. I don't want to use. I don't want to waste space if I don't have to, it's a little bit too long. So let me just move this up a little bit. So you want to have equal spacing. And that looks a little bit better. And then that way we don't have to use all that space that we don't need. And so again, C for the Crop tool, and we're just gonna crop that. So, there you go, that looks nicer. And then we'll make this look like a gray background. I usually to make a gray background, just looks nicer. Yeah, all right, cool. So let's go one by one, let's actually go with the middle one first. I actually really like the middle one, and let's widen this out, actually. And to make sure we can see the, there you go. I wanna be able to see my tools. So I like the idea here. What I want to do is put a nice lighting layer here. So I'll make a new layer and I just think it'd be really cool just to have this big, giant piece of light. Like that. Oh there you go. Sorry. Keep that angle a little bit. There you go. That looks cool. And I put, I guess on colored I guess, probably a good way to go. And overlay. I meant color dodge, there you go. And I'm just gonna to fill this what the with the light layer here. Like that, but I don't want it to be that dark, obviously. You can just lower the fill and something like that would be nice, that's cool. And then these edges are a little bit too much for me. So I'm just gonna go to Blur. I'm gonna go to Motion Blur. I'm gonna blur that up a little bit. Not too much, though. All right, so you get some of that nice little edge quality right there. That's what I'm talking about. Bam. I can actually move this around if I want to, which is nice too. So there you go. And you know what? Maybe, just maybe, we can have a little bit of some cool texture on it. So let's just limit ourselves to, I guess five minutes on each one here. And let's actually go to this guy right here, and let's actually add a little bit of [BLANK AUDIO] I guess some finishing touches here. And so what I want to do is I want to actually make this a little bit wider, and Color Dynamics, turn that on. And, there we go. So, I actually wanna lock the transparency here. And this is just an interesting way to get some extra texture and stuff like that. So, nothing too crazy there. And then this guy right here, we can go I really want, I'm gonna paint directly onto it, just for the sake of time because again, these are thumbnails I'm not, I'm not trying to get too crazy here, but I just want to show my clients some ideas of this lighting. So what if there was a little bit of lighting poking out here and that would be cool. So maybe in these areas right here there is some kind of light reflecting around. That stuff can be cool. Helps to pop a little bit, little bit of popping. And so, the last thing that I think will be cool is that there was some kind of sand maybe So we could try that out. I'm not sure, why not. This may work, this may not work, but ooo, actually that does work. I got to use a softer brush here. And then, let's see. Let's do this brush right here, I think that would work. And I can always, I'm not too worried about that, I can always delete that later, but [BLANK AUDIO] it's some, little bit of sand all that stuff. And again, I can always erase whenever I need, and I'm gonna keep this brush like that. And so that's kinda nice. It kinda creates this little bit of [BLANK AUDIO] of a texture there. So that's cool. And then again, if I locked the transparency, I can then have some things be in the dark, which is kind of nice. And I'm gonna use the radial gradient this time just cuz it makes it a little bit easier to control. And so there we go. We have some interesting things in terms of sand or some kind of dirt or something that we didn't really have, so that's kind of cool. And then we can do is we can hit this guy right here, we'll inverse the selection. So we delete everything that's not on there. So there you go. This guy, I don't think we have to do too much. I like where it was at in terms of the graphic read. So we'll leave this as is, but it would be nice to add a little bit of the shadows. So I'm not going to use too much of the custom brush, but this stuff, and we can always paint it back up if you don't like it. So something like that. Just so we can see some of the shadows. And then maybe, I guess maybe we'll go back here. Radio gradient, we'll drag that up a little bit so that way we don't get a little bit of that. And then this guy in the back. We'll make the background a little bit darker. We'll get a nice little gradient there. So you see how that makes it stand out a bit more. Exactly what I'm looking for. And then here, too, we can put the layer underneath, in between. Actually, we'll just exit out of there. Let's go right here. Let's make a new layer, in between these two guys. And let's just make a layer of Color Dodge, just around on top of it. And we're just gonna drag it down. And hopefully, that will create some nice little, know what I mean? Nice little light source. So that would be cool. If we actually took this, and underneath it, we're just going to drag upward a little bit. So, let's go. Yeah, that should work. There you go. So I just wanted to get a little bit of that darkness to it. And we can even do the same thing right here as well. I just want to go right here and see what just happened there. So I just want to go in and I want to lock the transparency. I want to just drag up a little bit. So little bit of color or you know what, I'll do it in the shadow layer. That's probably easier to do something like that and all of a sudden, a little bit more finishing touches. And for the last one, I think what we can do is we could definitely add some texture to this guy. So I'm just gonna get a brush that kind of simulates that texture for me. A little bit too dark, and I had the previous layer already there. So I got a paint that out, so hopefully that will go. We should probably blur this guy a little bit, cuz that's too sharp. So I'm gonna go to Filter > Blur, go to just regular Gaussian blur should be fine. So a little bit of pixels there, nothing too much. And then this guy, all this texture, we can definitely add in a little bit of a grimy texture in there. And I'm painting a little bit of black in there. So that way, it has a little bit of that uneasiness to it, and I kinda like that. And then this guy, we'll just drag downward. So again, it simulates that texture which I'm looking for. So that's all that I really want. Okay, looking good, and then let's see, the texture on this guy, we could definitely add some more to that. Don't see why not. So we're just adding a little bit more texture to that so it just gives it that look and feel of jagged rock. So nothing too crazy. And then maybe we'll get more of a painterly brush here to kind of mess around with some of the edges. So you can see me mess around with that just a little bit, so we have a bit more to to mess with. And then something cool that we can do as well is, let's actually take the sky, add a little bit of a gradient as well. And so that gradations always helps out because then it's here, I locked the transparency there so I don't do anything. So that transparency right there really helps out. And then we can actually throw a gradation, a little bit of a darker one here. Just so it stands a little bit more. Yeah, something like that. I think that can work. And then I think the last thing we can do with this one is we could add a little bit And this may this may or may not work so, you'll have to forgive me. What we can do is we can paint some, whoops, I used the wrong washed brush [INAUDIBLE]. So and I take a brush like this. I'm gonna kind of paint in random splotches like that, and I'm just going to distort it and what should happen, if we put this on multiply, is it should serve as cloud shadows. So hopefully this makes sense. So if I put this on multiply and kind of lower the opacity, it can serve as cloud shadows, which is what we want. And the cool thing about that is that I can always click on the areas that I want. And I'm gonna Ctrl+Shift+I to inverse the selection and then delete it on that layer, so that way it's only affecting the top layer, it's not affecting the cavern. And, we'll just lower that opacity just a little bit here. And the last thing we can do on this guy too, as well, is we'll just go back here to the background and we'll make a selection. And then we will drag upward a little bit of a multiply layer. So I'll make it on multiply. And oh, not bad. And we'll just lower that down. So there you go. So, those are the finishing touches. Not bad. And so we have three rendered environments. Not bad, I like it. So now we're just gonna go into the finishing touches on presentation, that kind of stuff, and get that going. So I'll see you then.


