
 Lessons: 15Length: 1.5 hours
- Overview
- Transcript
2.2 Tools and Brushes
What tools will we need to complete this painting? Let's take a look at the preset brushes available in Photoshop CC and how they work with our graphics tablet. Then we'll cover the many benefits of getting familiar with Photoshop's Adjustment Layers and Layer Blend Modes.
1.Introduction
1.1Introduction01:36
2.Set Up
2.1Document Setup and References08:38
2.2Tools and Brushes07:28
3.Concept Development
3.1Concept Development for Surreal Art06:44
3.2Sketch10:00
3.3Thumbnails for Light and Shadow07:32
3.4Adding Color to Your Thumbnails06:17
4.Paint a Surreal Digital Painting
4.1Painting a Grayscale Base06:39
4.2Convert Grayscale to Color05:48
4.3Highlights and Shading05:32
4.4Painting Realistically: Using Texture Brushes04:49
4.5Painting Realistically: Woman, Fish, and Water04:59
4.6Refine Your Painting04:59
4.7Final Touches04:18
5.Conclusion
5.1Conclusion01:54
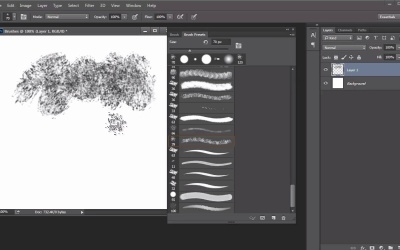
2.2 Tools and Brushes
Hello and welcome back to Surreal Digital Paintings. My name is Melody Nieves and this is lesson 2.2. Photoshop is jam packed with incredible tools that can make the process much easier for your digital painting. So in this lesson, we'll take a look at these tools as well as a few adjustment layers that I personally love. As I mentioned before, I'll be using Photoshop CC to complete this painting. I'll also need a reliable graphics tablet, which in this case is the Viacom Intellus 3. If you've been following along with my other digital painting courses then you may know by now that graphics tablets are essential to digital painting. They give you the movement and control that is just not possible with a traditional, optical mouse. Let's take a look at some of the preset brushes in Photoshop and how they work well with a graphics tablet. Hit F5 on your keyboard to bring up the brush panel. Make sure that you have the brush tool selected in order to see the presets and settings that are available. When the brush panel pops up, you'll notice all of the different settings that can help help you customize your brush, but if you just click over to the brush presets tab you'll see that Photoshop is all ready equipped with a large list of preset brushes that can help you with all your painting needs. These brushes range from smooth, round brushes to textural and even scattered brushes made from different shapes. How you choose to use the brush is up to you and only limited by your imagination. For this painting the main brush I'll be using is my all time favorite. It's the hard round pressure opacity brush that's located towards the top of the preset list. If you click back over to the brush panel, you'll see that there is a new check mark next to transfer. Transfer setting controls the dynamics for the build up of your paintbrush. Select the transfer setting and you'll notice that under Flow Jitter the control has been set to pen pressure. This means that as long as my pen tablet is connected to the computer, I'll be good to go in creating brush strokes similar to this preview at the bottom. You may be tempted to change a few settings and if you absolutely need to, go right ahead. But for now, I'll use this brush with the current settings. Let's make a couple of test strokes. The reason why I call this my all time favorite brush is because of it's versatility. I like the fact that with each stroke, the n's fade out nicely. The effect comes off more traditional even though we're using a digital medium. The other thing that I like about it is that as long as I keep the opacity at 100% I don't lose any significant color payoff. This would especially happen if I selected the button for additional pen pressure sensitivity for opacity. Ultimately it's just a matter of preferences, but I hate doing more work than I have to. If I just keep the original settings from the brush presets, I won't have to press too hard on my tablet for each stroke. This is very important to me because I spend so much time painting that any over exertion can lead to hand cramping. The next brush I'll be using is a textural brush. The best and easiest to cheat realism is to add texture to your painting. Going back to the list of presets, I selected the Dry Brush towards the end of the panel. We'll be using this brush for general environmental texture as well as adding texture to the water in our painting. As I try out a couple of test strokes it's easy to see why we're using this brush. If you've ever seen waves crashing against the shore, you may have noticed how sudsy the water gets. So this brush will help us achieve that same affect in later lessons. I also want you to consider that you should always look at your eraser brush as an additional brush. Sure, it doesn't add paint to the canvas, but it can take paint away, which still counts for something during the process. Just to see this example quickly, I'll show you a quick comparison. Select the hard round brush from before that has pressure sensitivity enabled. Try to draw a stroke that varies in applied pressure across your tablet. Not so easy, is it? Whenever you want to lift up some color from an area in your painting, simply use the eraser brush. It just takes two seconds, and you don't need any fancy effects or settings to get the result you want. The last thing I'll be covering in this lesson about tools and brushes is a note on my favorite adjustment layers and blend modes. There are so many settings at your fingertips in Photoshop. Adjustment layers allow you to make important color changes to your paintings in a fraction of the time. So traditionally, if you messed up or didn't like the color scheme of your painting, you would have to completely start over again or work with what you have. But adjustment layers allow us room for versatility and experimentation. The most common adjustment layers you'll see me using is hue and saturation, curves, and color balance. Let's see these quickly in action. If you have trouble picking out color schemes that work, then hue and saturation is the ultimate lifesaver. Put each color that's different on a new layer and go to Image, Adjustments, Hue/Saturation, to change any of the colors to the Hue, Saturation, and Brightness you prefer. Some artists know exactly what colors they want to use but I personally hate relying on swatches. This method allows me to have a little more freedom with my color choice, without feeling locked in. Similarly, curves and color balance allow you to make changes to your overall color scheme, but the difference between these, and hue, and saturation is that you can tweak the shadows, midtones, and highlights at the same time. And if you experiment with the settings, especially in curves, you can walk away with some really interesting color effects. I also love to incorporate different layer blend modes into my painting. With layer blend modes, you can paint a color on the canvas, then cycle through all the different modes, to see how the color is applied. Aside from applying new colors to a grayscale painting with either multiply or overlay, I don't generally have any favorites when it comes to blend modes. As a rule of thumb, I just start at the top of the list and cycle through each blend mode with the up and down arrow keys until I land on a color change I like. As you can see the options in Photoshop are truly limitless. Even if you think you've messed up, I bet there's a solution in the program somewhere. Now that we've covered the tool and brushes we needed for this course it's time to dive right into this painting. If you've ever had questions about certain surrealism or how to create a strong conceptual idea, then join me in chapter three. We'll go over the developmental process for this painting and how to turn real life events into powerful concepts.


