
 Lessons: 7Length: 38 minutes
- Overview
- Transcript
2.6 Adding Effects
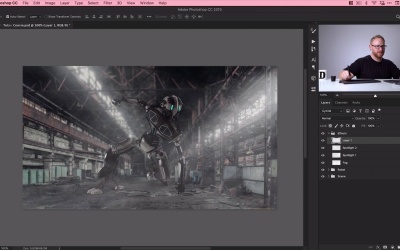
In this final lesson, you’ll learn how to use brushes to add fog and lighting effects in Photoshop, and also how to make some final adjustments to our composite image. With the digital compositing techniques you've learned in this course, you'll be ready to create stunning composite images and photo manipulations in your future projects.
Useful Links
2.6 Adding Effects
Hello, welcome back to the final lesson. So we're gonna add the finishing touches, some scene effects, to our composite in Photoshop. So without further ado, let's just grab this pen and let's jump back into it. Okey dokey, so we're just gonna save the document. Now we have our robot, lots of stuff, a scene, lots of stuff. We can go back and find which we might do in a moment. We have an empty effects folder, so let's add some effects. So first of all, I'm gonna click New Layer, just drag this into the effects folder. I'm gonna expand that down, and I'm gonna call these spotlights. So again, with the brush tool selected, we'll go to the brush panel. And we're gonna use some more Envato Elements brushes. So we have fog, Photoshop stamp brushes, now I love these, you can literally apply fog to a scene in one second. It's black, let's just press X on the keyboard, or just pick white or whatever color fog you'd like from the color picker. Boom, there we go, fog, literally that easy, end of lesson. Just joking, so [LAUGH] we can adjust the size. Now, you're gonna make sure that your brush covers your scene, but you can add fog literally this quickly. There's also different ones here, so I'm just kind of trying a few different ones, seeing how they work, and then just undoing if it's not quite right. I might go for this one, I could spend hours playing with these brushes. So you can see, I can really kind of choose the position. This one's kind of coming more from the lower half of the scene. And I've just realized that I've named this spotlights, so we're actually doing fog. So there we go, we'll do the fog first, we'll do the spotlights in a moment. So if I go to normal, and I can adjust the blending mode. I think I'm probably gonna keep this as is, but just drop the opacity a little bit, like so. So we're just adding a little bit of fog, a bit of mysterious mist to the scene. So we can turn this off and back on, you can see that's incredibly dramatic. And because this effects folder's right at the top, it's gonna affect our subject, like our robot, and our scene, everything below it. So we've got some fog, now we're gonna create another new layer. This is the actual spotlight layer, so we'll call this spotlights, I promise it'll be spotlights this time. So we've got some more brushes, there we go, fog, spotlights, lots of different ones here. Just click, bring it down, you can see the shape, so you can try out loads of different brushes. I'm just gonna keep this really simple and use number one. Then what I'm gonna do is just bring this down, left-click, and then I can go to Edit, and Free Transform. And just pull it into position, I can stretch this out of shape, this is really subtle. So I'm just adding some light coming over from the right-hand side. And again, as with anything, I can change the blending mode, we can go for hard light, for example. And I could bring this just down a little bit, so it's not so overpowering. In fact, I'm gonna call this Spotlight 1 because I'm actually gonna add another one over here on the left, one that's a little bit more subtle. And you can spend as much time as you like, you can even use a different brush and just brush in some light too, like a soft feather brush, you don't have to use spotlights. But let's just bring down a little bit more, so we're going with 39%, and I'm gonna call this Spotlight 2. So if I turn everything off, you can see we've gone from very dark, very moody image, to having a bit of fog. We could tone that down a bit, actually, that's incredibly foggy. We'll bring in a spotlight, we'll bring in another light source. So you could spend much more time fine tuning this if you wanted to, but there we go. You can see how quick and easy it is just to use brushes, whether it's fog, spotlights, particles. Whatever it is, you can use those brushes to really kind of add something to your scene. Okay, so we're nearly at the end, now I'm gonna add one more layer. Now, I like to add a new layer, we'll call this noise. So using 3D objects is awesome, using images is awesome. But sometimes they're just a bit too clean, a bit too perfect. If you zoom in loads, you can see here, this robot is like perfectly cut out. So actually, I'm just gonna select the robot, go to Filter, down to Blur, and just select Blur or Blur More. What this does is, it just very slightly blurs that, you can see we have this listed as a Smart Filter. Just so everything isn't so perfect, against the background. Now let's get back up to the new noise layer. What I can do, just select black as your foreground color, go to Filter, down to Noise, and Add Noise. And it can't do anything because I haven't actually filled this layer with a color yet. So if I just fill this way, we'll go with black, Filter > Noise > Add Noise. And you can adjust the amount, you can see here, it adds this, which looks terrible. I like to go with Gaussian and monochromatic, so it just kind of removes that color. And what you can do is actually, if you change the blending mode on this to something like overlay or soft light, you can see, it looks like that. But if you bring the opacity all the way down to something between, I find 5 and 10% is kind of the sweet spot. And I'll just zoom in so you can see, it kind of adds a little bit of that grain that you would get from a camera, like the noise you get from a camera photo, to the scene. So maybe 5%, let's go with that, really subtle, so if I turn this off and back on, you can just see. It adds that level of noise, that little bit of grain to your entire image. So your subject, even if it's a clean 3D image, gets the noise treatment, the background. It's a really subtle detail even at 5%, but it's something that I like to do to all of my images, just in case anyone ever zoomed in. So what we can do is, we can actually select the noise layer, and just lock that, we don't really to ever move that. And we can zoom all the way back out, turn our effects off and back on. So you can see they have quite a considerable effect on the overall image. And this is the part, really, where we can go back and fine-tune everything. Because now I've actually got this effect folder, I'll leave that on. I could go back here, double-click on my shadows for the robot, make them darker, make them a bit lighter. We've got the highlights over here, so I could accentuate those more. I could even go and add another shadows adjustment layer. So I'll go and add another levels layer, we'll darken this loads. And what I'm gonna do is, remember, select the layer mask command, Control+I, to hide everything. And then if I go and grab one those default round pressure opacity brushes with white, as we brushed in the highlights, I'm now gonna brush in some shadows. And these shadows are gonna be much more accentuated. And as I say, you can spend a lot longer, I'm just doing this super quick so you can see what I'm doing. Let's brush a little bit around here, little bit of that there, so there we go. If I just hide all of those layers but the initial one, we make it darker with some more shadows, we add some highlights. And we go back, we could fine-tune that, add more highlights, I could play around with this for absolutely hours. But essentially, if I just click all of these off, we have our scene, that we've done a little bit of work to. We've got a robot that we've done a lot of work to. And then we have our effects folder on the top that really finishes off our entire scene. And there we go, that wraps up the course for creative compositing in Adobe Photoshop. So I really hope you enjoyed this, we've gone from robot to industrial image to dramatic lighting effects. We've composited all that together into our final design. And if you'd like to follow along and download any of the assets, the brushes, the things we've used throughout this course, then there will be links provided in In the course notes. But anyway, that's it for me, I hope you enjoyed it, take care, and I'll see you soon.


