
 Lessons: 9Length: 1.2 hours
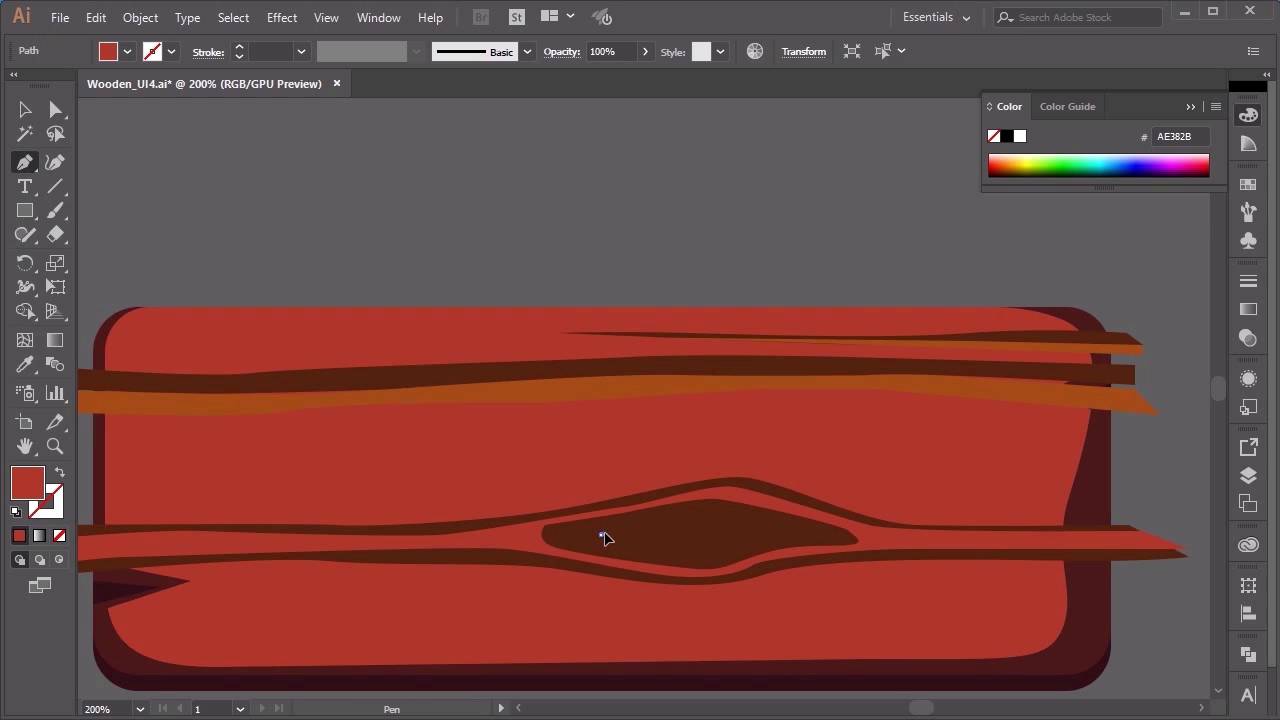
- Overview
- Transcript
2.2 Creating Texture
In this lesson you will learn how to create the details of the wooden textures for your basic shapes. We will go through how to manipulate shapes and different shape properties to create a fun style.
1.Introduction
1.1Introduction00:32
2.Create the Wooden Textures
2.1Blocking Out the Shapes09:55
2.2Creating Texture11:50
2.3Develop Highlights and Lighting06:21
2.4Create Alternative Shapes10:04
3.Buttons
3.1Create the Icons12:57
3.2Create a Round Button10:21
3.3Create Alternative Buttons11:19
4.Conclusion
4.1That’s a Wrap01:14
2.2 Creating Texture
Hi everyone, and welcome back to the Game UI course. In this lesson, we'll be looking at building on the skills that we learned by creating some details for our wooden boards. These details will include things like wood grain, shadow, and lighting. So let's begin by using the pen tool, which can be found here, to create some wood grain shapes. So, in the previous lesson, we used the pen tool to create some nice little wavy lines for the shape for a wooden board. We're going to do exactly the same thing for our wooden grains. So in here, I'm going to make sure that I've got no stroke in this section, I just want a fill color. And I'm going to choose my fill color by hitting the eye dropper tool and selecting one of these colors here. So I'm just going to go for a darker grain, so let's go for this color here. And all we have to do from here is just start drawing the grains in. So I'm going to zoom in here, and exactly the same thing as what we did before. Just going to start off just off the shape of the board, just create some grain shapes. So pulling the anchor points in, out like so. I'm going to make this one quite thin, and then finishing off just like that. I'm going to do another one. So, start another one here, start drawing it in. All the way down. And then all the way back. So you can see that I'm just roughly bringing out the line shapes here. You can always come back in and move the anchor points around exactly the same way as we did before. So coming in here, moving the anchor points the way that you like it and also changing the handles here as well. So do that for the whole piece of your wooden board. And then, the next thing that you'll do after that, Is to create a lighter color. Now the trick here with adding some sort of depth to these grains is to have the darker grains at the bottom and then some lighter grains at the top. So I'm just going to create some light grains, here. Just to give it a bit of depth. Again, it doesn't have to be too accurate. And over here as well. Just roughly drawing it in. Right, I'll go all the way down for this one. Like so. You'll also notice that with some wooden grains always have that circle effect in it. So I'm just going to quickly show you how I do that one as well. So with that, let's start off with the darker color. So, just going to use my eye dropper tool, select the darker wooden color grain and this time I'm going to start off quite wide with this one. So let's, going quite wide, and then I want the circle to appear here. So let's draw in a circle. And it sort of tapers off just at the end here, like so. Again start off quite wide, bring the circle, and taper it off. And join it back in. And then what we're going to do after that is we're going to draw on top of this using our original color. So I'm going to just select that original brown color, pink color at the bottom. I'm just going to draw over it, Like so. Just sort of following the previous shape. And you'll see here, that we're starting to create that sort of grain on the top and the bottom of our shape. And you follow the same thing again. This time, let's choose the dark color again. And now, all you have to do is zoom in and start drawing in. Start drawing in the circle. Just like that. And then picking the previous color and then drawing it on top. Let's make this grain thin. So, if you want to make your grain thin, you wanted to bring your shape as close to the previous shape as possible. Again it doesn't have to be too accurate because we can always zoom in and take a look at these handles like this. Now if I want to curve this out, then change it. Just by using our direct selection tool to move these points around like so. And again, choosing the brown color, and then just sort of working, working your way closer and closer to the middle of the circle. Until you're happy with it. So that's how we do the grains. Now, I'm just going to demonstrate how this depth layering works by bringing in some more grain shapes that I've created previously. So, I'm just going to use my selection tool and remove these out of the way. So this will be a lot clearer once you see these. So now we've got our dark grains here. In fact, let's make these a bit larger so that they'll fit the wooden board. So we've got our dark grains here, all grouped up, all grouped up nicely. And I'm just going to layer them on top of our wooden board, like so. Again, exactly like what we did before, just not worrying too much about the shapes outside. In fact, it would be better if the grains were further outside the edge of the board and that will make it easier further down the road. And then we've got our lighter grains here. Scoop those up And bring them in. Stretch it out a bit. So you can see now that this is sort of giving it a little bit of depth. This color here is slightly different from the one that I'm using here, so I'm just going to fix that by selecting the shapes and then choosing the eye dropper tool to correct it. And the same with this. In fact, I wanted to make it this color. Let's make it this color, instead. Let's see why that's not, I can correct, there we go, make this transparency a little bit higher. Now I've probably got a bit too many grains here so, we can probably get rid of a few of them. But for the purpose of this tutorial, let's keep them in. So now we're going to remove the grains on the sides here, and to do this, I'm just going to demonstrate by using the darker grains down here. And let's create a rectangle on this side. Select the group of dark grains. And then coming over here, we want to go to Pathfinder, and unite. Making sure that you've got the rectangle here as well. Pathfinder unite, and then just in case you've missed any here, go over here, select your dark grains, select the rectangle and unite. And then, you're going to select our wooden board shape here. Copy, Control-Shift-V to paste it on top and directly on top of our shapes. Select your wooden board, select the grains, and then we want to click either minus front or intersect. Let's try minus front, no, so intersect. And then all you have to do here is making sure that your wooden grains are selected, click on the color that you want, and there you go. So now our wooden grains are cut in exactly the same shape as our board underneath. Do that for the other grains, as well, and we'll have a wooden grain on our boards. So that's it for this lesson. In the next lesson, we'll go through how to create some highlights for our board. See you all there.


