


With Photoshop actions, you can create your own Photoshop filters to use with a single click on any image. In this tutorial, I'll show you how to create a Photoshop portrait action to add a glowing effect to a photo. This photo effect can be later applied to other photos as well! Follow me to learn how to create this cool Photoshop effect of a glowing pattern on the skin.
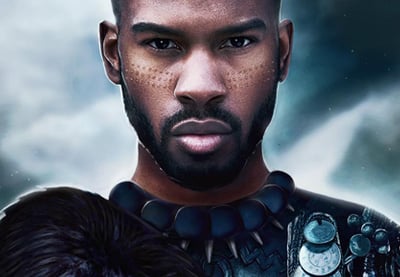
The effect we'll be working on here is based on African tribal makeup. Rather than being only a decoration, it has a deep meaning in the cultures that created it. The pattern may mark a person as a member of a specific tribe, show their status in the tribe, or have a special religious meaning. By creating a glowing effect for this makeup, we're going to accentuate its significance.
If you're interested in tribal-inspired effects like this one, you may also like the work of our author Kaylan Michael:

 How to Create a 3D Floral Collage in Adobe Photoshop & Lightroom

.jpg)
.jpg) How to Create a Vintage Photo Collage in Adobe Photoshop & Lightroom
How to Create a Vintage Photo Collage in Adobe Photoshop & Lightroom
.jpg)
.jpg) How to Create a Tribal African Inspired Pattern in Adobe Illustrator
How to Create a Tribal African Inspired Pattern in Adobe Illustrator
This tutorial was inspired by Evgeniya Osipova's rendition of Raquel Trave's character.
Follow along with this tutorial over on our Envato Tuts+ YouTube Channel:

Looking for inspiration or for a different effect? You can also browse our lists of the best Photoshop photo effects available:

 30 Cool Photoshop Photo Effects to Add Style & Wow


 25+ Best New Photoshop Actions & Photo Effects for 2024
How to Add a Glowing Photo Effect to a Portrait in Photoshop
Step 1
Open your photo. It's best to use a dark-skinned model for better contrast. I used this one.
Make sure that your image is on the Background layer. If not, go to Layer > New > Background from Layer.
Create a New Layer and paint the areas that you want to make glow. You can also select them with a tool of your choice and fill the selection with color. Name this layer mask 1.


Step 2
Create another layer. This time, select the eyes of the model. This way, we will be able to keep them bright, but not glowing. Name this layer mask 2.


Step 3
Click under the layer to deselect them. Then open the Actions panel and create a New Action. Give it a name. From now on, everything you do in Photoshop will be recorded.


Step 4
Go to Image > Image Size and round the top value. This will allow us to use a similar size for every photo that this Photoshop action will be applied to.


Step 5
Hide both masks. Hold Control and click the thumbnail of mask 1 to make a selection out of its contents. Go to Select > Inverse, and add an Exposure adjustment.


Step 6
Lower the Exposure to darken everything except the selection.


Step 7
Let's brighten the eyes now. Take the selection from mask 2 and click the mask of the adjustment layer. Then go to Edit > Fill and fill the selection with black to reveal the eyes. Deselect.


Step 8
Take the selection from mask 1 and create a New Layer. Go to Edit > Fill and fill it with white. Deselect. Name this layer white.


Step 9
Duplicate the white layer by pressing Control-J, and go to Filter > Blur > Gaussian Blur. Adjust the strength of the blur to create a subtle glow.


Step 10
Duplicate the layer and add a Hue/Saturation adjustment to it. Clip it and check Colorize. Change the color to a highly saturated red.


Step 11
Change the Blend Mode to Color. Now the skin looks as if it's glowing from the inside as well.


Step 12
Duplicate the white layer. Go to Filter > Blur > Gaussian Blur and add a little blur, to create a concentrated glow.


Step 13
To make this effect subtler, add a Layer Mask to it. Select it, and then go to Filter > Render > Clouds.


Step 14
Duplicate the white layer. Go to Filter > Blur > Motion Blur. Create a strong blur that makes an optical illusion of a shining effect. Change the Blend Mode to Soft Light.


Step 15
Make the effect subtler by adding a Layer Mask with Clouds.


Step 16
Duplicate the original background layer and drag it to the top. Go to Select > Color Range and select Highlights.


Step 17
Hide the layer and add a Curves adjustment. Change its Blend Mode to Overlay and drag the curve to accentuate the highlights that could have been lost by the darkening of the whole picture.


Step 18
Let's add a yellow glow now. Duplicate the white layer and double click the original to access its Layer Style panel. Check Outer Glow and change its Blend Mode to Vivid Light. Adjust the settings to add a concentrated glow.


Step 19
To make the glow more variable, go to Blending Options and drag the lower black marker to the right. Hold Alt to split it for a more gradual effect. By dragging this marker, you remove the effect from the darkest parts of the photo. You can adjust the intensity of this effect by changing the Opacity of the whole layer.


Step 20
Duplicate this layer and make the glow wider. Experiment with the settings to keep the effect eye-catching, yet still natural.


Step 21
Duplicate the layer once more to strengthen the glow if you want. Change the Blend Mode of the glow to Normal and create a more visible glow with it.


Step 22
Now that we've achieved our desired effect, click Stop Recording.


If you want to apply the same effect to other photos now, it's very simple. Just paint the masks, selecting the eyes and the pattern, and click Play. Everything you did earlier will be done to these new photos, and you just have to wait for the end result to appear. Now you have a great glowing eyes effect.


Photoshop Actions With Photo Art Effects
Photoshop Glowing Photo Effect
If you want to add other cool effects to your photos, you can save a lot of time by using Photoshop actions created by experts on Envato Elements. For example, this complex action turns your photo into a greyscale artwork with glowing elements. Just think how long it would take to create something similar on your own! But since it's an action, you just have to click Play.


Photoshop Storm Photo Effect
This Photoshop action adds a raging storm to your photo, with lightning and extreme color correction. Despite it being so automatic, the effect is very realistic and powerful. You can create an amazing poster this way in a matter of seconds!


Photoshop Magical Light Photo Effect
If you want to turn your photo into art, this Photoshop action will be perfect for you. It adds unique magical effects, changing the colors, adding textures, and modifying the lighting. It's hard to believe that it can all be done with a single click!


Photoshop Glowing Eyes Photo Effect
But there are also simpler, more specific actions like this one. It changes the eye color, offering a few different effects. For example, you can make the eyes glow, or make them shiny black.


Now you know how to create a Photoshop action with a glowing photo effect. If you're interested in photo manipulations, you may also like these tutorials:
 How to Create a Black Panther Movie-Inspired Photo Manipulation in Photoshop

 How to Create an Egyptian Goddess Manipulation in Adobe Photoshop

 How to Create an 80s-Inspired Double Exposure Manipulation in Adobe Photoshop

 Make a Trendy Double Exposure Effect in Photoshop


 100+ Awesome Photoshop Effects Tutorials


 How to Apply an Outer Glow to Layer Styles in Photoshop

 How to Create a Smoke Effect Photoshop Action


 By
By


