
 Lessons: 12Length: 49 minutes
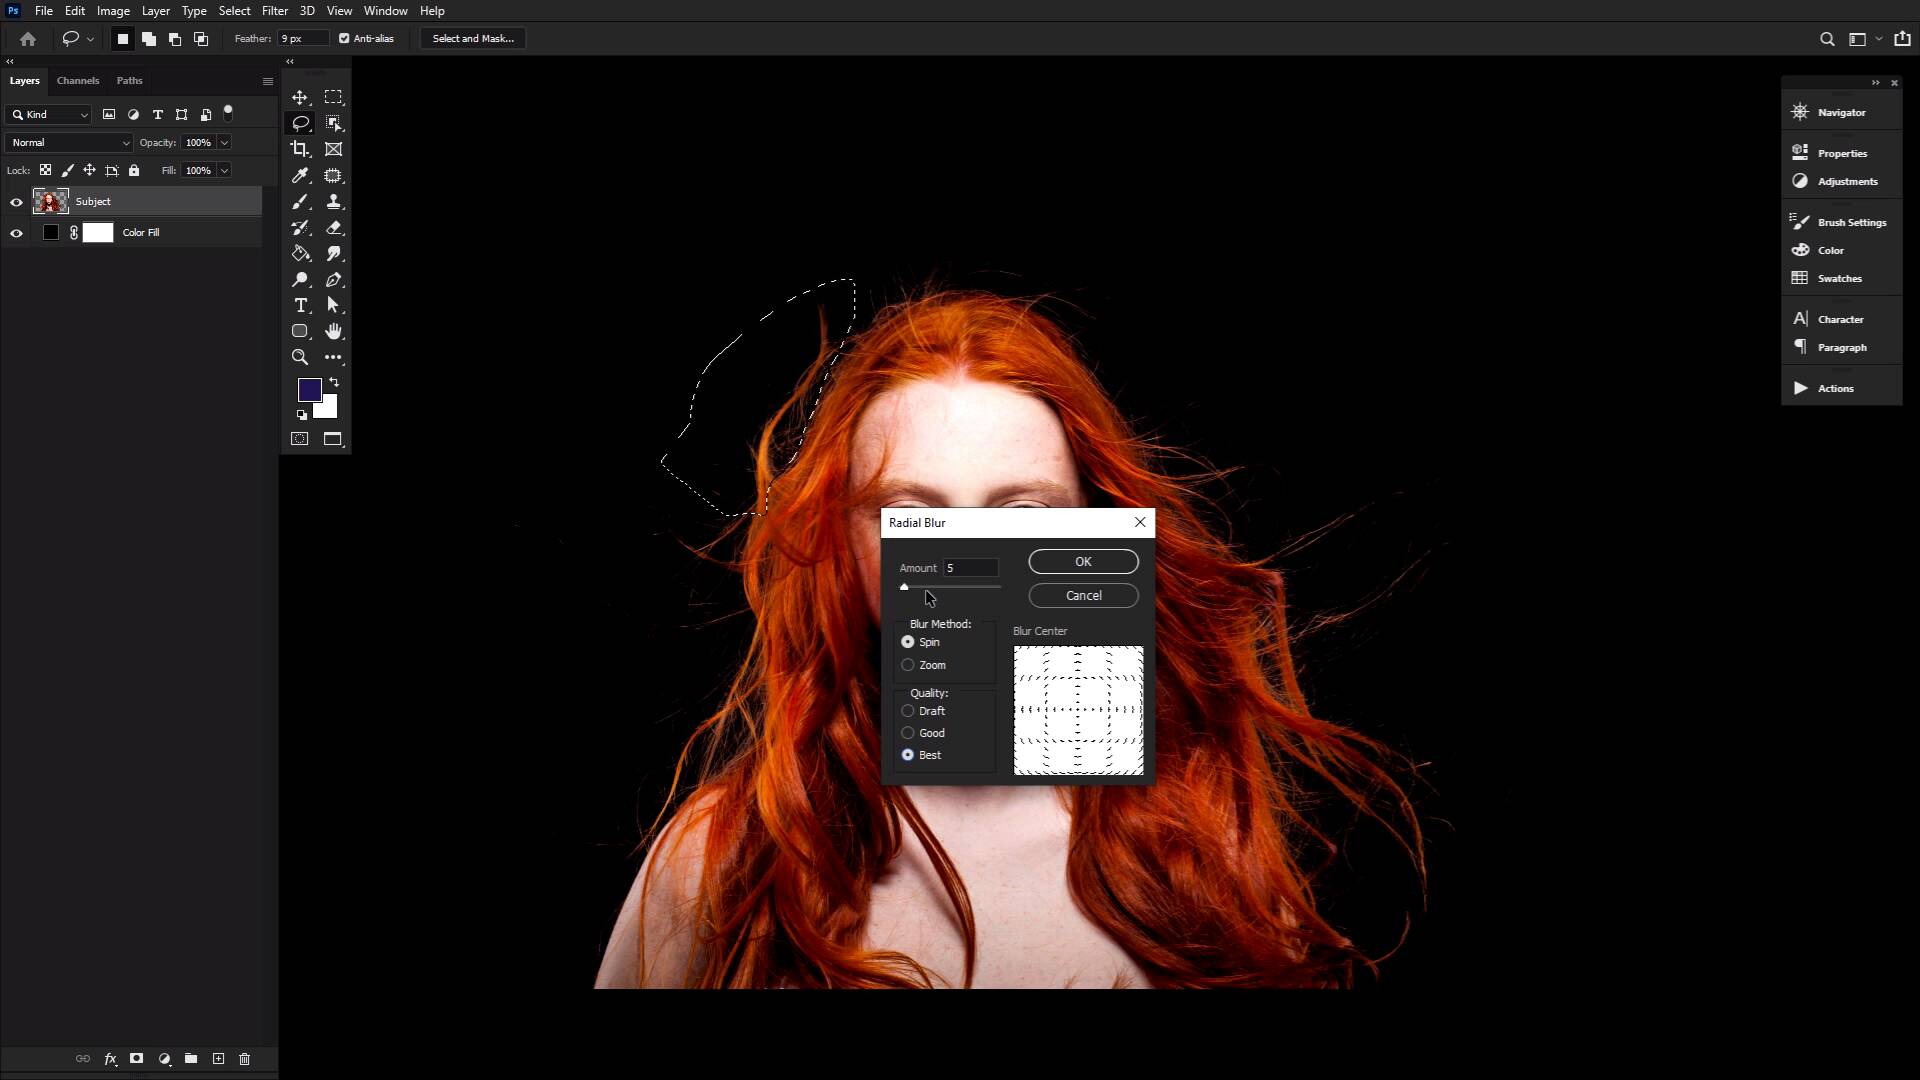
- Overview
- Transcript
4.4 Adding Movement & Reshaping Hair
In this final lesson, you will learn how to add movement to hair using the Lasso Tool and various blur filters. We will also take a look at the Liquify Tool and how to use it to reshape hair.
Related Links
- Wavy Red Hair 1 on Envato Elements
1.Introduction
1.1Introduction01:25
2.How to Cut Out Hair in Photoshop
2.1How to Cut Out Hair in Photoshop Using Layer Modes and Channels05:25
2.2How to Cut Out Hair in Photoshop Using Channels05:34
2.3How to Cut Out Hair in Photoshop Using Refine Edge04:34
3.Creating Hair Brushes in Photoshop
3.1How to Paint Hair in Photoshop Without a Tablet03:32
3.2How to Create a Pressure-Sensitive Hair Brush in Photoshop03:00
3.3How to Refine and Finish Hair Masks05:12
4.Adding Hair Details & Further Refinements
4.1Combining Hair in Photoshop02:57
4.2Lighting Hair, Shading Hair, & Painting Flyaways08:53
4.3How to Change Hair Color in Photoshop03:23
4.4Adding Movement & Reshaping Hair03:18
5.Conclusion
5.1Conclusion01:50
4.4 Adding Movement & Reshaping Hair
Welcome back to The Ultimate Guide to hair in Photoshop. In our final lesson, we'll be looking at how to both reshape hair and add some extra movement. Now, as we already did earlier, you can see how adding more hair can add a ton of movement to a head of hair. However, it can be a long, arduous process. And sometimes you just want to add a little oomph to your subject's already existing hair, without piling on more, with all the extracting and blending and lighting and painting, and all that, quote-unquote, fun stuff. For this you want to look no further than your blur filters. And well yes, of course the movement blur filter will work just fine and is sometimes the absolute perfect choice. I actually tend to prefer the Radial Blur filter. For me, I just tend to feel it gives me a much more dynamic and natural feel. Let's grab a large chunk of hair. So, you can go smaller if you want, using the lasso tool with a medium-level feather. The feather will depend on the size of your image, but it is essential when it comes to stopping any weird harsh edges of blurred and then not blurred areas. So play around with the different settings, if needed. You can always apply the blur, do it, choose a better feather, reselect and try again. I'm a big fan of trial and error. Once you do have your selection, head on over to Filter Blur, Radial Blur. Make sure the method is set to a radial, and the quality is set to best. That's an easy one to miss. As for the amount, again, it will depend on your specific image. However, 5 is always a good starting point, I find. You can also repeat the effect to intensify the blur further. Try not to push it too hard or you'll end up with a schmear of what might have been hair at one point in time. This is my go-to technique for dynamic, flowing hair and while it is simple, it simply delivers, and no one's giving out extra points for over-complicating simple processes. And finally, there's a good chance you probably already know that the liquefy tool is the go-to tool for reshaping and altering bodies. But it is also a beast when it comes to reshaping hair. And one of my favorite tools in general. I love to use it to create big surreal or fantasy hair as well as using it to give my mermaids and underwater floating effect, all just by pushing and pulling with the liquefy brush. I don't play with any of the other brushes, and my settings tend to stay pretty much the same. You can, however, use the masking tool to freeze the areas you don't want to be affected by the pushing and pulling, which I do use very often. You don't want the face to become distorted while you're messing with the hair here. Other than that, I'll be honest, I don't have any real tips or tricks for the liquefy tool, other than what I am actually showing you. It is just a powerful hair editing tool. So I just had to make sure I covered it before saying my goodbyes, because it's time to wrap things up next time in the Ultimate Guide to Hair in Photoshop.


