


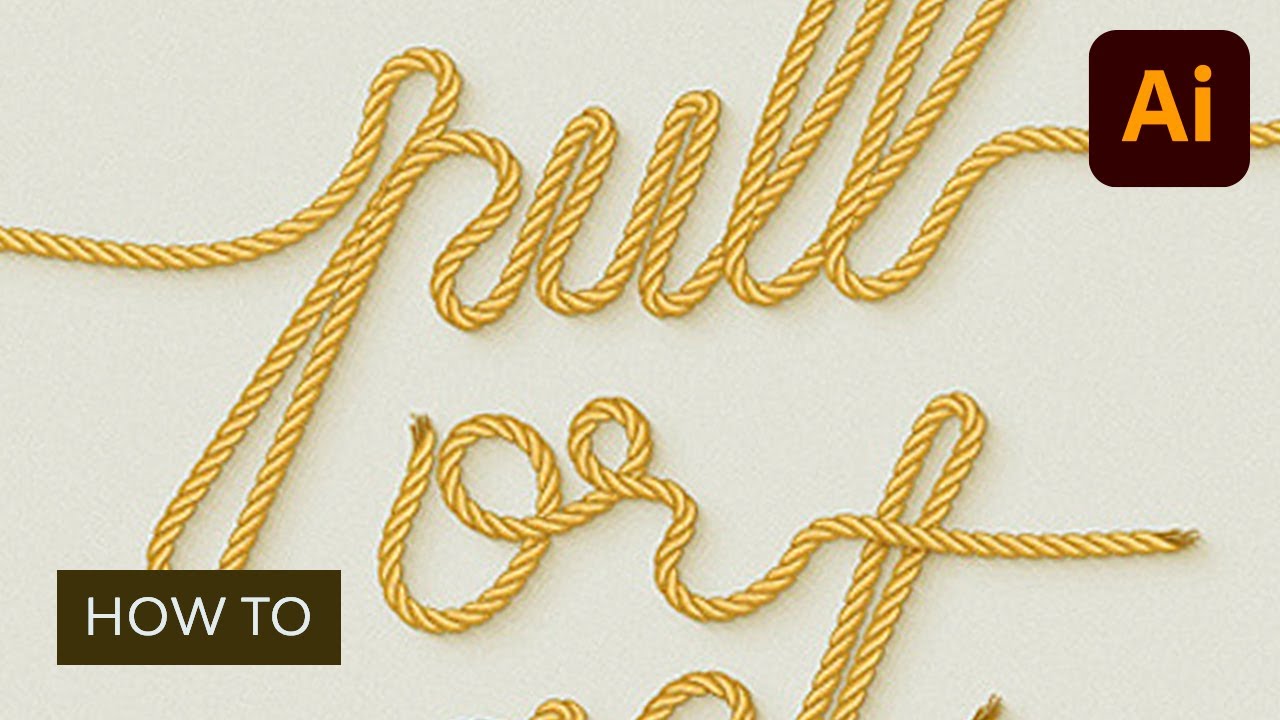
In this tutorial, you will learn how to create a simple rope brush in Illustrator and how to use it to create a rope brush text effect.
You'll learn the process of drawing a rope using the Rectangle Tool. We'll use blending and vector shape-building techniques, as well as the Live Corners feature. You'll also learn how to create the pattern brush components using the Shape Builder Tool. Finally, you'll learn how to create your rope pattern brush and how to turn it into a nice brush rope text effect.
Follow along with us over on our Envato Tuts+ YouTube channel if you like video tutorials:
What You'll Learn in This Illustrator Rope Brush Tutorial
- How to create a rope brush in Illustrator
- How to use your Illustrator rope brush to create a rope font
- How to create a rope pattern brush using the Shape Builder Tool
Jump to content in this section:
- How to Create a New Document and Set Up a Grid
- How to Create the Main Rope Illustration Piece
- How to Multiply the Rope Piece
- How to Create the Torn Rope Ends
- How to Create the Main Piece of the Brush Rope Pattern
- How to Create the End Sides of Your Pattern Brush
- How to Create Your Pattern Brush
- How to Create the Rope Font Text Effect
- Congratulations! You're Done!
- Awesome Rope Pattern and Texture Effects From Envato Elements
- Learn More Custom Brush & Text Techniques
1. How to Create a New Document and Set Up a Grid
Hit Control-N to create a new document. Select Pixels from the Units drop-down menu, enter 1075 in the width box and 1280 in the height box, and then click on the Advanced button. Select RGB, Screen (72ppi) and make sure that the Align New Objects to Pixel Grid box is unchecked before you click OK.
Enable the Grid (View > Show Grid) and the Snap to Grid (View > Snap to Grid). You will need a grid every 1 px, so simply go to Edit > Preferences > Guides & Grid, and enter 1 in the Gridline every box and 1 in the Subdivisions box. You should also open the Info panel (Window > Info) for a live preview with the size and position of your shapes. Don't forget to set the unit of measurement to pixels from Edit > Preferences > Units. All these options will significantly increase your work speed.


2. How to Create the Main Rope Illustration Piece
Step 1
Pick the Rectangle Tool (M) and focus on your toolbar. Remove the color from the stroke, and then select the fill and set its color to R=239 G=203 B=124. Move to your artboard and simply create a 15 px square—the Snap to Grid feature should ease your work.


Step 2
Focus on the right side of your square and pick the Direct Selection Tool (A). Select both anchor points and simply drag them 25 px up. Again, the Snap to Grid will come in handy.


Step 3
Make sure that the Direct Selection Tool (A) is still active, select the anchor point highlighted by the red circle in the following image, and go to the control panel. Open the Corners fly-out window, check the Corner: Round and the Rounding: Relative buttons, and enter a 1.5 px radius. Make sure that the Direct Selection Tool (A) remains selected, select the two anchor points highlighted by the green circles, and return to the control panel.
Again, open the Corners fly-out window, check the Corner: Round and the Rounding: Absolute buttons, and enter a 17 px radius. Move to the anchor point highlighted by the blue circle, select it, and get back to the control panel. Open the Corners fly-out window, check the Corner: Round and the Rounding: Relative buttons, and enter a 2 px radius. In the end, your shape should look like in the second image. Move to the Layers panel (Window > Layers), double-click on your shape, and rename it "main".


Step 4
Disable the Snap to Grid (View > Snap to Grid), and then go to Edit > Preferences > General and make sure that the Keyboard Increment is set to 1 px. Reselect your "main" shape and make two copies in front (Control-C > Control-F > Control-F). Select the top copy and move it 1 px to the left using the left arrow button on your keyboard.
Reselect both copies made in this step, open the Pathfinder panel (Window > Pathfinder), and click the Minus Front button. Make sure that the resulting shape is selected and replace the existing fill color with R=219 G=183 B=104. This will help us create the first level of shading in our rope texture drawing.


Step 5
Reselect your "main" shape and make two copies in front (Control-C > Control-F > Control-F). Select the top copy and move it 2 px to the left using that same left arrow button from your keyboard. Reselect both copies made in this step and click the Minus Front button from the Pathfinder panel. Make sure that the resulting shape is selected and replace the existing fill color with R=189 G=153 B=74.


Step 6
Reselect your "main" shape, make a copy in front (Control-C > Control-F), select it, and move it 1 px down and 1 px to the right. Make sure that this fresh copy is still selected and duplicate it (Control-C > Control-F). Select this new copy and move it 1 px down and 1 px to the right.
Reselect both copies made in this step and click the Minus Front button from the Pathfinder panel. Make sure that the resulting shape is selected and replace the existing fill color with white (R=255 G=255 B=255).


Step 7
Reselect your "main" shape and make a copy in front (Control-C > Control-F). Select it along with the white shape and click the Intersect button from the Pathfinder panel.
Make sure that the resulting shape stays selected, open the Transparency panel (Window > Transparency), lower the Opacity to 50%, and change the Blending Mode to Overlay.


Step 8
Reselect your "main" shape and make two copies in front (Control-C > Control-F > Control-F). Select the top copy and move it 1 px down and 1 px to the right.
Reselect both copies made in this step and click the Minus Front button from the Pathfinder panel. Make sure that the resulting shape is selected and replace the existing fill color with R=219 G=183 B=104. Now it's starting to look more like a rope texture drawing!


Step 9
Reselect your "main" shape, focus on the Appearance panel (Window > Appearance), add a 1 pt stroke, and set its color to R=169 G=133 B=54.
Keep focusing on the Appearance panel, click on the "Stroke" piece of text to open the Stroke fly-out window, and check the Align Stroke to Outside button. In the end, things should look like in the following image.


Step 10
Select all the shapes created so far, and hit Control-G to Group them. This easy rope drawing will serve as a building block for drawing our rope.


3. How to Multiply the Rope Piece
Step 1
Make sure that your group of shapes is selected, and go to Effect > Distort & Transform > Transform. Enter the properties shown in the following image, click OK, and then go to Object > Expand Appearance. Move to the Layers panel and rename the resulting group "ropeOne".


Step 2
Reselect your "ropeOne" group and go to Object > Transform > Move. Enter 35 in the Horizontal box, and click the Copy button. Move to the Layers panel and rename the newly created group "ropeTwo".


4. How to Create the Torn Rope Ends
Step 1
Enable the Snap to Grid (View > Snap to Grid) and focus on the bottom side of your "ropeOne" group. Using the Pen Tool (P), create a simple path roughly as shown in the first image. Add a 1 pt stroke for this tiny path and set its color to R=169 G=133 B=54.
Using the same tool, add some new paths roughly as shown in the second image. There's only one thing that you should keep in mind. This set of curly paths should not get wider than 17 px (which is the width of your "ropeOne" group) because it would mess up your pattern brush. Still, if you wish to go wider, make sure that you have the same extra width on both sides (e.g. 2 px on the left side and 2 px on the right side).


Step 2
Using the Pen Tool (P), add some new paths roughly as shown in the following image. Add a simple 1 px stroke for these new paths and set its color to R=149 G=113 B=40.


Step 3
Reselect all the curly paths made in the last two steps and Group them (Control-G). Make sure that this new group is selected and simply hit Shift-Control-[ to send it to the back.


Step 4
Focus on the top side of your "ropeOne" group. Using the Pen Tool (P), create some new curly paths roughly as shown in the following images. Add the same Appearance attributes used for the other group of curly paths.


Step 5
Reselect all the curly paths made in the previous steps and Group them (Control-G). Make sure that this new group is selected and send it to the back (Shift-Control-[ ). This element makes for a more realistic rope drawing.


5. How to Create the Main Piece of the Brush Rope Pattern
Step 1
Focus on your "ropeTwo" group. Using the Rectangle Tool (M), create a 19 x 17px shape, set the fill color to R=39 G=170 B=225, and place it exactly as shown in the first image. Make sure that this blue rectangle is still selected and send it to the back (Shift-Control-[ ).


Step 2
Select your "ropeTwo" group along with that blue rectangle and grab the Shape Builder Tool (Shift-M). Hold the Shift button from your keyboard, and then simply drag a selection along the top side of your group as shown in the following image. You might have to repeat this technique once or twice to make sure that you get rid of the tiny shapes. Just make sure that you don't drag that selection over the edge of your blue rectangle. This will make your Illustrator rope brush cleaner.


Step 3
Reselect your "ropeTwo" group along with the blue shapes and grab the Shape Builder Tool (Shift-M). Again, hold the Shift button from your keyboard and simply drag a new selection along the bottom side of your group as shown in the following image. Take a closer look at the edge—it's very important to make sure that you get rid of the tiny shapes.


Step 4
Select one of your blue shapes and simply go to Select > Same > Appearance to select the rest of the shapes with similar Appearance attributes. Once you have all these shapes selected, hit the Delete button from your keyboard to remove them from your artboard. In the end, things should look like in the third image. Move to the Layers panel and rename the remaining group "ropeBody".


6. How to Create the End Sides of Your Pattern Brush
Step 1
Focus on your "ropeOne" group. Using the Rectangle Tool (M), create a 19 x 17px shape, set the fill color to R=39 G=170 B=225, and place it exactly as shown in the first image.


Step 2
Select your "ropeOne" group along with that blue rectangle and grab the Shape Builder Tool (Shift-M). Hold the Shift button from your keyboard and simply drag a selection along your blue rectangle as shown in the following image. Make sure that you remove all the tiny shapes that intersect with your blue rectangle, and then select the remaining blue shapes and simply Delete them.


Step 3
Reselect your "ropeBody" group, drag it to the left, and place it as shown in the second image.


7. How to Create Your Pattern Brush
Step 1
Reselect all the shapes made so far, and go to Object > Transform > Rotate. Enter -90 Degrees and click OK.


Step 2
Focus on the Layers panel and simply turn off the visibility for your "ropeBody" group. Pick the Direct Selection Tool (A), focus on your artboard, select all the shapes highlighted in the second image, and simply drag them into the Swatches panel (Window > Swatches) to save them as a pattern.
Keep focusing on the Swatches panel, double-click on your new pattern, and rename it "endTile". Make sure that the Direct Selection Tool (A) is still active, select all the shapes highlighted in the third image, and save them as a new pattern. Return to the Swatches panel and rename this second pattern "startTile".


Step 3
Focus on the Layers panel and turn on the visibility for your "ropeBody" group. Select it, open the Brushes panel (Window > Brushes), and click the New Brush button (indicated by the little blue arrow in the following image). Check the Pattern Brush box and click OK to open the Pattern Brush Options window. Enter "rope" in the Name box, drag the Scale slider to 70%, and then move down to the Tile boxes.
Open the Start Tile drop-down window and add the "startTile" pattern from that list, and then open the End Tile drop-down window and add the "endTile" pattern. Finally, click OK and you should find your new pattern brush in the Brushes panel.


8. How to Create the Rope Font Text Effect
Step 1
Pick the Type Tool (T), click on your artboard, and add your black text. Make sure that it stays selected and open the Character panel (Window > Type > Character). Select the "Edwardian Script ITC" font, and then set the size to 350 pt. Lower the Opacity of your text to 30%, and then move to the Layers panel and lock it to make sure that you won't accidentally select/move it.


Step 2
Using the Pen Tool (P) or the Paintbrush Tool (B) (if you happen to own a tablet), draw a smooth path along your text as shown in the following image. Try to use the text in the back as a rough reference. For starters, use a simple, black stroke for your path.


Step 3
Once you feel that your path looks good enough, replace the black stroke with your "rope" pattern brush. Also, move to the Layers panel and simply remove the locked piece of text.


Step 4
Make sure that your text path is still selected, focus on the Appearance panel, and add a second stroke using the Add New Stroke button (indicated by the little blue arrow in the following image). Select this new stroke, set the color to black, make it 10 pt wide, and open the Stroke panel (Window > Stroke). Focus on the Profile section, open the drop-down menu, and select the Width Profile 1.


Step 5
Make sure that your text path is still selected, focus on the Appearance panel, and reselect that black stroke. Lower its Opacity to 10%, change the Blending Mode to Color Burn, and go to Effect > Artistic > Film Grain. Enter the properties shown in the following image and click OK.


Step 6
Reselect your text path and focus on the Appearance panel. Make sure that the entire path is selected (simply click on the "Path" piece of text from the top of the Appearance panel), and go to Effect > Stylize > Drop Shadow. Enter the properties shown in the top left window (in the following image), click OK, and then add the other four Drop Shadow effects shown in the following image. This shadow will make for a realistic rope drawing for the word.


Step 7
Make sure that your text path is still selected, open the Graphic Styles panel (Window > Graphic Styles), and simply click the New Graphic Style button (indicated by the little blue arrow in the following image) to save a new graphic style.


Step 8
Reselect the Pen Tool (P) and add some new text paths roughly as shown in the first image. Once you feel that things look good enough, select all your new paths and simply click on your saved graphic style from the Graphic Styles panel.


Step 9
Using the Rectangle Tool (M), create a shape the size of your artboard, set the fill color to R=230 G=230 B=230, and send it to the back (Shift-Control-[ ). Make sure that this new rectangle stays selected, focus on the Appearance panel, and add a second fill using the Add New Fill button (indicated by the little blue arrow in the following image). Select this new fill, set the color to black, lower its Opacity to 3%, change the Blending Mode to Multiply, and go to Effect > Artistic > Film Grain. Enter the properties shown in the following image and click OK.


Congratulations! You're Done!
Now you're an expert in how to draw a rope text using an easy rope drawing brush. Here is how it should look. I hope you've enjoyed this tutorial and can apply these techniques in your projects.


Awesome Rope Pattern and Texture Effects From Envato Elements
Need more inspiration? Check out and download some of these professionally made custom brush effects from Envato Elements! These are great especially if you are looking to save some time.
Real Rope Illustrator Brushes (AI)
This pack contains a professional rope brush ready to use in Adobe Illustrator! Supplied with frayed and flat ends and a mixture of both. Also included is a version of the brushes that you can recolor.


Doodle Brushes (AI, EPS)
Giving your art that loose, naive feel can be harder than it looks. This pack makes it easy by containing a wide range of different doodle style brushes to be used in Adobe Illustrator. A version of the brushes with pressure sensitivity enabled is now included—perfect for those who use graphics tablets.


Swirls & Strokes Brushes Set (PNG)
This pack contains over 100 high-quality custom brushes for Adobe Photoshop. All the strokes and swirls are versatile and easy to use. Adjust the colors and the size and let them go! Use them for business cards, wrapping paper, stationery and apparel design, stickers, posters, web design, and app design.


69 Stroke Spray Shapes (PNG)
This huge pack contains spraypaint shapes and textures as PNG files. These shapes are high resolution and could be a great addition to any project. Use them for cards, invitations, banners, templates, flyers, covers, posters, etc.


Againts Alphabethical brushes (PSD, PNG)
Made with transparent ink and black tint, this pack contains high-quality 300 dpi brushes to be used in Adobe Photoshop.


Play Dough Type (PSD)
This Adobe Photoshop template file will help you create realistic play-dough plasticine words. Included is a PSD file, set up and ready to use in a well-organized package filled with letters and some special characters


Learn More Custom Brush & Text Techniques
If you liked this and are looking to learn some more custom brush and text skills, check out the tutorials below! Expand your expertise by going through these in-depth guides. Happy designing!

 How to Create a Snowflake Brush in Photoshop


 How to Make a Pickle Pattern Brush in Illustrator


 How to Create a Light Particles Photoshop Brush


 How to Create Procreate Custom Brushes


 How to Create a Cool Bubble Font Text Effect


 New Course: Create an Isometric Text Effect in Adobe Illustrator


 How to Install and Use Brushes in Adobe Illustrator


 How to Make a Brush in Illustrator


 How to Make a Watercolor Brush in Adobe Illustrator

 How to Change the Brush Size in Illustrator
 By
By


