

In the following steps, you will learn how to create a bubble text design in Adobe Illustrator. For more inspiration on how to adjust or improve your final bubble text design using cool bubble letter fonts, you can find plenty of resources at Envato Elements.
Follow along with us over on the Envato Tuts+ YouTube channel. Or watch our bubble text tutorial video:

Jump to content in our bubble letters tutorial:
- How to Create a New Document and Use a Bubble Font
- How to Create Bubble Text Effects
- How to Save and Use a Graphic Style
- How to Add a Simple Background for Text Effects
- That's It! Now You Know How to Create a Bubble Font!
- 5 Cool Bubble Fonts & Bubble Text Effects (From Envato Elements)
- Want to Learn More?
What You'll Need
You'll need the following font in order to complete this text design:
- Bomber Balloon font
1. How to Create a New Document and Use a Bubble Font
Step 1
Hit Control-N to create a new document. Select Pixels from the Units drop-down menu, enter 850 in the width box and 600 in the height box, and then click that More Settings button. Select RGB for the Color Mode, set the Raster Effects to Screen (72 ppi), and then click Create Document.
You should also open the Info panel (Window > Info) for a live preview with the size and position of your shapes. Don't forget to set the unit of measurement to pixels from Edit > Preferences > Units. All these options will significantly increase your work speed.


Step 2
Pick the Type Tool (T), click on your artboard, and open the Text panel (Window > Type > Character).
Select the Bomber Balloon font and set the size to 250 px. Type the "BUBBLE" text and make it black (R=0 G=0 B=0). Feel free to search for more cool bubble letter fonts and use them instead of this one.


2. How to Create Bubble Text Effects
Step 1
Make sure that your cute bubble font stays selected, open the Swatches panel (Window > Swatches), and click that [None] swatch to remove the existing text color. This should make your text invisible, but don't worry—we'll fix it immediately.
Open the Appearance panel (Window > Appearance) and add a new fill using the Add New Fill button from the bottom of the panel. Select the new fill and set its color to R=40 G=73 B=138.


Step 2
Make sure that your text design stays selected and keep focusing on the Appearance panel.
Add a second fill using that same Add New Fill button, and select it. Set the color to R=50 G=120 B=181 and go to Effect > Path > Offset Path. Enter a -4 px Offset and click OK.


Step 3
Make sure that your text design stays selected and keep focusing on the Appearance panel. Select the top fill and go to Effect > Distort & Transform > Transform. Enter the attributes shown in the following image and click OK.


Step 4
Make sure that your text design stays selected and keep focusing on the Appearance panel.
Add a third fill using the Add New Fill button, and select it. Set the color to R=73 G=152 B=212 and go to Effect > Path > Offset Path. Enter a -8 px Offset, click OK, and go to Effect > Distort & Transform > Transform. Enter the attributes shown in the following image and click OK.


Step 5
Make sure that your text design stays selected, and keep focusing on the Appearance panel.
Add a fourth fill using the Add New Fill button, and select it. Set the color to R=71 G=188 B=235 and go to Effect > Path > Offset Path. Enter a -12 px Offset, click OK, and go to Effect > Distort & Transform > Transform. Enter the attributes shown in the following image and click OK.


Step 6
Make sure that your text design stays selected, and keep focusing on the Appearance panel.
Add a fifth fill using the Add New Fill button, and select it. Apply the linear gradient shown below (Window > Gradient), set its Angle to 90 degrees, and go to Effect > Path > Offset Path. Enter a -16 px Offset, click OK, and go to Effect > Distort & Transform > Transform. Enter the attributes shown in the following image and click OK.


Step 7
Make sure that your text design stays selected, and keep focusing on the Appearance panel.
Add a sixth fill using the Add New Fill button, and select it. Set the color to white (R=255 G=255 B=255) and go to Effect > Path > Offset Path. Enter a -22 px Offset, click OK, and go to Effect > Distort & Transform > Transform. Enter the attributes shown in the following image, click OK, and go to Effect > Blur > Gaussian Blur. Enter a 2 px Radius, click OK, and return to the Appearance panel. Expand your white fill and click on Opacity to open the Transparency fly-out panel. Lower the Opacity to 30% and change the Blending Mode to Overlay.


Step 8
Make sure that your text design stays selected, and keep focusing on the Appearance panel.
Select the white fill and duplicate it using the Duplicate Selected Item button from the bottom of the panel. Expand the newly added fill, select the existing Gaussian Blur effect, and remove it by clicking on Delete Selected Item from the bottom of the panel.


Step 9
Make sure that your text design stays selected, and keep focusing on the Appearance panel.
Add a new fill using the Add New Fill button, and select it. Change its Blending Mode to Overlay and apply the linear gradient shown below. The yellow zero from the gradient image stands for the Opacity percentage. This simply means that you must select that gradient slider and lower its Opacity to 0% from the Gradient panel.


Step 10
Open the fly-out menu from the Swatches panel and go to Open Swatch Library > Patterns > Basic Graphics > Basic Graphics_Texture. Make sure that your text design stays selected and focus on the Appearance panel.
Add a new fill using the Add New Fill button and select it. Apply the Mezzotint Dot pattern from the Basic Graphics_Texture panel and go to Effect > Distort & Transform > Transform. Enter the attributes shown in the following image and click OK. Be sure that you uncheck the Transform Objects box and check the Transform Patterns box. This will scale the applied pattern without affecting its boundaries.


Step 11
Make sure that your text design stays selected, and keep focusing on the Appearance panel.
Select the top fill, lower its Opacity to 50%, and change the Blending Mode to Color Dodge.


Step 12
Make sure that your text design stays selected, and focus on the Appearance panel.
Add a new fill using the Add New Fill button, and select it. Apply the USGS 22 Gravel Beach pattern from the Basic Graphics_Texture panel and go to Effect > Distort & Transform > Transform. Enter the attributes shown in the following image and click OK.


Step 13
Make sure that your text design stays selected, and keep focusing on the Appearance panel.
Select the top fill, lower its Opacity to 80%, and change the Blending Mode to Color Dodge.


Step 14
Make sure that your text design stays selected, and keep focusing on the Appearance panel.
Select the stroke, set the Weight to 8 px, and apply the linear gradient shown below (don't forget to select the right gradient slider and lower its Opacity to 0%). Change its Blending Mode to Soft Light and go to Effect > Path > Offset Path. Enter a -4 px Offset and click OK.


Step 15
Make sure that your text design stays selected, and keep focusing on the Appearance panel.
Add a second stroke using the Add New Stroke button from the bottom of the panel, and select it. Set the Weight to 4 px and apply the linear gradient shown below (don't forget to select the left gradient slider, lower its Opacity to 0%, and change the Location to 25%). Lower its Opacity to 70%, change the Blending Mode to Color Dodge, and then go to Effect > Path > Offset Path. Enter a -6 px Offset and click OK.


Step 16
Make sure that your text design stays selected, and keep focusing on the Appearance panel.
Select the bottom fill and go to Effect > Stylize > Drop Shadow. Enter the attributes shown in the top left window (in the following image), click OK, and then apply the other four Drop Shadow effects shown below.


3. How to Save and Use a Graphic Style
Step 1
Let's continue with our easy and simple bubble letters tutorial. Make sure that your text design is still selected, and open the Graphic Styles panel (Window > Graphic Styles). Click the New Graphic Style button to save the appearance attributes of your selection.


Step 2
Pick the Ellipse Tool (L) and simply click on your artboard to open the Ellipse window. Create two 50 px circles and a 70 x 50 px ellipse. Place these new shapes roughly as shown in the following image.


Step 3
Select the three shapes added in the previous step and apply your graphic style from the Graphic Styles panel.


Step 4
Select the top circle and go to Effect > Warp > Arch. Check the Vertical box, drag the Bend slider to 15%, and click OK.
Select the other two shapes and again go to Effect > Warp > Arch. Check the Horizontal box, drag the Bend slider to 15%, and click OK.


4. How to Add a Simple Background for Text Effects
Pick the Rectangle Tool (M), click on your artboard to open the Rectangle window, and use it to create a 610 x 860 px shape. Make sure that this new shape covers your entire artboard and send it to the back (Shift-Control-[).
Fill it with the radial gradient shown below and use the Gradient Tool (G) to stretch your gradient as shown in the following image. You're done! Our bubble font looks amazing.


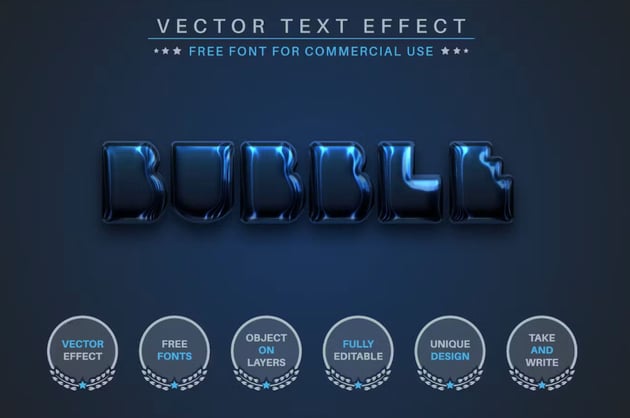
That's It! Now You Know How to Create a Bubble Font!
Here is how your bubble letter font should look. I hope you've enjoyed this bubble letters tutorial and can apply these techniques for your future text effects.
Feel free to adjust the final text design and make it your own. For more cute, fun, or simple bubble letters, you can explore Envato Elements, which offers tons of inspiring resources.


5 Cool Bubble Fonts & Bubble Text Effects (From Envato Elements)
If you enjoyed our bubble font tutorial, you might want to check out this list. We've compiled the finest bubble fonts and text effects to meet all your creative needs.
There are a lot of creative effects and typefaces out there, but unfortunately we can't include everything in this short list. If you want to download more creative fonts, head over to Envato Elements. Here you'll find unlimited downloads of fonts, illustrations, graphics, and more for a low monthly fee!
1. Metallic Bubble Text Effect (AI, EPS)

Here's a super-easy text effect for you. If you don't have the time to go through our bubble font tutorial, this file will be a lifesaver. Simply download it, start typing your text, and you'll have cool metallic bubble text in no time. The preview image shows a blue metallic bubble font, but it's a fully editable file, so please feel free to modify the color as you wish.
2. Cartoon Bubble Font (OTF)


When it comes to design and graphic trends, cartoon bubble fonts top the list. They'll bring a fun and modern touch to any graphic design project, poster, illustration, or other artwork. Experiment with this cartoon bubble font to create amazing results.
3. Soap Bubble Font (ATN, PSD, PDF)


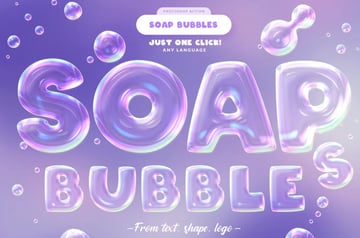
This text effect offers a highly realistic bubble effect. With just one click, you can create stunning soap bubble fonts for your designs. You can also apply the effect to logos, shapes, and vectors to further enhance your creativity. Download the soap bubble font here.
4. Groovy Bubble Font (OTF, TTF, WOFF)

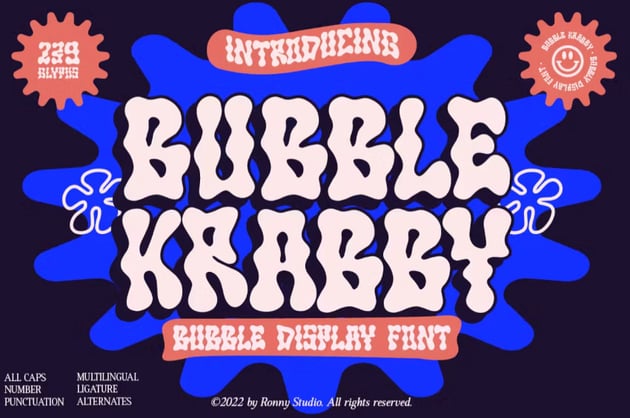

Groovy bubble fonts provide a playful, psychedelic, and retro option to add that extra flair to your designs. The file includes a groovy bubble font with lowercase, uppercase, numbers, punctuation, ligatures, and multilingual options.
5. Bubble Gum Font (PSD)
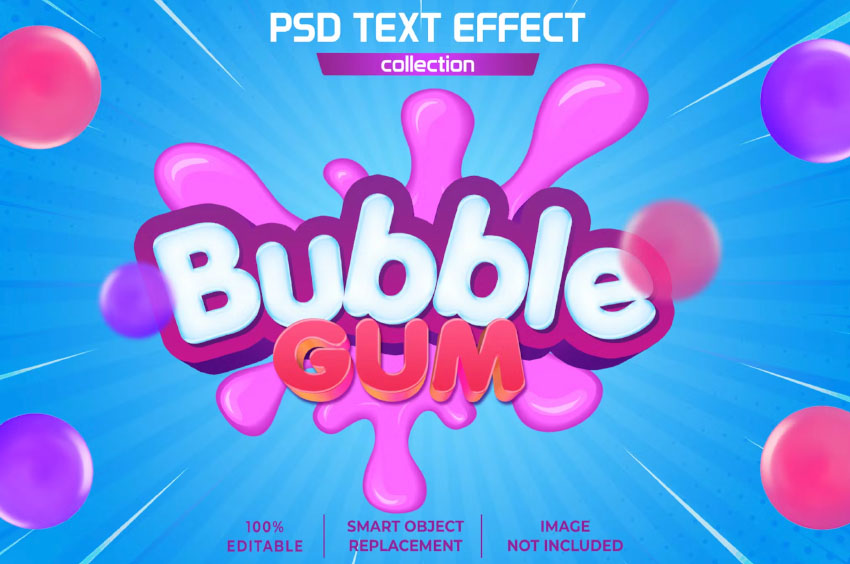


Use this bubble gum font effect to add a fun touch to your art or design projects. The greatest advantage of text effects is the ability to achieve high-quality results in a matter of seconds. So why wait? Download this bubble gum font and start having a blast with it!
Want to Learn More?
Love the aesthetic of bubble fonts? Check out the following text effects—you'll love them:

 How to Make a Tentacle Art Brush in Adobe Illustrator


 New Course: Create an Isometric Text Effect in Adobe Illustrator


 How to Create an Isometric Text Effect in Adobe Illustrator


 How to Create a Half-Blurred Text Effect in Adobe Illustrator

 How to Create a Repetitive Text Effect Illusion in Adobe Illustrator

 How to Create a Game Graphic Style Text Effect in Adobe Illustrator


 How to Create a Rococo Text Effect in Adobe Illustrator

 How to Create a Retro Chrome Text Effect in Adobe Illustrator

 How to Create a Layered Paper Art Text Effect in Adobe Illustrator

 How to Create a Folded Text Effect in Adobe Illustrator

 How to Create a Fur Action Text Effect in Adobe Photoshop

 By
By


