


In the following tutorial, you will learn how to create a vintage circus sign and how to make circus text in Illustrator.
If you don't have the time to make this vintage circus sign from scratch, then Envato Elements is the solution. This subscription-based marketplace has over 2,000 Illustrator add-ons you can download without restrictions. You can get circus fonts, circus text effects, and more.
Jump to content in this section:
What You'll Learn
- How to create a vintage circus sign
- How to make circus text in Illustrator
What You'll Need
You will need the following resources to complete this circus sign:
- The Circus Font
- Gray Plain Paper Texture
1. How to Create a New Document and Set Up a Grid
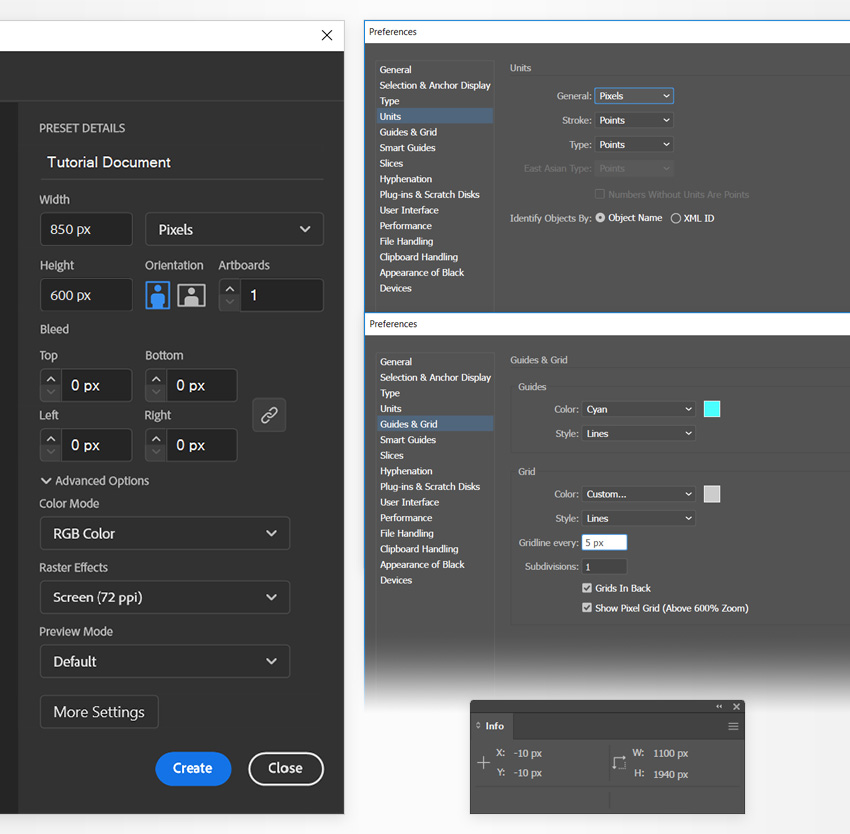
Hit Control-N to create a new document. Select Pixels from the Units drop-down menu, set the Width to 850 px and the Height to 600 px, and then click the Advanced Options button. Select RGB for the Color Mode and set the Raster Effects to Screen (72 ppi), and then click Create.
Enable the Grid (View > Show Grid or Control-") and Snap to Grid (View > Snap to Grid or Shift-Control-"). You will need a grid every 5 px, so simply go to Edit > Preferences > Guides & Grid, and enter 5 in the Gridline every box and 1 in the Subdivisions box. Try not to get discouraged by all that grid—it will make your work easier, and keep in mind that you can easily enable or disable it using the Control-" keyboard shortcut.
You should also open the Info panel (Window > Info) for a live preview of the size and position of your shapes. Don't forget to set the unit of measurement to pixels from Edit > Preferences > Units. All these options will significantly increase your work speed.

2. How to Create the Circus Sign Shape
Step 1
Pick the Ellipse Tool (L) from your toolbar and then focus on the color settings. Select the stroke and remove the color, and then double-click the fill and replace the existing color with a random grey.
Move to your artboard and simply create a 600 x 165 px shape—the grid and Snap to Grid should make it easier.
Keep your rectangle selected, and switch to the Direct Selection Tool (A). Focus on the Control panel (Window > Control) and set the Corner Radius to 75 px.


Step 2
Reselect the Rectangle Tool (M) and this time create a 500 x 265 px shape.
Use the Selection Tool (V) to select this rectangle along with your rounded rectangle, click the latter to make it the reference shape, and then click the Horizontal Align Center and Vertical Align Center buttons from the Control panel. This will perfectly align your two shapes to the center.


Step 3
Using the Ellipse Tool (L), add four 140 x 80 px shapes as shown in the following image.
Select these ellipses, along with the rectangle behind them, and click the Minus Front button from the Pathfinder panel (Window > Pathfinder).


Step 4
Using the Pen Tool (P) or the Line Tool (/), draw a 360 px horizontal line, as shown in the first image. Keep it selected, and go to Object > Path > Add Anchor Points.
Continue with the Add Anchor Point Tool (+) and use simple clicks to add another two anchor points as shown in the second image. Use the grid as a reference to make sure that these new points are 30 px away from the end points of your line.


Step 5
Keep focusing on your line and use the Direct Selection Tool (A) to select the middle point, and then drag it 55 px up, as shown below.


Step 6
Keep focusing on your path and add a bit of roundness using the Anchor Point Tool (Shift-C). Simply click and drag the added anchor points to round the path as shown below.
Once you're done, duplicate the entire path (Control-C > Control-V) and flip it horizontally, and then place it as shown in the second image.


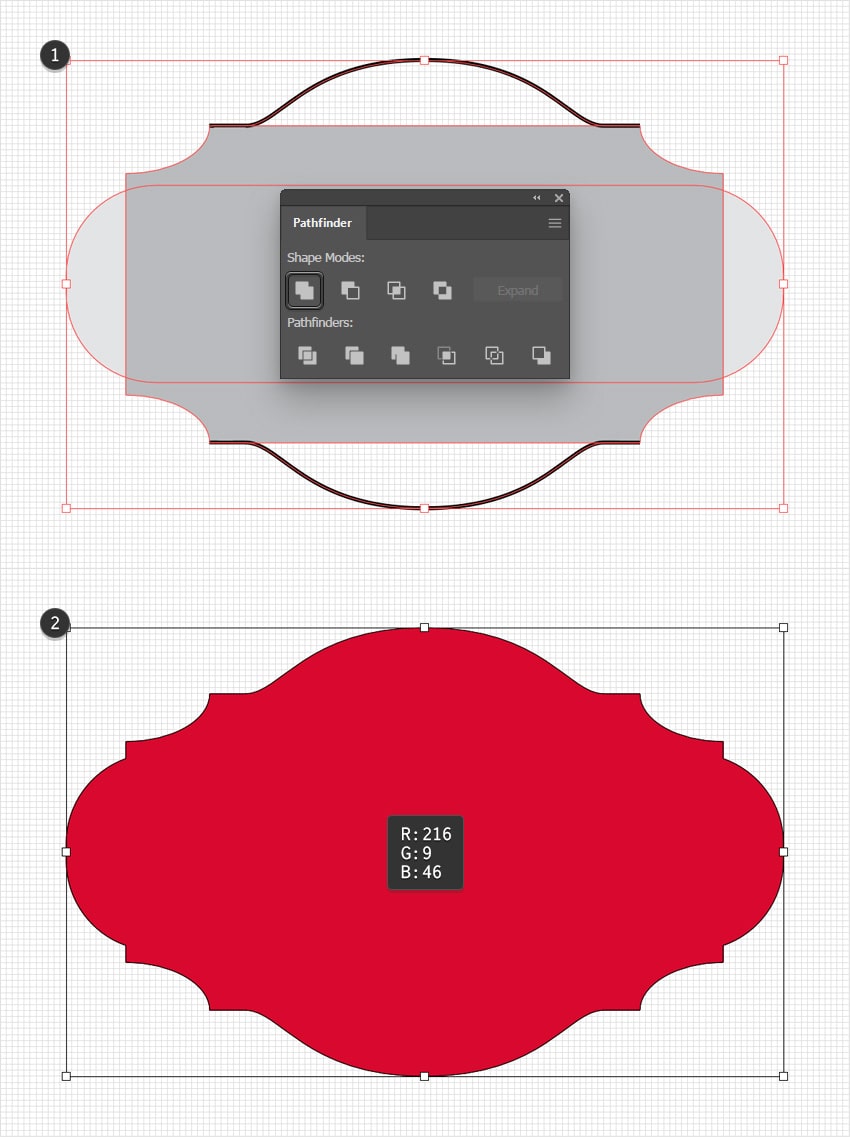
Step 7
Select all your shapes and merge them using the Unite button from the Pathfinder panel. Fill the resulting shape with R=216 G=9 B=46, and don't forget to remove the stroke color.

3. How to Add Light Bulbs to the Circus Sign
Step 1
Make sure that your red shape is selected, and go to Object > Path > Offset Path. Set the Offset to -12.5 px and click OK. Keep the resulting shape selected, and focus on the Control panel.
Remove the fill color, set the stroke color to R=249 G=216 B=165, and then click that "Stroke" text to open the Stroke fly-out panel. Increase the Weight to 9 px, click the Round Cap button, check the Dashed Line box, and then enter 0 px and 33 px in the first two dash and gap boxes. This will add a nice dotted line around your shape.


Step 2
Expand your dotted line by going to Object > Path > Outline Stroke. Click the Divide button from the Pathfinder panel to separate each shape from your newly created compound path, and then press Shift-Control-G to Ungroup the resulting group of shapes.


Step 3
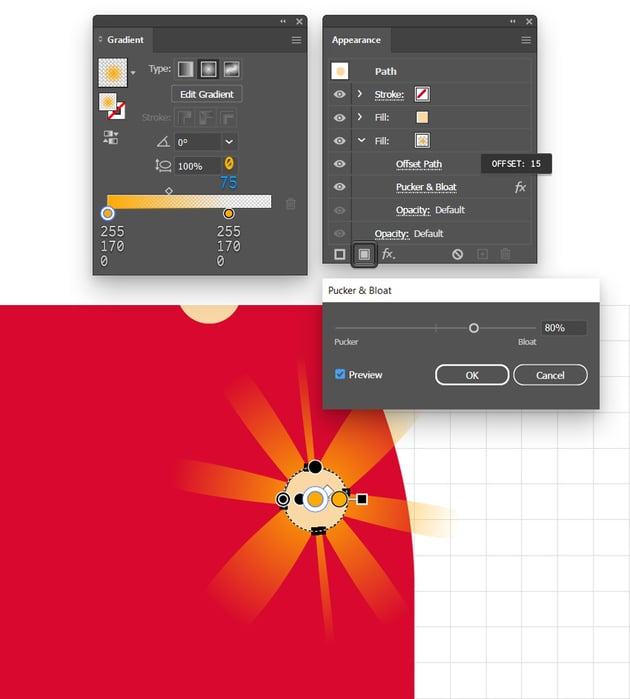
Select one of your dot shapes and focus on the Appearance panel (Window > Appearance). Use the Add New Fill button to add a second fill, select it, and move to the Gradient panel (Window > Gradient).
Click the Radial Gradient button to easily apply a radial gradient to your selected fill, and then focus on the gradient sliders. Select the left one and set its color to R=255 G=170 B=0, and then select the right one. Apply the same color, drag it to the left, set the Location to about 75%, and lower its Opacity to 0%.
Make sure that this gradient fill is still selected, and go to Effect > Path > Offset Path. Set the Offset to 15 px and click OK, and then go to Effect > Distort & Transform > Pucker & Bloat. Drag the slider to 80% and click OK.
Using the Gradient Tool (G), stretch the gradient outside the boundaries of your shape as shown below, and then return to the Appearance panel to drag the gradient fill below the one with the flat color.


Step 4
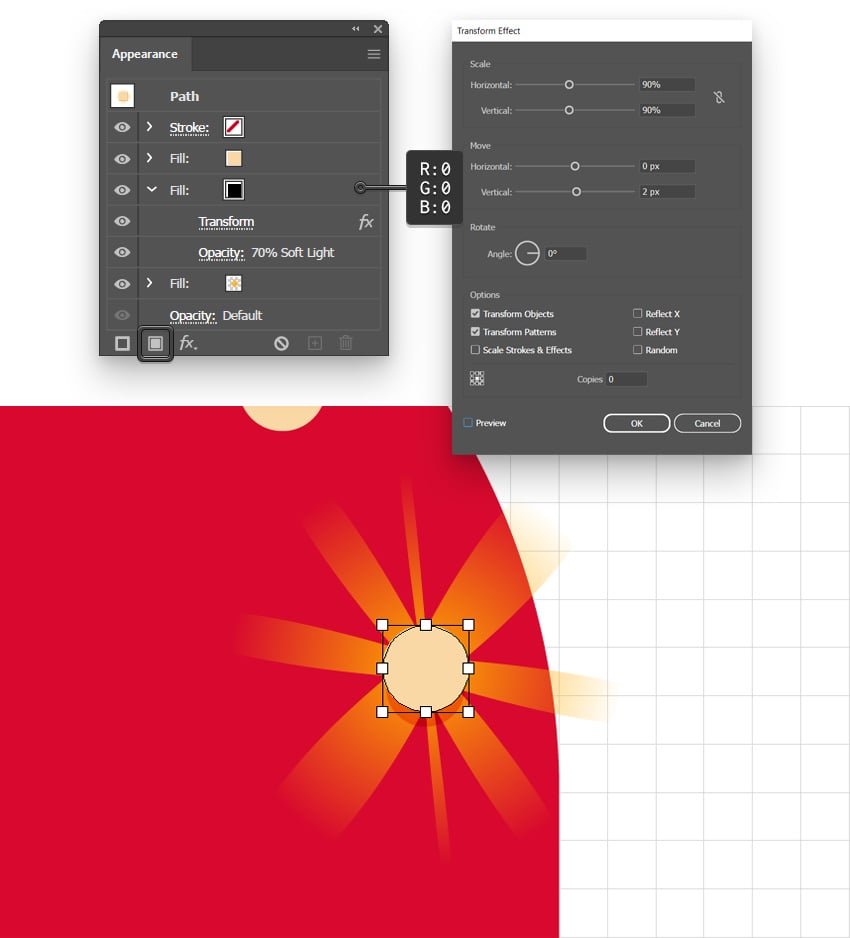
Make sure that your dot shape remains selected, and keep focusing on the Appearance panel. Add a new fill and drag it between the existing ones.
Make it black, lower its Opacity to 70%, change the Blending Mode to Soft Light, and then go to Effect > Distort & Transform > Transform. Set both Scale values to 90%, drag the Move-Vertical slider to 2 px, and then click OK.


Step 5
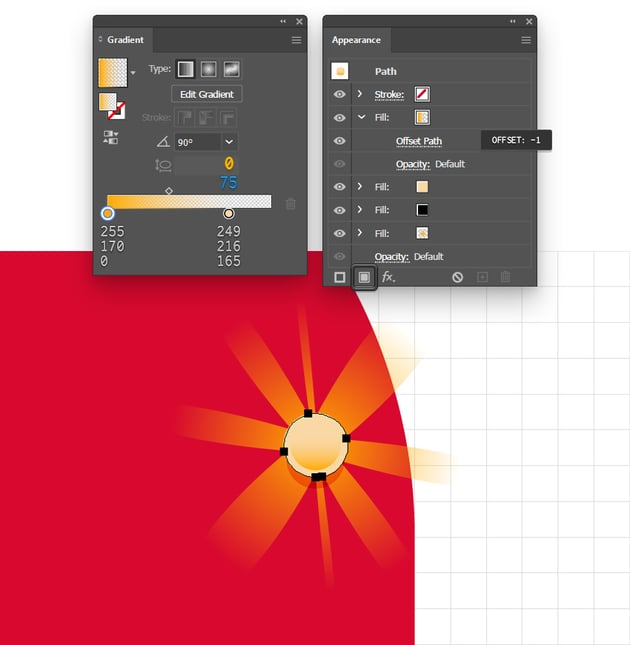
Keep focusing on your dot shape, add one last fill, and move it on top of the existing ones.
Select it to apply the linear gradient shown below, and then go to Effect > Path > Offset Path. Set the Offset to -1 px and click OK.


Step 6
Make sure that your dot is still selected, open the Graphic Styles panel (Window > Graphic Styles), and click the New Graphic Style button to save the Appearance attributes as a graphic style.
To quickly select the rest of your dot shapes, select just one and then go to Select > Same > Fill Color. Once selected, simply click your saved graphic style to instantly apply the same Appearance settings that we used for the dot.


4. How to Style the Circus Sign
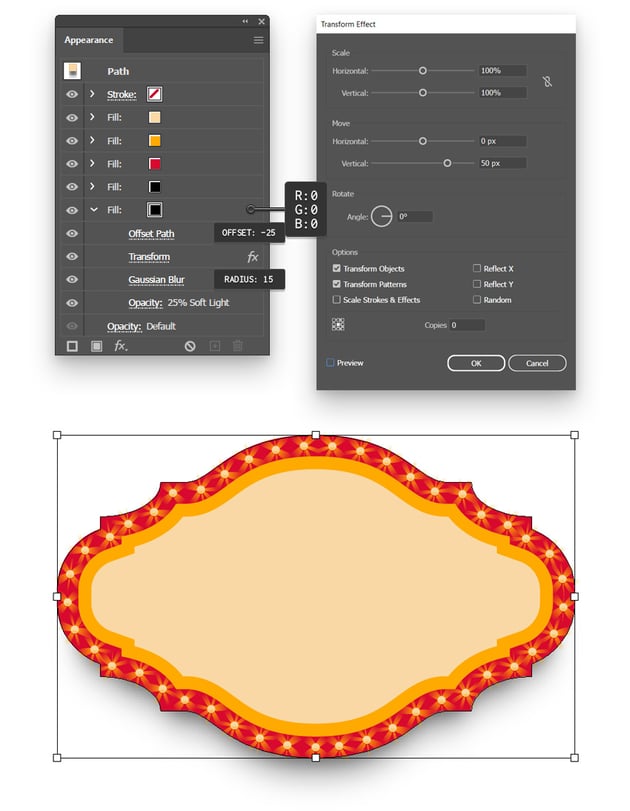
Step 1
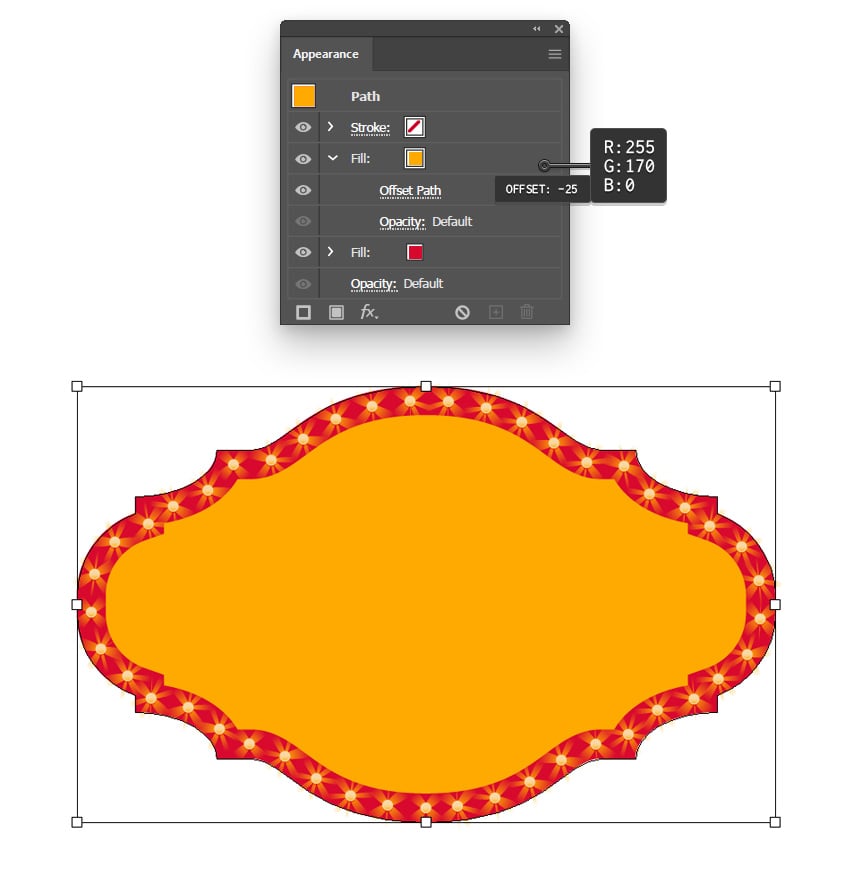
Select your red shape and add a second fill. Select it and set the color to R=255 G=170 B=0, and then go to Effect > Path > Offset Path. Set the Offset to -25 px and click OK.


Step 2
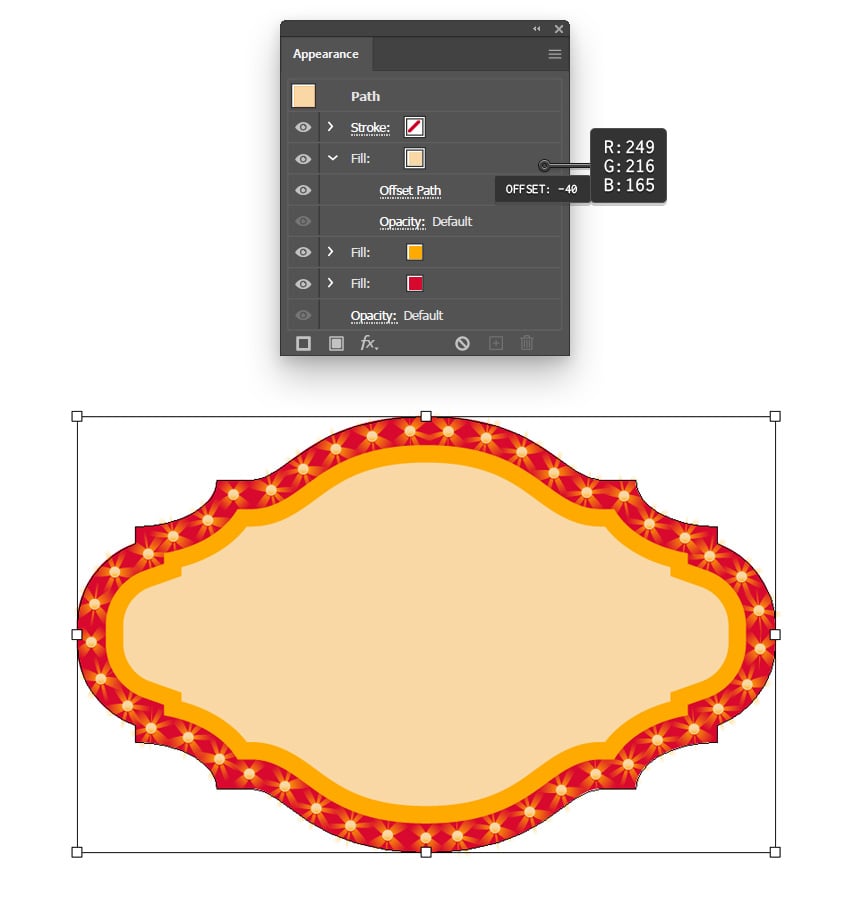
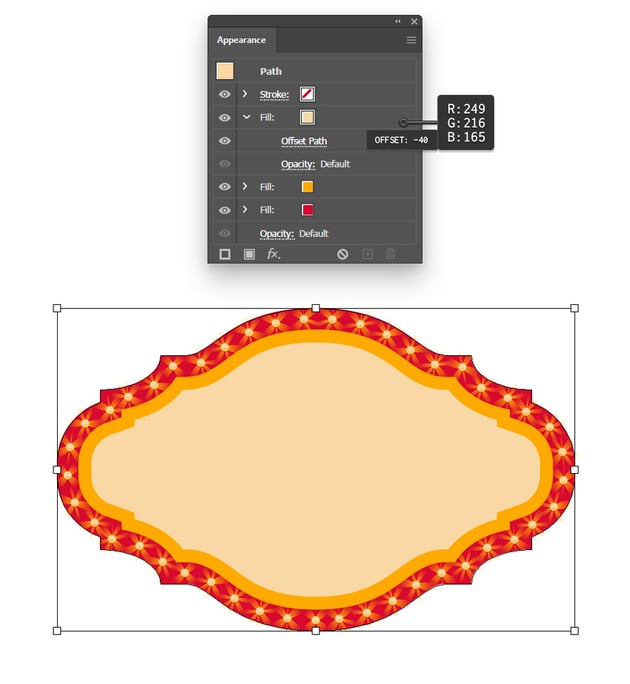
Make sure that your circus sign shape is still selected and add a third fill on top of the existing ones.
Select it and set the color to R=249 G=216 B=165, and then go to Effect > Path > Offset Path. Set the Offset to -40 px and click OK.

Step 3
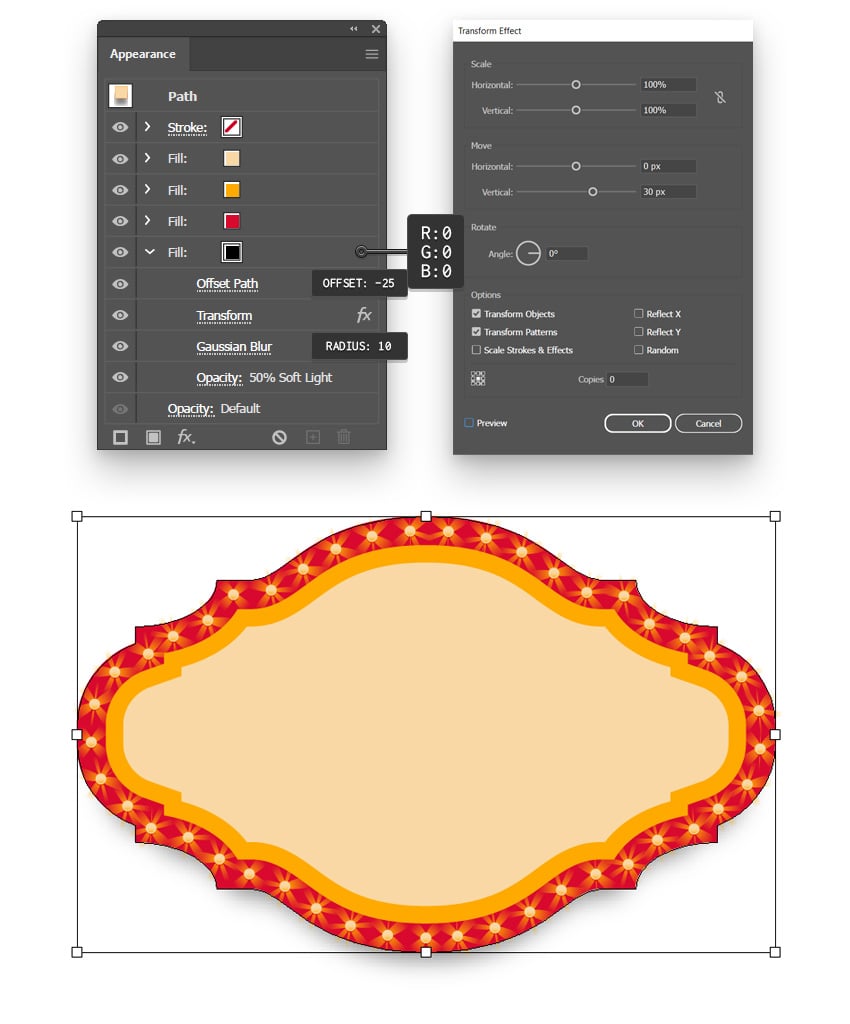
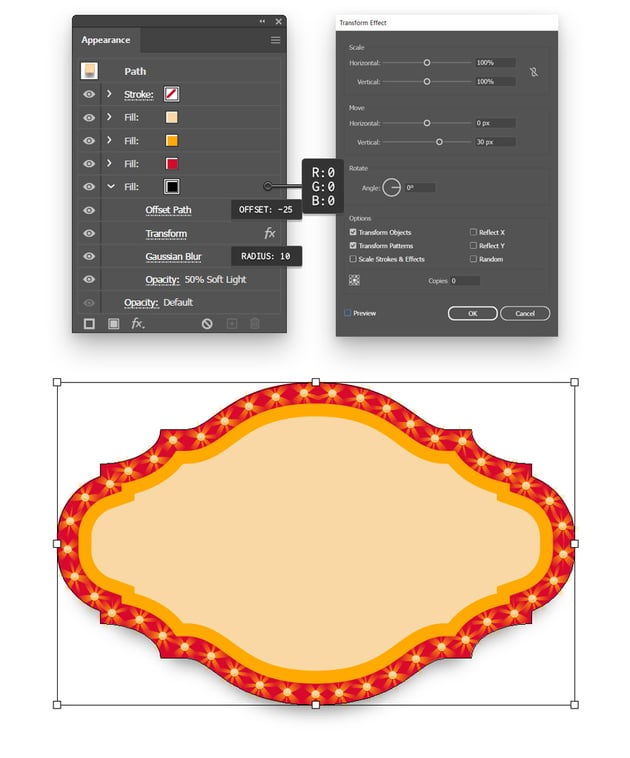
Make sure that your circus sign shape is still selected, and add a fourth fill below the existing ones.
Select it, set the color to black (R=0 G=0 B=0), and then go to Effect > Path > Offset Path. Set the Offset to -25 px and click OK, and then go to Effect > Distort & Transform > Transform. Just drag that Move-Vertical slider to 30 px and click OK, and then go to Effect > Blur > Gaussian Blur. Set the Radius to 10 px and click OK.
Return to the Appearance panel to lower the Opacity of your black fill to 50% and also change the Blending Mode to Soft Light.

Step 4
Make sure that your circus sign shape is still selected, and add a fifth fill below the existing ones.
Select it, set the color to black (R=0 G=0 B=0), and then go to Effect > Path > Offset Path. Set the Offset to -25 px and click OK, and then go to Effect > Distort & Transform > Transform. This time, drag that Move-Vertical slider to 50 px and click OK, and then go to Effect > Blur > Gaussian Blur. Set the Radius to 15 px and click OK.
Return to the Appearance panel to lower the Opacity of this black fill to 25% and also change the Blending Mode to Soft Light.


Step 5
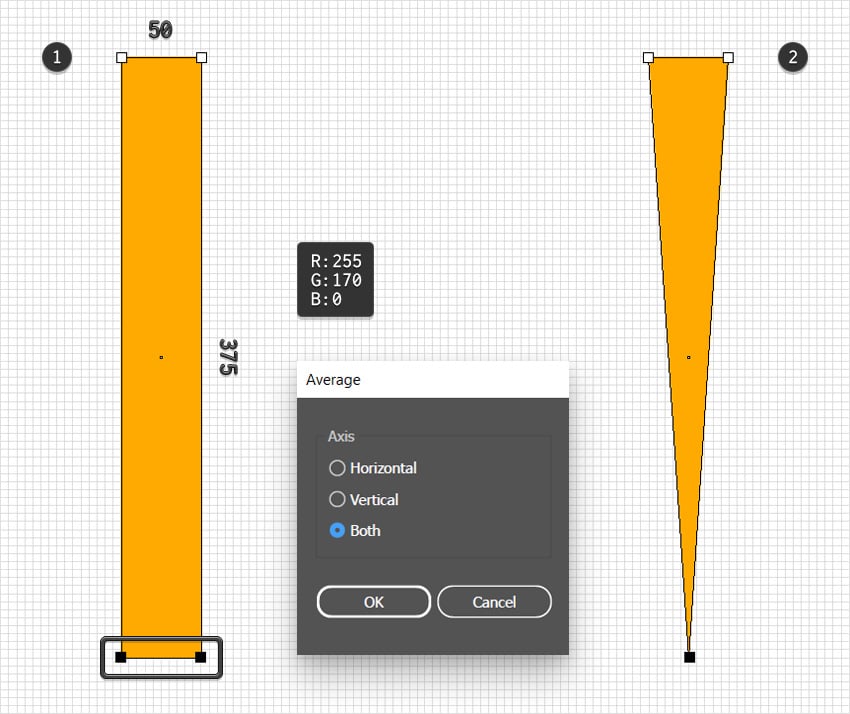
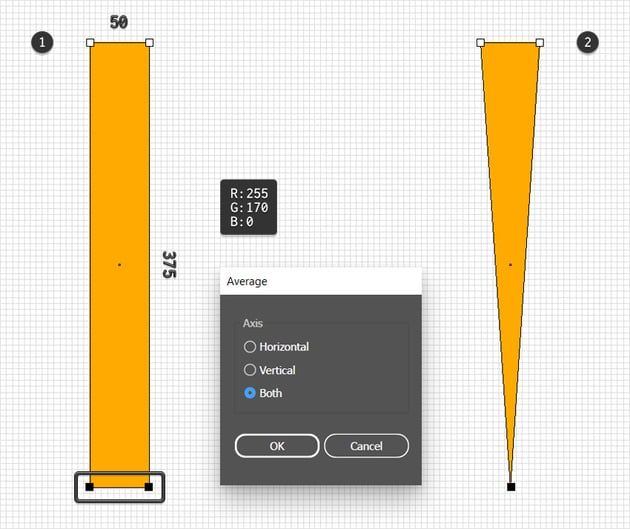
Pick the Rectangle Tool (M), use it to create a 50 x 375 px shape, and fill it with R=255 G=170 B=0.
Using the Direct Selection Tool (A), select the bottom anchor points and go to Object > Path > Average (Alt-Control-J). Check that Both box and click OK to easily turn your rectangle into a triangle.

Step 6
Make sure that your triangle is selected, and go to Effect > Distort & Transform > Transform.
Check that Reflect Y box, set the number of Copies to 1, drag the Move-Vertical slider to 375, and click OK. Then return to Effect > Distort & Transform > Transform.
This time, you need to set the Angle to 15 degrees and increase the number of Copies to 11. Click OK, and you should have a nice starburst effect.
Using the Selection Tool (V), simply drag it inside the Swatches panel (Window > Swatches) to save it as a pattern.


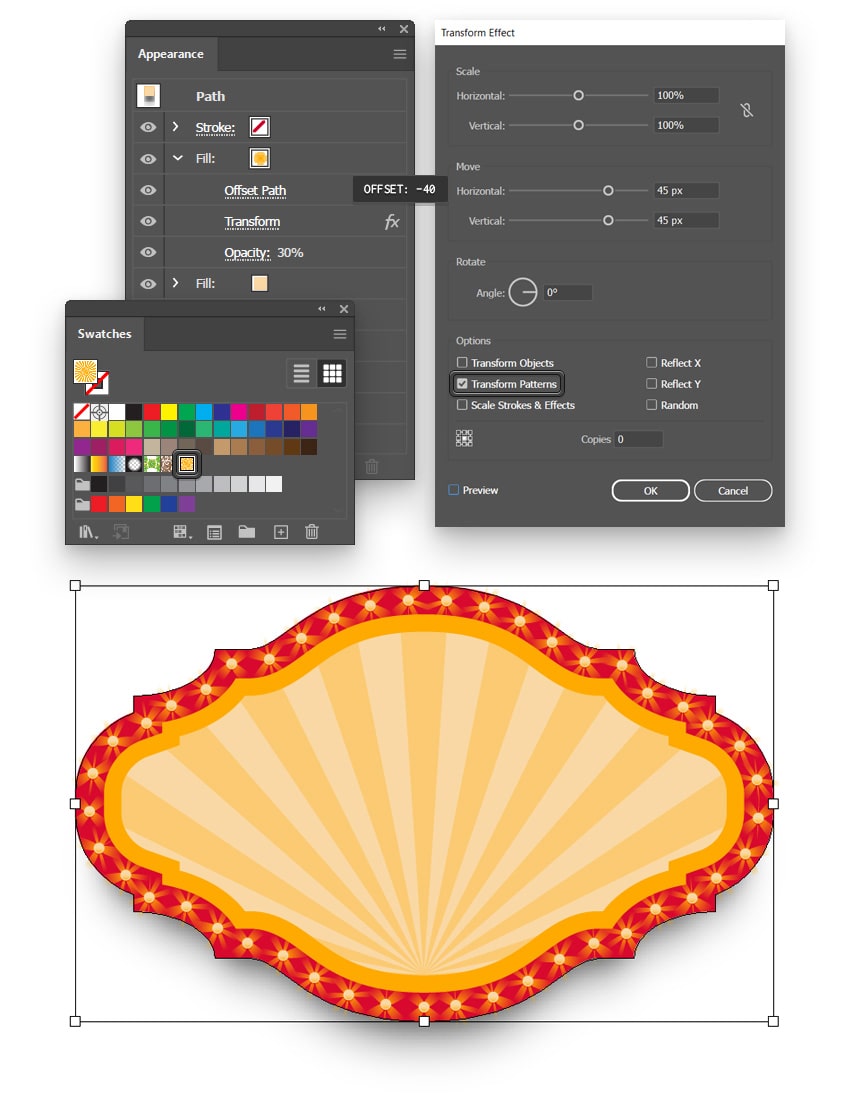
Step 7
Reselect your circus sign shape and add a new fill on top of the existing ones. Select it, apply your saved starburst pattern, lower its Opacity to 30%, and then go to Effect > Path > Offset Path. Set the Offset to -40 px and click OK, and then go to Effect > Distort & Transform > Transform.
Uncheck that Transform Objects box and keep the Transform Patterns box checked. This way, the Transform effect will affect the applied pattern. Also, drag both Move sliders to 45 px and click OK. This should nicely align the applied pattern with your circus sign shape.


Step 8
For the background, we'll use a simple rectangle. Using the Rectangle Tool (M), create a shape that covers your entire artboard. Fill it with R=40 G=35 B=100 and send it to the back (Shift-Control-[).


5. How to Create the Circus Text
Step 1
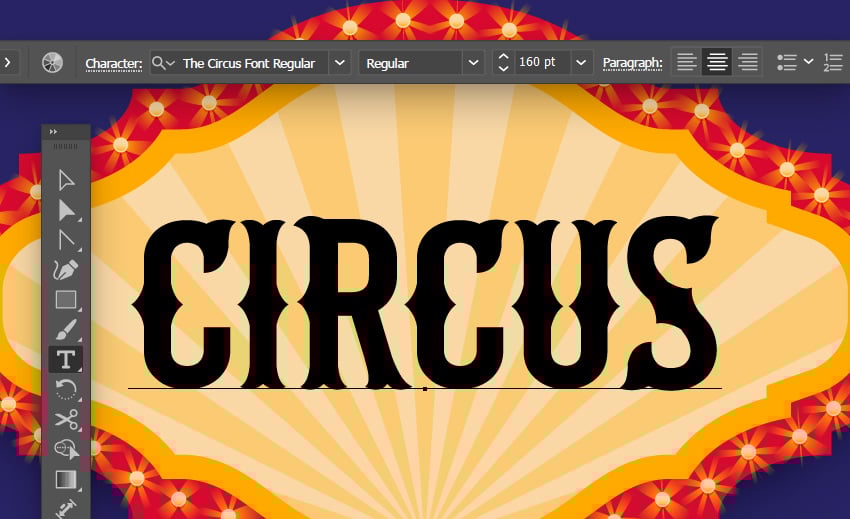
Pick the Type Tool (T) and focus on the Control panel to set the settings for the text that you're about to add.
Select the Circus font and set the Size to 160 pt, and then simply click on your artboard to type in the text.


Step 2
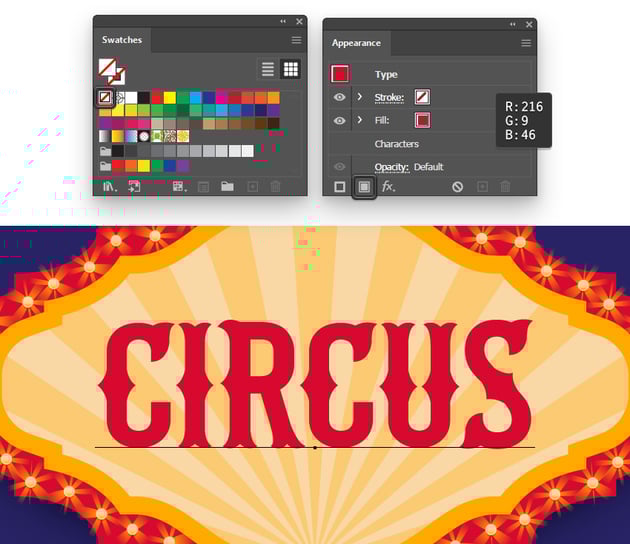
Make sure that your text remains selected, and remove the existing text color. This will make your text invisible.
Move to the Appearance panel and add a Fill to your selected text. Select it and set the color to R=216 G=9 B=46.


Step 3
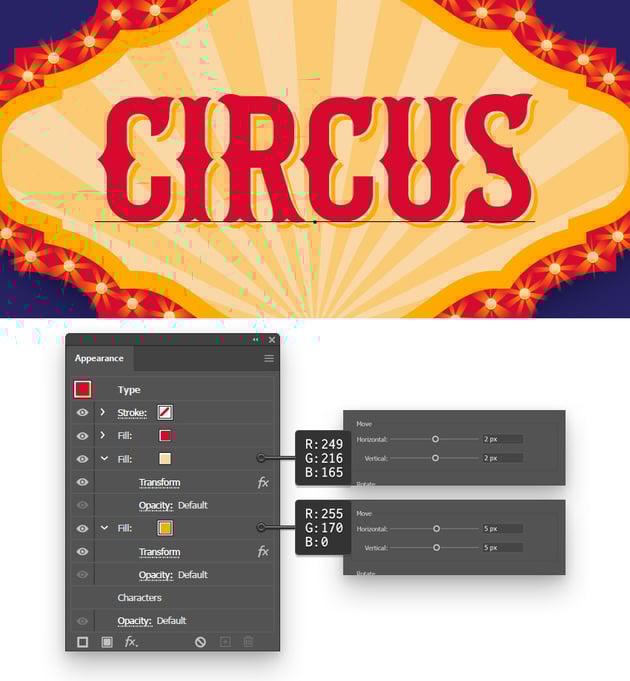
Keep focusing on the Appearance panel and add a second fill to your text. Move it below the existing one, set the color to R=249 G=216 B=165, and then go to Effect > Distort & Transform > Transform. Use the Move sliders to move your selected fill 2 px down and 2 px to the right.
Add a third fill to your text and, again, move it below the existing ones. Set the color to R=255 G=170 B=0 and go to Effect > Distort & Transform > Transform. This time, use the Move sliders to move your selected fill 5 px down and 5 px to the right.


Step 4
Keep focusing on the Appearance panel and add one last fill to your text. Place it on top of the existing ones and set its color to R=249 G=216 B=165, and then go to Effect > Path > Offset Path. Set the Offset to -10px, select Round from the Joins menu, and then click OK.


Step 5
Select the Star Tool from your toolbar and simply click on your artboard to open the Star window.
Enter the settings shown below and click OK to create the first star. Fill it with R=216 G=9 B=46, duplicate it, and then place these two stars as shown below.


Step 6
Finally, drag this paper texture into your document. Scale it to cover the entire canvas, and then lower its Opacity to 80% and change the Blending Mode to Multiply.


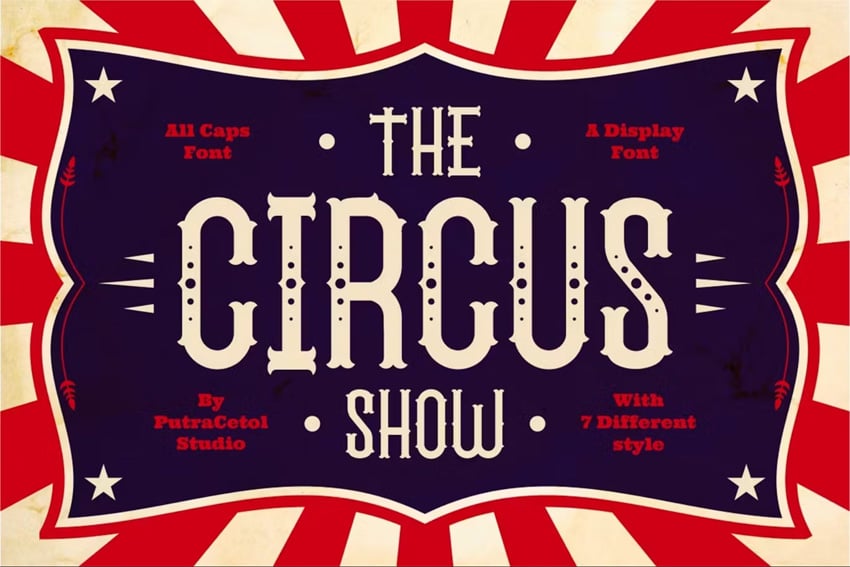
Congratulations! You're Done!
Here is how your vintage circus sign should look. I hope you've enjoyed this tutorial and can apply these techniques in your future projects.
Feel free to adjust the final circus text and make it your own. You can find some great sources of inspiration at Envato Elements, with interesting solutions to improve your vintage circus signs.


Popular Assets From Envato Elements
Envato Elements is an excellent resource for circus letter fonts. Here's a short list of some of the most popular circus fonts and circus signs that you can find.
Acrobats Circus Font (OTF, TTF, WOFF)
Keep it smooth and simple with the Acrobats circus font. This could be the perfect solution if you're looking for a simple yet elegant circus letters font.


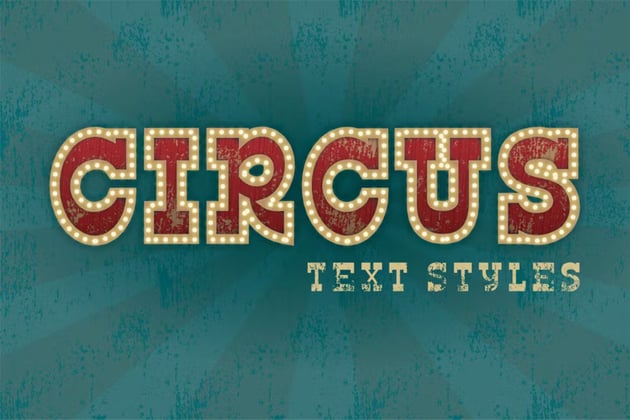
Circus Show Font (OTF, TTF, WOFF)
Whether used for posters, invitations, or signage, this circus show font instantly captures the spirit of the circus in every character. It comes in seven styles: Regular, Dot, Centerdot, Line, Needle, Rough, and Outline.


Circus Text Styles (EPS)
Avoid the hassle of learning how to make circus text in Illustrator, and use one of these colorful text styles instead.


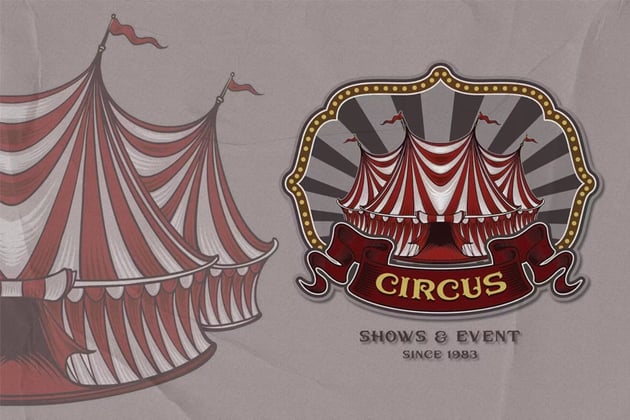
Circus Emblem (AI, EPS, JPG, PNG, SVG)
If you're looking for something more complex, this circus tent emblem might be the perfect choice. The design is 100% vector, so you don't have to worry if you need to make it larger.

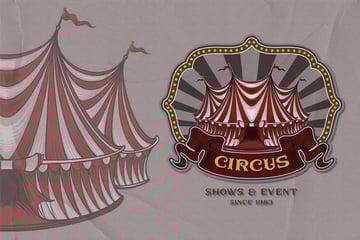
Circus Illustration Set (AI, EPS)
Go vintage with this superb set of circus illustrations. These 100% vector designs can be easily resized without losing quality.


Want to Learn More?
We have loads of tutorials on Envato Tuts+, from beginner to intermediate level. Take a look!

 How to Design a Set of Circus Icons in Adobe Illustrator


 How to Design a Vintage Circular Logo in Illustrator


 How to Design a Vintage Travel Poster in Adobe Illustrator and Photoshop


 How to Design a Wes Anderson Movie Poster


 How to Create a Vintage Type Postcard

 How to Create a Vintage Cartoon Aesthetic Character

 How to Create a Vintage Brush to Add Texture in Illustrator


 How to Create a Grunge, Vintage Text Effect in Adobe Illustrator

 How to Create a Vintage Movie Text Effect in Adobe InDesign

 How to Create a Retro Long Shadow Text Effect in Adobe Illustrator

 By
By


