


Transport yourself to the whimsical world of Wes Anderson with this The French Dispatch movie poster tutorial. In this beginner Adobe InDesign and Photoshop poster tutorial, you’ll learn how to recreate The French Dispatch artwork for the movie poster, using signage-style Wes Anderson fonts, newspaper-style photos, and vintage textures.
We’ll look at how to recreate the quirky vintage feel of The French Dispatch artwork by using spotlit typography and applying film grain effects to achieve an authentic collage look. Read on to discover more about the distinctive character of the Wes Anderson style and learn how to create your own version of The French Dispatch movie poster.


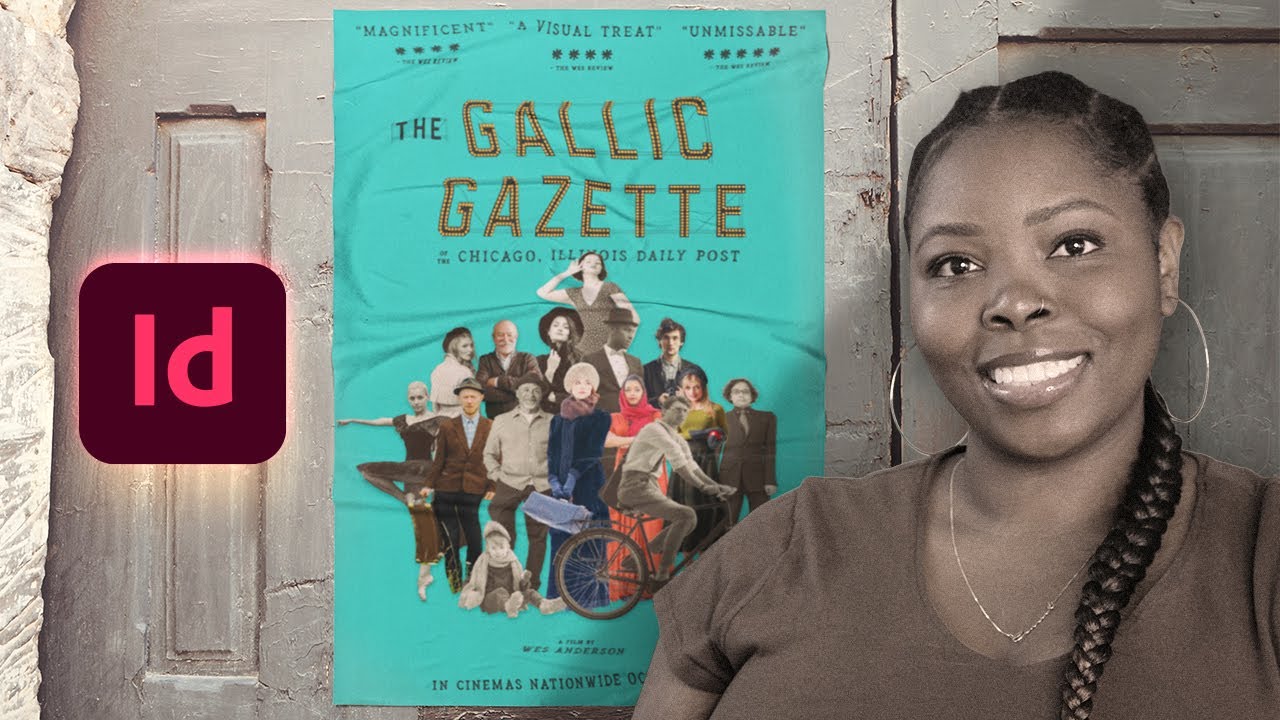
Do you prefer video tutorials? Then you're in luck! Watch this new video by Ashlee Harrell from the Envato Tuts+ YouTube channel to learn how to create a Wes Anderson movie poster step by step:
Jump to content in this section:
- What Is the Wes Anderson Style?
- What You’ll Need to Create The French Dispatch Movie Poster
- How to Create The French Dispatch Movie Poster
- How to Prepare The French Dispatch Poster in Adobe InDesign
- How to Create Wes Anderson Typography on The French Dispatch Poster Design
- How to Prepare Collage Photos for Your Wes Anderson Poster
- How to Create a Photo Collage on Your Wes Anderson Poster
- How to Bring Vintage Texture into The French Dispatch Artwork
- How to Export Your Wes Anderson Poster for Printing
- How to Adapt Your Poster Design as a Character Poster
- Conclusion: Your Finished Wes Anderson Movie Poster
What Is the Wes Anderson Style?
The American movie director Wes Anderson is known for his meticulous eye for visual detail, employing a dedicated team of graphic designers for each movie and commonly turning to vintage design styles for inspiration. Pastel colors, symmetry, and retro typography all contribute to the distinctive Wes Anderson style, best seen in the movie poster designs for The Grand Budapest Hotel, Moonrise Kingdom, and The French Dispatch, which we’ll be paying tribute to here.

 How to Make a Pastel Effect in Photoshop (Aesthetic Edit Action)


 How to Mirror in Procreate for Symmetrical Drawings

The typography he uses in his movie posters is certainly one of the most recognizable elements of the Wes Anderson style, with typewriter fonts, signage typefaces, and vintage scripts being among some of his preferred typestyles.
To recreate the look of his distinctive typography, you can use Wes Anderson fonts as impactful headlines to give your Wes Anderson movie posters instant character. What font does Wes Anderson use? He always uses fonts with a vintage style, suited to the period of the movie, such as 1930s sans serifs or 1950s scripts. Try the typefaces below to achieve an authentic Wes Anderson font style.
Union Made Font (OTF, TTF, WOFF, WOFF2)


Union Made is inspired by retro signs and vintage billboards. Try this signage-inspired typeface on Wes Anderson movie posters to give your type some authentic vintage character.
Padger Vintage Sans Display (OTF, TTF)


For cute and quirky style, Padger Vintage Sans Display will help you to recreate the childlike charm of the Wes Anderson style, used in movies like Fantastic Mr. Fox.
What You’ll Need to Create The French Dispatch Movie Poster
In this tutorial, you’ll learn how to create a tribute design to The French Dispatch artwork, which features Wes Anderson fonts, 1960s-inspired colors, and an on-trend photo collage effect. To design your Wes Anderson poster, you will need the following fonts and textures:
To create the collage photo part of the Wes Anderson poster, you can either use a selection of stock images or ask your friends to dress up in vintage clothes! You can also download the exact images used in the design from this Envato Elements collection.
You will also need access to Adobe InDesign and Adobe Photoshop. Once you have the fonts installed onto your computer and the images saved to an easy-to-find folder, you’re ready to get started!
How to Create The French Dispatch Movie Poster
We’ll begin by setting up the Wes Anderson movie poster in Adobe InDesign, before moving to Photoshop to prepare the collage photos.
1. How to Prepare The French Dispatch Poster in Adobe InDesign
Step 1
Open InDesign and go to File > New > Document. Click on Print at the top of the window that opens.
To create the poster at a traditional One Sheet movie poster size, set the Width to 27 in and Height to 40 in.


Set the Margins to 1 in and add a Bleed of 0.25 in, before clicking Create.


Step 2
Go to Window > Layers and click on Layer 1, renaming it Background. Use the Create new layer icon at the bottom of the panel to create a sequence of five more layers above this: Signage backs, Type behind, Lights, Collage, and Paper Texture.
Lock all layers except Background, which we’ll work on first.


Then go to the Swatches panel (Window > Color > Swatches) and create three new CMYK swatches:
- Blue: C=67 M=0 Y=32 K=0
- Yellow: C=0 M=43 Y=84 K=0
- Off-Black: C=72 M=62 Y=61 K=76


Step 3
On the Background layer, use the Rectangle Tool (M) to create a shape across the whole page, setting the Fill to Blue.


2. How to Create Wes Anderson Typography on The French Dispatch Poster Design
Step 1
Working on the Type behind layer, use the Type Tool (T) to create a large text frame towards the top-center of the poster artwork. Type in the first main part of the movie title, setting the Font to Union Made, around 350 pt in size. Adjust the Font Color to Off Black.
Copy and Paste the text frame to build up the other sections of the headline, reducing the Font Size for ‘THE’.


Step 2
Add a subheading below, set in Arber Vintage Extended, around size 80 pt.
Copy and Paste, moving this to the bottom of the poster. Here, you can add the name of the director and the movie release date.


Paste more text frames along the top of the poster, editing to read reviews of the movie. You can create stars for the reviews by going to Window > Type & Tables > Glyphs and inserting an asterisk glyph from the Arber Vintage Extended font selection.


Step 3
Lock the Type behind layer and unlock the Lights layer.
To give the spotlights a hand-drawn quality, we can lift a glyph from the Arber Vintage Extended font.
Create a new text frame and set the Font to Arber Vintage Extended. Then double-click on the bullet icon in the Glyphs panel to insert it into the frame.


Go to Text > Create Outlines to vectorize the glyph.


With the vector selected, switch the Fill to Yellow, before going to Object > Paths > Release Compound Path.


Step 4
You now have a single ‘spotlight’ you can use to embellish your headline typography.
Working on the Lights layer, continuously Copy and Paste spotlights around the inside perimeter of each title letter.


When you’ve completed one letter, you can Copy parts of this to make it quicker to create the same effect on the other title letters.


Step 5
To complete the lit-up signage effect, we will need to give the signs some ‘backs’. Unlock the Signage backs layer.
Use the Line Tool (/) to create double-lined bars behind each edge of each word, setting the Stroke Color to Off Black and Stroke Width to around 1 pt. It might be easier to do this with the Type behind layer temporarily switched off, so you can see a little better.


Use the first pair of lines to frame the whole word, and set a single diagonal line at each end as a sign support.


Copy and Paste the first signage back, using it to create one for the second title word. Remember to create a smaller signage back for ‘THE’ also.


3. How to Prepare Collage Photos for Your Wes Anderson Poster
Step 1
Save your InDesign poster and minimize the window—we’ll come back to it soon. Open one of your unedited photos in Photoshop. It’s a good idea to choose photos that feature subjects in vintage clothes and have contrasting or empty backgrounds which can be easily removed.
Use the Magic Wand Tool (W) or similar to select the figure in the photo. You can also use the Select Subject button in the top Control panel to quickly select the subject.


Once selected, Copy and Paste the selection onto a new layer, switching off the visibility of the Background layer.


Then go to File > Export > Quick Export as PNG to save your image as a transparent background PNG.


Step 2
If you have some photos that look a little too modern in style, we can apply sepia and grain effects to ‘age’ them before using them on The French Dispatch poster.
As before, open an image in Photoshop and Select Subject, moving it onto a new layer. Create a new Adjustment > Channel Mixer layer.


Check Monochrome to switch the image to black and white.


Then add a Hue/Saturation adjustment layer, choosing Sepia from the Preset options. Reduce the Saturation level to around 11.


With the image layer selected, go to Noise > Add Noise.
Set the Amount to about 19% and click OK. Then you can save your image as a PNG, as before.


4. How to Create a Photo Collage on Your Wes Anderson Poster
Step 1
Work through the other images, removing the backgrounds of all of them and setting around half of them to black and white with a grainy noise texture. Once all are prepared as PNG images, return to your InDesign document.
Working on the Collage layer, use the Rectangle Frame Tool (F) to create an image frame centrally on the page. File > Place, choosing your first and central character for the collage.


Step 2
Create more image frames for additional characters, using Right-Click > Send to Back to send certain characters behind others.


Step 3
Aim to create a rough pyramid shape, leading the eye up towards the movie title. If any photos don’t include the full body of the subject, position these towards the back of the collage.


When you’ve finished crafting the collage, Right-Click > Group.


Then go to Object > Effects > Drop Shadow. Set the Mode to Multiply and adjust the Effect Color to Blue. Bring the Opacity down to 75%, the Distance to 0.125 in, Size to 0.18 in, Spread to 5%, and Noise to 10%. Click OK.


5. How to Bring Vintage Texture into The French Dispatch Artwork
Step 1
Unlock the top Paper Texture layer.
Create an image frame across the whole poster using the Rectangle Frame Tool (F). File > Place and choose one of the paler paper textures from the vintage paper texture bundle.


With the image frame selected go to Object > Effects > Transparency. Set the Mode to Multiply and Opacity to 75%. Click OK.


Step 2
Create a second image frame, this time File > Place one of the film grain images from the film grain texture bundle.


Go to Object > Effects > Transparency. Set the Mode to Screen and Opacity to 22%. Click OK.


The combination of these two textures will bring a beautiful vintage texture to the design.


6. How to Export Your Wes Anderson Poster for Printing
Step 1
Your French Dispatch poster is finished, and all that’s left to do is export it ready for printing.
Go to File > Export and choose Adobe PDF (Print) from the Format options. Click Save. In the Export Adobe PDF window that opens, choose Press Quality from the Preset options at the top.


Step 2
Click on Marks and Bleeds in the window’s left-hand menu, and check both All Printer’s Marks and Use Document Bleed Settings. Click Export to create a PDF version of your poster that can be sent off for printing. Great job!


7. How to Adapt Your Poster Design as a Character Poster
It’s really quick and easy to adapt the Wes Anderson movie poster you’ve created into a character poster. If you’d like to create a character version of the design, simply follow the steps below.
Step 1
The first thing to do is prepare an architectural collage backdrop for your character, which is a common trait of Wes Anderson poster designs.
Open this facade photo in Photoshop, and choose Select Subject to isolate the building from its background. Paste the building onto a new layer.


Step 2
As we did earlier, use a Channel Mixer adjustment layer to switch the image to Monochrome.


Then use a Photo Filter adjustment to add a moderate Sepia tone to the image. Save the image as a transparent background PNG.


Step 3
Return to the InDesign poster document, and create a duplicate of the original poster by dragging Page 1 onto the Create new page icon at the bottom of the Pages panel.
Working on this duplicate page, first remove the multi-figure collage from the design, and then unlock the Background layer.
Create a new CMYK swatch, C=0 M=32 Y=13 K=0, and adjust the color of the background to this pastel pink. Drag the top and side edges of the pink rectangle down to create a border effect, as shown.


Step 4
Create a new layer, Building, above the Background layer, and File > Place the PNG image of the building onto this layer.


Copy one of the photo subjects from the collage on Page 1 of your InDesign document, and Paste this onto the character poster page, enlarging it to create a much larger central headshot.


Step 5
Move the bottom lines of text from the Text behind layer to a new Type in front layer, which should sit below the top Paper Texture layer. Adjust the Font Color of these to contrast sufficiently against the photo.


You can also adjust the text at the top of the poster to read a character name.


With your character poster finished, you can also export this for print by following the steps in Section 6 of the tutorial, above.


Conclusion: Your Finished Wes Anderson Movie Poster
In this tutorial, you've learned how to create a French Dispatch movie poster, complete with a quirky Wes Anderson style, vintage elements, and Wes Anderson fonts. You can adapt your Wes Anderson movie posters as character posters, or why not share your finished design online on social media?
Now that you've created a design featuring The French Dispatch artwork, why not try to create different Wes Anderson movie posters? For more kooky Wes Anderson fonts to use on your designs, as well as creative poster design tips, look to the vintage-inspired typefaces and tutorials below:
Palmore Vintage Rounded Serif Font (TTF, OTF)


Palmore Vintage Sans is inspired by retro editorial typefaces and has a distinctive 1970s feel. Contrast with sepia-toned photography for dreamy poster designs.
Mighty Rooster Font (OTF, TTF, WOFF)


For rustic vintage poster designs, look no further than Mighty Rooster. A versatile display font with homely vintage character, this would be a great choice for creating Wes Anderson posters.
Vasque Vintage Display Font (OTF)


High-impact and perfect for creating retro movie titles, Vasque is extremely legible and eye-catching. Try this Wes Anderson font for titles or logo designs for all-American retro appeal.
Contender Vintage Typeface (OTF, TTF)


A more subtle vintage typeface that would suit subtitles or review text, Contender is inspired by woodcut and typewriter typestyles. Use it as a supporting font to display styles on vintage movie poster designs.
Monire Creative Vintage Font (OTF, TTF)


If you love the ethereal typestyles used on the artwork for Moonlight Kingdom, this flowing vintage display font will certainly appeal. Use Monire to create quirky titles on Wes Anderson movie posters and more.

 How to Make a Pastel Color Palette in Photoshop

 30 Stylish Vintage Fonts


 10 Best Classic Typewriter Fonts With Old (Vintage) Machine Styles

 How to Create a Vintage Photo Filter With Photoshop

 28 Best Movie Poster Templates


 How to Make a Movie Poster in Photoshop


 What Makes for the Best Movie Poster Font?


 Movie Poster Design 101: The Anatomy of a Movie Poster
 By
By


