
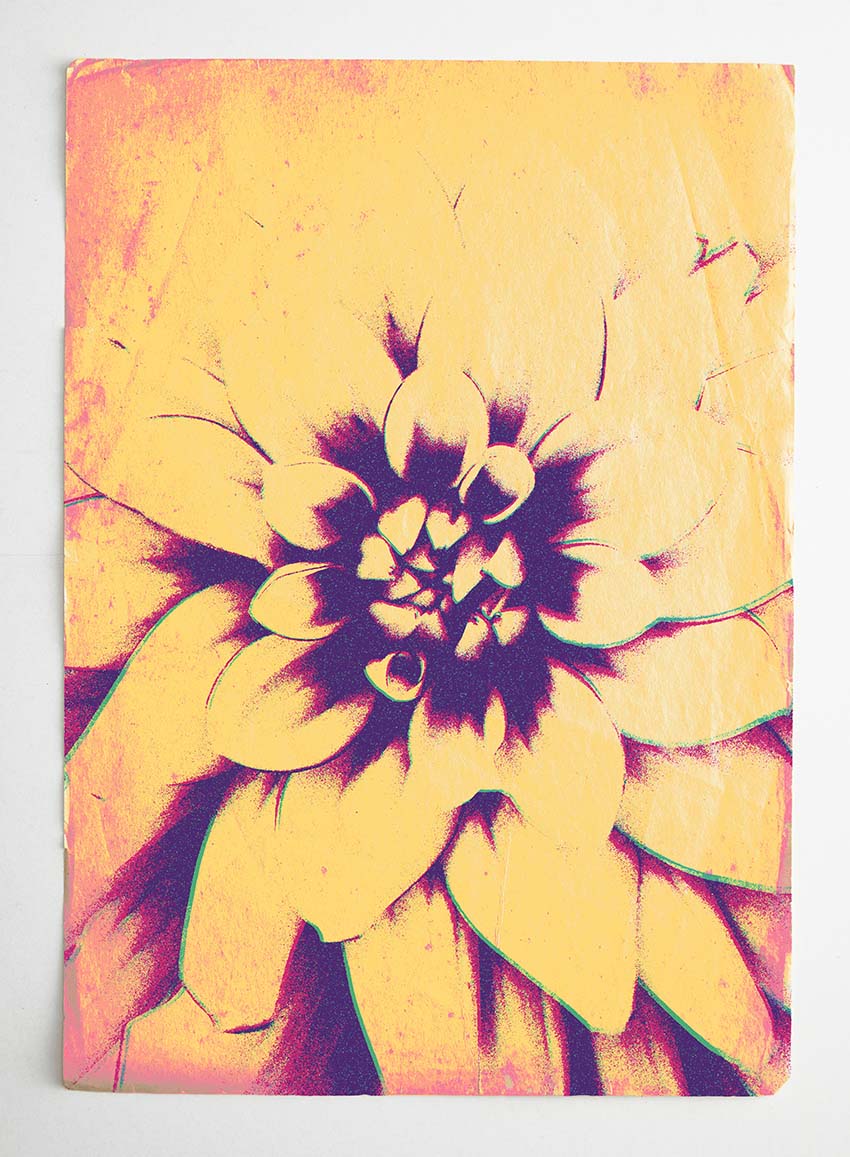


What is botanical gel printing? The toner that laser jet printers use to create black and white images holds ink differently than the paper itself. By spreading ink on a laser jet print, we can use the print to reproduce the image in any color ink we desire, with the added benefit of randomness and texture. Botanical gel printing is a fun and accessible project.
The inherent randomness creates an element of surprise in the final gel printing. At the same time, however, that randomness can be difficult to work with when designing a graphic for a specific look, and the ink can be messy. Replicating the botanical gel printing effect in Photoshop will allow us to get the same look in a controlled and replicable manner.
Jump to content in this section:
- How to Set Up the Paper Texture
- How to Add the Flower Image
- How to Add Filters to the Flower
- How to Dial in the Filter Settings
- How to Set the Blend Mode
- How to Control Color With Adjustments
- How to Create Multiple Gel Prints
- How to Add Variation to the Second Gel Print
- How to Adjust the Texture of the Second Gel Print
- How to Add a Base Coat
- How to Create Imperfections in the Base Coat
- How to Add a Second Base Coat
- How to Finalize the Gel Print
1. What You'll Need
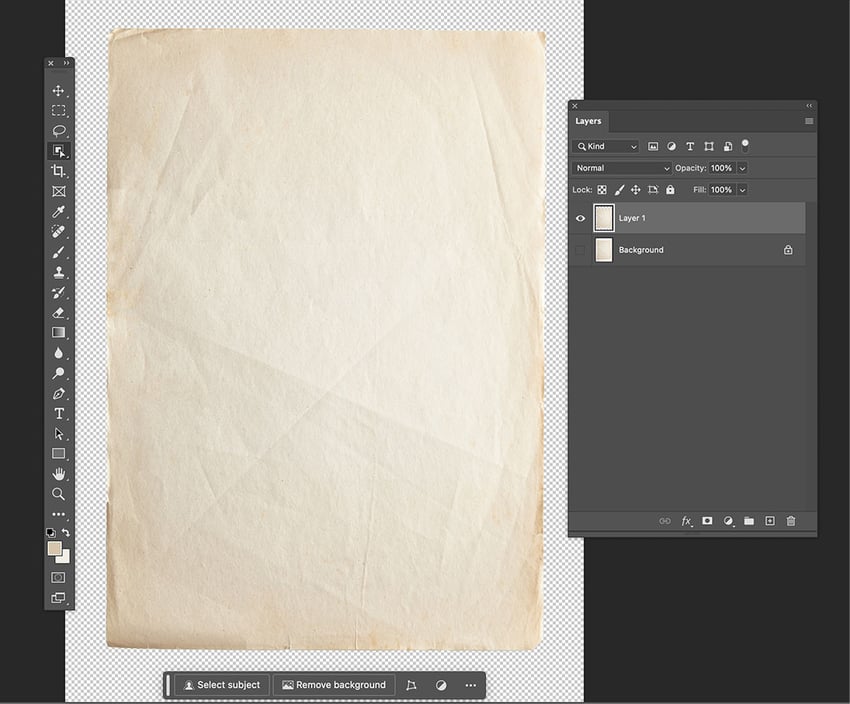
You'll need some assets to work with, specifically an image of a flower or flower pattern that you want to transfer, and a paper texture to simulate the paper you would be transferring ink onto. If you'd like to use the same assets I'm using in the tutorial, you can pick them up on Envato Elements.
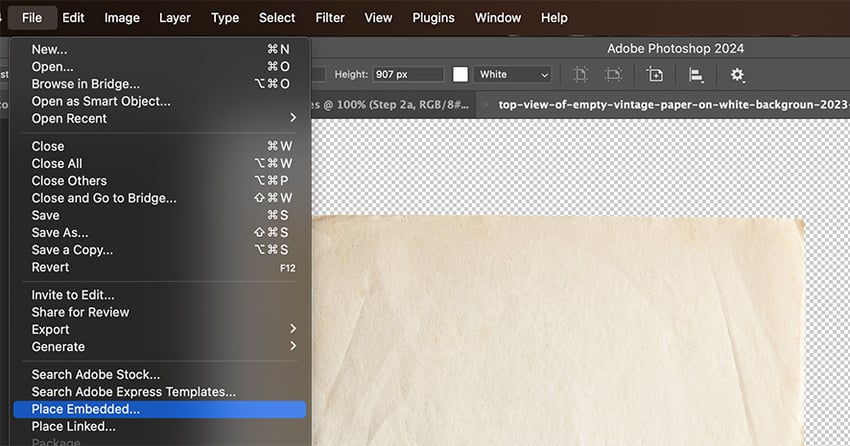
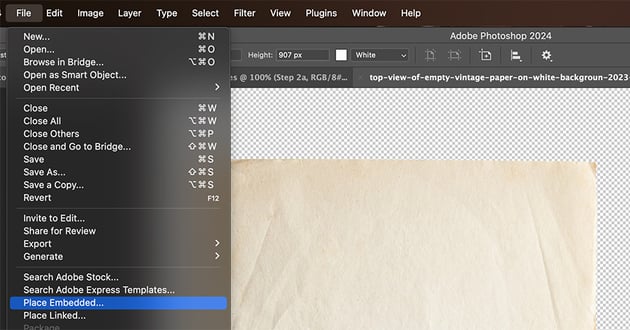
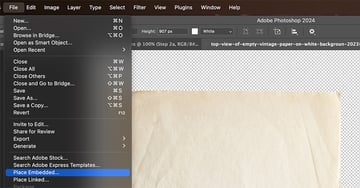
Open the paper texture in Photoshop, and then use File > Place Embedded to bring in the flower image.
2. How to Set Up the Paper Texture
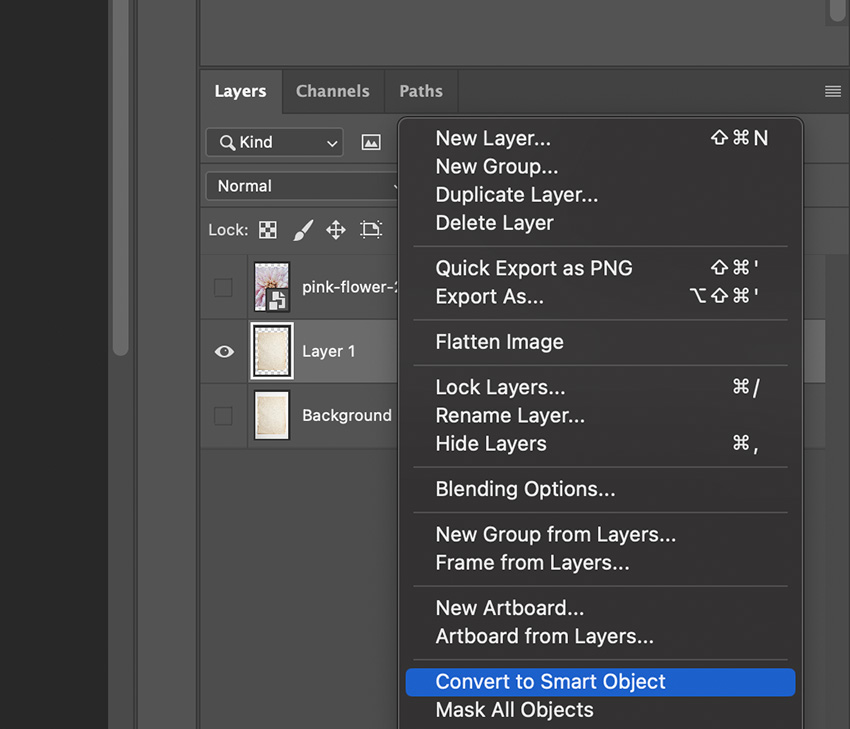
The core of botanical gel printing is the paper. Creases, folds, and the tooth of the paper itself create a lot of the randomness, and we can replicate that in Photoshop with a good paper texture. Select the paper with the Object Selection Tool and duplicate the paper texture layer with Command-J so that you can clip the flower image to the paper. Go ahead and convert the duplicated paper texture layer to a Smart Object as well.

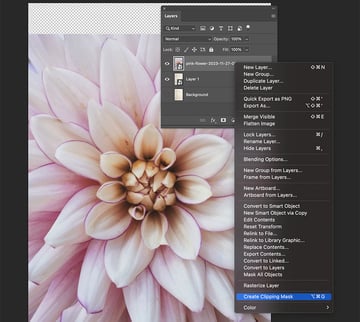
3. How to Add the Flower Image
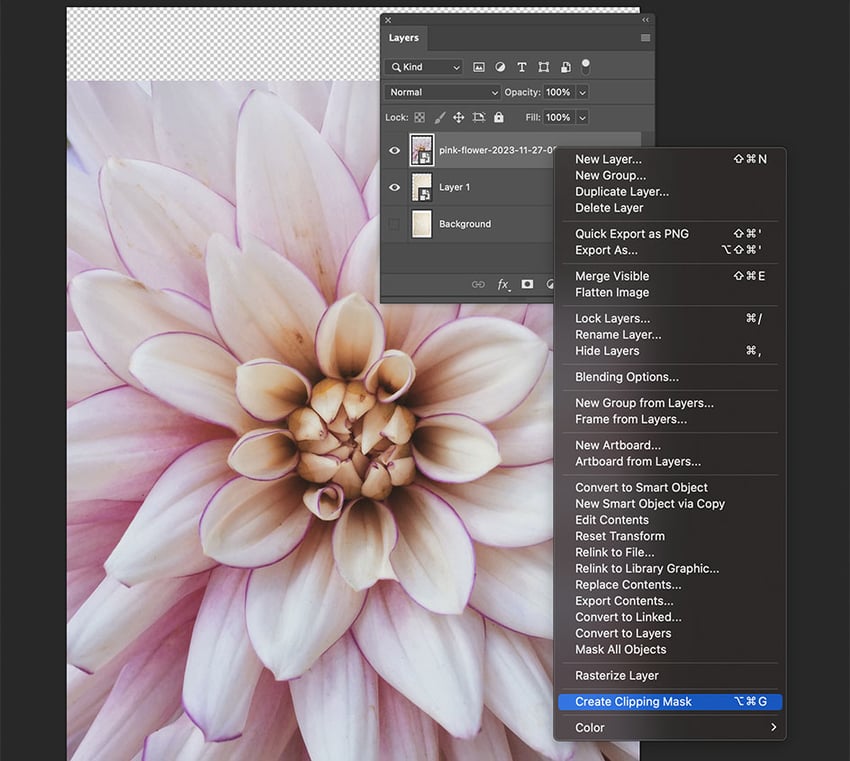
The botanical element in botanical gel printing will come from this flower image. The flower layer should be a smart object automatically, but if it isn’t, just right-click the layer and convert it to a smart object. Right-click again and Create Clipping Mask so that it clips to the duplicated paper texture we created in step 2.


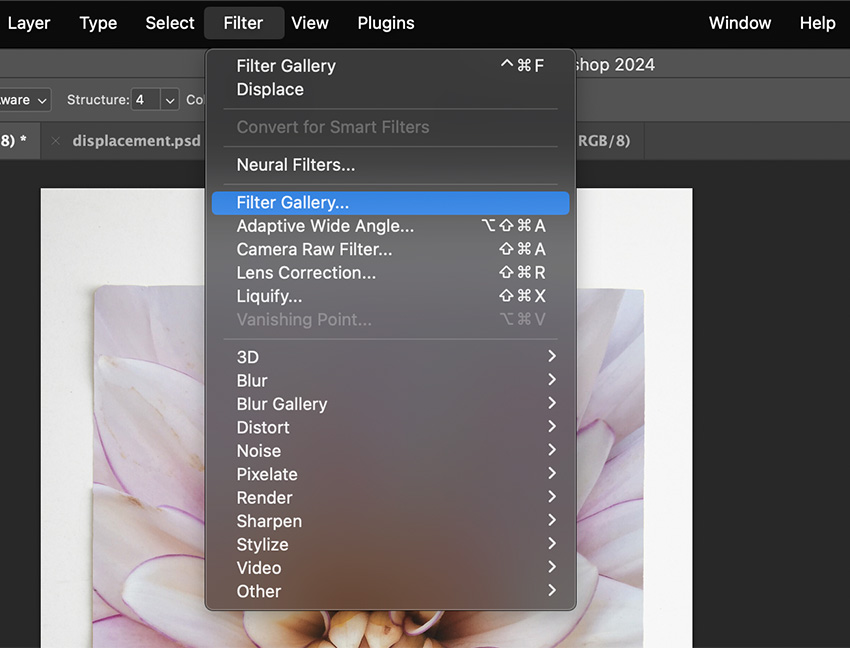
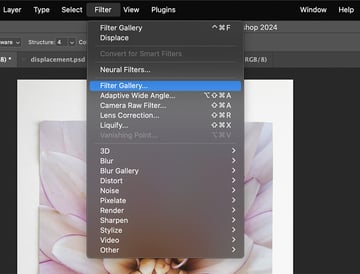
4. How to Add Filters to the Flower
Select the flower layer and go to Filter >Filter Gallery. The filter gallery will open, and we can apply several filters at once.

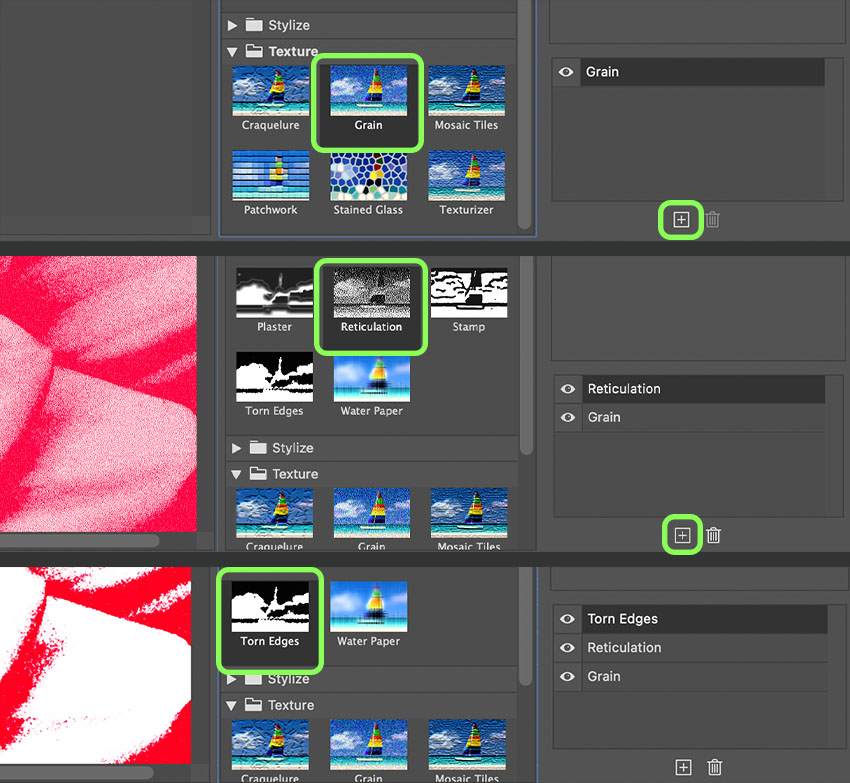
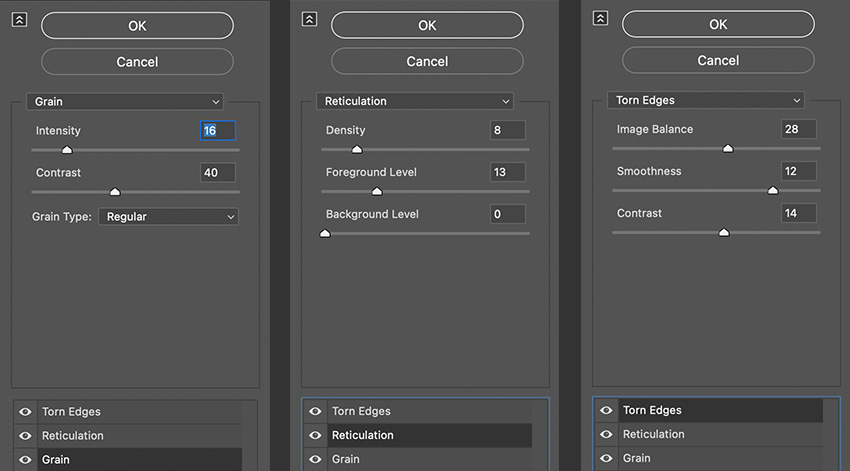
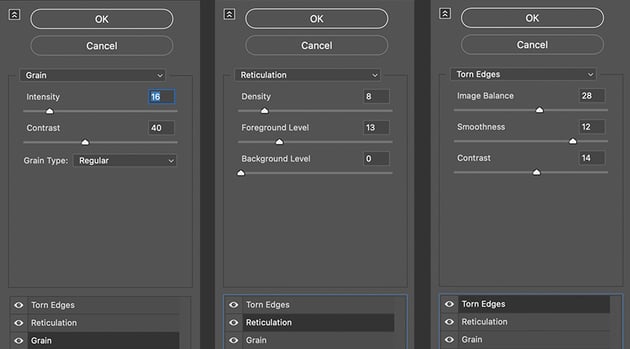
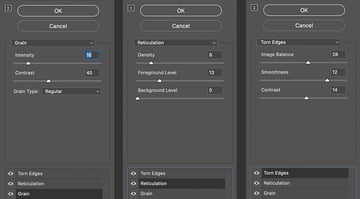
Apply the Grain filter, which you'll find in the Texture folder. Click the plus button in the bottom right corner to add another filter. That will add another instance of the Grain filter. Make sure that the filter at the top of the stack is selected, and click Reticulation in the Sketch folder. Finally, click the Plus button to add one more filter at the top of the stack, make sure it’s selected, and then click Torn Edges in the Sketch folder. These filters should get you pretty close to the gel print look. The filters can be reordered in the stack, but this is an ideal setup.


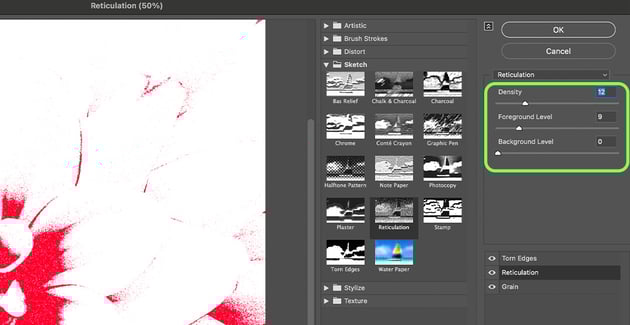
5. How to Dial in the Filter Settings
Adjust the filter settings to taste. The Image Balance, Smoothness, and Contrast settings in Torn Edges will control the amount of detail that comes through from the image. Use Density and Foreground Level in Reticulation to control how the darkest parts of the image get applied. This is roughly analogous to the amount of time you might let ink set on a traditional gel print. The Intensity, Contrast, and Grain Type settings in the Grain filter to break up the gel print and add texture to it.
6. How to Set the Blend Mode
Set the blend mode of the flower layer to Darken so that the paper texture shows through the white parts of the image.


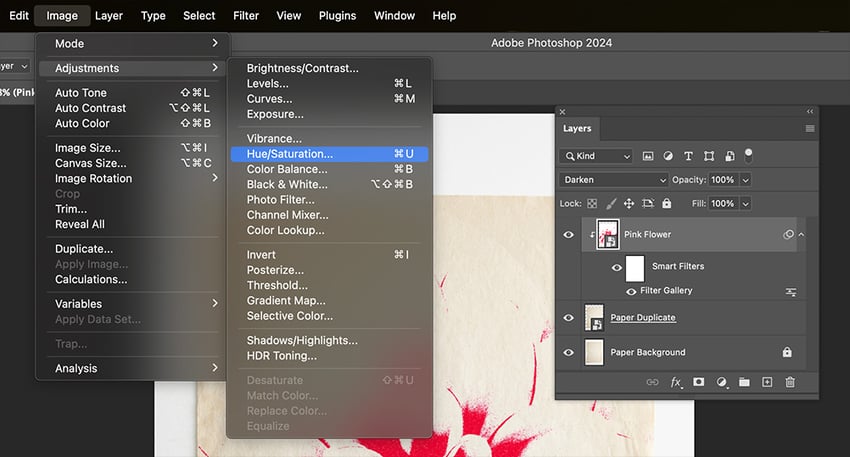
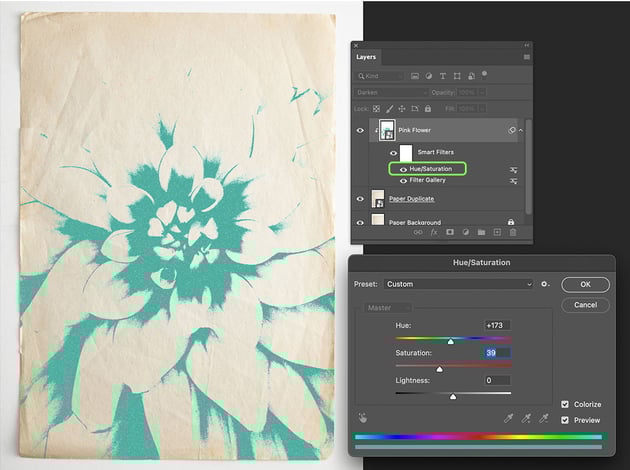
7. How to Control Color With Adjustments
What is gel printing if not a vehicle for color? We can use the Hue and Saturation adjustment layer to control the color and simulate gel printing in Photoshop with different color inks. With the flower layer selected, go to Image > Adjustments > Hue and Saturation. Since the layer is a smart object, it will be applied non-destructively. Tick the box for Colorize to get more natural-looking colors that simulate gel print ink, and then adjust the hue and saturation as needed. Leave the Lightness at 0. Click OK.


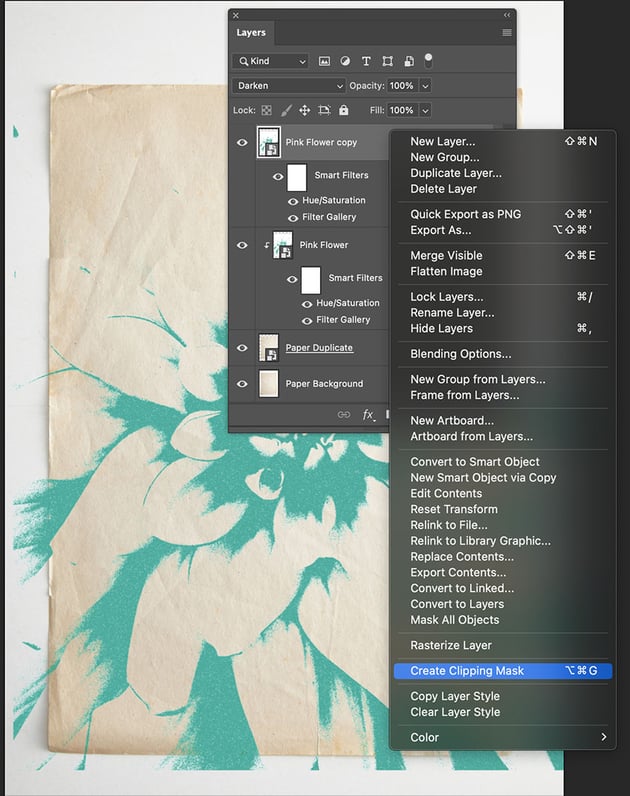
8. How to Create Multiple Gel Prints
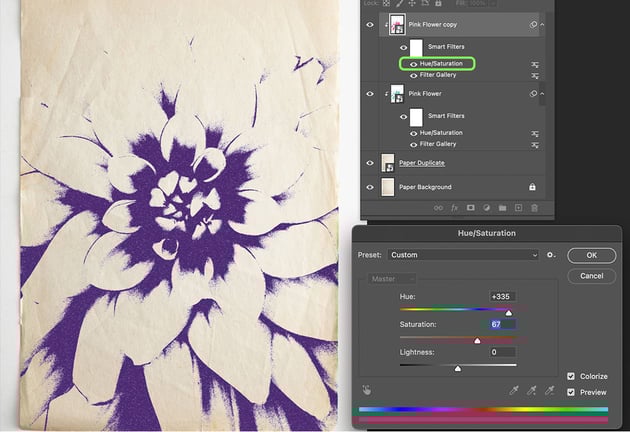
You can simulate multiple overlapping gel prints in Photoshop by simply duplicating the layer and adjusting the settings. Select the Flower Layer and press Command-J to duplicate it. Then, right-click the duplicated layer and select Create Clipping Mask so that it clips to the paper texture underneath. Finally, adjust the color in the Hue and Saturation adjustment layer attached to the new flower layer smart object, and click OK when satisfied with the color.
Keep in mind that the Darken blend mode is causing whatever color you select to blend with the layer below, and if you select complementary colors as I have, they are going to cancel out and darken. This is analogous to gel printing with semi-transparent inks. We will see more of a difference once we add some randomness to the new layer.


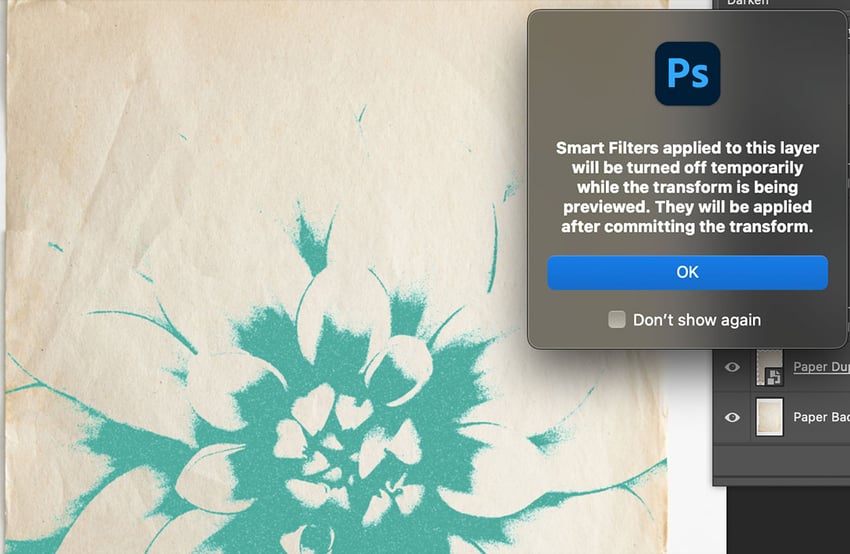
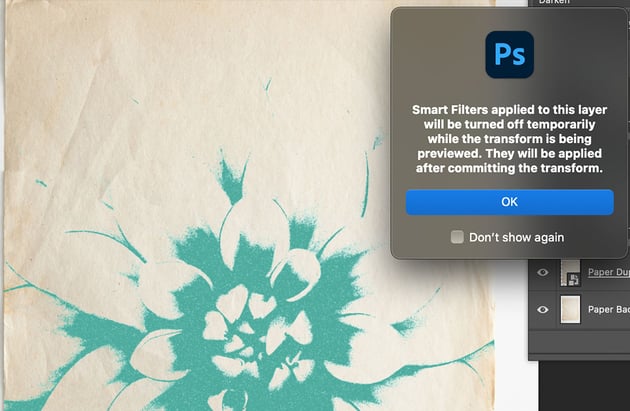
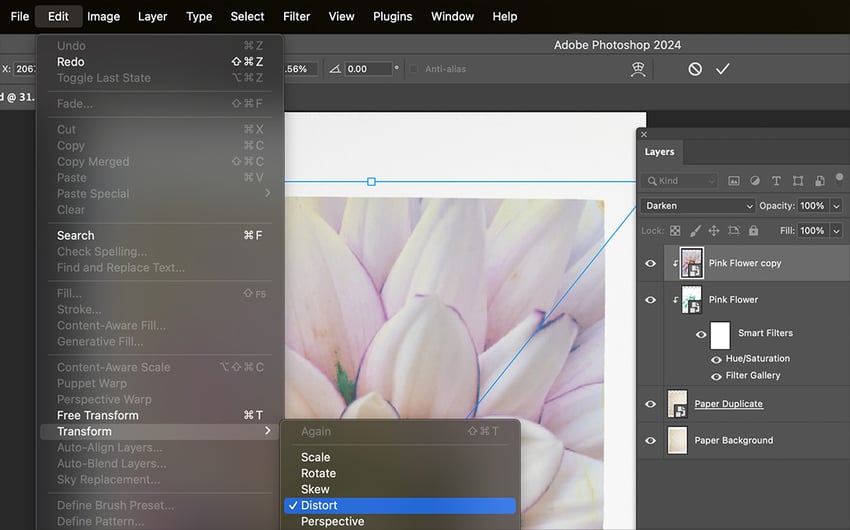
9. How to Add Variation to the Second Gel Print
I’m going to transform the layer slightly with Command-T. The warning that pops up explains that the visual you see when transforming does not show a true representation of what it looks like with the filters applied, so just click OK, and you'll see a representation of the layer with some of the smart filters turned off while Transform is active.
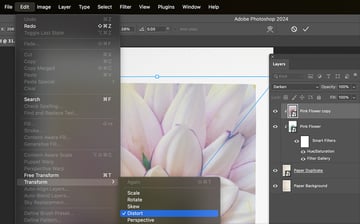
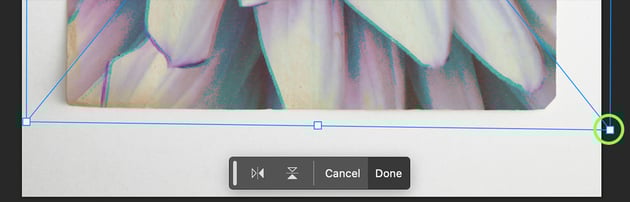
Go to Edit > Transform and select Distort. Now, when you click and drag one of the corner handles on the Transform bounding box, it will Distort instead of scaling. Move each of the corner handles slightly to simulate a gel print that’s slightly offset. When you're satisfied, click Done.


10. How to Adjust the Texture of the Second Gel Print
You can further add to the illusion of a second gel print by double-clicking the Filter Gallery adjustment layer attached to the new flower layer smart object, and adjusting the settings of Torn Edges, Reticulation, or Grain. I’ve changed the Reticulation filter settings Density and Foreground Level to 4 and 6 respectively.


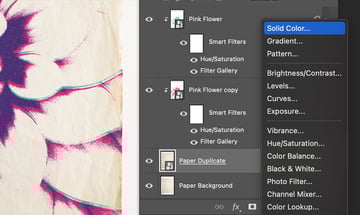
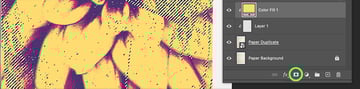
11. How to Add a Base Coat
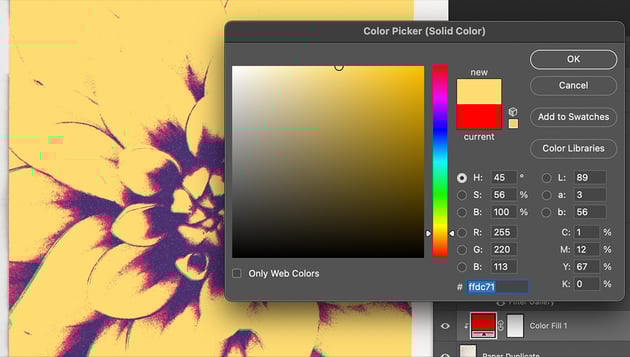
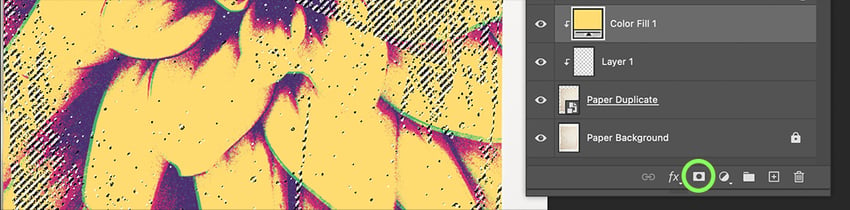
Gel printing typically involves applying a layer of ink to the paper. We can accomplish this with a solid color layer and a mask generated from the paper. First, select the Paper Duplicate Layer so that when we create a new layer it will be under the Flower layers. Then click the Create New Fill or Adjustment Layer button at the bottom of the Layers panel and select Solid Color. Choose a color that works well with the colors you’ve already selected.


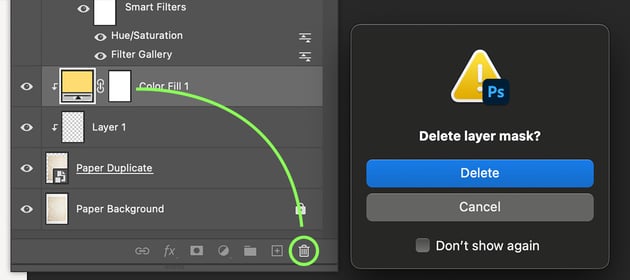
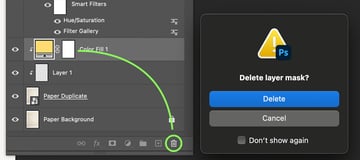
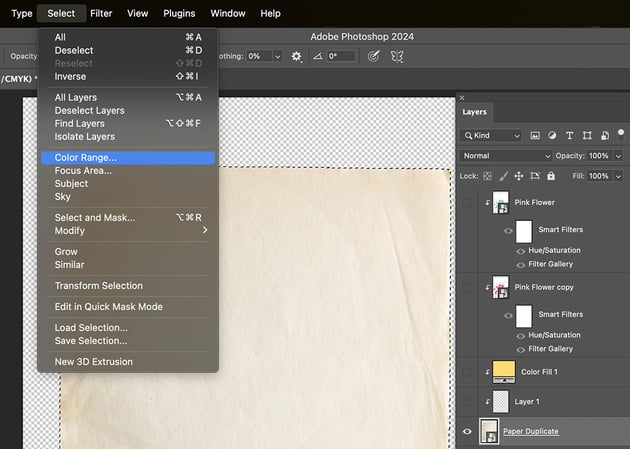
12. How to Create Imperfections in the Base Coat
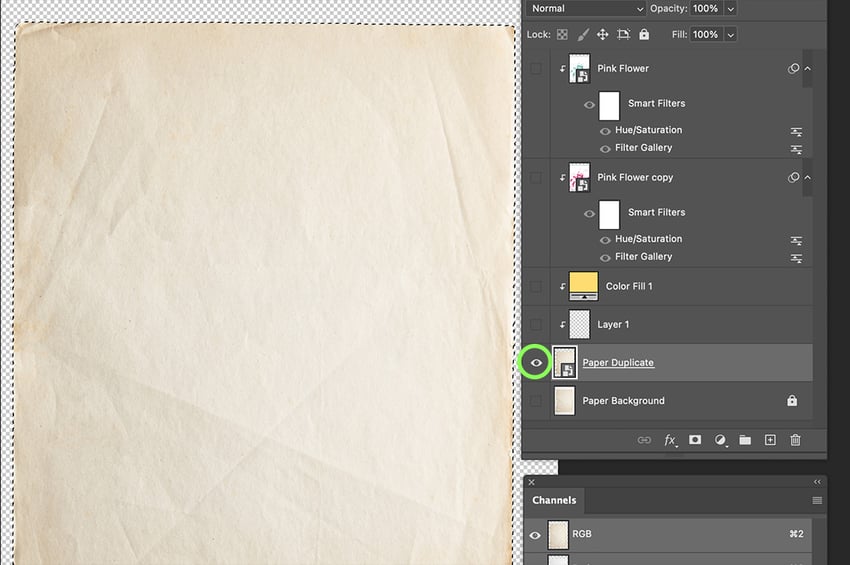
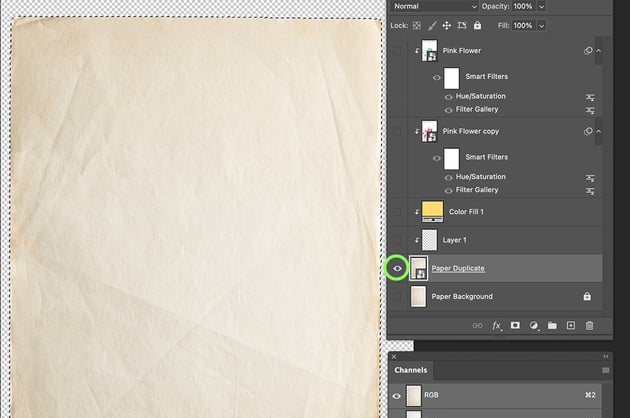
Delete the mask that’s automatically applied to the Color Fill 1 layer by dragging it to the Trash Can icon in the Layers panel. Click Delete to confirm in the popup. We will temporarily hide all of the other layers and select only the Paper Duplicate layer by holding Option (Alt) and clicking the eyeball on the Paper Duplicate layer.
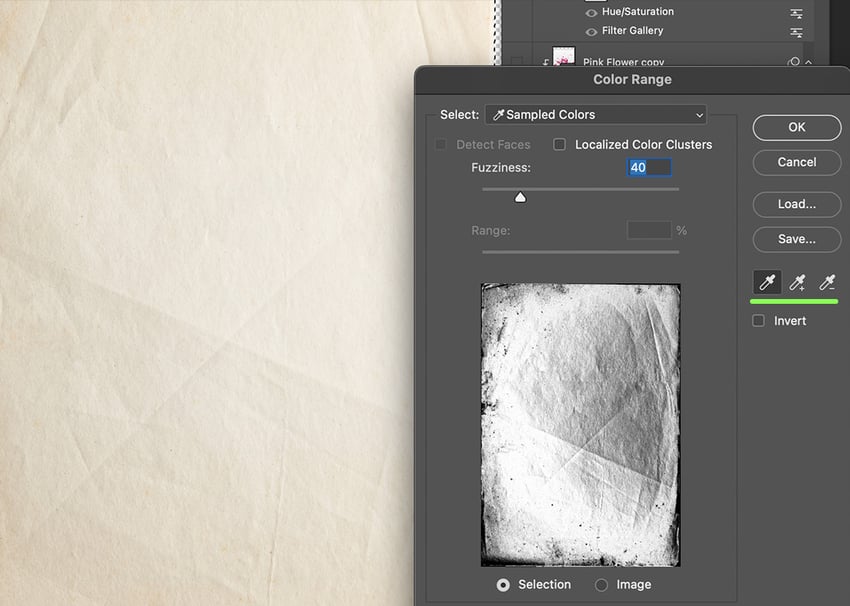
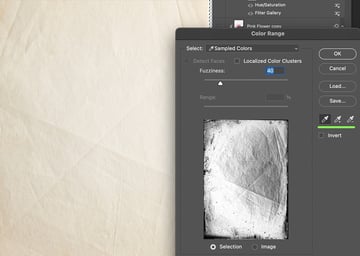
Go to Select > Color Range. Click and drag over the paper texture in the viewport to select a range of colors. The black and white preview in the Color Range menu shows you what will be selected. Anything white will be opaque, and anything black will be transparent. You can fine-tune the selection with the Add and Subtract eyedropper tools. Simply click one and drag over the viewport again. Click OK when you’re happy with the selection.


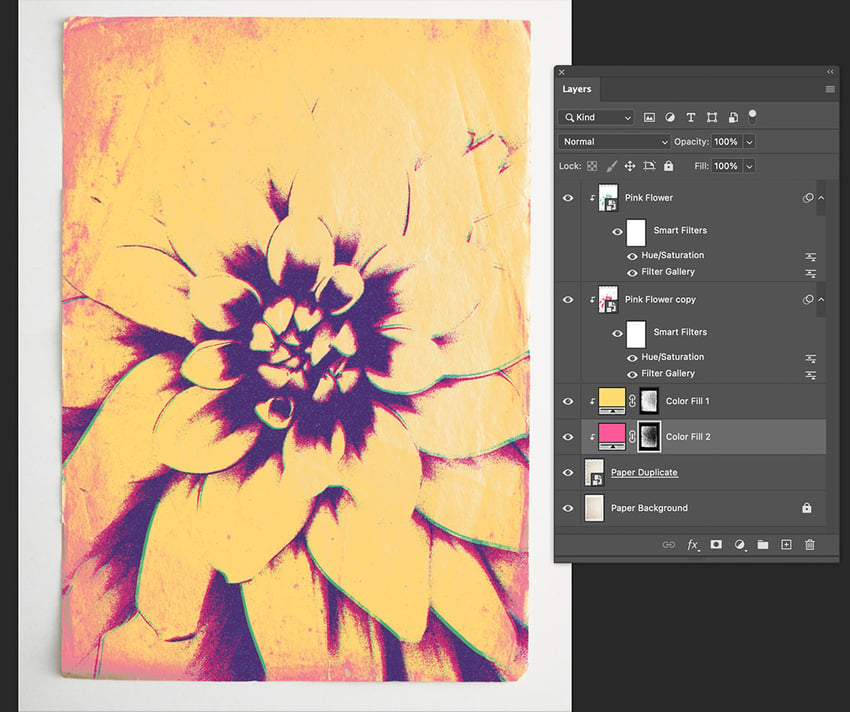
13. How to Add a Second Base Coat
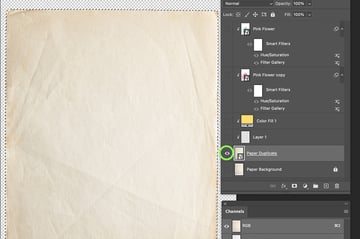
Option-click the eyeball on the Paper Duplicate layer to bring back all the other layers and make them visible again. You should see marching ants all over the viewport, indicating that you have a selection active. To apply it as a mask, simply click the Color Fill 1 layer to select it, and then click the Layer Mask button at the bottom of the Layers panel.

14. How to Finalize the Gel Print
Repeat the last two steps to add additional paper texture layers as needed. Then export your work!


Your Botanical Gel Printing Is Finished!
What is gel printing? A fun and whimsical project where the artist uses laser jet prints to add color and randomness to an image. We can replicate the botanical gel print effect in Adobe Photoshop to create a botanical flower image and a paper texture image.
The filter gallery does a lot of the work in this case, and you can experiment with different colors and effect orders to tweak your effect. Since everything is done with smart objects, the effect is non-destructive, so you can tweak it endlessly for different results. Create entirely new images by simply swapping in different flower images and copying and pasting the filter and adjustment effects.


Explore More Tutorials and Resources

 How to Create a Photo-to-Cartoon Effect in Photoshop


 How to Cut Out an Image in Photoshop


 How to Create a Charcoal Drawing From a Photo (With a Photoshop Action)


 How to Create a Twitch OBS Stream Overlay in Photoshop


 38 Best Halftone Actions, Patterns, Brushes, and More! (For Photoshop and Illustrator)

 How to Make a Wind Effect in Photoshop

 By
By


