
In this quick tutorial, I'll show you what leading is in InDesign, why it's called leading, and how to change the leading in InDesign to improve your typesetting skills. Knowing how to control leading is essential to a designer's skillset. Good leading can help make text readable and sometimes even save space and money.
If you're looking for amazing fonts for your projects, be sure to check out Envato Elements. Elements offers thousands of premium mockups, graphic elements, logos, photos, and much more. And you can download as many of these digital assets as you like, as often as you like, for one low monthly fee.
What Is Leading in InDesign?


Leading (pronounced ledding) is defined as the space between each line of text in a paragraph. The name comes from the old typesetting days, when a strip of lead was inserted by hand between the lines of type.
Leading is measured from baseline to baseline, and in hand typesetting, each leading signified 1 point. If the type size was 12 points and a strip of leading was 2 points, the leading would be 14 points. As a rule of thumb, leading is +2 points from the type size. You'll see this commonly written as 12/14: type size is 12 points over 14 points leading.


Leading enhances the legibility of a paragraph. If the leading is too tight, a paragraph can look like a solid block of ink. The ascenders and descenders would also crash into each other. Too much leading can make the reader lose the continuity of the lines of text. The right amount of leading not only results in an aesthetically pleasing-looking page but also helps the reader read comfortably. Book typesetting relies on details like leading to save space when printing long publications.
How to Change the Leading in InDesign
Step 1
Open InDesign and create a new document of any size.
Using the Text Tool (T), create a text box. Right-click, and select Insert Placeholder Text.
If you're wondering where leading is in InDesign, it's on the Options panel, or you can also access it through the Character panel. Go to Window > Type & Tables > Character to open the Character panel.


Step 2
In this case, I set the text with Gorgeous, a beautiful serif font that looks elegant and graceful.
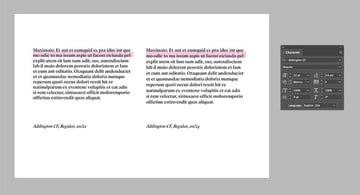
Select the text and go to the Character panel. You'll notice that the size I chose is 20 pt but the leading is set to 24 pt. While the text looks fine and readable, adjusting the leading can help us save space while making it look good. Set the Leading to 22 pt. You'll notice the lines will get tighter and the text will look more compressed. Here you can see a side-by-side comparison: the left side is with the new leading setting, and the right side is the original leading.
Another way to do this is by selecting the text you want to alter and pressing Option and the up or down arrows to add or subtract leading.


That's It!
In this tutorial, you learned what leading is in InDesign and how to change the leading in InDesign. This very essential skill is important to create readable blocks of text that can also help save space in book design and even money. Properly typeset content is invaluable for the enjoyment of readers.
If you're looking for serif fonts for your projects, Envato Elements is a great resource. Elements offers thousands of premium mockups, graphic elements, logos, photos, and much more. And you can download as many of these digital assets as you like, as often as you like, for one low monthly fee.
If you liked this quick tutorial, you might like:

 Quick Tip: How to Create Pantone Colors in Your Designs


 Quick Tip: Using the Eyedropper Tool in Adobe InDesign

 The Beginner’s Quick-Start Guide to InDesign (Tutorials, Tips & Resources)

 How to Highlight Text In InDesign

 Quick Tip: Troubleshooting Font Problems in Adobe InDesign

 Quick Tip: Creating a Custom Text Box Using Type and InDesign

 What Is Kerning, Tracking, and Leading?


 Readability and Typesetting Basics: Kerning, Tracking, Leading, and More!


 Quick Tip: Working With Tabs in InDesign


 By
By


