

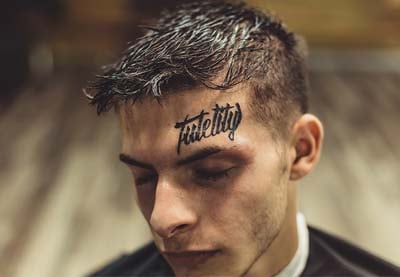
A tattoo font is the easiest way to create a stylish tattoo in no time. In this tutorial, I'll show you how to add a realistic tattoo in Photoshop using a tattoo font. The process is fast and can be used for all skin colors.
Follow our tattoo Photoshop video tutorial on the Envato Tuts+ YouTube channel, where you'll find useful tutorials like this one:

Let's start learning how to add a tattoo to a photo!
Use a Tattoo Font to Add a Realistic Tattoo to a Photo in Photoshop
Step 1
Open your photo (I used this one). Use the Type Tool (T) to add the text of the tattoo in Photoshop. Change the font to a tattoo font (for example RockSands), center the text, and resize it. The text should be wider than the area you're putting it on.


Step 2
With text selected, click Create Warped Text. Pick the style that fits the shape and perspective of the body part you're working on.


Step 3
Let's accentuate the perspective some more. When the letters turn away from us, they get tighter. Select the text and open the Character panel. Select the first three letters and reduce their width to 75%. Lower the distance between them by 10.


Select the first two letters and make the effect even stronger.


Finally, select the first letter and add an even more dramatic change to it.


Adjust the other side the same way, keeping in mind that here the angle isn't that sharp.


Step 4
Reposition and rescale the text if necessary with the Free Transform Tool (Control-T). Right-click and select Rasterize Type.


Step 5
Duplicate (Control-J) the background layer and drag it to the top. Go to Filter > Sharpen > Smart Sharpen and strengthen the texture with it.
Go to Image > Adjustments > Desaturate, then Image > Adjustments > Levels. Deepen the contrast by dragging the left and white markers towards the center. Don't go too far—we need the texture of the skin.


Step 6
Copy this image and save it as a separate file. Name it Map.


Step 7
Hide this layer and go back to the text layer. Go to Filter > Distort > Displace. Click OK and select the Map file. After the distortion is applied, decide if it's too strong or too weak. If needed, undo and repeat, this time adjusting the values accordingly.


Step 8
Group the text (Control-G). Add a Layer Mask to the group. Paint with black to remove the parts that go outside of the body.


Step 9
Duplicate the background layer and drag it over the group. Sharpen it with the Smart Sharpen filter. Hold Alt and click the line between the layers to clip it to the group below.


Step 10
Now let's get the right tattoo texture. Add a Hue/Saturation adjustment to make the tattoo dark blue. Change its Blend Mode to Darken.


Step 11
Show the upper layer and clip it as well. Change its Blend Mode to Screen. Double-click this layer. In the Blend If section, hold Alt and drag the upper black marker to the right. This way, you'll remove the effect from the shadowed part of the skin. Hold Alt to split the marker for a more gradual effect. Lower the Opacity for a more realistic shine.


Step 12
Double-click the text (not the group!) to access its Layer Style panel. Add a Drop Shadow to simulate some gentle blowout. This will give us the right tattoo texture.


Step 13
If you want to make this effect more visible, you can also add an Outer Glow. Adjust its intensity with Opacity, Size, and Noise.


Step 14
If you want to add this photo effect to darker skin, apply the same process. In most cases it will look all right, but sometimes you'll have to adjust the color of the tattoo or the opacity of the blowout.


And that's how you add a tattoo to a photo! You can now explore using some tattoo add-ons and effects.
5 Best Tattoo Fonts From Envato Elements
You've learned how to add a realistic tattoo in Photoshop using a tattoo font. Now let me share with you a selection of some of the best tattoo fonts from Envato Elements.
This is our subscription-based marketplace. Download as many cool tattoo ink fonts as you need, and many more creative graphic assets, for a low monthly fee.


Get 8,000+ tattoo fonts on Envato Elements for a low monthly subscription. Find different fonts for tattoos, such as typewriter fonts for tattoos and Arabic tattoo fonts. Also find hundreds of tattoo script fonts and cursive tattoo font alphabets. Check out these text tattoo styles:
1. Brooklyn Tattoo Script Font (OTF, TTF, WOFF)


If you're looking for classic tattoo lettering fonts, this one is for you. Brooklyn is a cursive tattoo font inspired by tattoo parlors. It features bold curves and fat-to-thin brush strokes. The cursive tattoo font alphabet also includes more than 75 bonus glyphs!
2. Strong West Retro Tattoo Script Font (OTF, TTF)


Interested in different fonts for tattoos? Looking for original text tattoo styles? Strong West is one of the coolest tattoo lettering fonts. This American traditional font features a retro style, and you can also use it as a tattoo number font.
3. Samir Arabic Tattoo Font (OTF, TTF, WOFF)


Arabic tattoo fonts are so eye-catching. Just take a look at cursive and elegant tattoo fonts like this one. This Arabic tattoo font includes the basic Latin A-Z characters and numbers. It's a good option if you're looking for a unique M font for a tattoo. It's also a great option for tattoo number fonts.
4. Black Angela Tattoo Script Font (OTF, TTF)


Looking for some tattoo lettering with shading? Black Angela is a classic, cursive tattoo font inspired by tattoo lettering fonts. It comes with OpenType features and can be used for logotypes, badges, tattoo artists, tattoo ink font merchandise, and more. This tattoo font could also work for tribal tattoo letters.
5. Perfect Thoughts Typewriter Font Tattoo (OTF, TTF)


Different fonts for tattoos are a great alternative, like this typewriter font tattoo pack that includes not one, but three fonts! One is a real tattoo ink font with stamp marks. The second is a straighter and more serious typewriter font tattoo, and the third features a funky, irregular baseline font.
Discover More Awesome Tattoo Lettering Fonts
I hope you've enjoyed my tutorial on how to create a realistic tattoo using a tattoo font in Adobe Photoshop. Now you know how to use a cursive tattoo font to add a realistic tattoo to a photo in Photoshop.
Check out more different fonts for tattoos or learn more about tattoo design with these tutorials. You can also explore our Envato Tuts+ YouTube channel, where you'll find many cool Photoshop projects.

 38 Epic Tattoo Fonts


 40 Best Blackletter and Gothic Fonts for Designers


 15 Inspiring Old English Fonts

 How to Create a Nautical Tattoo Font


 30+ Free Tattoo Fonts (Download Now to Use)


 21+ Best Free Gothic Fonts for Fantasy Lettering Art Designs
 How to Choose a Tattoo Font


 How to Remove Tattoos in Photoshop

 By
By


