


This tutorial was originally published in October 2009 as a Tuts+ Premium tutorial. It is now available free to view. Although this tutorial does not use the latest version of Adobe Illustrator, its techniques and process are still relevant.
During this tutorial, I'll show you the process for creating one of my illustrated type posters. I love to work type into all of my illustrations for the balance and rhythm it provides to a layout, but I especially love creating images out of type itself... the graphic designer inside me compels me to do it!
For more incredible resources, check out our amazing selection of Vector Robots available through GraphicRiver.
1. How to Prepare Your Sketch and Document
Step 1
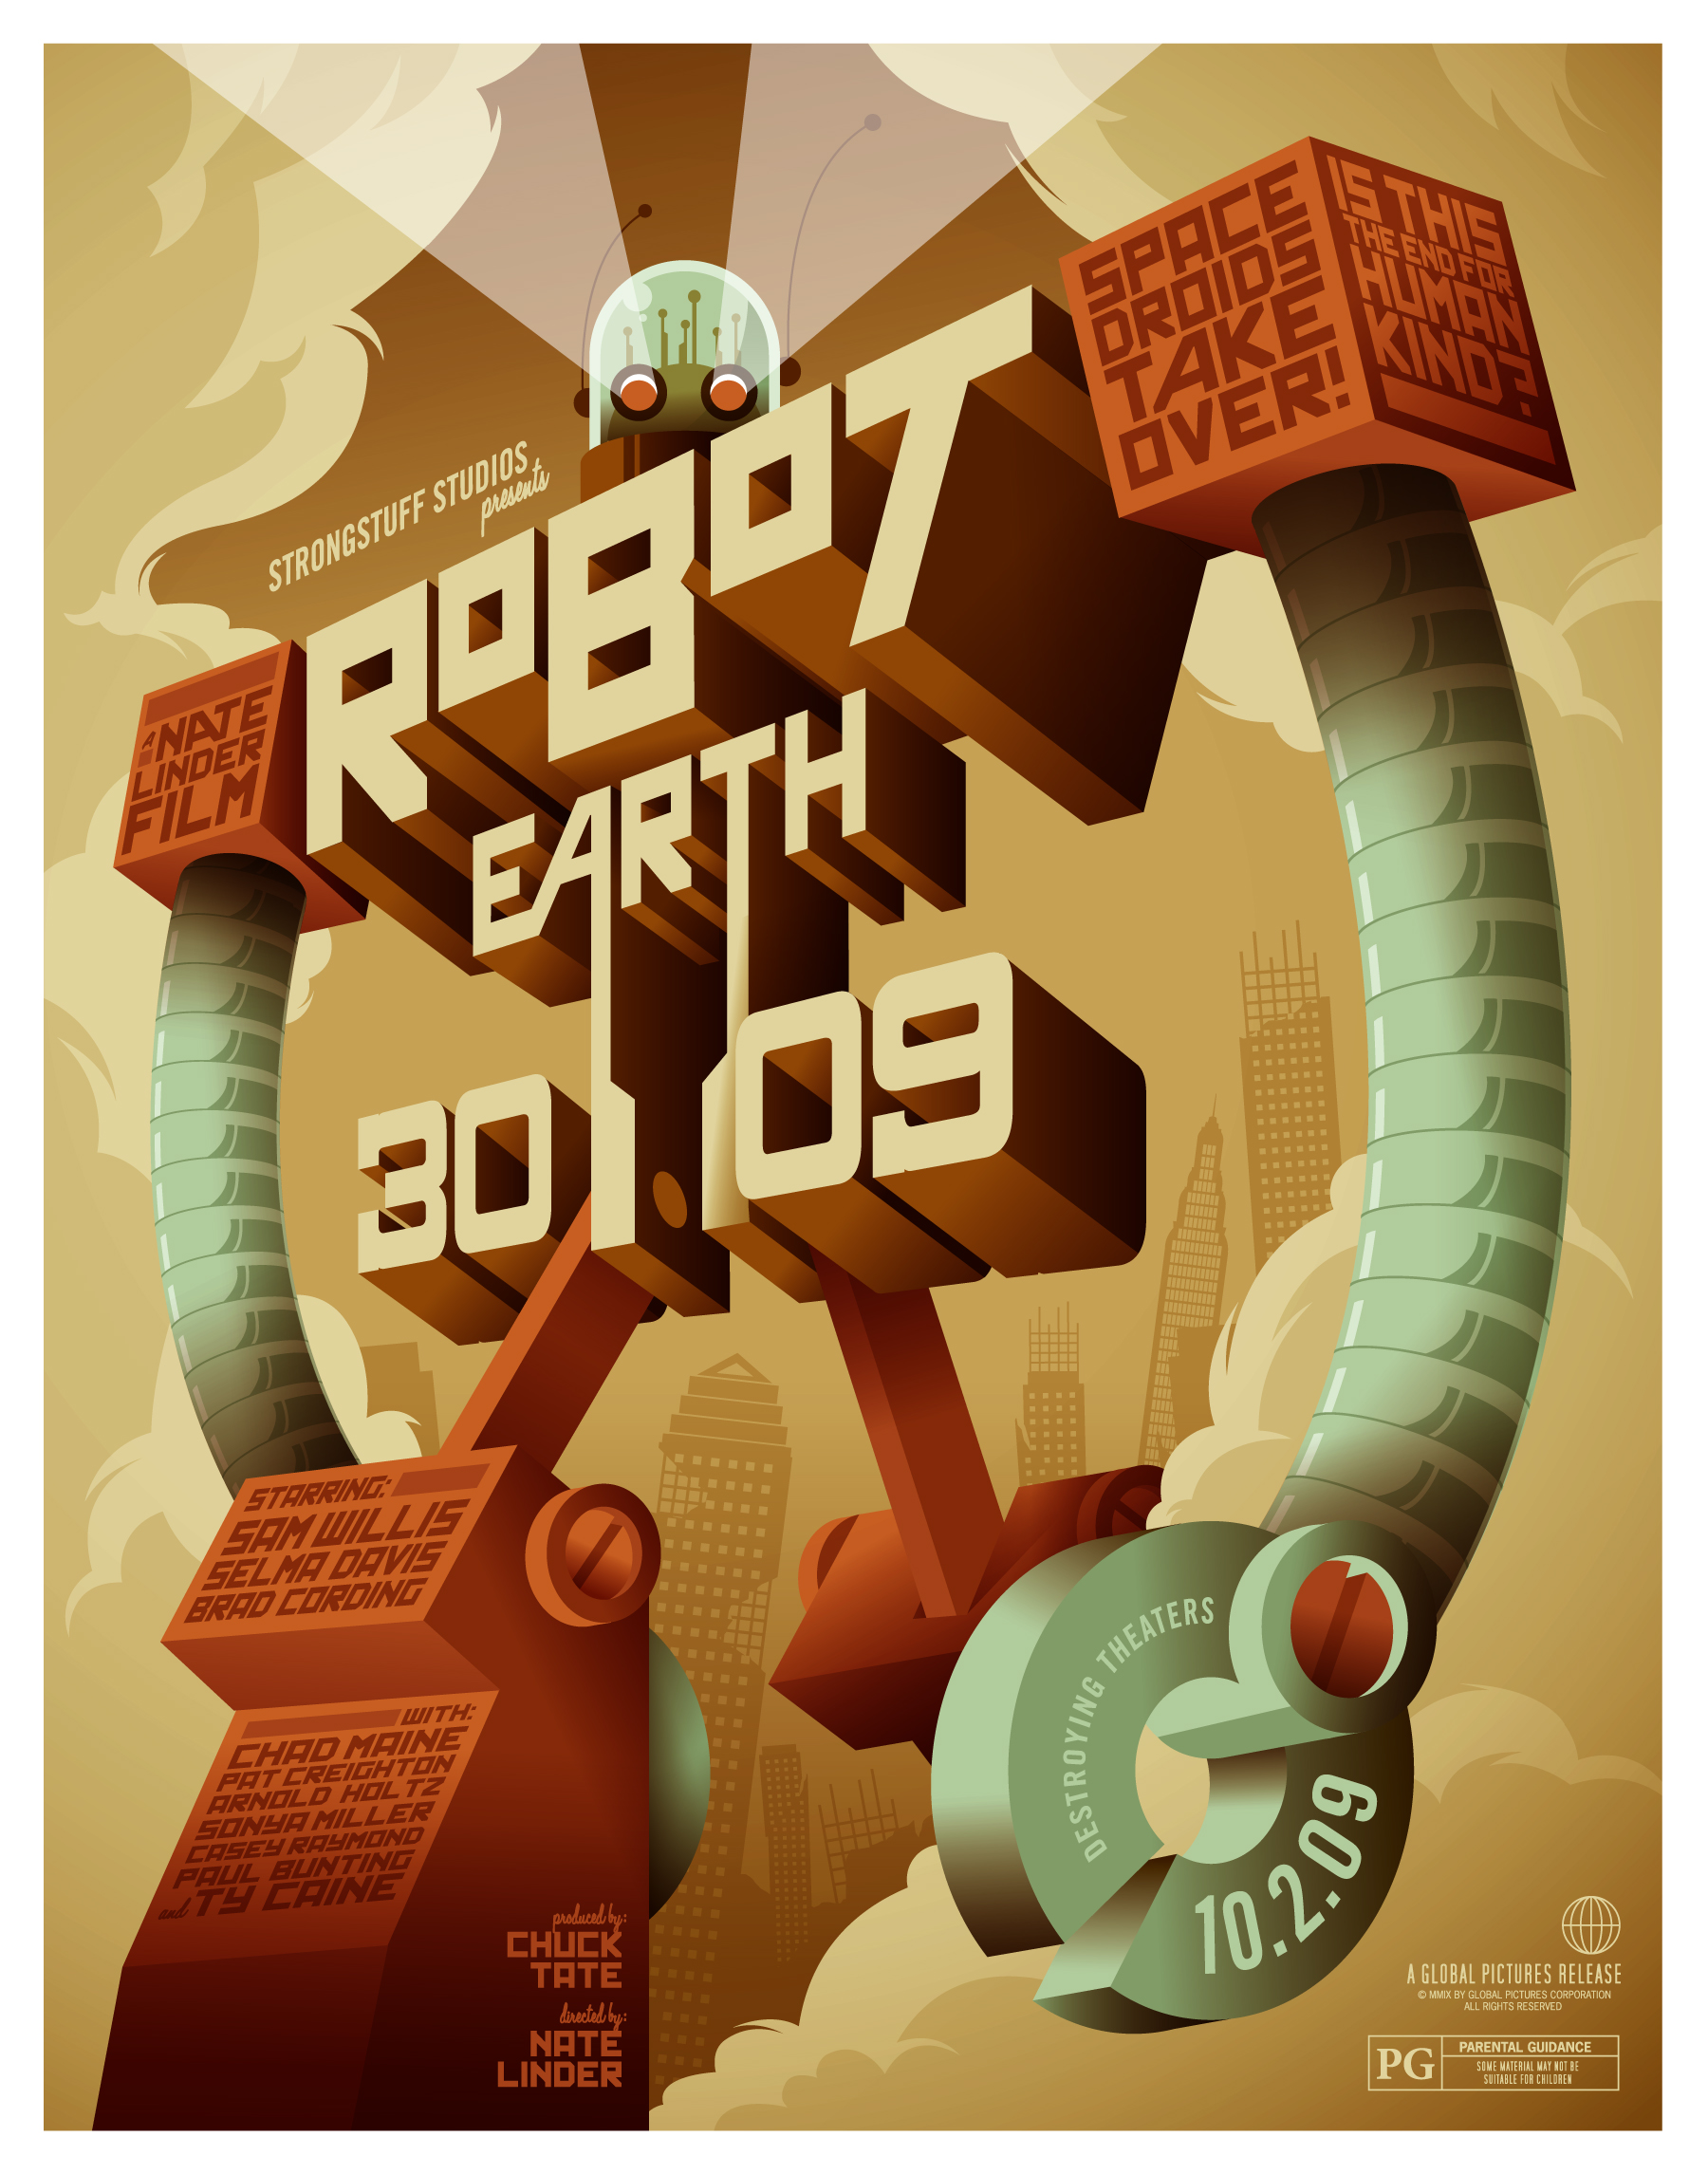
I have a passion for robots, sci-fi, and typography, so what better chance would I have to create a poster that merges all three? After gathering some robot references and paging through a few Will Eisner issues of "The Spirit" (look him up...a comic artist who was a master at illustrated type), I began by getting a very rough layout for my faux movie poster down on paper.
My vision was to create a large robot (that also serves as the type for the movie's title) roaming menacingly through a war-torn city.


Step 2
With the initial idea out of my brain and into my sketchbook, I moved into Adobe Illustrator. The next task was to set up my document. I created an 11" by 14" artboard and, once open, optimized my workspace by opening and organizing frequently used panels and toolbars. My must-have panels include Character, Pathfinder, Align, Layers, Swatches, Color, Transparency, Gradient, and Stroke.


2. How to Add the Initial Elements
Step 1
I tend to use a lot of layers in my illustrations, and this one was no exception. The first layer that I always create is a white "frame." I set it as my topmost layer, and it acts as a mask for all of the artwork underneath it. That way, I can extend images on layers out past the artboard, but not worry about seeing them.
I started with a rectangle the size of the artboard, and then created a larger one that I placed behind it, selected them both, and used the Minus Front option in the Pathfinder panel. I locked this layer and left it that way for the rest of the project.


Step 2
After adding a few new layers in the Layers panel, I began to mix some custom colors. I always throw out all of the generic Illustrator colors and mix my own simple, limited scheme in CMYK.
It's also very helpful, when mixing your own colors in the Color panel, to set them as "Spot Color". This allows you to double-click that color in the Swatches panel at any time, adjust the CMYK mix, and have those changes automatically applied to any instance of that color in your document.
I envisioned a warm palette for this illustration, and I created a red, a brown, and a few tans to get me started.


Step 3
After adding a solid rectangle of color to the background layer, I dropped a scan of the sketch into the scan layer (File > Place), resized it to fit the page, and set the Blending Mode to Multiply using the Transparency panel. This drops all of the white out of a placed image and allows you to work on layers underneath it by seeing through it.
I also added a second frame layer that would serve as a foreground element that the robot would be walking through (you'll see later on that I abandoned this element for the final piece).


3. How to Add the Text
Step 1
Next, I began to rough out the body of the robot. Starting with straight type, I designed a flat type composition that would eventually become the torso of the robot. Note the name changed from "Robot Earth 57" to "Robot Earth 3009." I thought 3009 would serve as a better basis for robot hips.


Step 2
I dragged the flat type-body on top of the rough scan and with it still selected, chose the Free Transform Tool.


Step 3
This tool is a great addition to Illustrator, if a bit tricky to use. It allows you to scale an object in perspective, which is just what the doctor ordered for this image. I began by moving the cursor over one of the open white boxes in the corner of the selected group and moved it ever so slightly until the white boxes disappeared. While still holding the mouse down, I then pressed Command-Alt-Shift.
This forces the art to skew back into space with perspective. Releasing any one of that combination of keystrokes, while still holding the selection with the mouse, releases one constraint, so you can get some pretty sophisticated effects. My best advice is to experiment liberally to get the hang of it.


Step 4
With the desired perspective achieved, I deselected the art and turned off the layer with the scanned sketch in it.


Step 5
Finally, I broke the type down into separate layers: "robot," "earth," "3009", and the two shoulder blocks. This allowed for greater control when working on each section.


4. How to Add Depth to the Text
Step 1
Never one to leave the fun parts for last, I jumped in and started work on the robot head. I wanted it to have the effect of an array of machinery covered by a transparent glass dome. Starting with a half-pill-capsule shape, I copied (Command-C) and pasted in front (Command-F) and stroked the copy. Then I converted that path to outlines (Object > Path > Outline Stroke).
Next, I copied the original dome shape and pasted it in front to make sure it was perfectly lined up. With that still selected, I selected the new outlined stroke, went into the Pathfinder panel, and pressed Intersect. I was left with a shape perfectly contoured to the dome shape that would serve as a lit edge for the clear glass dome. Next, I added the brains of the robot by adding simple shapes together.
I sent them behind the dome shape, which I set to Multiply in the Transparency panel. Finally, I copied the original dome shape and pasted it all the way in back and set the color to white. This allowed me to place the head assembly on any color background without that background showing through the multiplied glass piece.

Step 2
Once the perspective was finished, I began to add dimension to each of the characters in the body type. I created an angled box that served as a side of the letters and then copied, repeated, and adjusted it over and over until the letters appeared to have volume.


For some more visual interest, I slid the word "earth" backwards a bit to create the illusion that it was a shorter depth than the word "robot". To clean up my dimension work, I created temporary guides using locked white strokes (which I later threw away). These ensured that the perspective of the dimension boxes remained consistent with that of the original letters.


With the dimension finished, I dropped in the head that I created earlier to see how my robot was shaping up.


5. How to Add Limbs and Final Detailing
Step 1
Next up on the agenda was to create some legs for the robot. Always making sure the perspective visually matched the rest of the body, I intentionally made his lower legs out of large, flat surfaces to accommodate the bits of type that I had envisioned for them.


Step 2
Not content with the look of my hard-edged border, I thought the robot would look way cooler striding through clouds of dust created by the destruction he had just inflicted upon the city.
I printed a small copy of the file and laid a piece of tracing paper over that image. Then I drew my clouds on the tracing paper, scanned them in and dropped the image in a scan layer behind the robot. This way, I had a nice template to make the final vector art from.


Step 3
I was finally ready to start adding in all of my supporting type. I began by selecting and skewing the robot's left shoulder block so that it appeared to be swinging in mid stride.


Step 4
Next, I created the "Is This The End For Humankind?" type lockup as a flat graphic and, using the Skew and Scale Tools, mapped it onto the side of the shoulder.


Step 5
Finally, I did the same for the actors, producer and director credits on the leg, and added a fictitious studio cred above the right shoulder. You can also see that I began to render the dust clouds that I talked about in the previous step.


Step 6
The robot's claw began as a simple circle shape with the center punched out of it (Pathfinder > Minus Front). I then copied the shape, pasted it in back, and colored the new shape a lighter green.
Next, I created a concentric circle and added the movie premier date and "Destroying Theaters" with the Type on a Path Tool. Finally, I drew in the connecting dimension between the two circles, added some detail to the wrist joint, and skewed the type with the Scale and Skew Tools until I got the desired effect.

Step 7
My next task was to create a ribbed metallic effect on the robot's arms. I could have created a section and copied and repeated it along the length of the arm manually, but to get even spacing just by eyesight would take an eternity. Fortunately, there's a much better way.
I began by creating one section of the tubular arm, which consisted of the divider for each section, the shadows, and the highlights. Then I dragged that grouped section into the Brushes palette and selected Pattern Brush from the available options in the dialog box that popped up. I then hit OK in the following brush dialog box.


Step 8
Next, I made a Copy of the green stroke that serves as the base of the arm and pasted that in front (it's shown here to the left of the original stroke for tutorial purposes). I applied the newly made pattern brush to that stroke and... voila! The tubing section that I created repeats along the length of the path. Some experimentation may be necessary to achieve the proper effect, but Pattern Brushes are a great way to get great looking, evenly spaced effects along a path.


Step 9
Heading into the home stretch, I turned my attention to the cityscape in the background. I had created buildings for an earlier illustration (recycling works!), but they weren't destroyed, as I intended them to appear here.
A simple mask with a jagged edge over the original building achieved the crumbling look that I was going for, and the addition of an uneven-edged grid pattern behind the building stood in for exposed I-beams. Finally, a tilt added to each building sewed up the just-destroyed-by-a-100-foot-robot look that I was going for.


Step 10
With all of the elements of the illustration created, I just had to add some depth by using multiply shadows. For any surface that I thought could use a shadow, I simply Copied and Pasted in Front, set up that new copy as a linear gradient in the Gradient panel, set it to Multiply, and aimed the direction of the shadow with the Gradient Tool.


I went on to add many more multiplied shapes throughout the piece for a uniformly shaded look.


Step 11
For one final menacing touch, I added eye beams coming out of the robot's eyes. White shapes set to an Opacity of 50% achieved this effect.


Awesome Work! You're Now Done!
Illustrated typography is a passion of mine, so I hope you've enjoyed my tour of one of the fiercest type-based-robot-designs you've ever laid your eyes upon! The final image is below. You can view the large version here.


Fun Vector Robots From GraphicRiver
Can't get enough vector robots? Check out our amazing selection of Vector Robots from GraphicRiver for more incredible design assets. Enjoy one of our favorites listed below!
Vector Flat Modern Robots
This colorful set of vector robots is ready to take over the world! Complete with modern flat designs and gorgeous color schemes, these robots are sure to charm the socks off any intruder. Create an Envato account today to download these helpful resources.


 By
By


