
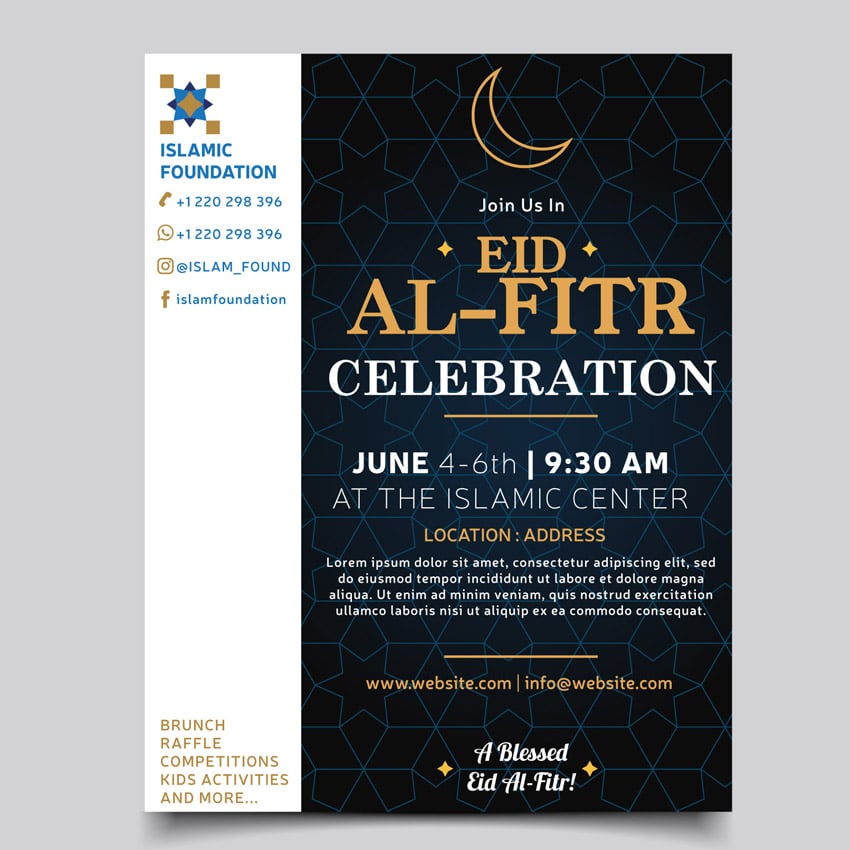


Today, we will be using Adobe Illustrator to create a flyer design in celebration of Eid al-Fitr. We will use basic tools to create an event flyer and learn how to create a customised grid template and a quick Arabesque pattern. You'll also discover what it takes to quickly put together a flyer design!
And if you don't have the time, just head over to Envato Elements and download any existing flyer template available.
Let's get started!
What You'll Need
Prepare by downloading and installing the following fonts:
- YoungSerif Font
- Lobster Font
-
Neris Font
Also head over to Envato Elements to download some social media graphics to include in the flyer design.
1. How to Set Up the Eid Event Flyer Template
Step 1
Open Adobe Illustrator and go to File > New... (Command-N).
Set the flyer to Print and Letter format:
- Name: Eid_Al_Fitr_Flyer
- Width: 8.5 in
- Height: 11 in
- Orientation: Portrait
In More Settings, set the Bleed to 0.125 in, and click Create Document.


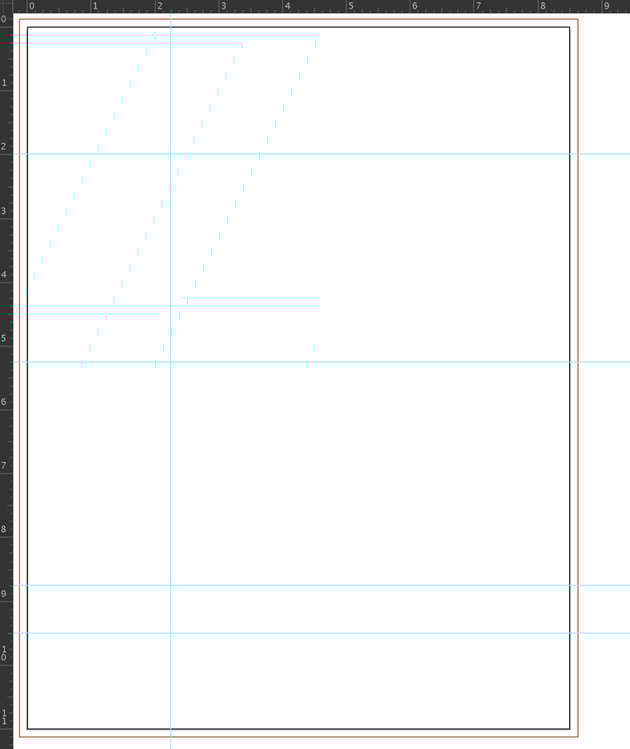
Step 2
Before we start with the design, let’s turn on our Ruler, so we can use the Ruler Guides to divide our template into these categories:
- Logo
- Social Media
- Activities
- Main Title
- Date
- Address
- Extra Information
- Website
- Greeting
View > Rulers > Show Ruler (Command-R).
Drag the straight-line guides from the left ruler by 2.2 in in order to create a vertical guide on the artboard. The left section of the flyer will include the logo, contact details, and activities for the event.
And on the right we will have the event title, date, address, main info, and greeting.
To create four horizontal guides, drag down the Ruler Guides from the top to the following alignment:
- 2 in
- 5.4 in
- 8.8 in
- 9.5 in

2. How to Add an Islamic Background Pattern to the Flyer Design
Step 1
Let's begin by laying out our background.
Turn on the Smart Guides (Command-U).
Open the Layers panel. Open Window > Layers.
Double-click 'Layer 1', rename it 'BACKGROUND', and click OK.
Grab the Rectangle Tool (M) and, with a Fill of white, draw a rectangle to cover the bleed lines.


Step 2
On the right side of the vertical partition, let's add a gradient and arabesque pattern.
Open the Gradient panel (Window > Gradient) and apply a Radial Gradient of colors #11253a to #0d0d0d.
Use the Rectangle Tool (M) and draw a rectangle from the vertical partition to the right, along the bleed lines.


Step 3
From the top menu panel, select a 1 pt Stroke Weight and apply a Stroke color of #0d4869.
Grab the Star Tool, click once on the artboard to open the Star Options dialog box, and apply:
- Radius 1: 1.2167 in
- Radius 2: 0.7024 in
- Points: 6
- OK
Then, in the center of the six-pointed star, draw another six-pointed star pattern and rotate it to align with the inner edges.


Step 4
Let's create a simple arabesque pattern for the flyer background template.
Select both stars. Object > Pattern > Make. This will make the Pattern Options dialog box appear. Adjust the pattern settings:
- Tile Type: Brick by Row
- Brick Offset: 1/2
- Width: 2.1 in
- Height: 1.83 in
Our new pattern will appear immediately in the Swatches panel (Window > Swatches). Then delete the shapes used to create the pattern.
That was easy!


Step 5
Now with the new pattern selected, take the Rectangle Tool (M) and draw a rectangle over the gradient shape.
Lock the 'BACKGROUND' layer from the Layers panel, and select Create New Layer option.
Name the new layer 'TEXT & INFO'.


3. How to Add Graphics & Format the Type on the Flyer Design Template
Step 1
Let's start simply by adding a logo to the top left corner.
For the sake of this tutorial, I quickly created a mockup logo made up of four-pointed stars and rotated rectangle shapes.
Now let's add some type for our 'Organisation Name'.
Open the Paragraph panel (Window > Type > Paragraph), as well as the Character panel (Window > Type > Character).
Select the Point Type Tool and type in the organisation name—in this case it's our mockup name 'ISLAMIC FOUNDATION' written in:
-
Blue
#1b75bc - Font: Neris
- Font Style: Black
- Font Size:19 pt
- Leading: 22.8 pt
- Align Left
- Left-to-Right Paragraph direction


Step 2
Next, let's add our social media icons.
Open the social media icons you downloaded earlier. Grab the Telephone, WhatsApp, Instagram and Facebook icons, and bring them into the current file.
Open the Align panel (Window > Align).
Grab the four icons and give them a gold color Fill of #b58a42.
You might need to scale them down, so select the Free Transform Tool (E) and hold down the Shift key to constrain the shape.
Then, from the Align panel:
- Align to: Align to Selection
- Align Objects: Horizontal Align Center
- Distribute Objects: Vertical Distribute Center
Make sure everything is aligned to the left of the logo (the Smart Guides will guide you).


Step 3
Next to the social media icons, use the Point Type Tool to add the dummy contact info:
- +1 220 298 396
- +1 220 298 396
- @ISLAM_FOUND
- islamfoundation
using the settings:
-
Blue
#1b75bc - Font: Neris
- Font Style: Semibold
- Font Size: 14.5 pt
- Leading: 34 pt
- Tracking: 50
- Align Left
- Left-to-Right Paragraph direction


Step 4
Again, use the Point Type Tool to add in the activities of the event. The Smart Guides will help you align to the top info. Add the text:
- BRUNCH
- RAFFLE
- COMPETITIONS
- KIDS ACTIVITIES
- AND MORE...
using the settings:
-
Gold
#1b75bc - Font: Neris
- Font Style: Semibold
- Font Size: 16 pt
- Leading: 19 pt
- Tracking: 50
- Align Left
- Left-to-Right Paragraph direction


Step 5
Let's move on to the right section of the flyer. On the top section, we will add a simple moon, as a symbolic reference to Islam.
Open the Pathfinder panel (Window > Pathfinder). Select a stroke color of Light Gold #e2a854 and Stroke Weight of 3 pt.
Take the Ellipse Tool (L) and draw two 1.5 x 1.5 in circles, overlapping to create a crescent shape section, as shown below.
Then select both circles and from the Pathfinder panel, choose Shape Modes: Minus Front
Position the moon shape in the center of the upper header section.


Step 6
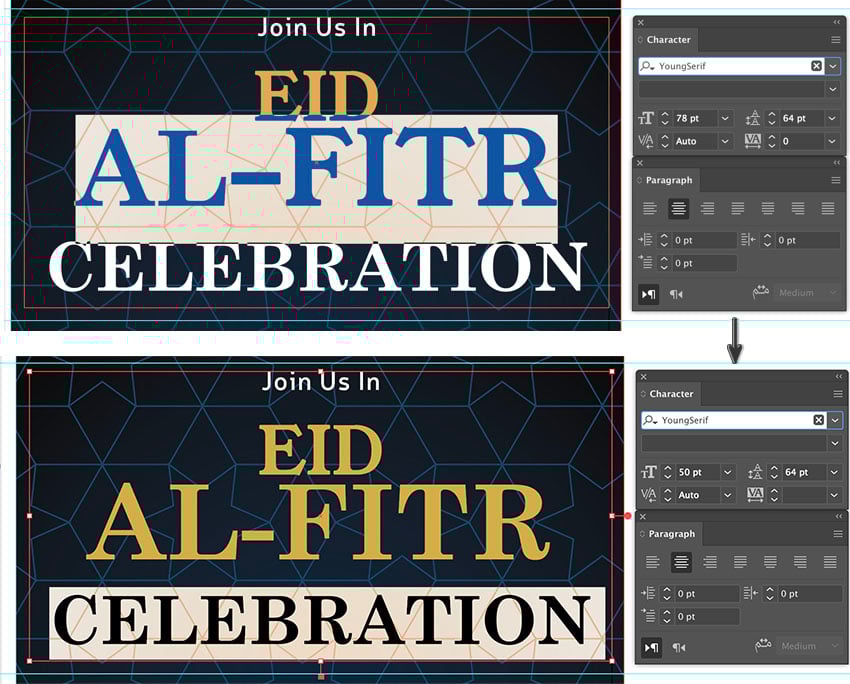
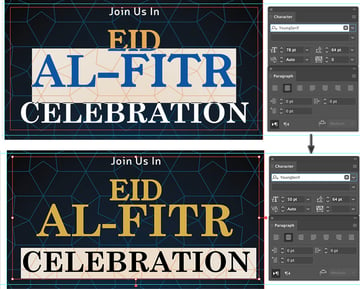
Next, let's add the main 'catchy' title for the Eid al-Fitr flyer.
We are going to create area type (also called paragraph type). Click and drag the Type Tool, within the second section, to create a type container in which we will add the text: 'Join Us In EID AL-FITR CELEBRATION', using the following settings:
'Join Us In':
-
White
#ffffff - Font: Neris
- Font Style: Semibold
- Font Size: 19 pt
- Leading: 64 pt
- Tracking: 50
- Align Center
'Join Us In':
-
Light Gold
#e2a853 - Font: YoungSerif
- Font Style: Regular
- Font Size: 50 pt
- Leading: 64 pt
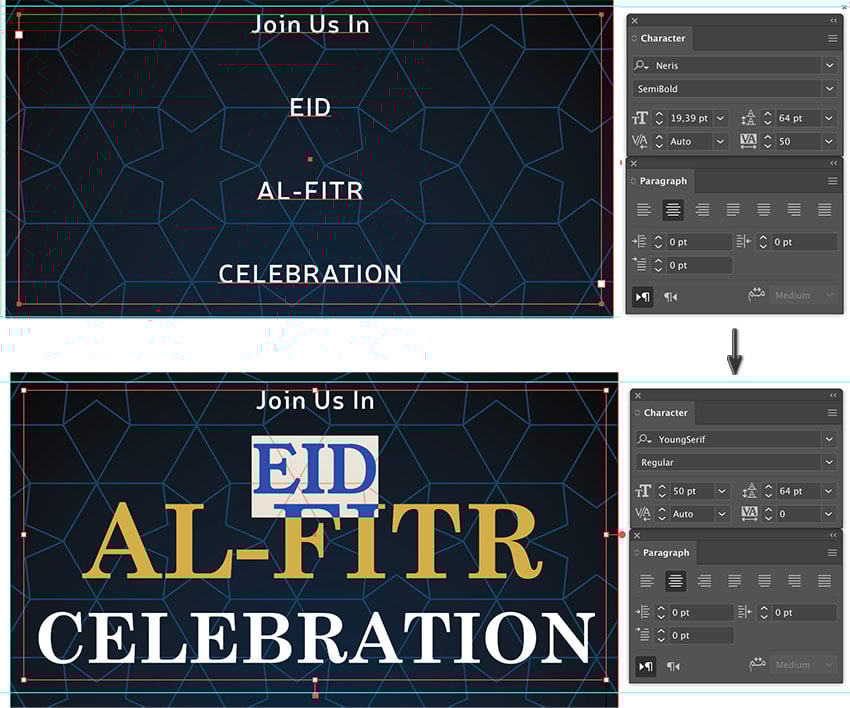


Step 7
Underneath the text will be as follows:
'AL-FITR':
-
Light Gold
#e2a853 - Font: YoungSerif
- Font Size: 78 pt
- Leading: 64 pt
'CELEBRATION':
-
White
#ffffff - Font: YoungSerif
- Font Size: 50 pt
- Leading: 64 pt

Step 8
Let's add two bars to the top and bottom of the third partition, the information section.
Select the Rectangle Tool (M) with a Fill of Light Gold #e2a853. Draw two bars that are 2.2 x 3.2 in, on the guidelines as shown.


Step 9
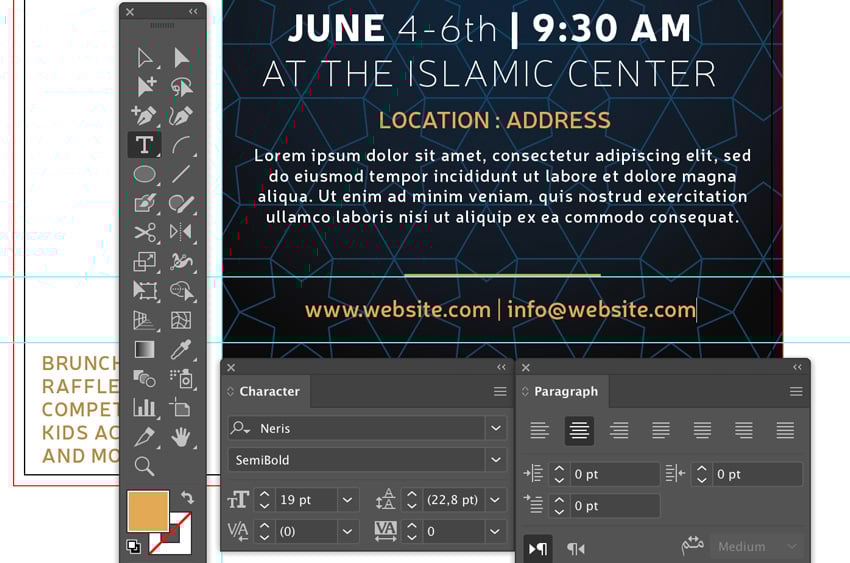
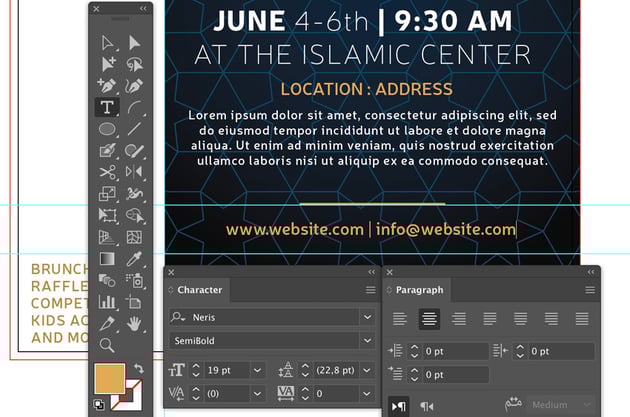
Let's start adding our flyer information.
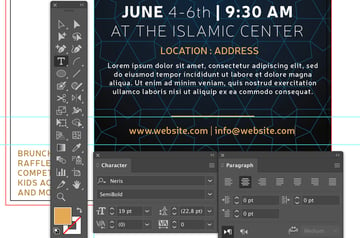
Grab the Type Tool, Align Center from the Paragraph panel, and type:
'JUNE 4-6th | 9:30 AM'
Adjust 'JUNE' & '9:30 AM' with these settings:
-
White
#ffffff - Font: Neris
- Font Style: Black
- Font Size: 30.67 pt
- Tracking: 50
'4-6th':
- Font: YoungSerif
- Font Style: Thin


Step 10
Underneath 'JUNE 4-6th | 9:30 AM', type in the dummy event location:
'AT THE ISLAMIC CENTER', using the Character settings:
- Font: YoungSerif
- Font Style: Thin
Then use the Point Type Tool to add 'LOCATION: ADDRESS' in:
-
Light Gold
#e2a853 - Font: Neris
- Font Style: Semibold
- Font Size: 19 pt
- Leading: 22.8 pt


Step 11
Then, let's create our Area Type underneath.
Click and drag the Type Tool and create a type container in which to add the dummy text: 'Lorem ipsum dolor sit amet, consectetur adipiscing elit, sed do eiusmod tempor incididunt ut labore et dolore magna aliqua. Ut enim ad minim veniam, quis nostrud exercitation ullamco laboris nisi ut aliquip ex ea commodo consequat."
-
White
#ffffff - Font: Neris
- Font Style: Semibold
- Font Size: 14 pt
- Leading: 16.8pt
- Tracking: 50
- Align Center


Step 12
Moving on, let's add our website and email info:
'www.website.com / info@website.com'
From the Character & Paragraph panel, use the settings:
-
Light Gold
#e2a853 - Font: Neris
- Font Style: Semibold
- Font Size: 19 pt
- Leading: 22.8 pt
- Align Center
Step 13
In the last section, let's add our Eid al-Fitr holiday greeting to the flyer design:
Grab the Type Tool and type in "A Blessed Eid Al-Fitr!"
In the Character & Paragraph panel, use the settings:
-
White
#ffffff - Font: Lobster
- Font Style: Regular
- Font Size: 26 pt
- Leading: 31.2 pt
- Align Center


Step 14
Next you can Hide Guides (View > Guides > Hide Guides).
For the last bits, let's add some four-pointed star graphics.
Select the Star Tool, open the Star Options dialog box, and apply:
- Radius 1: 1.1153 in
- Radius 2: 0.0577 in
- Points: 4
- OK
Use the drag-drop action, by holding the Shift and Alt keys and dragging the object across with the Selection Tool (V), to duplicate the four-pointed star as shown below.


Great Job! We Are Done!
Our Eid al-Fitr flyer template design is ready!
I hope you enjoyed this tutorial and learned how to create an easy Eid al-Fitr event flyer.
If you would like to find some other template ideas, you can find some flyer designs over at Envato Elements or GraphicRiver.
I'm looking forward to seeing your creations on this. Please share in the comments section below!
Thanks for following!


Enjoyed this tutorial? Learn more with the following tutorials:


