


In this tutorial, you will learn how to create a sandstorm Photoshop action to add amazing special effects to your photos. I will explain everything in so much detail that everyone can create it, even those who have just opened Photoshop for the first time.
Want more sandstorm Photoshop actions? Don't forget to check our quick list of five amazing sandstorm special effects for pictures and Photoshop effect actions in this article that you may want to try.
If you want to check out even more fun filters, Photoshop actions and Photoshop filters as well as other special effects for pictures, jump over to GraphicRiver and/or Envato Elements.
What You'll Need
To recreate the design above, you will need the following resources:
- Original stock image used no longer available. Try this one instead.
- Brushes 1
- Brushes 2
1. How to Start Creating an Action
Step 1
First, open the photo that you want to work with. To open your photo, go to File > Open, choose your photo, and click Open. Now, before we get started, just check a couple of things:
- Your photo should be in RGB Color mode, 8 Bits/Channel. To check this, go to Image > Mode.
- For best results, your photo size should be 2000–4000 px wide/high. To check this, go to Image > Image Size.
- Your photo should be the Background layer. If it is not, go to Layer > New > Background from Layer.


Step 2
Now go to Window > Actions, and in the Actions panel click on the menu icon in the top right-hand corner, choose New Set to create a new set, and name it Sandstorm. Then, click on the same menu icon again, choose New Action to create a new action, and name it Sandstorm as shown below:


2. How to Select the Subject
Step 1
In this section, we are going to make a selection of our subject and then copy the subject to a separate layer. Choose the Quick Selection Tool (W) and select the background of the photo. Use the Shift-Alt buttons on your keyboard to add or subtract areas from the selection. After you've made a perfect selection, press Control-Shift-I on your keyboard to invert the selection.


Step 2
Now go to Select > Modify > Smooth and set the Sample Radius to 5 px. Next, go to Select > Modify > Contract and set Contract By to 2 px. Finally, go to Select > Modify > Feather and set Feather Radius to 2 px.


Step 3
Press Control-J on your keyboard to create a new layer using a selection, and name this new layer Subject.


3. How to Create the Background
Step 1
In this section, we are going to create the background. Select the Background layer, go to Layer > New Fill Layer > Solid Color to create a new solid color fill layer, name it Background Color, and choose the color #3c2c1c.


Step 2
Now change the Blending Mode of this layer to Multiply and set the Opacity to 80%.


4. How to Create the Sand Dispersion Effect
Step 1
In this section, we are going to create the sand dispersion effect. Go to Layer > New > Layer to create a new layer and name it SD_1.


Step 2
Now go to Window > Actions, and in the Actions panel click on the rectangle icon in the bottom left-hand corner to stop recording the action. Then, in the same panel, click on the menu icon in the top right-hand corner and choose Insert Stop to record a stop in the action commands. We are going to do the brushing part manually.
Set the foreground color to #000000, choose the Brush Tool (B), and pick the Dust Brush 5 brush from the first brushes link. Then, adjust the Diameter of the brush as you like, and brush as shown below:


Step 3
Go to Window > Actions, and in the Actions panel click on the circle icon in the bottom area of the panel to resume recording the action. Then, change the Opacity of this layer to 69%.


Step 4
Now select the Background Color layer, go to Layer > New > Layer to create a new layer, and name it SD_2.


Step 5
Now stop recording the action and record a stop in the action commands as described previously. We are going to do the brushing part manually again. After you finish brushing, resume the action recording as described previously.
Set the foreground color to #000000, choose the Brush Tool (B), and pick the 18 brush from the second brushes link. Then, adjust the Diameter of the brush as you like, and brush as shown below:


Step 6
Repeat this process to create as many sand dispersion layers as you want. Don't forget to stop recording the action and to record a stop in the action commands before each brushing, and then to resume the action recording after you finish with each brushing. Here is my result:


Step 7
Now select the SD_1 layer, go to Layer > New Fill Layer > Solid Color to create a new solid color fill layer, name it SD_1_Color, and choose the color #9a8969.


Step 8
Now press Control-Alt-G on your keyboard to create a clipping mask. Then, change the Blending Mode of this layer to Pin Light.


Step 9
Repeat this process to colorize as many sand dispersion layers as you want. Here is my result:


Step 10
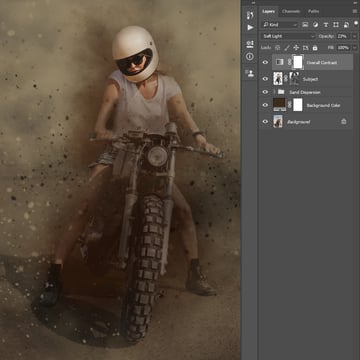
Now select your last sand dispersion layer and Shift-click on the SD_1 layer to select all layers between. Then, go to Layer > New > Group from Layers to create a new group from the selected layers and name it Sand Dispersion.


5. How to Blend the Subject
Step 1
In this section, we are going to blend the subject. Select the Subject layer, and go to Layer > Layer Mask > Reveal All to add a layer mask that reveals the whole layer.


Step 2
Now set the foreground color to #000000, choose the Brush Tool (B), pick a soft brush, and brush as shown below. Feel free to use different settings for the Opacity of the brush.


6. How to Make the Final Adjustments
Step 1
In this section, we are going to make the final adjustments. Press D on your keyboard to reset the swatches. Then, go to Layer > New Adjustment Layer > Gradient Map to create a new gradient map adjustment layer and name it Overall Contrast.


Step 2
Now change the Blending Mode of this layer to Soft Light and set the Opacity to 23%.


Step 3
Go to Layer > New Adjustment Layer > Levels to create a new levels adjustment layer, and name it Overall Brightness.


Step 4
Now Double-click on this layer thumbnail and, in the Properties panel, enter the settings below:


Step 5
Go to Layer > New Fill Layer > Solid Color to create a new solid color fill layer, name it Color_Look_1, and choose the color #a78b6c.


Step 6
Change the Blending Mode of this layer to Color and set the Opacity to 49%.


Step 7
Now select the Overall Brightness layer, go to Layer > New Fill Layer > Solid Color to create a new solid color fill layer, name it Color_Look_2, and choose the color #2a2118.


Step 8
Change the Blending Mode of this layer to Exclusion and set the Opacity to 53%.


Step 9
Go to Layer > New Adjustment Layer > Vibrance to create a new vibrance adjustment layer and name it Overall Vibrance/Saturation.

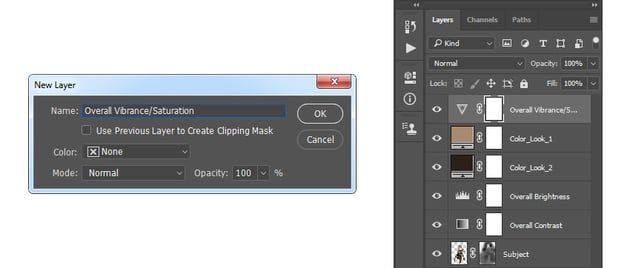

Step 10
Now Double-click on this layer thumbnail and, in the Properties panel, set the Vibrance to +11 and Saturation to +7.


Step 11
Press Control-Alt-Shift-E on your keyboard to make a screenshot, and then press Control-Shift-U to desaturate this layer. Then, go to Filter > Other > High Pass and set the Radius to 2 px.


Step 12
Now change the Blending Mode of this layer to Hard Light and name it Overall Sharpening.


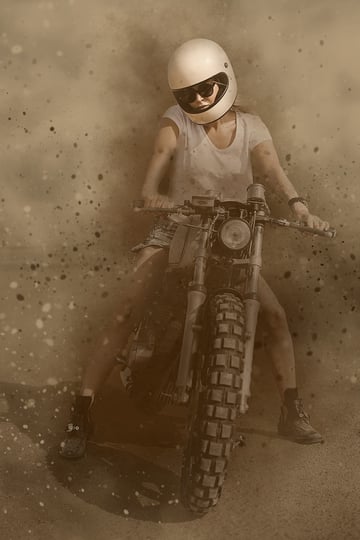
You Made It!
Congratulations, you have succeeded! You have learned how to create a special effect Photoshop action to create sandstorm photo effects. Here is our final result:


5 Sandstorm Photoshop Actions
Want more sandstorm Photoshop actions and fun filters? Here is our quick list of five amazing sandstorm special effects and Photoshop effects/actions you may want to try:
Sandstorm Photoshop Action
Create this highly detailed effect from your photos with just a couple of clicks. Make sure to watch the customization tutorial on how to get the most out of this effect. This action is designed to save you an immense amount of work per photo.


Animated Sand Photoshop Action
Animated Sand is a pack containing 100 animated sand effects (around the concept of a sandstorm) and a Photoshop action to place them, very easily, over your images.


SandDust Photoshop Action
SandDust Action creates its effect with sand particles and rays of light. You can choose a beautiful sky as the background image, or leave only sand particles on your photos to create an awesome photorealistic sandstorm on your landscape.


Dustum PS Action
This impressive Photoshop action creates the effect of a sandstorm breaking and shooting pieces of the object on your photo. It offers four actions with different directions: up, left, right, and down. You'll get a highly detailed result, and this one-click action is easy to use, customize, and improve.


Dust Storm Animation Photoshop Action
The item Dust Storm Animation Photoshop Action is one of the best in its kind. This product is very useful and has been developed with great care. The main outstanding feature of this product is its quality. This action might prove a game changer for you.


You may also like:


 By
By


