


Compositions that combine both photographic and illustrative elements are often popular among graphic designers. Today, we will demonstrate how to combine these elements to create a vintage squid illustration. Let's get started!
Resources Used
The following resources were used during the production of this tutorial.
Step 1
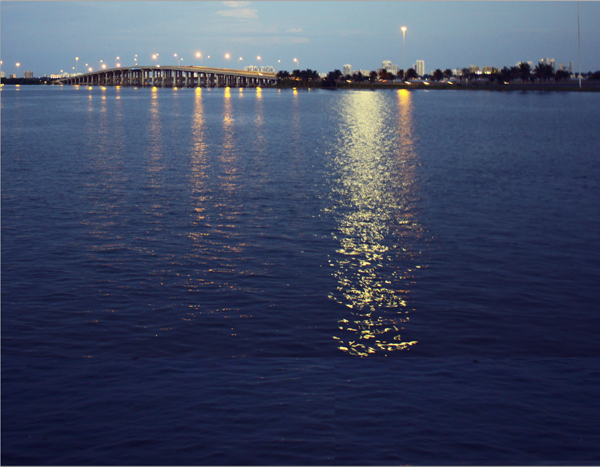
Alright let's get started with this tutorial! The first thing we need is a base image to use as our background for which the character will be drawn onto, (for this tutorial I took a nice shot of the bay the other day and I think it will do just fine). Now keep in mind the perspective, angles and depth of the photo since anything we draw has to match those angles as to create the illusion successfully.


Step 2
After you have selected the image you're going to use, go ahead and print it out; 8x11 standard letter size is fine. Next, grab a sheet of tracing paper and a piece of scotch tape as we're now going to place the tracing paper over the photo we just printed and draw our giant squid on it (if you have a lightbox handy go ahead and use this as it makes things much easier). Go ahead and draw a light simple outline of our squid character, you don't have to draw the details right now, we'll do those later on. Right now it's more important to get the angles and base size of the squid right so it matches the original photo.


Step 3
When you have your rough sketch ready remove it from the photo and scan it at 300 dpi (very important to get the hi-res scan otherwise you won't be able to get the right curves of the lines). Take this scan and place it in a new document in Illustrator, this is the part that's the most time consuming as we need to trace the octopus using the pen tool. So first just draw all the outside lines, which in the end will be the outside stroke, (right now you don't have to worry about colors, black and white will do fine). After you're done tracing all the outside lines, move on and trace the inner pieces, (these pieces will make the "skin" of the squid).


Step 4
Ok, so we finally got all of the squid done, that took forever. After all of the lines are done go ahead and double check that; A) You don't have any open paths, and B) The curves and angles of your lines look very smooth and flow together nicely. It's important that you notice the details and your craftsmanship as it will make all the difference in the end result. Having 1 shape instead of 2 shapes overlapping might look like extra work but in the end gives more control, since every shape is an individual piece this makes it easier to adjust the colors, sizes, strokes, etc. later on.


Step 5
Now let's make a splash and create some water. Since the squid is coming out of the water there might be some splashes, this is where the decisions can get tricky. I originally had planned to create the splashes with images in Photoshop, but i think it would be cooler to do them using vectors. So using the pen tool create a variety of splashes at the beginning of each tentacle and than fill them with this gradient. C: 95, M: 17, Y: 25, K: 5 for the first color and C: 77, M: 11, Y: 0, K: 0 for the second color. then draw a smaller wave and fill it with, C: 77, M: 11, Y: 0, K: 0.


Step 6
After you have all you outlines ready, find the color palette to use; for this I was thinking of saturated colors to further enhance that vintage/new school look we're going for. We really want this to look like an older picture, yet have the art style of the squid be contemporary. Fill the outside line with this color: C: 6, M: 92, Y: 5, K: 0 and C: 0, M: 83, Y: 0, K: 0 for the inner pieces, for the eyes: the outline is C: 9, M: 25, Y: 100, K: 0 and the eyeball C: 20, M: 0, Y: 98, K: 0.


Step 7
It's moving time. The easiest way to do this is to create a new document in Photoshop at 8x11 landscape at 300 dpi, (nothing worse than creating a piece and then finding out you've been working in low-res). So once again make sure you're working at 300dpi, then while leaving this window open first drag the water photo (our background) and then repeat with the vector squid from illustrator, (the squid will be linked as a smart object which is great since you can just click on the icon and the original squid will open in illustrator where you can edit over and over until you feel comfortable and not have to keep dragging files back and forth all day).


Step 8
Now that we have this going let's add the waves we created. After that, arrange all the vector pieces around and scale them until you have the right composition. Composition is super important when creating pieces, we want everything balanced and appealing to the eye.


Step 9
After looking around at this piece for a while I wasn't completely happy with the beak on the squid so I thought it would look cool if we just saw the head peeking out of the water. So using a mask I hid the lower part of the squid. After that, I duplicated the layer where the squid is on and rasterized it. Now we can work on the tones and shadows of the squid.
We now need to add shadows and highlights to give the image some depth. There are tons of different ways to add shadow effects (like using the brush tool on low opacity); but for this piece, I used dodge and burn at 5% to 10% around the edges. It's important to notice where the light source is in the photo so when you add the shadows to the squid they will look more organic. It's always best to use a tablet for this since it gives the natural brush look, but a lot of people can do a great job with a mouse too. In the end it's what's most comfortable for you and your style.


Step 10
Now let's add some texture to the photograph to give it that worn vintage look. I used a paper texture to give it a yellowish tone. Add this on a new layer and set it to overlay and set the transparency to 27%. Than duplicate this layer and set it to 60% on multiply and you'll end up with something like this.


Step 11
Now we're going to play with the tones a bit to perfect the vintage look. Usually with older photographs the white edges start to turn yellow and the shadows turn to a blueish tint, we're trying to mock this look. First we'll adjust the curves, by making the shadows darker and the highlights brighter the image will look richer. After that change the hue/saturation: Hue: 249, Sat: 43, Lightness: +30.


Step 12
To further add to the vintage look we're going for, we need to add a frame around our piece. I found this image on flickr and it has some nice edges and textures we could really use, so add this as another new layer and mask the face, you can use the pen tool to outline the edges and really get some details.


Step 13
Looking at the borders there are some more textures in there we could use so, duplicate the layer and with a soft brush at a low opacity (10%) mask around the edges to give the image the paper texture of the photograph, set the opacity to 48% and the blend mode to multiply.
Step 14
More Curves! Add another adjustment layer, this time curves again this will help to blend the frame and all these new elements together, since adding curves makes all the tones equal, it helps to create the illusion.


Step 15
Do a final adjustment layer, a gradient map pick the default blue, red, and yellow gradient then by dragging down on the red color chip remove it, this will give all the shadows a blueish tone and the lighter colors a yellow tint.


Final Image
So there you have it, our final image. Hope you enjoyed creating it as much as I did.


 By
By


