


It's that time of year where there are many fireworks displays for events such as Hogmanay (Scottish New Year) and New Year's Eve. In this tutorial, I'll teach you how to install pre-made firework brushes and how to quickly create glow effects using Layer Styles and Masking.
And if you'd love to find even more Photoshop fireworks add-ons, scroll down after this tutorial. We'll share a hand-picked selection of our top fireworks PSD resources from Envato Elements.


Some people love detailed written tutorials. Others prefer to watch videos. If you belong to the latter group, you can learn how to make fireworks in Photoshop by following our video on the Envato Tuts+ YouTube channel:

What You'll Learn in This Photoshop Fireworks Tutorial
- How to unzip brushes and use them in Photoshop
- How to set up the night sky
- How to create the glow effects on the red fireworks
- How to create an orange glow layer effect
- How to create a purple inner glow layer effect
- How to make the orange sparks glow
- How to create the glow effects on the blue fireworks
- How to add finishing touches
What You'll Need
For this Photoshop fireworks tutorial, I'll be using three brushes from the 25 Hi-Res Fireworks Brushes set by SPetrany.
These fireworks PSD brushes are:
- Fireworks 01
- Fireworks 02
- Fireworks 06
This is what the brushes look like in Photoshop. In this lesson, I'll also cover how to install brushes in Photoshop.


Because I use Windows, this tutorial will cover extracting files on a PC. However, the steps after file extraction in Photoshop are the same across all platforms.
You may require an unzipping utility. I prefer to use 7-zip, which is a free, open-source file unzip utility if you do not have an unzipping program available.
In this tutorial I have included the PSD I created the artwork in. This is so you can see for yourself how I created the effects. Have a play with the settings I used, or create your own!
Fireworks Base Illustration


1. How to Unzip Brushes and Use Them in Photoshop
Step 1
After you have downloaded your fireworks PSD brushes, open the folder where you have saved the zip file. Brushes are generally saved in zip files with the brush file (called .abr which is an Adobe Photoshop Brush File), some license agreement documents, and thumbnail images. Here is the .zip file in a folder on my C:/ drive.
Note: I cannot include the brushes in this tutorial. Please feel free to use any fireworks brush Photoshop you wish or purchase the set from Envato Market.


Step 2
Next, in the folder, right-click on the .zip file and in the dropdown there should be "7-zip"; click on "extract here". If you are using another file extraction utility, these names may be slightly different. This will extract the contents of the brushes file into your folder.


Step 3
Double-click on the folder—in this case SGP Fireworks Brush Set. In here are a selection of fireworks brush Photoshop files. There are two folders for images in case you cannot get the .abr file to work or wish to make your own brush settings from scratch. There are two sets of installation instructions, as a .txt file and SGP_Fireworks_Instructions.psd. If you are ever unsure of how to install your brushes, then check these out!
The file we need is SGP_Brushes_Firworks.abr.
Unfortunately, it's not a simple case of double-clicking this file to install it in Photoshop, so next I will show you how to add these brushes to your brush collection!


Step 4
In Photoshop's Brush Presets, which is hotkey F5, click on the dropdown arrow and select Replace Brushes.
Alternatively, you can Load Brushes which will add the brushes to the end of your list.


Step 5
If you selected Replace Brushes, a dialogue will pop up that asks you if you want to save the brushes you have in the current configuration.


Step 6
Next we navigate to where you have extracted the brushes, which is in my case Computer > (C:) > Hannibal > Brushes, and select the SGP_Brushes_Firworks.abr file and click Load.


Step 7
This is one configuration of the Brush Presets. Depending on preference and type of brush, you may wish to set this up differently.
There are two main kinds of fireworks brush Photoshop: brushes which are intended to be used as brushes for strokes, and brushes which are to be used as a stamp. These are the latter. These can also be modified in exactly the same way as any other brush. For the "stamp" style, I prefer to view them as Large Thumbnails. In the Brush Preset dropdown, select your preferred setup.


Here's how the brushes look as Large Thumbnails. Aren't they pretty? Next, I will show you how to use three of these brushes to create our glowing fireworks.


2. How to Set Up the Night Sky
The brushes we will be using are:
- Fireworks 01
- Fireworks 02
- Fireworks 06
Step 1
Here I have created Groups with Firework Brushes. You can do this by dragging layers into a group. Groups can be created by pressing the icon at the bottom of the Layers panel that looks like a cardboard folder. The first group has Fireworks 01 and Fireworks 02; the second group Fireworks 06. Here I've used white to make sure I get the size right and it works in the composition.


These were created by having the Brush selected (B) and selecting your brush of choice from the Brush Presets (F5).
For the first, I select Fireworks 02 and try out the brush. To change the size of the brush, press the square brackets [ and ].


I decide it's a bit bland on its own, so on a New Layer (Control-Shift-N) I overlay the Fireworks 01 which looks like this:


Here is how the final Fireworks 06 brush looks on its own.


Once you have them in your composition, we can now move on to choosing our colours.
Step 2
In each group, we create a New Layer and press G, which is the Fill command, to fill that layer with the desired colour. Next, we right-click on that coloured layer and select Create Clipping Mask. This will only show colour where there are pixels below. Then press Control-U to bring up the Hue/Saturation slider.


Use this to modify the layer colours until they look good.


Alternatively, just stamp the fireworks in with the colour you desire. I like this method as it means I can change them easily. You can also use Gradients as Clipping Mask Layers.
Step 3
Flatten the colour layers with the individual fireworks layers. You can do this by selecting the two layers and pressing Control-E.


Step 4
Duplicate the base layer three times to create separate effects layers. You can do this by dragging the original layer onto the New Layer icon at the bottom of the Layers panel. For this, it does not matter what colour these layers are. I have used Hue/Saturation (Control-U) to make them black so that you can see them more easily.


3. How to Create the Glow Effects on the Red Fireworks
Step 1
To begin, we will create an Outer Glow. Double-click on the layer to bring up the Layer Styles. The Layer Styles are powerful tools that can change the appearance of the layer without changing its original content.
Before we get started creating the glow effects, here's a note on the difference between Opacity and Fill Opacity. Select Blending Options to see this dialogue. Opacity (under General Blending) changes the opacity of the layer and effects, whereas Fill Opacity (under Advanced Blending) only changes the opacity of the layer contents and not the effects. For this, we will be setting the Fill to 0%.


Next, in Outer Glow, I have the Blend Mode set to Screen. I have found this is the best setting for creating a glow on a dark background.
You can select any colour or gradient for this by clicking either the coloured square or gradient drop-down below Noise in the Structure section. Ensure you have Preview selected so you can see a live update of the effects.


Here you can see the before and after. This looks good, but the glow is too uniform. Let's try masking off these effects.


Step 2
To create a mask, select the layer you wish to mask and press the "rectangle with a circle" icon at the bottom of the Layers panel. Next, paint in black to hide any artwork and white to paint it back in. I like to use a soft, round default Photoshop brush for this.


Here I have painted some areas away to show an issue you will come across when masking Layer Styles. Any area you mask off the effect will continue to wrap around the edges.
Note: here I have turned off the base layer so you can see this phenomenon more clearly.


Step 3
Luckily, there's an easy fix for this! Back in the Layer Style dialogue, select the Blending Options. In the Advanced Blending section, there is an unchecked box next to Layer Mask Hides Effects. Now your masks will affect whatever effect you apply, and this keeps them completely editable!
Make sure you do this with each Layer Style instance.


Step 4
Create a mask on the Effects 1 layer by pressing the mask icon at the bottom of the Layers panel, which is a rectangle with a circle.


Step 5
Using a soft brush, paint in black to the centre of the firework so the effect only makes the ends of the sparks glow.


Here you can see a before and after and what a difference it makes.


4. How to Create an Orange Glow Layer Effect
Step 1
On Layer Effect 2, we need an orange glow to add a bit more oomph. The way I choose colours is by moving around the colour wheel, so for a red object I would make the glow orange. If the object was orange I'd go yellow and so on. In this case I set the blend mode to normal as that's what seemed to work the best.


Step 2
I upped the Range and Size settings to make the orange come out further and pack more punch.


Step 3
As before, we create a mask and paint out some of the central outer glow.


Step 4
Zoom in and mask away some of the areas of the individual trails.


This is starting to look great, but I think we need a bit of variation with the colour.
5. How to Create a Purple Inner Glow Layer Effect
Step 1
On Layer Effect 3, we select Inner Glow and a gorgeous purple colour. I chose purple because it's complementary to the orange and will make the firework pop!


Check this out!


Step 2
Again we create a mask, but rather than masking the inside of the firework, we paint the outer edges so the purple stays in the middle.


Next, we'll move on to the orange sparks!
6. How to Make the Orange Sparks Glow
Step 1
I have turned on the sparks layer. It looks OK, but it needs a little extra.


Step 2
In the Layer Style, we go into inner glow and pick a bright red with the blending mode set to Normal. Play with the Size so the glow stays around the inner edge only.


If you wish, you can paint some of the effects in the layer masks.


7. How to Create the Glow Effects on the Blue Fireworks
Step 1
Duplicate the base layer twice by dragging the original layer onto the New Layer icon.


Step 2
In the Layer Style, select Drop Shadow. Next, we change the Drop Shadow colour to a high-saturation teal and set the blend mode to Normal. Increase the Spread to 2% and the Size to 144 px to make a big cloud behind the firework.


Remember: Check Layer Mask Hides Effects!


This makes the blue sparks glow against the purple and navy sky!


Step 3
I know that I want to add an Inner Glow to the explosion. To give a convincing glow, you should choose a pale, high-saturation version of the original firework colour in the colour selection—this is the square marked below Noise.


Play around with the settings until you find something you love!


Step 4
OK, we need a bit more punch and "oooh!" for this, so I take an incredibly pale royal blue and set that as the Outer Glow. Both these effects are on the same layer. I do this as I want the mask to relate to both of them. Remember in the Layer Style Blending Options to check Layer Mask Hides Effects.


This is looking fantastic and really festive! The colours really pop off the screen.


8. How to Add Finishing Touches
Step 1
Another way to add in a glow is to use one of Photoshop's default soft brushes. Here I painted in a large, soft cloud in an orange-red on a New Layer behind all the red fireworks.


Here's how the glow looks in place, although I'm not 100% happy with it.


Step 2
Using Hue/Saturation (Control-U), I changed the background glow to a pinker red, which made the purple tails pop a bit more.


Your Photoshop Fireworks Design Is Done!
In this Photoshop fireworks tutorial, you've learned how to install fireworks PSD brushes and how to create glow effects using Layer Styles.
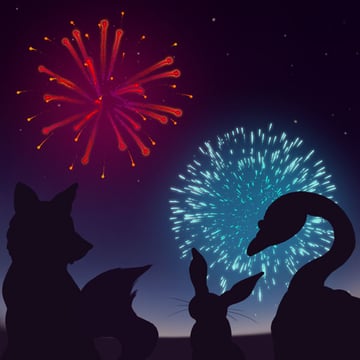
You'll be able to create a glow on anything you wish, from fireworks to magic spells, sci-fi scenes, and text. I have attached the .PSD with the background and creature silhouettes included if you would like to try this process out yourself!


5 Top Fireworks Photoshop Actions and Resources From Envato Elements
Now that you know how to make fireworks in Photoshop, you might be looking for more resources to make more awesome designs.
If you're an avid Photoshop user or a design enthusiast, you'll love Envato Elements. The subscription-based marketplace offers you unlimited downloads for a flat monthly fee.
Download Photoshop add-ons, action and presets, graphic templates, stock photos, and more! Here are our top five resources to create fireworks in Photoshop:
1. Fireworks Photoshop Action (ABR, ATN)


This pack of fireworks Photoshop brushes and actions is a great option. You'll be able to quickly create a Photoshop fireworks design in a few clicks.
The fireworks brushes and actions are easy to use. You can either save the result as a static image or as an animated GIF. And if you need extra guidance, the download includes a video tutorial!
2. Sparklers Animation Photoshop Action (ABR, ATN)


Do you prefer to add a touch of sparkles? This pack of actions and brushes could be a nice addition to your Photoshop fireworks design. Just like the previous resource, you can also save the design as a static image or as an animated GIF.
3. Meteor Shower Light Photoshop Action (ABR, ATN)


Who doesn't love to watch meteor showers? Now you can recreate this effect with this pack of actions and brushes. The meteor shower rain lights are a great complement to a fireworks Photoshop effect. Try them out today and save them as an animated GIF as well!
4. 20 Fireworks Lightroom Presets & LUTs (XMP, PNG)


This pack of presets for Adobe Lightroom and Photoshop is a fantastic option for your festive designs and pictures. These fireworks presets claim to give your picture the perfect boost of colours by bringing up the colours and keeping the shadows neutral.
The complete pack includes:
- Baby Reveal (5 Presets)
- Blue Highlight (5 Presets)
- Blue Sky (5 Presets)
- Burst (5 Presets)
- LUTs for Premiere Pro, After Effects, Final Cut Pro X, DaVinci Resolve, OBS Studio, Spark AR Studio, and more
5. 20 New Year Lightroom Presets & LUTs (XMP, PNG)


Get in a festive New Year spirit with these awesome presets for Adobe Lightroom and Photoshop. Once you create fireworks in Photoshop, you can enhance them with these cool presets.
The pack includes:
- Fireworks (5 Presets)
- Gold Glitter (5 Presets)
- New You (5 Presets)
- Sparklers (5 Presets)
Explore More Photoshop Tutorials and Resources
I hope you liked this tutorial on how to make fireworks in Photoshop. Curious to learn and discover more cool tutorials? Check out this selection of amazing Photoshop resources from Envato Tuts+:

 How to Apply an Outer Glow to Layer Styles in Photoshop

 How to Add Light in Photoshop


 How to Make a Melting Text Effect in Photoshop


 How to Create Water Effects in Photoshop

 How to Create a Silhouette in Photoshop


 Ultimate Guide: How to Rotate in Photoshop


 How to Create an Underwater Text Effect in Photoshop


 How to Mirror an Image in Photoshop


 30+ Best New Photoshop Actions & Photo Effects (Updated for 2024)


 20+ Best Photo Filters and Effects for Photoshop for 2024

Editorial Note: This post has been updated with contributions from Maria Villanueva. Maria is the Associate Editor of the Tuts+ Design channel.
 By
By


