

Spanish (Español) translation by Javier Salesi (you can also view the original English article)


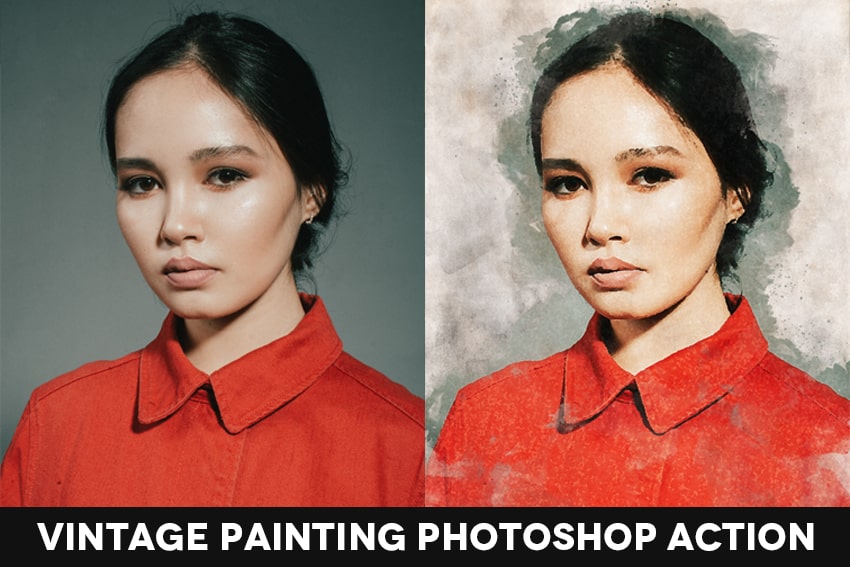
En este tutorial, crearemos una acción de Photoshp para pintura vintage usando filtros inteligentes, máscaras de capa, texturas vintage y pinceles dinámicos.
Puedes crear efectos similares usando acciones de Photoshop, así que podrías consultar mi Acción Efecto de Pintura Vintage en mi portafolio en GraphicRiver.


Recursos del Tutorial
- Cualquier foto que quieras usar para esta manipulación. Elegí esta foto de Envato Elements.
- Un conjunto de pinceles dinámicos y texturas para superponer.
1. Cómo Preparar el Documento
Paso 1
Usa Control-O y luego selecciona la imagen que quiere usar.


Paso 2
Presiona las teclas Alt-Control-I y redimensiona la imagen a 2000 x 2000 px.


Paso 3
Crea una nueva capa usando la combinación de teclas Mayúsculas-Control-N y nómbrala "mask".


Paso 4
Crea un duplicado de tu fondo usando Clic derecho > Duplicar.


Paso 5
Renombra tu nueva capa como "image" y luego haz Clic derecho > Convertir en Objeto Inteligente.


Paso 6
Ahora necesitamos instalar los pinceles en Photoshop. Haz clic en la tecla B para activar la Herramienta Pincel y luego ve al Gestor de Ajustes Preestablecidos.


Paso 7
Después de eso, haz clic en Cargar y selecciona los pinceles de los archivos adjuntos del tutorial.


2. Cómo Crear una Máscara de Recorte de la Capa
Paso 1
Ahora comencemos a crear la máscara de nuestra imagen. Selecciona la capa "mask" y haz clic en la tecla B, y luego dibuja trazos con el segundo pincel del conjunto, como se muestra en la imagen de abajo.


Paso 2
Dibuja los pinceles en los bordes de la figura con el primer pincel del conjunto.


Paso 3
Mueve la capa mask debajo del objeto inteligente.


Paso 4
Selecciona el objeto inteligente y luego haz Clic derecho > Crear Máscara de Recorte.


Paso 5
Haz invisible la capa "Fondo".


3. Cómo Crear un Efecto de Pintura en Photoshop
Paso 1
Selecciona la capa de tu objeto inteligente y ve a Galería de Filtros > Artístico > Pincel Seco. Usa los siguientes ajustes.
- Tamaño del Pincel: 5
- Detalle de Pincel: 6
- Textura: 1


Paso 2
Después de eso, ve a Galería de Filtros > Trazos de Pincel > Sombreado y usa los siguientes ajustes:
- Longitud de Trazo: 9
- Enfoque: 6
- Intensidad: 1


Paso 3
Ve a Galería de Filtros > Artístico > Pinceladas y usa los siguientes ajustes:
- Tamaño de pincel: 2
- Enfoque: 1


Paso 4
Y para el último filtro, necesitamos añadir un efecto de salpicado. Ve a Galería de Filtros > Trazos de Pincel > Salpicaduras con los siguientes ajustes:
- Radio: 5
- Suavizado: 5


4. Cómo Crear un Efecto Vintage en Photoshop Usando Texturas para Superponer
Paso 1
Ve a Archivo > Colocar y selecciona "Background Texture" (Textura de Fondo) Redimensiónala a los bordes del documento mientras mantienes presionada la tecla Mayúsculas.


Paso 2
Después de eso, mueve "background texture" a la parte inferior del panel Capas.


Paso 3
Ahora necesitamos colocar y redimensionar la segunda textura como lo hicimos antes.


Paso 4
Ahora cambiemos el Modo de Fusión de la textura a Multiplicar.


5. Cómo Crear una Corrección de Color de la Imagen
Paso 1
Y para los últimos pasos, necesitamos crear una corrección de color del documento. Ve a Capa > Nueva Capa de Ajuste > Brillo/Contraste y establece los siguientes ajustes:
- Brillo: 30
- Contraste: 45


Paso 2
Ve a Capa > Nueva Capa de Ajuste > Tono/Saturación y establece el Tono en +25.


¡Fabuloso Trabajo, Ahora Terminaste!
De esta manera sencilla, podemos crear ilustraciones creativas desde cualquier foto usando filtros estándar de Photoshop, texturas para superponer, y pinceles dinámicos.


Espero que hayas disfrutado este tutorial; por favor no dudes en contactarme para cualquier ayuda con las técnicas que cubrimos. También puedes consultar mi Acción Efecto de Pintura Vintage en mi portafolio en GraphicRiver.


Cómo Crear una Acción de Photosohop para Efecto de Pintura Escurriendo


Cómo Elaborar una Acción de Photoshop para un Efecto de Libro de Historietas Retro Desde un Retrato


Cómo Crear un Revelado de Foto Animado para Historias de Instagram en Photoshop


Cómo Convertir una Foto en Arte al Crear una Acción de Photoshop


