
Designing art for use on a t-shirt or any other kind of apparel can be a bit of a challenge. Not only do you have to come up with something interesting and creative, but you also have to work inside certain dimensions and use a limited color pallet. The more colors you use, the more ink the printers have to use and that costs a lot more money, so it's important to keep your colors as limited as possible.
This tutorial will show the process of how I go about creating an illustration. Of course there are a million different ways designers and illustrators go about creating work, but hopefully this will give you some helpful information.
You can find the Source files in the directory labeled 'source' that came in the files that you downloaded. You may wish to look through them briefly before we begin.
Tools
These are the tools that I use to go about creating an illustration on the computer:
- Adobe Illustrator
- Wacom Intuos3 Drawing Tablet
- Traditional Drawing Instruments (like pencil and paper)
Sketching
You don't have to have a sketch before you start working. Many illustrators just begin drawing into illustrator without making a sketch first, but it makes things a lot easier to have a reference before heading on to the computer. Following is what my sketch looks like.


Step 1
Open Illustrator and set your dimensions to what the picture has displayed. These are the dimensions I usually work in for creating most of my illustrations and apparel designs. These settings can always be changed later if necessary, but don't forget to name it.
Now as soon as your dimensions are set, go ahead and save the project. I can't stress enough the importance of saving every chance you get. You don't want to have your hard work disappear because of a program error, computer malfunction, or if the power goes out.


Step 2
Place the sketch onto the art board. This can be done by going to File > Place, and selecting the sketch from your hard drive. Once the sketch is in place, resize it as you feel necessary, then take the opacity down a bit making it easier to trace over.


Step 3
Once you have your image resized, lock the layer and create a new layer. This will be for all the basic line work, so title it "lines." Making different titles for each layer isn't necessary, but can help with confusion, especially if you work with multiple layers as I do.


Step 4
Choosing your brushes is very important when working in Illustrator. There is no pressure sensitivity in Illustrator, so you have to constantly keep changing your brushes and your brush size. These are the brushes that I use, found under the Artist Ink section found in Illustrator's Brush Panel. You don't have to use these exact brushes, it's important to find brushes that fit your style and you are comfortable with.


Step 5
Here comes the fun part, drawing! Select the brush you want to use; I usually start with the Artist Ink brush that is tapered on both ends. I begin working on the face before anything else because usually it is the main focus of the image.


Step 6
Using the Direct Selection Tool for sections that are round, or a little bit more technical is helpful. Also, moving or deleting anchor points after a path is drawn can create smoother curves or straighter lines.


Step 7
Once a few of the basic lines on the face are out of the way, create a new layer to begin to work on the details. This usually requires a mix of all the brushes at various sizes. A separate layer for details is created because it is easier to control the lines if you need to make changes to a specific detail or a basic line.


Step 8
I usually move back and fourth between the basic "lines" layer and the "detail" layer. Now go ahead and finish the basic lines and some of the details for the face and body.


Step 9
There is a reason I haven't drawn the wings yet. The wings will be put on a separate layer with it's own detail layer. This is done to make things easier later on in the process, just in case I ever want to change the angles or sizes of the wings. Once the layers are made, draw the wings the same way as the face and body were drawn.


Step 10
Solid blacks are then added to the drawing on yet another separate layer, I usually put the layer on top of all the others. The blacks are laid in with the use of the Pencil Tool. Rough shapes are drawn where the blacks are needed, and then filled in. This would be easier to do when colors are added, but I like to see the way it looks before I begin to think about colors.


Step 11
I don’t like the way the wings are looking and fitting on the artboard. So, I select the "wings" and "wing detail" layers, then use the Selection Tool to move, rotate, and scale the wings to my liking. This does create a small problem with the way the wing lines line up with the body, but that can be easily fixed with more drawing and erasing of certain lines.


Step 12
Now, here comes the most important part. When I color in Illustrator, I use the Live Paint Tool. In order for it to work properly, all the paths have to be closed. The best way to check for this is to view the art in an Outline mode. This can be seen by going to View > Outline. The image then looks like the one shown below.


Step 13
The first image below is what an open path looks like. We will change it from this to what the second image looks like. This is done by using the Direct Selection Tool to move certain anchor points.
Keep in mind, it is incredibly important that you look at every single basic line and making sure the paths are closed. It's a bit of an annoying thing to do, but it will help you out a lot once you start coloring.


Step 14
This next thing we'll work on is just an aesthetic choice I made, but I feel it makes the line work look better and the drawing pop more. The problem with using a brush with both tapered ends is that some lines are tapered when they don't need to be, as shown below.


Step 15
This can be fixed by using any of the other brushes that only have one end that is tapered and going over it just where it's thinner than the rest of the line. I do this on the detail layer and the line should look like the image below when finished.
During this step you can also add any more details that you feel are necessary.


Step 16
Now, there is a slight problem towards the bottom of the drawing where the legs are. The legs will be cut off because of the way I sized the image, so some kind of solution has to be made. My solution is to add some grass to the image. The Pencil Tool is used to draw some rough grass shapes to the bottom of the drawing on the basic "lines" layer. Don't worry, if it doesn't have to look perfect, it will all be fixed later in the tutorial.
Once this is done, you can merge the "lines" and "wings" layers, as well as the "details" and "wings detail" layer, so you end up with three layers: "blacks," "lines," and "details."


Step 17
Let's review another important step to set up for coloring. Make a copy of the "lines" layer. Move it to the bottom, and rename the layer "base."


Step 18
Use the Live Paint Tool, select all the lines and Click to Make a Live Paint Group.


Step 19
Once the Live Paint Group is made, select all again and make sure that the "base" layer has no stroke to it (if the stroke is kept, it makes all the lines look jagged).
Duplicate layers for each color that will be used and begin coloring. The Live Paint Tool sort of acts like the Paint Bucket Tool in Photoshop. I usually title every "base layer copy" a certain color or a part of the body the color is being used for to keep things organized.


Step 20
I'm a big fan of cell shaded art and cartoons, so I like my art to look like that. To get this look, add shadows to certain parts of the image. This is done with a darker color and the use of the Pencil Tool. A simple shape is drawn and the color is filled in.


Step 21
This is the result of the shading.


Step 22
It's also done for darker colors as well. To keep the mess under control in the layers panel, try to keep the same colors on the same layer.


Step 23
There is a small problem with the wings. They are slightly outside of the art board and will get cut off when printing or importing into another program. This can be easily fixed by changing the dimension of the artboard. To change the dimensions go to File > Document Setup and change them to the settings shown in the first image below. The second image shows the problem is solved!


Step 24
Now it's time for even more detail. First, choose a background color, I chose black, and make a new layer under all the existing layers. Use the Rectangle Tool and draw a square as big as the artboard, then fill it with black.
Now it's time to add the grass. Make a new layer on top of all the existing layers and title it "grass." Use your various brushes and brush sizes and begin drawing some random lines to simulate the grass. It should end up looking like the second image below.


Step 25
Now it's time to start thinking about a background (if you haven't thought of one yet). I want some kind of smoke-like appearance. I create a new layer on top of the black background layer, then use the Pencil Tool and begin drawing random shapes. Lastly, I fill them with a color.


Step 26
Something is missing; maybe we will put him in a graveyard. Make a new layer on top of the "smoke" layer. Next, use the Pencil Tool to draw random graves and grass. If some of the shapes aren't to your liking, just use the Direct Selection Tool and move around some anchor points. The second image below is the result.


Step 27
Here is a quick shot of what the Layers Panel looks like at this point.


Step 28
Now we are pretty close to being done! You can mess around with the colors to see what works best. Go a little bit crazy if you want!


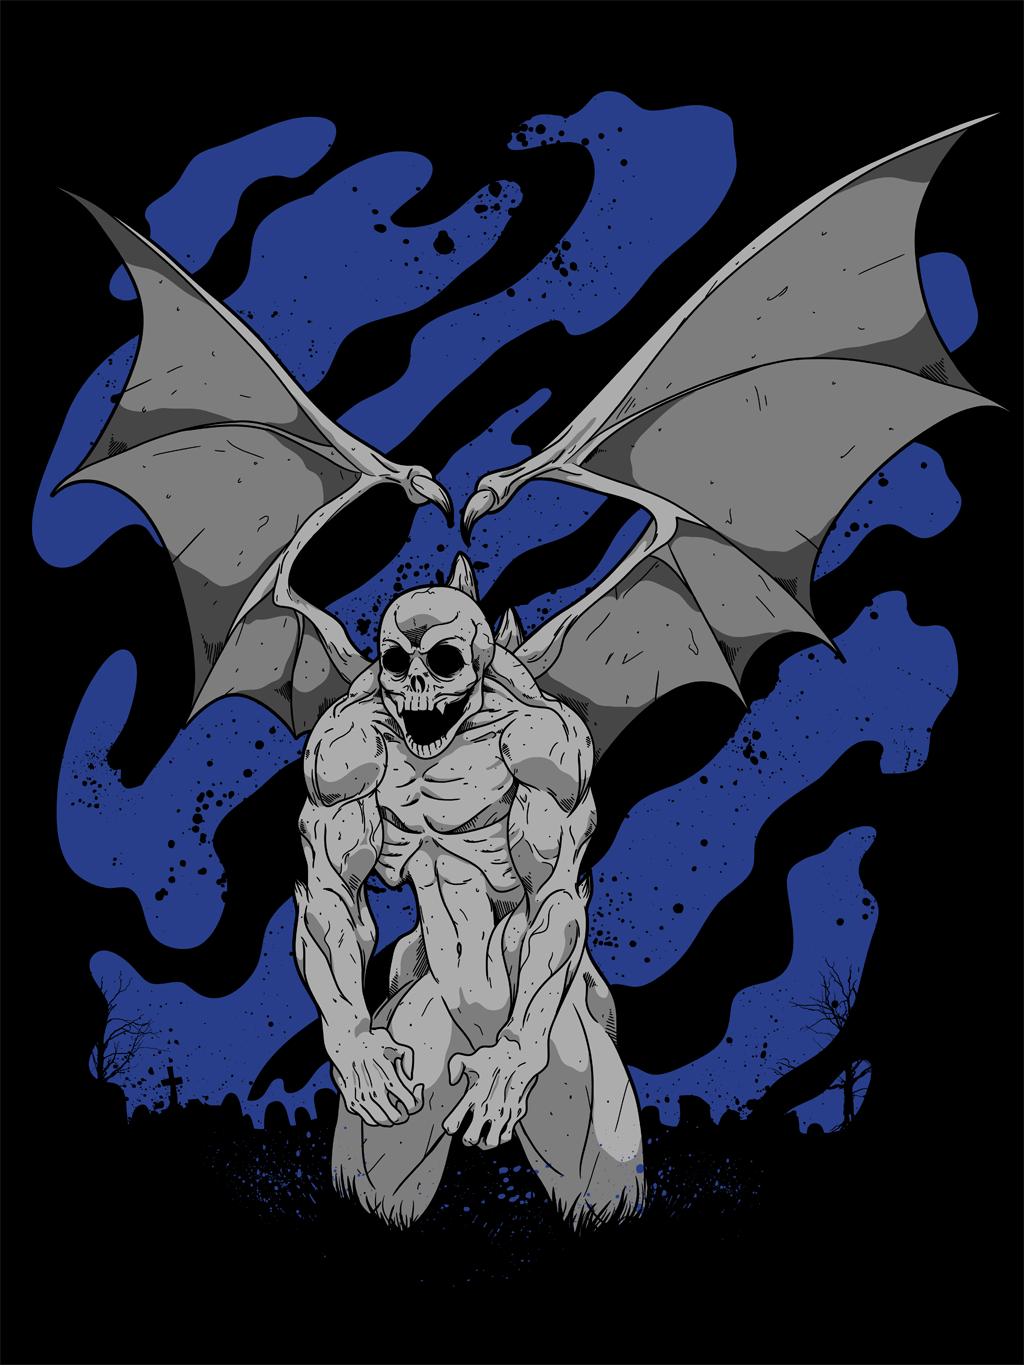
Final Image
Once you have chosen the right color scheme, add any remaining details you would like and then you are finally finished! If this is for a band or a certain company, you may be asked to add some kind of text to it, but for now this is what the final image looks like. You can view the large version here.
Conclusion
After all the hard work is done, all you have to do now is figure out what to do with the image. Maybe you'll make a poster of it, I usually will mock it up on a t-shirt in Photoshop and either show the client my work or try to sell it. Now you’re done and you can move on to your next project! Hopefully someone will buy your art, or print it yourself so you can see the finished product in some sort of physical form.


 By
By


