
In this project we'll walk you through the entire process of creating a poster design with a strong environmental message. You'll use Photoshop to assemble the illustration, then add the text and graphics with InDesign to produce error-free artwork. Many of the photos used in this tutorial are available free for Psd Premium Members. Let's get started!
Tutorial Assets
We have granted a complimentary personal license to Psd Premium Members for most of the PhotoDune images used in this tutorial. They can be accessed in the source files of your premium download. If you are not a premium member, you can download the images used in this tutorial below. You'll also find a template, additional images, and the InDesign print-ready artwork in the source folder too.
- Hands (Not in source files)
- Clouds
- Iceberg
- Waterfall
- Tree
- Animal group
- Elephant
- Penguins
- Vulture
- Cloud brushes
Preparation
Every image starts life as a concept before it can be realized. Before we get started, I'd like talk about how I approach a typical illustration brief. If you're working commercially, you'll probably be commissioned because your style fits the brief. Depending on your working relationship, sometimes just an email or phone call is sufficient before you commence work.
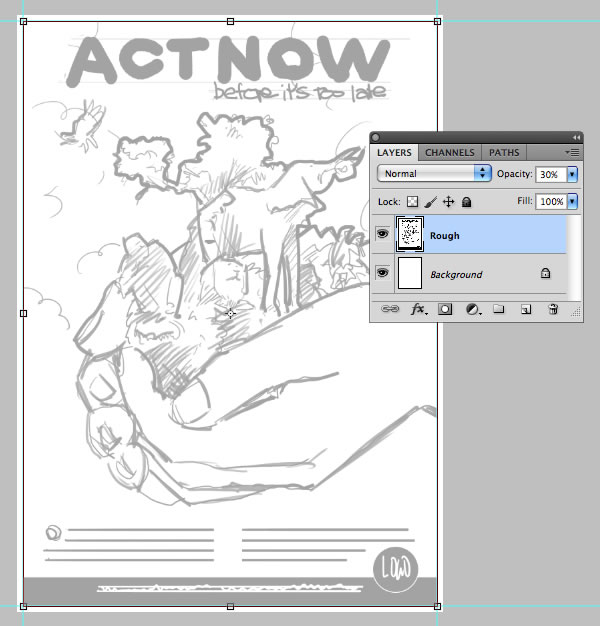
Some clients or art directors may ask for a preliminary rough concept for approval – It's here that you need to use your judgement on whatever to spend hours comping elements together which could well be rejected, or just do a quick sketch. I opted for the a bit of both. The sketch shown below was done with a pen and tablet and used as a template for the final artwork.


Step 1
Create a new Photoshop file to the trim size of the poster: 21cm x 29.4cm, set the Resolution to 300dpi, the Color Mode to RGB and the Background Contents to White.


Step 2
Press Cmd/Ctrl + semi-colon to view Guides and Cmd/Ctrl + R to view Rulers. Now snap guides to all four edges of your canvas.


Step 3
Hit Shift + Cmd/Ctrl + I to access the Canvas Size dialogue box. Ensure the central Anchor point is highlighted, then increase the Height and Width fields by 6mm and keep the Canvas extension color as White. After clicking OK your canvas now has the 3mm bleed on all edges needed by your printer.


Step 4
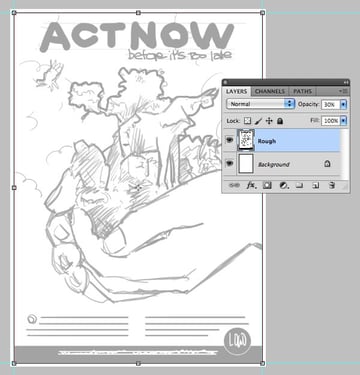
Open the "Scamp.jpg" from the "source" folder and Shift-drag the layer thumbnail into your new canvas to create new layer. Name it "Rough" and reduce its Opacity to 30%.
Remember, this layer is a guide, so you'll need to toggle its visibility as you work through the project.
Step 5
Open the hands. To extract the image from the white background, first set the Magic Wand Tool (W) to Add to selection, a Tolerance of 15, then check Anti-alias and Contiguous in the Options bar. Now select all the white background.


Step 6
Choose any selection tool and click the Refine Edge button in the Options bar. In the next window choose On Black (B) from the View Mode drop-down menu. This mode will give the best preview for any undesired white halos. Next, copy these settings and click OK.


Step 7
You'll now see a new masked layer appear and the visibility of the original layer disabled. Zoom in and check you're happy with the results of the Refine Edge command. At this point you can modify the mask by painting with either white (to reveal), or black (to hide) with a small brush (B) set to around 50 hardness if needed.
When you're happy, drag the mask thumbnail into the trash icon at the foot of the Layers tab and click Apply in the following window.


Step 8
The next stage is to eliminate the protruding plant. Grab a round-edged Eraser (E), again set to around 50 hardness. Zoom in and remove the area nearest the hand, but follow the shape of the hand as shown at the top of the screengrab. Now increase your brush diameter and remove the remainder.
If you feel uneasy about permanently removing pixels, do this part on the mask before applying it in the previous step.

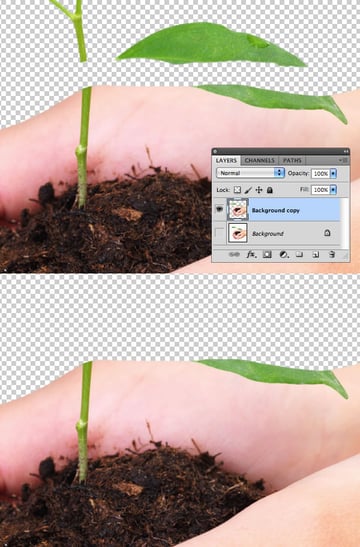
Step 9
We now need get rid of the remaining leaf overlapping the thumb. Use the Lasso Tool to draw a rough selection as shown. Hit Shift + F6 to open the Feather window, enter 10px and click OK. Now press Cmd/Ctrl + J to copy the selection to a new layer, then tap the arrows on your keyboard to nudge the layer up as indicated.
Note: If you find the "marching ants" annoying, hit Cmd/Ctrl + H to hide the visibility of the selection – just remember to deselect when you're done.


Step 10
Continue to select, Feather and copy additional areas from the "Background copy" layer to cover the leaf.


Step 11
When your happy, Shift-click all your patch layer thumbnails and press Cmd/Ctrl + E to merge them. Now Cmd/Ctrl-click the "Background copy" thumbnail to create a layer-based selection. Ensure your top layer thumbnail is highlighted in the Layers tab, hit Shift + Cmd/Ctrl + I to Inverse the selection and press delete to remove the overlap.


Step 12
Merge the top layer down, then use the Spot Healing Brush (J) to fix small flaws and the Patch Tool (J) over any larger areas. That's it your hand image should be perfectly extracted and expertly retouched.


Step 13
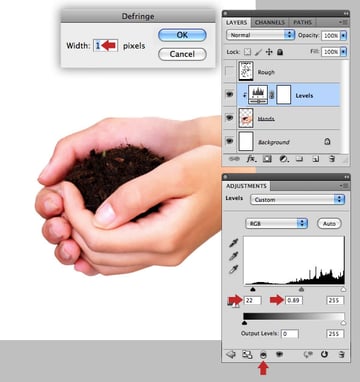
Add the hands to your project file below the "Rough". Name the layer "Hands", then hit Cmd/Ctrl + T to access Transform and enlarge/position to the right edge of the canvas. Now choose Layer > Matting > Defringe and enter 1px to remove any white edge halos that could be hiding. Next, we'll increase the contrast a little; choose Levels from the Create new layer of adjustment icon at the foot of the Layers tab. In the following window activate the double ring icon to clip the adjustment to the target layer and copy these settings.
Tip: As this project is destined for commercial print, certain on-screen colors will not look the same. These colors are referred to as out-of-gamut. Your monitor creates colors by mixing red, green, and blue light (RGB), whereas your printer creates color by using light-absorbing inks of cyan, magenta, yellow, and black (CMYK), these pigments are much more limited in their ability to reproduce color. To remedy this, work in RGB Mode (to have access to all filters etc.) and press Cmd/Ctrl+ Y to Proof Colors – this will avoid any nasty surprises when the job is printed.

Step 14
Now modify the same layer with a Hue/Saturation adjustment. Lower the Master Saturation to -14, then the Reds (from the drop-down menu) to -19.


Step 15
Click on your Foreground swatch to open the Color Picker and choose # ecf5f9, target the "Background" layer and press Alt/Opt + Delete/Backspace to fill with the new color.


Step 16
Press D to reset your Foreground/Background colors to their default black and white. Add the cloud image as a new layer above the "Background" and enlarge as shown. Name this layer "Sky", reduce the Opacity to 79%, then add a layer mask. Set the Gradient Tool (G) to Foreground to Transparent, then choose Linear and check Dither/Transparency in the Options bar. Target the layer mask and Shift-drag as indicated by the direction and length of the arrow.


Step 17
Place an unclipped Exposure adjustment (to affect all underlying layers) above the "Sky" and apply the following settings.


Step 18
Now add another unclipped Color Balance adjustment above the previous one and reduce the Midtone Red to -25.


Step 19
Open "Moss.JPG" from the "source" folder. The small detail in this moss-covered rock will provide the perfect setting for our miniature animals. First, go to Filter > Sharpen > Smart Sharpen and copy these settings.


Step 20
Because the background is more complex, use the Quick Selection Tool (W) to select the stone, then use the Rectangular Marquee Tool (M), set to Subtract from selection to chop off the bottom portion. Now apply the following Refine Edge settings.


Step 21
When your happy, remove and Apply the mask to the duplicate layer.


Step 22
Add the isolated rock as a new layer below the "Rough", label it "Land", then Transform/position so it fits snugly within the hands. Now add a mask and use a selection of Photoshops default natural media and soft/medium edged brushes to blend the environment into the hands.
Note: My mask is shown in isolation on the right of the screengrab for clarity.


Step 23
Clip a Levels adjustment to the "Land" and set the blackpoint/midpoint sliders as below to boost the contrast.


Step 24
Next, add a Color Balance adjustment to the same layer, increase the Midtone Cyan/Green and reduce the Blue as shown.


Step 25
Open the iceberg and use the Quick Selection Tool (W) to make a selection around the ice, then Feather by 1px and Copy to the Clipboard.


Step 26
Paste as a new layer below the "Rough", name it "Ice", then re-size/position over the right side of the land. Add a mask and use an assortment of brushes at different opacity to blend the snow into the vegetation.


Step 27
Clip a Levels adjustment to the "Ice" and copy these settings.


Step 28
Add the waterfall at the top of the stack, then re-size/position just below the ice cap. Add a mask, then hit Cmd/Ctrl + I to Invert the mask to negative. Now use a variety of white brushes to gently merge it into the scene.


Step 29
Open the tree. This time we'll use a different method to get rid of the white background. Go to Select > Color Range, then click anywhere on the white background. Check the Invert button, set the Fuzziness slider to 52 and hit OK.


Step 30
With the selection active, access the Refine Edge window and apply the following.


Step 31
Zoom in and carefully examine the new layer for any black holes the Color Range selection may have included in the tree trunk. If you spot any, paint them out on the mask with a small white brush.
Note: To view your mask full-size, simply Opt/Alt-click its thumbnail in the Layers panel.


Step 32
Apply the mask, then add the tree to your working file as shown. Name it "Tree", then carefully mask the base of the trunk. Next, clip a Levels and Color Balance Adjustment Layers to increase the contrast and intensify the greens.


Step 33
We want the Levels to affect the trunk and branches and the Color Balance to affect the leaves, so paint on each adjustment mask to limit their effects (shown at the bottom of the screengrab).


Step 34
Add a new layer called "Retouch". Set the Clone Stamp Tool (S) to Current & Below and turn off the adjustment cloning option. Now use an assortment of natural-media and soft-edged brushes to add more rocks and vegetation, then clone over the gap on the glacier.


Step 35
Open the animal group, then create a rectangular selection around the gorilla and Copy to the Clipboard.


Step 36
To successfully extract tricky subjects like fur from plain backgrounds we'll use a channel, or density mask. Go to Image > Calculations, in the next window copy these settings to create a composite channel made up from the Blue channel and click OK.


Step 37
Jump to the Channels tab and you'll see the new channel ("Alpha 1") at the bottom. Enable the visibility of the top RGB composite channel. Ensure "Alpha 1" the target channel, the use a white brush paint out the lion.


Step 38
Switch off the visibility of the composite channel, then with "Alpha 1" the target layer, press Cmd/Ctrl + L to access the Levels dialogue box and set the whitepoint Input slider to 277 to remove the pale background grey.


Step 39
By default, white acts as selective channel areas, so hit Cmd/Ctrl + I to Invert the channel to negative, then Cmd/Ctrl-click the thumbnail to create a channel selection.


Step 40
Now activate the top RGB composite channel and Copy the selection to the Clipboard.


Step 41
Paste the selection below the "Rough", re-size and label it "Gorilla". Mask the feet of the Gorilla to reveal some blades of grass, then clip a Levels adjustment to increase the contrast using these settings.


Step 42
Generate a layer-based selection from the gorilla, the add a new layer below it called "Gorilla shadow". Change the Blend Mode to Multiply, squash vertically from the top middle control point, then hold Cmd/Ctrl and skew to the right to create a cast shadow. Next, apply a Gaussian Blur of 3px.


Step 43
Now we'll break up the softness of the shadow with some grain. Set your Foreground color to black, then go to Filter > Sketch > Reticulation and copy these settings.


Step 44
For a realistic shadow, mask the right edge with a black to transparent Linear Gradient, then mask any protruding left-hand areas as required.


Step 45
Use the same workflow to add a cast shadow layer beneath the "Tree" Next, extract the elephant using the techniques you've learnt and place below the "Rough". Re-size/position as shown and label it "Elephant". Clip a Levels adjustment, then add a cast shadow layer.


Step 46
Repeat the cut-out process on the lion and place below the "Rough". Clip a Levels adjustment, then add a shadow layer.


Step 47
Isolate and add the lemma and toucan in the tree. Clip a Levels adjustment to the "Lemma", then add a shadow layer.


Step 48
Finally, extract and place the penguins and vulture, then add shadows as required. That's the basic elements of the composition completed.


Step 49
Sit back and study your image and see where more shadows are needed. I added two more: one cast by the tree over the elephant and one over the lion as indicated. You can also use Inversed selections from your animal layers to delete any shadow overlaps.


Step 50
At this stage I decided to give the "Tree" layer a little more shape. Make a loose selection over the top with the Lasso Tool (L), then Feather by 2px. Now access Warp via Transform and adjust the mesh as shown. You'll also need to modify the clipped Levels adjustment mask accordingly.


Step 51
Download and instal these cloud brushes. Create a new layer below the "Hands" called "Extra clouds". Set your Foreground color to white, then use these brushes in a stamping fashion to taste.
Clip another Levels adjustment to the "Hands" and copy these settings. Now Shift-drag a black to transparent Liner Gradient (G) as indicated to limit the effect to the lower half.


Step 52
Carry out any further cloning as necessary on a new layer called "Retouch 2" below the "Template".


Step 53
Next, we'll apply a non-destructive dodge and burn technique to add highlight and shadow. First, add a new layer called "Dodge and burn" below the "Rough". Press Shift + F5 and select 50% Gray from the Contents drop-down menu and hit OK. Now if you change the layer's Blend Mode to Soft Light the grey will disappear.
From here create a layer-based selection from the "Hands", set the Brush Tool (B) to 30% Opacity and paint with black to create a shadow on the lower half. Repeat this technique, painting within a selection from the "Tree", then paint with white to create highlights. I've changed the layer's Blend Mode to Normal in the screengrab for clarity.
Use the same layer selection painting technique to build up shadows and highlights using black and white respectively. The completed layer is shown on the right.
Tip: If you make a mistake and need to reinstate 50% Gray, set the layer back to normal and pick up the grey using the Eyedropper (I), or use the Color Picker to set all three RGB fields to 128, then paint at 100% Opacity.


Step 54
Here's the layer set back to Soft Light Mode. If you feel the effect is too strong, lower the layer Opacity to compensate – I used 90%.


Step 55
To finish off, we'll add a little sharpening. Place an empty layer below the "Rough" and label it "Sharpened". Now choose Image > Apply Image, ensure the Blending is set to Normal and hit OK. This command creates a single composite layer. Now choose Filter > Other > High Pass, set the Radius to 3.1 px and click OK.


Step 56
Finally, change the layer back to Soft Light. That's the layered file completed, so be sure to hit Save!


Step 57
In the final part of this project we'll use InDesign to create the poster artwork. To keep file sizes manageable, Flatten your illustration, click OK in the next window and Save As a .TIFF file.


Step 58
Launch InDesign and create a new A4 document with these settings and click OK.


Step 59
Go to View > Grids & Guides and activate Show Guides, Lock Column Guides, Snap to Guides and Smart Guides, then View > Extras > Show frame Edges. Now press Cmd/Ctrl + D to locate and place your .TIFF file. Activate the top left icon on the Reference Point Locator and set both coordinates to the bleed guides (-3mm). Next, go to View > Display Performance > High Quality Display, then name the default layer "Placed image".


Step 60
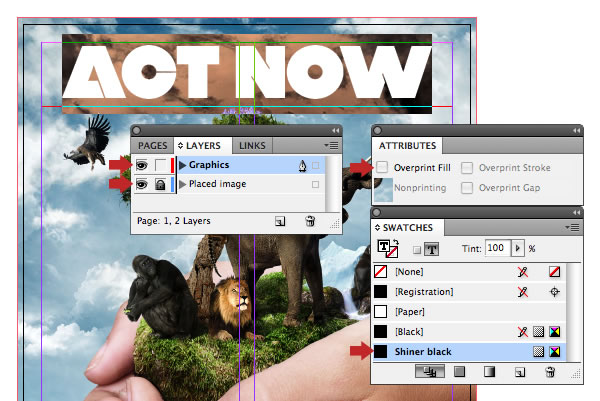
Go to your Swatches tab and use the top-right fly-out menu to select New Color Swatch, then uncheck the Name with Color Value button and label it "Shiner black". Ensure the Color Type is set to Process and the Color Mode is CMYK. Now enter 40% Cyan, 1% Magenta, 1% Yellow and 100% Black. Adding 40% Cyan to the color breakdown makes a deeper or rich black.


Step 61
Lock your "Placed image" layer, then add a new layer called "Graphics". Grab the Type Tool (T) and snap a text box to the top guide and add the main heading colored as "Shiner black" using this font. Go to Window > Output > Attributes and with the text highlighted uncheck Overprint Fill. At this point I decided to omit the second smaller sub heading that I included on my sketch as I felt the message was clear enough.
Note: Mistakes are often made for black text, as traditionally it overprints, but if the text is above a certain size you may see the image or element behind it. The reason for 1% Magenta and Yellow is a fail safe, just in case the printers' RIP is not set correctly and avoids the possibility of the black text and panel overprinting instead of knocking out any elements that run behind them.

Step 62
Use the Rectangle Tool (M) to snap a frame to the bottom bleed filled with "Shiner black". This also should be set to Knockout the underlying colors in the Attributes panel. Now add the whiteout tag line in your own choice of font. I've used FFDin.


Step 63
Snap another text frame from the left guide to the centre gutter. Now go to Type > Fill with Placeholder Text (This will be substituted for actual text once the design is approved). Click on the red cross icon to the right of the box and snap a second text box to reflow the text. Smart Guides will help your new text box match the depth of the first one.


Step 64
Style your body text as required – I used FFDin again at 9pt on 11pt leading. Type this small appearing over a pale background should be colored up with InDesigns default black and set to Overprint in the Attributes panel.


Step 65
Highlight the first paragraph and apply an Initial cap as shown in the Options bar.


Step 66
Grab the Ellipse Tool (E) and add a circle frame roughly 25mm in diameter. Press Cmd/Ctrl + D and locate the "Logo.pdf" from the "source" folder. Now click the Fit content to frame button in the Options bar and snap the logo into place as shown.


Step 67
With the logo selected, choose > Window > Text Wrap and apply the following settings to force the text to run around the logo. If the Text Wrap interferes with the white tag line, select its text frame, press Cmd/Ctrl + B and check the Ignore Text Wrap button.
A low-resolution .PDF can now be sent over for client approval, then when the actual text is in place, another proof sent for final sign-off. The final stage would be a print-ready .PDF using your printer's preferred preset or InDesigns built-in PDF/X-1a2001 preset.


Conclusion and Scope
Now you've worked through this project, why not create your own version of a hard-hitting environmental poster. You could even use different animals such as sea creatures for example?


 By
By


