
This tutorial will explain the steps needed to turn this boring Prius into an awesome street racer. This tutorial is aimed at intermediate users of Photoshop, those who know most of its basic tools and how to use them. This is Part II of a two-part series. Get situated comfortably in your chair, as we pick this series up from where we left off.
Step 24
From this point on, I will mostly be using techniques that I have already explained. I'm not going to go into as much detail in Part II. When using new techniques, I will continue to give a detailed explanation, though.
Draw a path around all the glass on the windows. Make a selection of the path and feather it 0.5px. Make a solid color adjustment layer in the "windows" group and fill it with a very dark gray. Call it "tint." Assign the path as a vector mask on the color fill and turn off the vector mask. Make a noise layer like we did before and apply it as a clipping mask on the "tint" layer.


Step 25
Make a heavily feathered selection around the top of the windows. Make a Curves adjustment layer that lightens the top part so you get a nice fade at the top of the windows.


Step 26
Make a heavily feathered circular selection around the center of the windows. Invert the selection and make another Curves adjustment layer that lightens the outer parts of the windows. Both of these curves layers should be a clipping mask to the "tint" layer.


Step 27
Turn the "tint" layer's Opacity down to 90%. Draw a path along the border of the two triangle windows. Then load the selection of the path. Make a new Curves adjustment layer just above the other two and lighten the selection a bit.


Step 28
Here is what my layer palette and image looks like so far.


Step 29
Turn off the "tint" layer for now. Now we have to retouch out the window support that we don't need anymore. I did it by drawing a path around each part I needed to retouch out. Then I painted in the color that I needed on a new layer.


Step 30
After that I fixed the borders by duplicating parts of the surrounding border from the "base" layer and transforming them to fit.


Step 31
Finally, I created a "seat" from scratch and filled it with a dark gray that matched the surrounding colors. Then I put it just below the "tint" layer.

Step 32
Draw a path that will represent the outline of the door.

Step 33
Create a blank layer at the top of the "paint" section and call it "door." Set a dark gray as your foreground color. Grab the Brush(B) and make the Diameter 3 and the Hardness 50. Now with the "door" layer selected, right-click on the path and choose Stroke Path. Make sure that the source is Brush and that Simulate Pressure is off. Now apply the Bevel/Emboss layer style to the door layer.


Step 34
Go back to the "base" layer and draw a path around the handle. Feather it 0.5px and hit Cmd/Ctrl+J to duplicate it. Bring the duplicate to the top of the "paint" section, then place it where you like it. Mine overlaps the highlight a little so I am going to disrupt the highlight by drawing a path and and filling that part of the path with black like below.


Step 35
Isolate the "base" layer by holding Option/Alt and clicking on the "eye" icon next to it. Grab a selection of the door indentation and duplicate it to a new layer. Call it "side bar." Option/Alt-click on the eye again to turn off isolation.


Step 36
Move the layer so it sits just below the "noise" layer that is applied to the "grad" layer in the Layers Palette. Stretch the "side bar" layer so that it extends the length of the door. Blur the layer a little to get rid of the stretched noise.


Step 37
Now draw a path around it that resembles the original shape. Use the path to create a mask for the "side bar" layer.


Step 38
Isolate the "base" layer once again. Now in the channels palette, drag the red channel down to the New Channel button to duplicate it. Now what we are going to do is isolate that highlight that sits just below the door. On the new channel you made put a harsh curve that makes everything surrounding the highlight black.


Step 39
Draw a marquee around the highlight. Invert the selection. Remove any details that aren't the highlight.


Step 40
Load the selection of your channel. At the top of the "paint" section, make a Solid Color adjustment layer and fill it with white. Now transform the layer until it fits the door. Set the layer to Overlay.
Make a path along the bottom of the car where it should be black. Load the selection and feather it 1px. Fill the "grad" layer mask black in that area to remove the paint.


Step 41
Finally, make a selection along the bottom. Feather it about 25px. Then make a Curves adjustment layer just above the "grad" layer. Then darken it until it almost becomes black.


Step 42
Go to File>Place and select the flames.ai file. Place the flames at the top of the "paint" section and scale them how you see fit.


Step 43
Load the transparency of the "flames" layer by holding Cmd/Ctrl and clicking on its icon in the layer palette. Make a Curves adjustment layer that looks like the image below.


Step 44
Now delete the old placed layer. Then just to even out the color of the paint, make a new solid color adjustment layer at the top of the "paint" section. Make the fill a very light blue. I used (#f0f4ff). Set the layer's blend mode to color.


Final Step
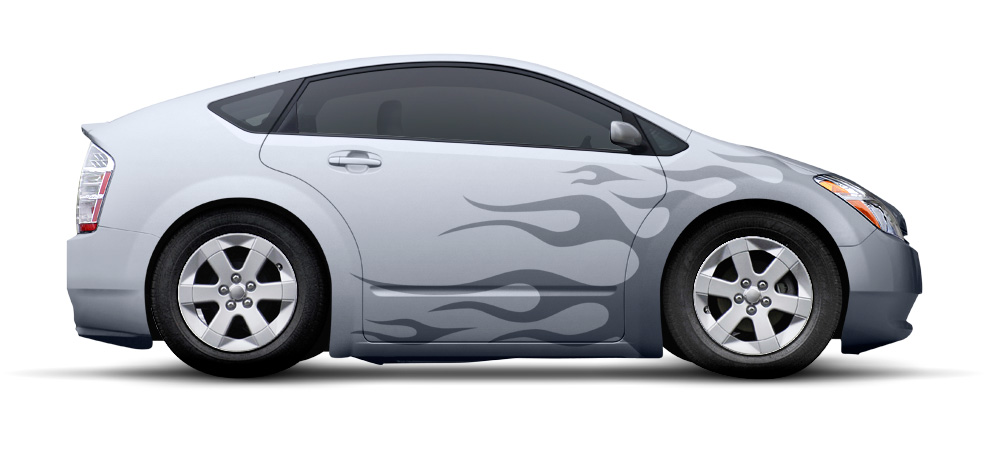
As a final touch, I just increased the contrast and sharpened the lights by making adjustment layers in the "lights" group. The final image is below.


Conclusion
Knowing what you want to do and knowing how to execute it are equally important. I didn't use any groundbreaking techniques to create this design. I just had a good idea of what I wanted to do, and I did it. You can do the same.
 By
By


