
So you keep hearing about Adobe Firefly, but what exactly is it? And how do you use it? Let's take a quick look at how to use Adobe Firefly in Photoshop to easily incorporate it into your workflow.
If you like video tutorials, don't miss this new video about how to use Firefly in Photoshop from the Envato Tuts+ YouTube channel:

What Is Adobe Firefly AI?
Adobe Firefly is Adobe's version of AI. It includes all of Adobe's AI generative tools used throughout the Adobe Suite, including photo editing and video editing.
Adobe Firefly was trained on images from Adobe Stock, making it one of the more ethically trained AI-powered image generators. Here's a more detailed article about it:


How to Get Adobe Firefly
When asking yourself how to get Adobe Firefly, you probably think there's a desktop app to download. But for now, you can use the beta version of Adobe Photoshop with Firefly as an integration or the most recent version of Photoshop.
It's available to anyone with a Photoshop subscription plan and can be downloaded in the Creative Cloud desktop app. The beta apps are found in the left column, under Categories, marked Beta Apps.
1. How to Use Adobe Firefly AI to Extend Images
Step 1
With your image opened in Photoshop, use the Crop tool to extend your canvas. I'll be extending an abstract illustration first, and then we can look at landscapes and people in Adobe Photoshop with Firefly.


Step 2
Hold Control/Command and click your image's layer in the Layers panel. This will select the layer.
Next, go to Select > Inverse to invert the selection. This will select the empty parts of the canvas.
Step 3
Hit the Generative Fill button, keep the prompt box empty, and hit Generate.
When we generate without a prompt, Photoshop will use the existing pixels as a reference and attempt to fill in the empty space.


Step 4
You'll be given three variations to choose from in the Window > Properties panel. Or you can generate more using the Generate button, also found in the Properties panel.
Generative Layers will save all generated image variations until Rasterized. However, they will make PSD/PSB files very large.


Step 5
Adobe Firefly in Photoshop excels at expanding abstract backgrounds and textures, but it also does amazingly well with landscapes. You can view the "before" version of the below example on Envato Elements.
You may be wondering how to use Firefly in Photoshop with human subjects. Is that possible? The answer's yes. You can turn close portraits into full body shots, though the results will vary.


2. How to Use Adobe Firefly in Photoshop to Add Details
Step 1
To add specific details to an image, use one of the selection tools to select the area where you want to add the detail. I like to use the Lasso tool or Rectangular Marquee tool, but any selection tool will work.

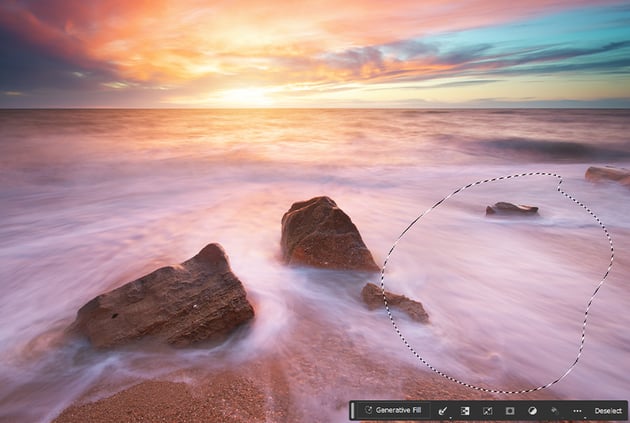

Step 2
Activate the Generative Fill in Photoshop through the button, and type in what you want to add. Here I typed "dog." Hit Generate once you've typed in your prompt.


Step 3
Just like when extending an image, you'll be given three variations to choose from in the Window > Properties panel. Or you can generate more using the Generate button located above the Variations.


Step 4
You can create as many Generative Layers as you need. Below, I added a lighthouse and extended the sky. Each added detail is on its own layer.
You can view the "before" image on Envato Elements.


That's It!
That's how to use Adobe Firefly in Photoshop. The ability to extend landscapes, backgrounds, and textures is incredibly powerful and is my favorite use of the Photoshop generative tools. However, as with all Photoshop tools, experimenting is key.
Discover how to pair Adobe Photoshop with Firefly to improve your workflow and your existing techniques. When learning how to use Adobe Firefly in Photoshop, the sky's the limit!
Want to learn a few more tricks about AI, Adobe Photoshop, and Firefly? Check out more tutorials:


 By
By


