
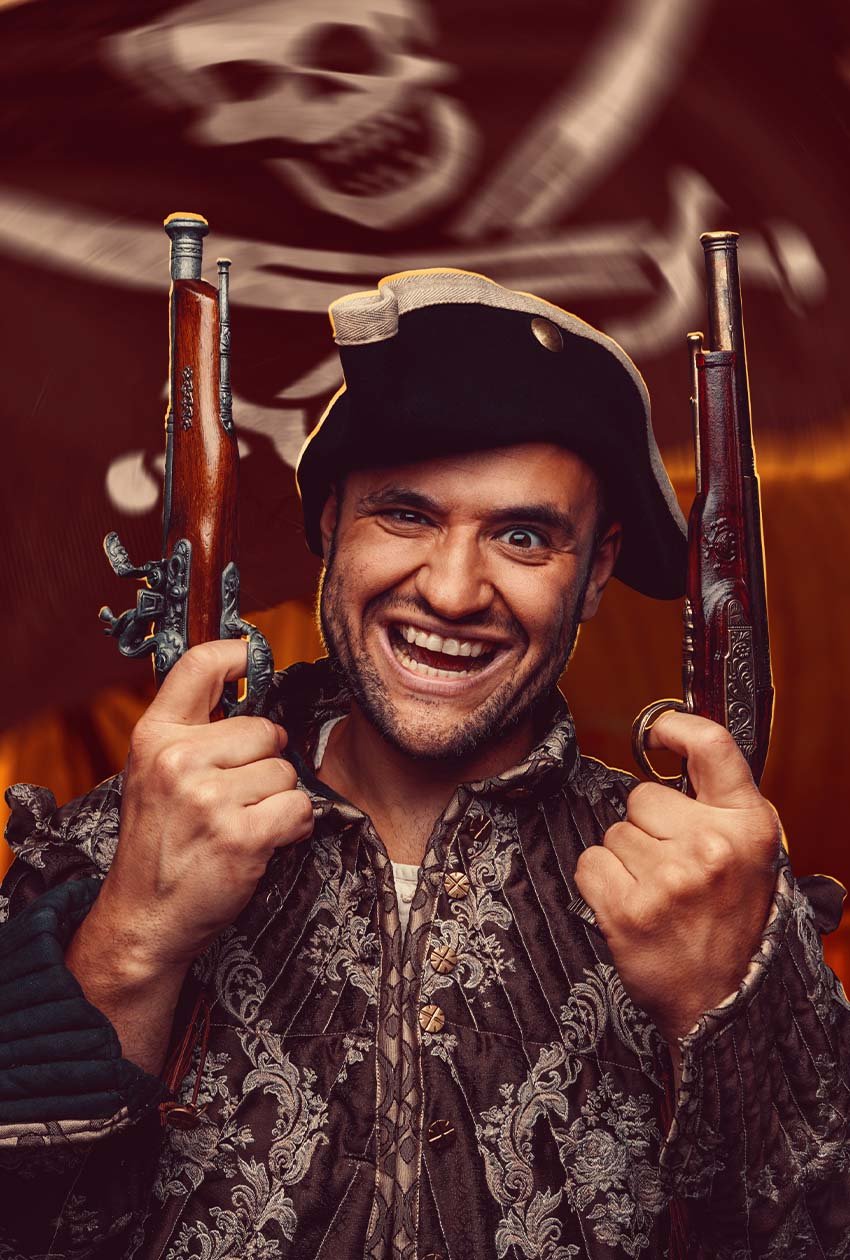
Today, we will be looking at how to pirate Photoshop... literally! We will be adding tons of pirate details like gold teeth, eye patches, ships, flags, and much more. We'll even create our own pirate eye patch template!
If you're looking for pirate design assets to accompany your newly created pirate, Envato Elements has hundreds of pirate-themed logos, fonts, assets, and more!


Some people like written guides, while others prefer video tutorials. If you belong to the latter group, we’ve got you covered. You can visit the Envato Tuts+ YouTube channel to learn how to make a pirate in Photoshop:

What You'll Learn in This Adobe Photoshop Tutorial
- How to create a pirate Photoshop effect
- How to create a gold gradient in Photoshop
- How to create a sunset color grade in Photoshop
- How to Photoshop a hat on a head
- How to add sparks to an image in Photoshop
What You'll Need
To complete this project, you will need the following resources:
Find more resources on Envato Elements!
1. How to Create a Pirate Photoshop Background
Step 1
We're going to start things off with a quick and dirty background. We're going to blur all of this, so you really don't need to fuss too much.
We have a sail ship background, with an image of a sunset set to Multiply right on top.
Our background will mainly consist of the topmost parts of the sails, so position the sunset with that in mind. But again, don't fuss too much.


Step 2
Next, we'll select those two layers and turn them into a Smart Object: Right-click > Smart Object.
And then, we can Enlarge that smart object so the sails fill up most of the canvas.


Step 3
As I mentioned earlier, we're going to add a pretty heavy Filter > Blur Gallery > Field Blur to the background.
The amount will vary; I ended up with a Blur of 45 px.


Step 4
Then we can drop in this 3D render of a pirate flag, Enlarging it and tilting it.
Don't worry about it getting blurry from enlarging it because we're going to add a Filter > Blur > Radial Blur of 5.


Step 5
We are going to do some quick color corrections to the flag.
First, an Image > Adjustments > Brightness/Contrast set to Brightness -20 and Contrast 10.
And then an Image > Adjustments > Color Balance set to +15, 0, and -15, giving the flag an orange tinge.


Step 6
And let's finish the background by creating a Curves adjustment layer. Choose the RGB drop-down, go into the Reds, and bring the left anchor point up. This will bring a hint of red into all of the darker levels of the background.
We can then Group those three layers and name that group Background.


2. How to Create a Dramatic Red Color Grade
Step 1
Let's create a quick, non-destructive color grade!
This color grade will consist of five adjustment layers grouped and placed at the top of the layer stack. So all future layers will be created underneath this group.
I'm going to place my pirate subject, which I already extracted using the Pen Tool. Still, you can use whatever method you prefer.


Step 2
For the actual color grade, let's start with a Color Lookup adjustment layer:
- 3DLUT: Teal Orange Plus Contrast
- Opacity: 30%
And a second Color Lookup layer:
- 3DLUT: Film Stock
- Opacity: 20%


Step 3
Next, a Selective Color adjustment layer, with the settings seen here:


Step 4
And then a third Color Lookup layer:
- 3DLUT: Edgy Amber
- Opacity: 20%
And one last Color Lookup layer:
- 3DLUT: Drop Blues
- Opacity: 50%
- Layer Mode: Color
Go ahead and collapse the group, and you can even Lock it, so it stays out of your way.


3. How to Create Dramatic Lighting Effects
Step 1
With the colors figured out and our subject placed, we can start adding some shadows and highlights. We’ll start by adding a super quick rim light effect.
First, Duplicate the subject, bringing the duplicate below the original. Add an Orange #ffb156 Color Overlay.
And then, let's Enlarge and Warp the duplicate, so there is an uneven rim of orange around the subject. We don't want that light to be perfectly even.


Step 2
In fact, let's add a layer mask to the rim light layer and mask out portions of the rim, so that it tapers off in certain places and is completely hidden in others.
This is a very stylistic effect, so it doesn't have to be overly accurate, but think about where light would be shining through the strongest.
Once you're happy with your mask, you can Right-click > Rasterize Layer Effect and then change the layer mode to Screen or Color Dodge. Use whichever looks best to you.


Step 3
Now, let's start building some inner lighting by applying an Inner Glow layer style to the subject. I'm using that same Orange #ffb156 as before, set to Color Dodge, and here are my exact settings:


Step 4
That gives us a good base to start with, but let's paint some more light around the subject's edges.
First, create and Clip a New Layer set to Color Dodge into the subject, and then, using a soft round Brush, let's paint with that same Orange #ffb156. Focus on the edges of the subject, but bring and taper the light inwards as well.
Setting your Brush to a low Flow will help you build the light up slowly and give you nice smooth transitions. And you can always lower your layer's Opacity if the effect is too harsh.


Step 5
And then, we can finish up the rim lighting by adding some highlights to the beard area.
Create and Clip a New Layer into the subject and set it to Screen. Now, you could individually paint in stubbly hair, tapering the edges of the subject's face using a hard round Brush. But I recommend creating a super-easy hair stubble brush by creating a New Canvas and drawing a few hair-like lines as you can see here:


Step 6
Then create an Edit > Define Brush Preset. Set the Bush Settings to what you see here, but don't forget to Save the Brush after applying these settings. Otherwise, you'll be stuck re-applying those settings every time you switch brushes.


Step 7
So, with that new Stubble brush, we can paint in our hairs much more quickly, using that same orange #ffb156 as before.


Step 8
Let's finish up our lighting by adding some shadows.
Create and Clip a Solid Color fill layer into the subject and set it to a dark blue #080e1b color. Next, set it to a layer mode of Multiply and an Opacity of 70%.
Then, double-click the layer to open the Layer Style panel and adjust the Blend If to remove the shadows from the highlights. Hold Alt to split the Toggles, and aim to create something similar to what you see here:


Step 9
With the shadow layer prepped, we can Invert the layer mask using Control-I, filling the layer mask with black.
Then, mask in some shadows using a default round Brush at different sizes and softness. Focus on the inner parts of the subject and places like the smile lines, the neck area, and other shadowy areas.
You can also use this layer to start bringing in things like dark under the eyes or dirty patches of skin.


4. How to Photoshop a Hat on a Head
Step 1
Our pirate is all lit up, but we still need to add some more pirate-y details. Let’s start with some gold teeth, and then we'll Photoshop a hat on his head.
Create and Clip a Gradient adjustment layer into the subject, right above the shadow layer. Now, replicate the Gradient you see here.
The colors and placement of the toggles don't have to be perfect. Depending on your subject, you may need to adjust them anyway, but this is a good starting point for gold-inspired gradients. So I highly suggest saving it as a preset by using the New button once you're done setting it all up.


Step 2
Let's fill the gradient's Layer Mask with black using Control-I, and then mask in the gold on some of the teeth using a semi-hard round Brush. We can also add gold accents to the buttons and guns.


Step 3
And we can really make those teeth shine by adding a few golden #ffd086 sparkles on a New Layer set to Screen.
I have a six-point star brush that I like to use, but you can use any sparkly brush you might have. Even a simple soft light bloom will work perfectly fine.


Step 4
Let's move on to the pirate hat because every pirate needs a big fancy hat.
We could use different pictures of pirate hats, but he already has a good base hat. Let's select the current hat using the Lasso tool. The selection does not have to be perfect since most of the hat is already extracted.
Copy and Paste the hat onto a new layer, and let's Right-click > Convert to Smart Object so we can resize that hat without having to worry about pixel deterioration as much.
Step 5
We're going to Enlarge the hat as much as we can before it starts to become noticeably blurry. If it starts to look too pixelated, you can then shrink it back down.


Step 6
Then we can add a Layer Mask and mask out any harsh edges, blending the larger hat into the original hat.


Step 7
We also need to add a quick rim light to the new hat using the same method as before.


Step 8
Let's finish off the hat by placing an image of a white feather on a black background below the subject, setting that layer to Screen.
Since the background of this feather isn't solid black, we can do some quick masking using a default round Brush. We don't have to be overly careful while masking, though, since we'll add some final sparks that hide a lot of the extra feathers.


5. How to Make an Eye Patch Photoshop Effect
Step 1
Next up, let's create an eye patch Photoshop effect.
Start by creating a pirate eye patch template using either a solid hard round Brush or the Pen Tool.


Step 2
Then we're going to Clip an image of some cloth into that pirate eye patch template.


Step 3
Next, we have to do some color correcting.
First, go to Image > Adjustments > Curves. Bring up the shadows but darken the highlights. This will create a matte cloth effect.
Secondly, go to Image > Adjustments > Color Balance and set it to -26, 0, and +21 to bring in a slight blue tint.


Step 4
We can finish the eye patch by adding both shadows and highlights using layers set to Soft Light and Multiply.
I used one Softlight layer Clipped into the eye patch to add some shape to the edge of the eye patch, highlight the middle portion, and darken the parts closest to the hat.
Then add a second Soft Light layer above the hat layer to darken the forehead area and bring some of the shadows the hat would be casting onto the eye patch.
Finally, I painted in a simple shadow under the eyepatch using a Multiply layer.
You may end up using more or fewer layers; just use as many as you need.


Step 5
I almost forgot, we have to add some greasy pirate-y makeup!
Create two adjustment layers underneath the eye patch layers: a black and white Gradient Map and a Brightness/Contrast layer set to -150 Brightness and 66 Contrast.
Then we want to go into the Layer Style panel of the Brightness/Contrast layer and remove the highlights. Try to replicate something like this:


Step 6
Group the two adjustment layers together, add a Layer Mask to the group, and then Invert the mask using Control-I.
Use a semi-soft round Brush to paint in eye shadow, grease, and dirt around the eyes and face, and you can even bring it into the teeth for a grimy tooth effect.


6. How to Create Sparks in Photoshop
Step 1
Now, let's give these guns a bit more spark.
Place an image of embers or sparks behind the guns, setting the layer to Screen. Make sure to position the sparks to look as if they are shooting from the gun.


Step 2
Let's add a bunch of contrast to the sparks using Image > Adjustments > Brightness/Contrast, setting the Contrast to 100. This will help separate the sparks from their original background. And then, we can Mask out any extra background using a soft round Brush.


Step 3
You can use the same sparks for the second gun—just Duplicate and Flip them Horizontally. And try to Mask out any details that look too repetitive.


Step 4
Repeat the same steps to add some more floaty sparks to both the foreground and background. Try blurring the sparks in the foreground to make them appear closer to the "camera lens."


Step 5
And we can finish by bringing in a second enlarged portion of the pirate flag to the foreground of the image. Again, we’ll blur it so that it looks slightly out of focus.


You're Done!
That is how to pirate Photoshop, the right way! Starting with a base costume is always ideal, but you can use these same techniques to turn anyone into a pirate—or to just Photoshop hat on heads and give someone some pretty awesome golden teeth.
Get More Cool Pirate Photoshop Assets
If you're looking for even more high-quality pirate Photoshop assets, check out these add-ons, graphics, and fonts from Envato Elements!
Pirates Rum Vintage Typeface (OTF, WOFF)


The Pirates Rum vintage typeface is the perfect retro typeface to pair with your new pirate design! Use it for book covers or movie posters. It fits all kinds of adventure themes!
Vintage Pirate Design Kit (EPS, JPG, PNG)


Looking for pirate hat images and design elements to pair with a pirate-themed photo? With pictures of pirate hats, ships, and sunken treasure, this design kit has everything you need! Create logos, or you can even use them as quick tattoo designs.
Skull Pirate Logo (AI, EPS, JPG, PDF)


If you're in need of pirate hat images or a logo with an edgy pirate feel, then you're in luck! This logo is chock full of the rebel personality that people love about pirates. Edit the colors, the font, or even the main design to fit your exact needs.
Pirates Display Vintage Font (OTF)


The Pirates font is vintage with a little extra flair. It comes with over 250 glyphs, including extra features like stylistic alternates and ligatures. The different design options make it the perfect movie poster font, or even a base for a pirate-themed logo design.


 By
By


