


In this Photoshop tutorial, you'll learn how to create a torn paper effect in Photoshop. I'll explain everything in so much detail that everyone can learn how to make a torn paper collage portrait, even those who have just opened Photoshop for the first time.
What You'll Learn in This Torn Paper Portrait Tutorial
What You'll Need
To create the torn paper collage art in Photoshop, you will need the following resources:
- Portrait of a Woman
- 10 Handmade Paper Textures
- 25 Isolated Torn Paper Clipart With Ripped Edges
- Typography 5 Photoshop Actions
- Grain Grunge Concrete Wall Background Texture
- Grunge Brushes
- Texture of Dirty Stains and Grease
1. How to Start Creating a Torn Paper Collage
First, open the photo that you want to work with. Go to File > Open, choose your photo, and click Open. Before we get started, just check a couple of things:
- Your photo should be in RGB Color mode, 8 Bits/Channel. To check this, go to Image > Mode.
- For best results, your photo size should be 2500–4500 px wide/high. To check this, go to Image > Image Size.
- Your photo should be the Background layer. If it is not, go to Layer > New > Background from Layer.


2. How to Add a Paper Texture
Step 1
In this section, we are going to add a paper texture to give the photo a subtle grunge poster look. Go to File > Place Embedded, select the 08 texture from the paper textures link, and click Place. Adjust the Width and Height of the image so that the texture covers the canvas. Then, change the Blending Mode of this layer to Soft Light, and name it Texture.


Step 2
Now go to Image > Adjustments > Levels, and set the Midtone Input Level to 0.25.


3. How to Make a Torn Paper Collage
Step 1
In this section, we are going to make a torn paper collage. Go to File > Place Embedded, select one of the torn paper images from the torn paper clipart link, and click Place. Then, transform and position this layer as you like, and name it Torn_Paper_1. Here is my result:


Step 2
Repeat this method to add as many torn paper images as you like. Here's my result:


4. How to Add Typography
Step 1
In this section, we are going to add typography. Select the Texture layer, press Control-Shift-N on your keyboard to create a new layer, and name it Typography. Then, set the foreground color to #000000, go to Edit > Fill, and set the Contents to Foreground Color, Mode to Normal, and Opacity to 100%.


Step 2
Right-click on this layer and choose Blending Options. Then, select and check the Pattern Overlay style and use the settings below:


Step 3
Go to Layer > Layer Mask > Hide All to add a layer mask that hides the whole layer. Then, set the foreground color to #ffffff, choose the Brush Tool (B), pick a hard brush, and brush inside the torn paper areas to reveal the typography. Here's my result:


5. How to Create a Distressed Effect
Step 1
In this section, we are going to create the distressed effect. Select the Torn_Paper_1 layer, go to File > Place Embedded, select Grain Grunge Concrete Wall Background Texture - 11 from the grunge textures link, and click Place. Then, adjust the Width and Height of the image so the texture covers the canvas. Name this layer Grunge Texture.


Step 2
Go to Layer > Layer Mask > Hide All to add a layer mask that hides the whole layer. Then, set the foreground color to #ffffff, choose the Brush Tool (B), pick one of the grunge brushes from the grunge brushes link, and brush where you want to reveal the grunge texture. Here's my result:


Step 3
Right-click on this layer and choose Blending Options. Enter the settings below:


Step 4
Now we're going to reveal some parts of the typography. Select the Typography layer, and press Control-J on your keyboard to duplicate it. Then, drag this new layer to the top of the layers in the Layers panel. Right-click on its layer mask, choose Delete Layer Mask, and go to Layer > Layer Mask > Hide All to add a new layer mask that hides the whole layer. Lastly, set the foreground color to #ffffff, choose the Brush Tool (B), pick one of the grunge brushes from the grunge brushes link, and brush where you want to reveal a bit more of the typography. Name this layer Typography Overlay.


Step 5
Select the Typography layer, go to File > Place Embedded, select the rust texture from the link, and click Place. Then, adjust the Width and Height of the image so that the texture covers the canvas. Name this layer Rust Texture.


Step 6
Go to Layer > Layer Mask > Hide All to add a layer mask that hides the whole layer. Set the foreground color to #ffffff, choose the Brush Tool (B), pick one of the grunge brushes from the grunge brushes link, and brush where you want to reveal the rust texture. Here's my result:


Step 7
Right-click on this layer and choose Blending Options. Select and check the Inner Shadow style and enter the settings below:


6. How to Make the Final Adjustments
Step 1
In this section, we're going to make some final adjustments to the torn paper portrait. Select the Typography Overlay layer, go to Layer > New Adjustment Layer > Levels to create a new levels adjustment layer, and name it Overall Brightness.


Step 2
Now Double-click on this layer thumbnail and, in the Properties panel, set the Shadow Input Level to 50, Shadow Output Level to 40, and Highlight Output Level to 240.


Step 3
Go to Layer > New Adjustment Layer > Color Lookup to create a new color look adjustment layer, and name it Color Look.


Step 4
Double-click on this layer thumbnail and, in the Properties panel, set the 3DLUT File to 3Strip.look. Set the Opacity of this layer to 50%.


Step 5
Press Control-Alt-Shift-E to make a screenshot, and then press Control-Shift-U to desaturate this layer. Then, go to Filter > Other > High Pass and set the Radius to 2 px.


Step 6
Change the Blending Mode of this layer to Hard Light and set the Opacity to 50%. Name this layer Overall Sharpening.


You Made It!
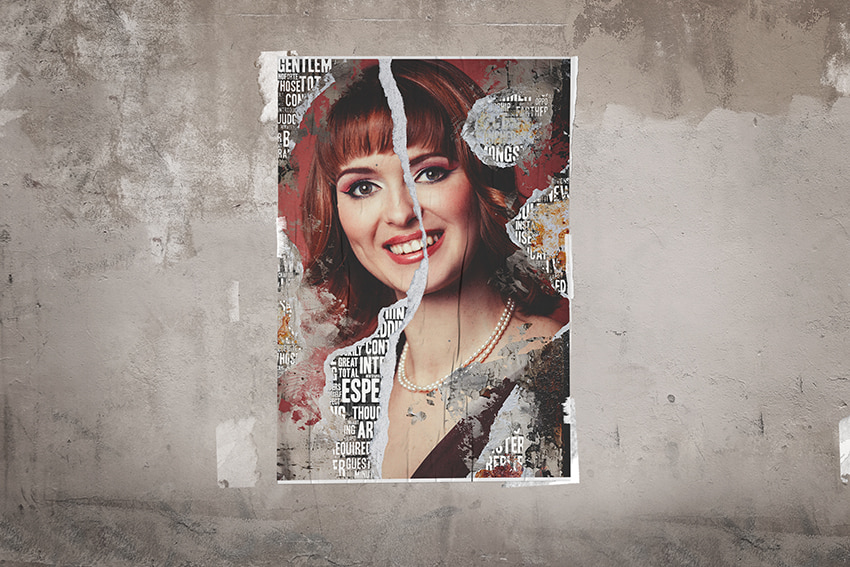
Congratulations, you've succeeded! You've learned how to create a torn paper effect in Photoshop, how to create torn paper edges in Photoshop, and how to make a torn paper collage portrait. Here's our final Photoshop pixelated effect:


5 Photoshop Torn Paper Collages From Envato Elements
Want to see some cool torn paper collages? Check out this list of torn paper collage art from Envato Elements.
Instagram Feed Campaign Torn Paper Collage (PSD)


There are six different torn paper collage templates included in this pack. They are in square format so you can use them for your Instagram feed, and the layers are well organized, so the templates are easy to customize.
Torn Paper Effect (PSD)


Here we have another torn paper effect PSD template. You simply place your image using a smart object, and you get an instant torn paper effect over your photo.
Collage Art Generator (PSD)


With this generator, you can convert your photos to a newspaper or magazine collage in just a few clicks. There are four collage colors included, as well as an additional seven color effects.
Torn Paper Pixel Photo Square and Poster Effect (PSD)
In this torn paper collage template, you get a fully editable text layer and well named and organized layers. You can place your photo using a smart object so it only takes a couple of clicks.
Torn Paper Effect (PSD)


This torn paper brush Photoshop effect will not only create a ripped paper effect, but it will also create a sketch effect. So if you want a torn paper effect with an artistic touch, this might be the template you are looking for.
Did you like this torn paper portrait tutorial? Then you may also like:


 By
By


