

Looking for a video tutorial to follow along to create metallic letters? Watch this new video from the Envato Tuts+ YouTube channel to learn how to make a metallic effect in Illustrator:
In the following tutorial, you will learn how to make a metallic effect in Illustrator. In the first part you will learn how to create a brushed metal effect in Illustrator, and in the second one you will learn how to create a silver metallic effect in Illustrator.
If you don't have the time to learn how to make a metallic effect in Illustrator from scratch, you can always count on Envato Elements. There you'll find a massive collection of resources like metallic lettering that you can use to create metallic effects in Illustrator.
What You'll Learn in This Adobe Illustrator Metal Effect Tutorial
- How to Set Up the Background for the Brushed Metal Effect in Illustrator
- How to Make a Metallic Effect in Illustrator
- How to Set Up the Background for the Silver Metallic Effect in Illustrator
- How to Create a Silver Metallic Effect in Illustrator
- Popular Adobe Illustrator Metal Effects From Envato Elements
What You'll Need to Create Metallic Lettering
You'll need the following resources in order to complete these metallic effects in Illustrator:
1. How to Set Up the Background for the Brushed Metal Effect in Illustrator
Step 1
Hit Control-N to create a new document. Select Pixels from the drop-down menu, set the Width to 850 and the Height to 400, and then click that More Settings button.
Select RGB for the Color Mode, set the Raster Effects to High (300 ppi), and then click the Create button to create your document.


Step 2
Pick the Rectangle Tool (M) and focus on your Toolbar. Remove the color from the stroke and then select the fill and set its color to R=68 G=68 B=68. Click on your artboard to open the Rectangle window and simply create an 870 x 420 px shape.
Keep this shape selected, switch to the Selection Tool (V), and focus on the control panel to easily center your selection. Make sure that the Alignment is set to Artboard and then just click the Horizontal Align Center and Vertical Align Center buttons.
Move to the Appearance panel (Window > Appearance) and click the Add New Fill button to add a second fill for your rectangle. Select this new fill and change its Blending Mode to Soft Light, and then click the Radial Gradient button from the Gradient panel (Window > Gradient). This will apply a radial gradient for your selected fill. Focus on the gradient sliders and start by selecting the left one. Lower its Opacity to 0% and then double-click it to replace the color in Illustrator with R=68 G=68 B=68. Move to the other gradient slider, double-click it, and set the color to R=18 G=18 B=38.
Once you're done, select the Gradient Tool (G) from your toolbar and use it to stretch your radial gradient roughly as shown in the following image. Now that your background is set up, let's learn how to make a metallic effect in Illustrator.


2. How to Make a Metallic Effect in Illustrator
Step 1
Pick the Type Tool (T) and open the Character panel (Window > Type > Character).
Select the Headline Regular font, set the size to 150 px and the tracking to 50, and then simply click on your artboard to type in "METAL".


Step 2
Make sure that your text remains selected as we move on. Focus on the Swatches panel (Window > Swatches) and click the [None] swatch to replace the color in Illustrator.
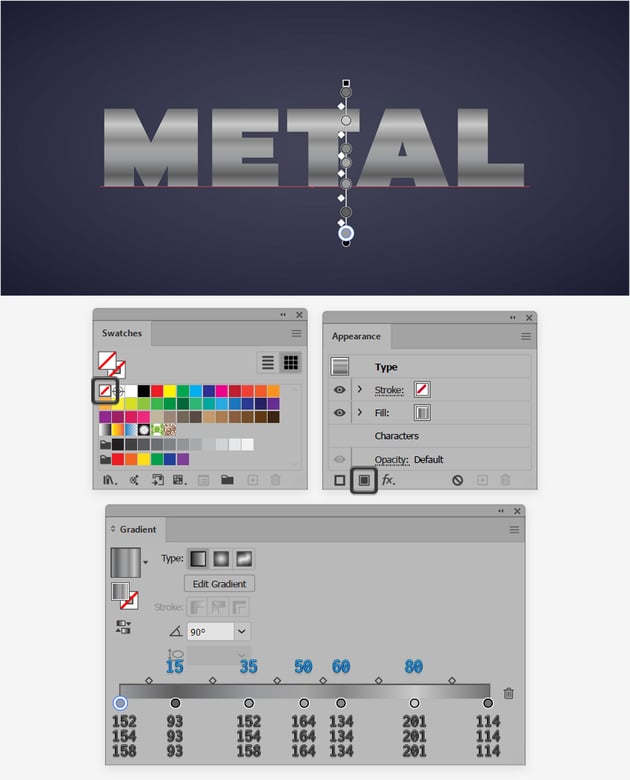
Move to the Appearance panel and use that Add New Fill button again to add a fill for your text. Select it, move to the Gradient panel, and click that Linear Gradient button to apply a linear gradient for your selected fill. Set the Angle to 90 degrees and focus on the gradient sliders. The gradient is key to achieve the metallic look.
First of all, double-click the left slider and set the color to R=152 G=154 B=158, and then double-click the right one and replace the color with R=114 G=114 B=114.
Click on the gradient bar to add a third gradient slider, select it and set the Location to 15%, and then double-click it to set the color to R=93 G=93 B=93. Repeat the same technique to add four more gradient sliders and select them one by one:
- For the first one, set the Location to 35% and the color to R=152 G=154 B=158.
- For the second one, set the Location to 50% and the color to R=164 G=164 B=164.
- For the third one, set the Location to 60% and the color to R=134 G=134 B=134.
- For the fourth one, set the Location to 80% and the color to R=201 G=201 B=201.


Step 3
Make sure that your text stays selected, keep focusing on the Appearance panel, and select the stroke. Click the Stroke button to open the Stroke fly-out panel, increase the Weight to 3 pt, and don't forget to check the Round Cap button.
Apply a black to white linear gradient for this stroke, set the Angle to 90 degrees, and return to the Appearance panel. Lower the Opacity of your stroke to 50%, change its Blending Mode to Soft Light, and then go to Effect > Path > Offset Path. Set the Offset to -1.5 px and click OK. This step will set the metal gradient Illustrator effect.


Step 4
Make sure that your text stays selected, keep focusing on the Appearance panel, and add a second stroke using the Add New Stroke button. Select it, set the Weight to 1 pt, and remember to check the Round Cap button.
Apply the linear metal gradient in Illustrator shown below, set the Angle to 90 degrees, and return to the Appearance panel. Just lower the Opacity of this stroke to 70% and then go to Effect > Path > Offset Path. This time, set the Offset to -0.5 px and click OK.


Step 5
Make sure that your text stays selected, add a second fill using that same Add New Fill button, and drag it below the existing one.
Select this new fill and set the color to R=88 G=89 B=91, and then go to Effect > Stylize > Drop Shadow. Enter the settings shown in the top window, click OK, and again go to Effect > Stylize > Drop Shadow. This time, enter the settings shown in the second window and click OK.


Step 6
Make sure that your metallic font stays selected, add a third fill, and drag it above the existing ones. To achieve that Illustrator metallic effect, let's add some raster effects.
Select the new fill and set the color to black (R=0 G=0 B=0), lower its Opacity to 50% and change the Blending Mode to Color Burn, and then go to Effect > Distort > Diffuse Glow. Drag those sliders to 7, 20, and 10, click OK, and go to Effect > Sketch > Note Paper. Enter the settings shown in the following image and click OK to apply the metallic effect.


Step 7
Make sure that your text stays selected, add a new fill, and drag it above the existing ones.
Select this new fill and set the color to black (R=0 G=0 B=0), change its Blending Mode to Soft Light, and then go to Effect > Sketch > Note Paper. Set those sliders to 25, 15, and 8, click OK, and go to Effect > Distort > Ocean Ripple. Set the Ripple Size to 6 and the Ripple Magnitude to 20, click OK, and then go to Effect > Brush Strokes > Angled Strokes. Enter the settings shown in the following image and click OK to apply the effect.


Step 8
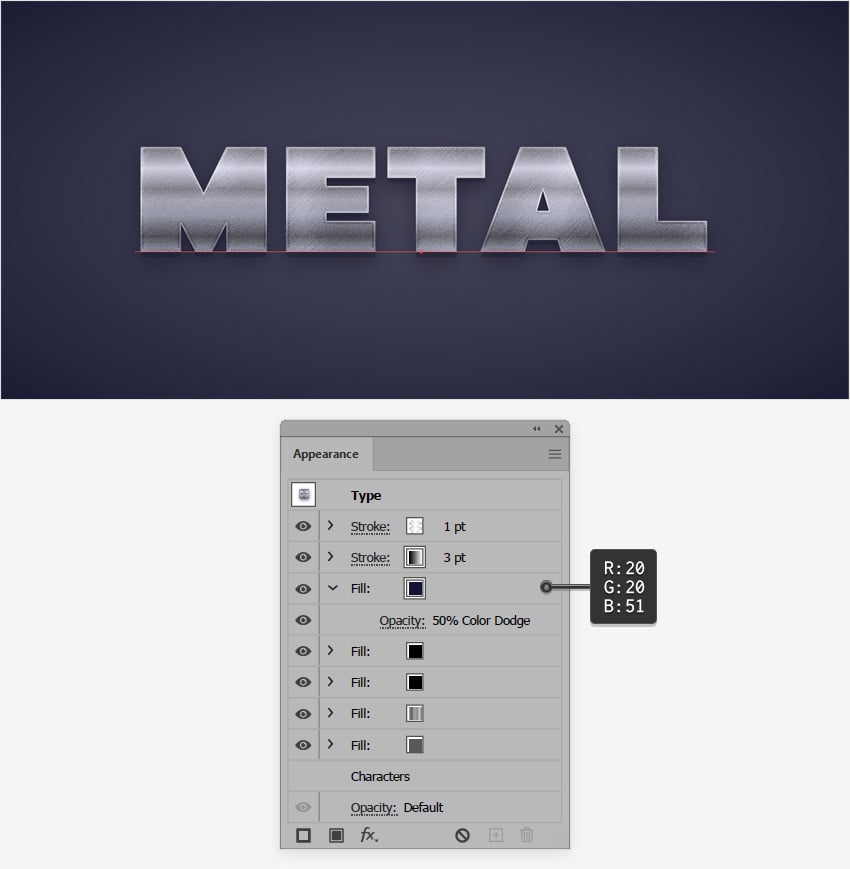
Make sure that your metallic font stays selected, and add one more fill on top of the existing ones.
Select it and set the color to R=20 G=20 B=51, lower its Opacity to 50%, and change the Blending Mode to Color Dodge.


Step 9
Now that you've achieved that metallic effect in Illustrator, let's see how you can easily apply it to other elements from your design. We'll use this Pointer Logo from Envato Elements to exemplify the techniques and create a metallic look for a logo in Illustrator.
Make sure that your text is still selected, open the Graphic Styles panel (Window > Graphic Styles), and just click the New Graphic Style button to save the Appearance settings of your text as a graphic style.
Now select the pointer logo or any other element from your design and simply click your saved graphic style to create a metallic look for a logo in Illustrator.


3. How to Set Up the Background for the Silver Metallic Effect in Illustrator
Step 1
Let's create a new document. Select Pixels from the drop-down menu, set the Width to 1100 and the Height to 500, and then click that More Settings button.
Select RGB for the Color Mode and set the Raster Effects to High (300 ppi), and then create your new document.


Step 2
We'll start with the background again, so select the Rectangle Tool (M) and focus on your Toolbar. Remove the color from the stroke, and then select the fill and set its color to R=120 G=120 B=151. Click on your artboard to open the Rectangle window and simply create an 1120 x 520 px shape.
Keep this shape selected, switch to the Selection Tool (V), and focus on the control panel to easily center your selection. Make sure that the Alignment is set to Artboard and then just click the Horizontal Align Center and Vertical Align Center buttons.
Move to the Appearance panel (Window > Appearance) and click the Add New Fill button to add a second fill for your rectangle. Select this new fill and change its Blending Mode to Soft Light, and then click the Radial Gradient button from the Gradient panel (Window > Gradient) to apply a radial gradient to your selected fill. Focus on the gradient sliders and start by selecting the left one. Lower its Opacity to 0% and then double-click it to replace the existing color with R=120 G=120 B=151. Move to the other gradient slider, double-click it, and set the color to R=70 G=70 B=101.
Once you're done, select the Gradient Tool (G) from your toolbar and use it to stretch your radial gradient roughly as shown in the following image.


4. How to Create a Silver Metallic Effect in Illustrator
Step 1
Pick the Type Tool (T) and open the Character panel (Window > Type > Character).
Select the Robinson Regular font, set the size to 330 px and the tracking to 50, and then simply click on your artboard to type in "SILVER".


Step 2
Make sure that your text remains selected, focus on the Swatches panel (Window > Swatches), and click the [None] swatch to get rid of the existing text color.
Move to the Appearance panel and use that Add New Fill button again to add a fill for your text. Select it, move to the Gradient panel, and click that Linear Gradient button to apply a linear gradient to your selected fill. Set the Angle to 45 degrees and focus on the gradient sliders.
First of all, double-click the left slider and set the color to R=188 G=190 B=192, and then double-click the right one and use the same color.
Click on the gradient bar to add a third gradient slider, select it and set the Location to 10%, and then double-click it to replace the color with R=231 G=230 B=233. Repeat the same technique to add six more gradient sliders. Select them one by one and use the settings shown in the following image.
Once you're done, return to the Swatches panel and click that New Swatch button to save your gradient.


Step 3
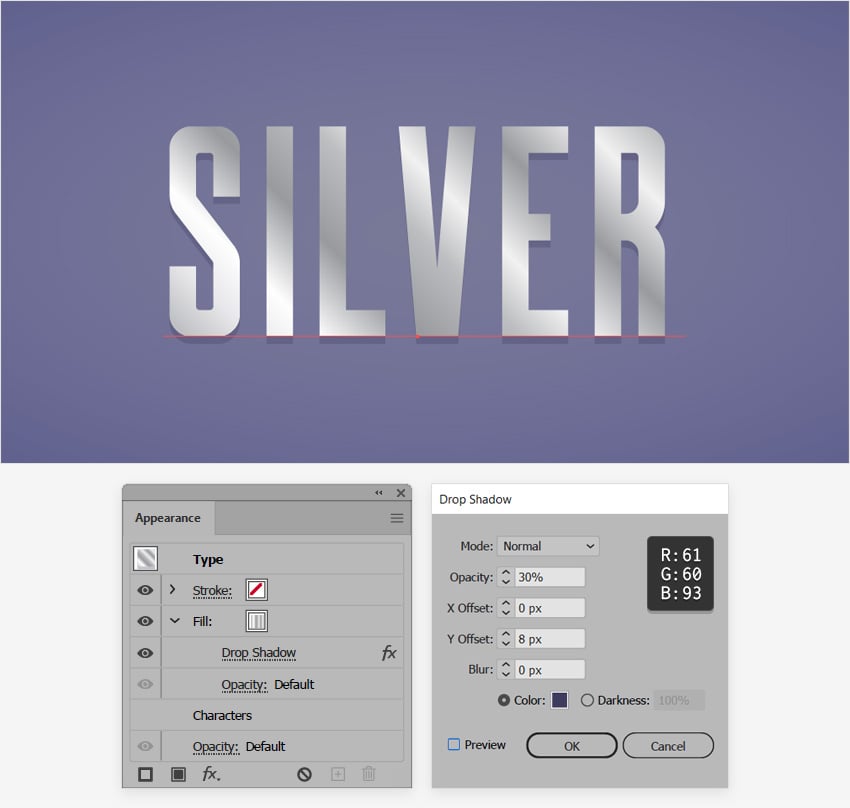
Keep focusing on the Appearance panel, make sure that the fill applied to your text is still selected, and go to Effect > Stylize > Drop Shadow. Enter the settings shown in the following image and click OK.


Step 4
Make sure that your text stays selected, keep focusing on the Appearance panel, and add a second fill using that same Add New Fill button.
Drag this new fill below the existing one and select it. Set the color to R=61 G=60 B=93 and lower its Opacity to 75%, and then go to Effect > Path > Offset Path. Set the Offset to -4 px, click OK, and go to Effect > Distort & Transform > Transform. Just drag that Move - Vertical slider to 16 px, click OK, and go to Effect > Blur > Gaussian Blur. Set the Radius to 25 px and click OK.


Step 5
Make sure that your text stays selected, keep focusing on the Appearance panel, and add a third fill using that same Add New Fill button.
Drag this new fill below the existing ones and select it. Apply the linear gradient shown below and go to Effect > Distort & Transform > Transform. This time, drag that Move - Vertical slider to 35 px, click OK, and go to Effect > Blur > Gaussian Blur. Increase the Radius to 60 px and click OK.


Step 6
Make sure that your text stays selected, add a new fill, and move it on top.
Select it, set the color to R=120 G=120 B=151 and change the Blending Mode to Soft Light, and then go to Effect > Distort > Diffuse Glow. Enter the settings shown below and click OK to apply this subtle effect.


Step 7
Make sure that your text stays selected, keep focusing on the Appearance panel, and this time select the stroke.
Increase the Weight to 4 pt and apply your saved gradient from the Swatches panel, and then go to Effect > Path > Offset Path. Set the Offset to -2 px and click OK.


Step 8
Make sure that your text stays selected, keep focusing on the Appearance panel, and add a new fill.
Drag this new fill to the top, above the stroke, and select it. Set the color to R=120 G=120 B=151, lower its Opacity to 50%, and change the Blending Mode to Soft Light.


Step 9
Make sure that your text stays selected, keep focusing on the Appearance panel, and add one more stroke.
Drag it to the top of the panel and select it. Increase the Weight to 10 pt and set the color to black, lower its Opacity to 50% and change the Blending Mode to Soft Light, and then go to Effect > Path > Offset Path. Set the Offset to -5 px, click OK, and go to Effect > Sketch > Chrome. Set the Details to 8 and the Smoothness to 10, click OK, and you’re done.


Step 10
We'll use this Pointer Logo from Envato Elements again to exemplify how you can easily apply this silver effect to create a metallic look for a logo in Illustrator.
Make sure that your text is still selected, open the Graphic Styles panel (Window > Graphic Styles), and just click the New Graphic Style button to save the Appearance attributes of your text as a graphic style.
Now select the pointer logo or any other element from your design and simply click your saved graphic style to create a metallic logo in Illustrator.


Congratulations! You're Done!
I hope you've enjoyed this tutorial on how to create metallic fonts and metallic logos. Try to apply these techniques in your future metal texture Illustrator projects.
Feel free to adjust the final designs and silver effects to make your own metallic effects in Illustrator. You can find some great sources of inspiration at Envato Elements, with interesting solutions to improve your Adobe Illustrator metal effects.


Popular Adobe Illustrator Metal Effects From Envato Elements
Envato Elements is an excellent resource for metallic effect Illustrator add-ons. Here's a short list of some of the most popular assets you can find to help you create a metallic look.
Silver Effect in Illustrator (AI, EPS)
Turn any font into a metallic font in Illustrator with this amazing graphic style. Add metallic letters to your designs with this easy-to-apply metallic effect. All you have to do is type in your text and apply the graphic style.


Ultimate Metal Graphic Styles for Illustrator (AI)
This massive collection of metallic graphic styles is the perfect solution if you wish to have more alternatives. Among those 50 graphic styles, you should be able to find one that's fit for your metallic font project.


Cute Metallic Textures and Patterns (EPS, JPG, PNG)
This collection of 200 metallic textures and 24 hand-drawn patterns is perfect if you prefer to experiment and create your own unique metallic effect in Illustrator. Add metallic lettering and elements to your projects.


Metallic Textures for Illustrator (EPS, PNG)
Using these neatly crafted metallic textures, you can easily apply a brushed metallic effect in Illustrator. If creating a metal gradient in Illustrator seems daunting to you, a metal texture in Illustrator can surely help you save some time.


Bright Steel Metallic Effect in Illustrator (AI, EPS)
Creating metallic lettering can really set the tone for a design piece. Here's another graphic style that you can use to turn your fonts into metallic fonts in Illustrator.


Want to Learn More?
There's a metallic effect in Illustrator for every need. We have loads of tutorials on Envato Tuts+ to creative metallic fonts, from beginner to intermediate level. Take a look!

 How to Create a 3D Black and Gold Text and Logo Mockup


 Quick Tip: How to Create a Metallic Text Effect Using Layer Styles in Photoshop


 How to Create a Medieval Metallic Text Effect in Adobe Photoshop

 How to Create a Realistic Chrome Text Effect in Adobe Photoshop


 How to Create a 3D Gold Text Effect With Photoshop Layer Styles

 How to Create a Metallic 3D Spiky Text Effect in Adobe Photoshop

 How to Create a Gold Effect in Illustrator


 How to Make a Gold Statue in Photoshop

 By
By


