
- What You Will Need
- How to Draw a 3-Point Star
- How to Draw a Star with 4 Points
- How to Draw a Five-Pointed Star
- How to Draw a 6-Pointed Star
- How to Draw a 7-Pointed Star
- How to Draw an 8-Pointed Star
- How to Draw a Five-Pointed Star in a Casual Way
- Your Drawings Are Complete
- Discover More Geometric Design Tutorials and Resources


In this tutorial, I’ll show you the way to design different types of star drawings, from a 3-point star to an eight-pointed one. We'll use ordinary tools like a ruler, a graphite pencil, compasses, and a protractor. Let's get started!
What You Will Need
You will need the following equipment to complete your drawings of stars:
- a graphite pencil (I recommend using an HB or H type, and please make sure it’s sharp)
- a pair of compasses
- a protractor
- a ruler
- an eraser
- an ink pen (an optional tool)
- drawing paper

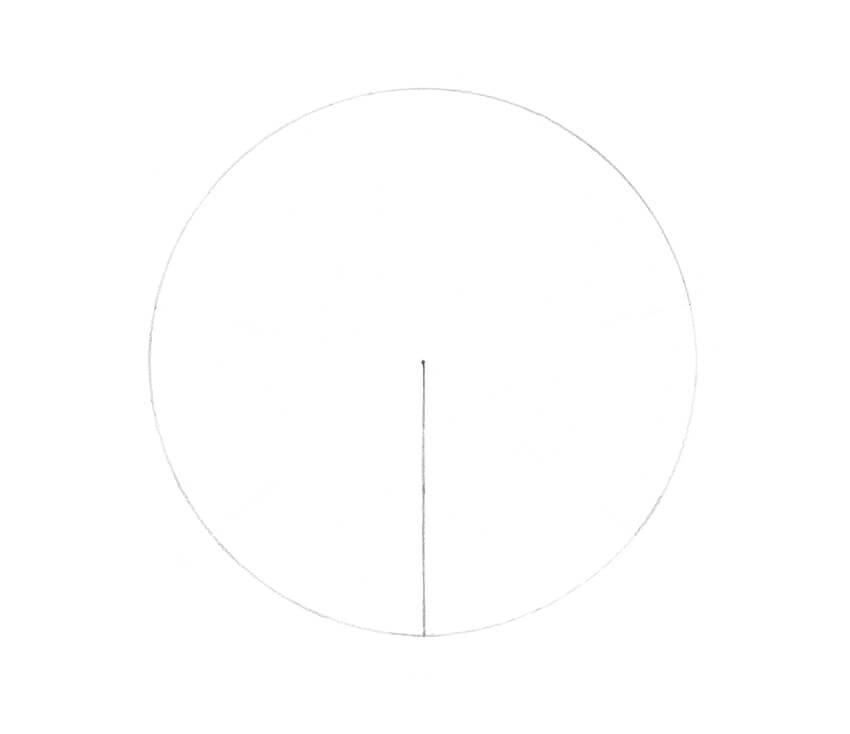
1. How to Draw a 3-Point Star
Step 1
I mark the central point with a graphite pencil, and then draw a small circle of an arbitrary radius, using the compass. It’s important to leave enough space around this circle.
Keep your pencil marks light, just in case you decide to erase the subsidiary lines later on.

Step 2
I draw a bigger circle, using the central point as a reference.

Step 3
I draw a straight line that is going upwards from the center of the circumference. If you need perfectly even lines, make sure you use a ruler.

Step 4
A circle has 360 degrees. To draw a 3-point star, we should create three equal sectors; 360 divided by 3 is 120.
With a protractor, I construct a sector that has an angle of 120°. The central point and the vertical line are the beginning of the star measurements for the drawing.

Step 5
I create another sector of the circle with the angle of 120°. Now we have three lines; the points where they meet the bigger circumference are the apexes of our star.

Step 6
It’s time to divide each sector in two. With the protractor, I find the angles of 60° and mark the segments with dashed lines.
I also mark the points of intersection where these lines cross the small circle.

Step 7
I connect the points with the apexes. Now we have a beautiful 3-point star!

Step 8
I outline the contours of the star, using an ink pen.
This step isn’t obligatory; it’s just useful to emphasize the main lines of the figure. You can erase all subsidiary pencil lines or leave them—it’s completely up to you.

2. How to Draw a Star With 4 Points
Step 1
I draw a small circle of an arbitrary radius, using a pencil and a compass.

Step 2
I add a bigger circle that is encircling the existing one.

Step 3
I add a straight vertical line going from the center of the circle.

Step 4
With the protractor, I find a 90° angle and create the first sector.

I add two more lines, based on the same method; now we have four sectors, each with an angle of 90°. The points where the lines cross the bigger circumference are the apexes of our star.

Step 5
Let’s divide each sector in half. To do that, I find the angle of 45° within each sector and mark the new segments with dashed lines.
I also mark the points of intersection, where these lines cross the small circle.

Step 6
I connect the points with the apexes, using straight lines. Our star with 4 points is complete!

Step 7
I outline the contours of the star, using the ink pen.

3. How to Draw a Five-Pointed Star
Step 1
Learn how to draw a star the easy way. Just mark the central point with a pencil, and then draw a relatively big circle of an arbitrary radius, using the compass.

Step 2
I add a vertical line that is going from the central point of the circle.

Step 3
Let’s find the first sector with a protractor; its angle should be 72°.

Using the same principle, I add more lines. Now we have five sectors; the points where the lines cross the circumference will be the apexes of our star.
I also name these points with letters, just to simplify the process and make it visually clear.

Step 4
I connect the points A and B with a straight line.

Step 5
I connect the points A and C with a line.

Step 6
In the same manner, I join the point B and the point D.

Step 7
I connect the point E with the points D and C. The shape is complete!

Step 8
With an ink pen, I outline the contours of the star, and then erase the unnecessary captions.

4. How to Draw a 6-Pointed Star
Step 1
I mark the central point and draw a relatively big circle of an arbitrary radius, using the compass.

Step 2
I add a straight vertical line from the center of the circle.

Step 3
To learn how to draw a 6-pointed star, we need to create six equal sectors, each with an angle of 60°.
I create the first sector, using the protractor.

I add the sectors, using the same principle, and name the points of intersection with letters.

Step 4
I connect the points A and B.

Step 5
Now I connect the points B and C.

Step 6
I connect another pair of points, this time A and C. Now we have a triangle.

Step 7
I connect the points D and E with a straight line.

Step 8
I join the points E and F.

Step 9
I connect the points D and F; now we have another triangle, and the shape of the hexagram is complete.

Step 10
I outline the contours of the star with black ink pen lines.

Step 11
By the way, there is another method of learning how to draw a 6-pointed star, this time without a protractor. Let’s try this option!
I draw a circumference of an arbitrary radius, using the compass.

Step 12
I add the lines (a vertical and a horizontal one) that are going right through the central point of the circle. Let’s agree that the upper point of intersection is the point A.

Step 13
Put the needle point of your compass right into the point A, and measure the distance between this point and the center of the circle.
Then, without removing the needle point, measure the same distance on the circumference. You'll get the point C on the right side and the point B on the left side.
Repeat this action several times, shifting the needle point of the compass, and name the points you get with letters.

Step 14
I connect the points A and D, A and E, and D and E with straight lines. Now we have the first triangle.

Step 15
I connect the points B and C, C and F, and F and B with straight lines. We get the second triangle, and the star is complete!

5. How to Draw a 7-Pointed Star
Step 1
I draw a circumference of an arbitrary radius, using the compass.

Step 2
I draw a straight vertical line that is going downwards from the central point of the circle.
Step 3
When 360 is divided by 7, we get a fractional number, so we have to pick the closest value (51°). I create a set of sectors that have angles of 51°, using the vertical line as a reference.
I also name the points of intersection with letters.

Step 4
I connect the point A with the points B and C.

Step 5
I join the points B and D.

Step 6
I connect the points D and E.

Step 7
I join the points E and F.

Step 8
I connect the points F and G.

Step 9
I connect the points G and C. The shape is complete!

Step 10
Finally, I outline the contours of the heptagram, using the ink pen. You're done. Now you know how to draw a 7-pointed star.

6. How to Draw an 8-Pointed Star
Step 1
I draw a circumference of an arbitrary radius, using the compass.

Step 2
I add a straight vertical line that is going upwards from the center of the circle.

Step 3
360 divided by 8 is 45, so we have to construct the sectors that have angles of 45° each. I create the first sector, using the existing vertical line as a reference.

I complete the set of sectors and name the points of intersection.

Step 4
I connect the points A and D with a straight line.

Step 5
I connect the points D and G.

Step 6
I join the points G and B.

Step 7
I connect the points B and E.

Step 8
I connect the points E and H. Do you foresee where the next line will be?

Step 9
I join the points H and C.

Step 10
I connect the points C and F.
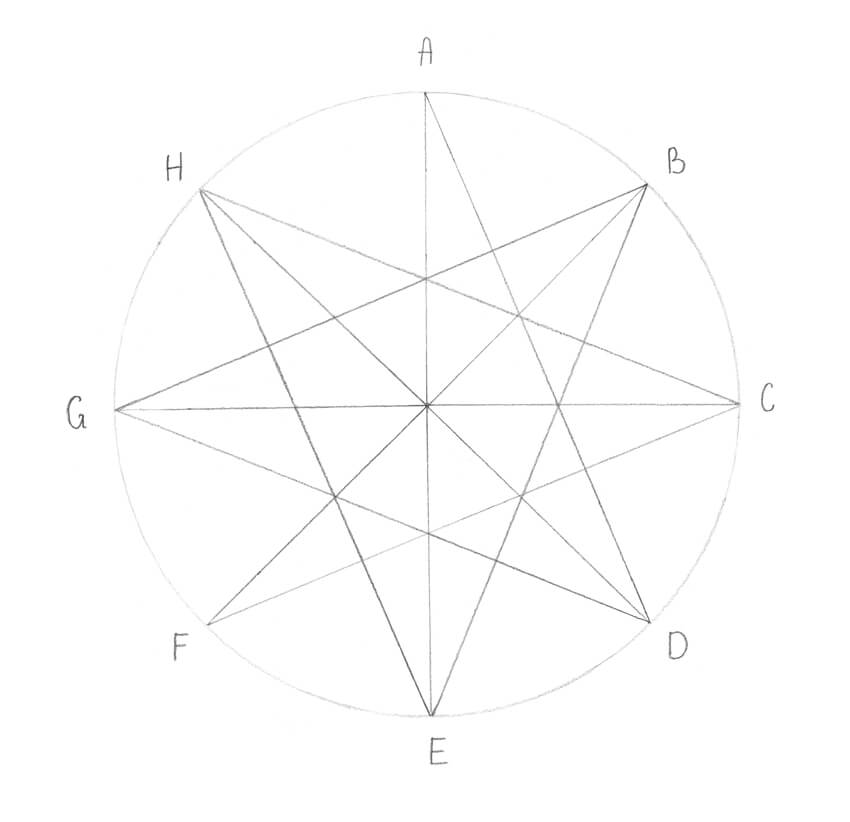
Step 11
I connect the points F and A. The octagram is complete!

Step 12
Finally, I outline the contours of the star with ink lines. You're done! Now you know how to draw an 8-pointed star.

7. How to Draw a Five-Pointed Star in a Casual Way
Step 1
Are you tired of making calculations and measuring everything? The serious part is over, so let’s relax and draw a pentagram in a casual way. If you want to draw a star the easy way, continue reading.
I draw a straight inclined line, using a pencil and a ruler. You can use a ruler, too, or draw the lines just by hand.

Step 2
I draw another inclined line, starting from the top point of the existing one. Now we have a contour resembling an upturned “v” letter.

Step 3
I add another line going to the left-hand side.

Step 4
I add a straight horizontal line.

Step 5
I complete the shape of the star, connecting the points with a finishing line.
By the way, it’s possible to draw a star following the same method, by marking all five points beforehand and then connecting them with lines.

Your Drawings Are Complete
Congratulations—you've learned many types of star drawings! Now you can draw different kinds of stars. I hope the compass and protractor became your best friends, and together you’ll create many more geometrical objects.
Creating technically perfect figures requires skill and patience, so if your stars came out slightly uneven at the first attempt, don’t give up—just try again. Sometimes the tools we use allow imperfections, like the inaccuracy of the protractor’s grid.
At the same time, remember to have fun and enjoy the process!

Discover More Geometric Design Tutorials and Resources
If you loved our tutorial on how to create different types of star drawings, you should take a look at our selection of tutorials on geometric design:
 Geometric Design: The Basics
 Geometric Design: Working With 4 and 8
 Geometric Design: Tenfold Star in a Rectangle
 Geometric Design: How to Draw a Flowery Tiling Pattern
 Geometric Design: Knots and Weaves
 Geometric Design: Working With 5 and 10
 Geometric Design: A Celtic Grid
 Geometric Design: The North Rose Window in Chartres
 By
By


