


Wondering how to recreate a retro film effect in Photoshop? If you like vintage and retro styles, make sure to follow this tutorial and learn how to make a film frame in Photoshop.
Want to get a Photoshop film frame right away? Check out the 4 Retro Film Frames Stories Overlays over on Envato Elements, where you can choose from various templates.
Jump to content in this section:
- How to Start Creating a Film Frame in Photoshop
- How to Make a Frame in Photoshop
- How to Add Text to a Film Frame in Photoshop
- How to Add a Photo to a Retro Film Photoshop Effect
- How to Add Screen Elements
- How to Add a Film Grain in Photoshop
- How to Add a Paper Texture
- 5 Film Frames and Overlays From Envato Elements
What You'll Need
To recreate the retro film Photoshop effect above, you will need the following resources:
1. How to Start Creating a Film Frame in Photoshop
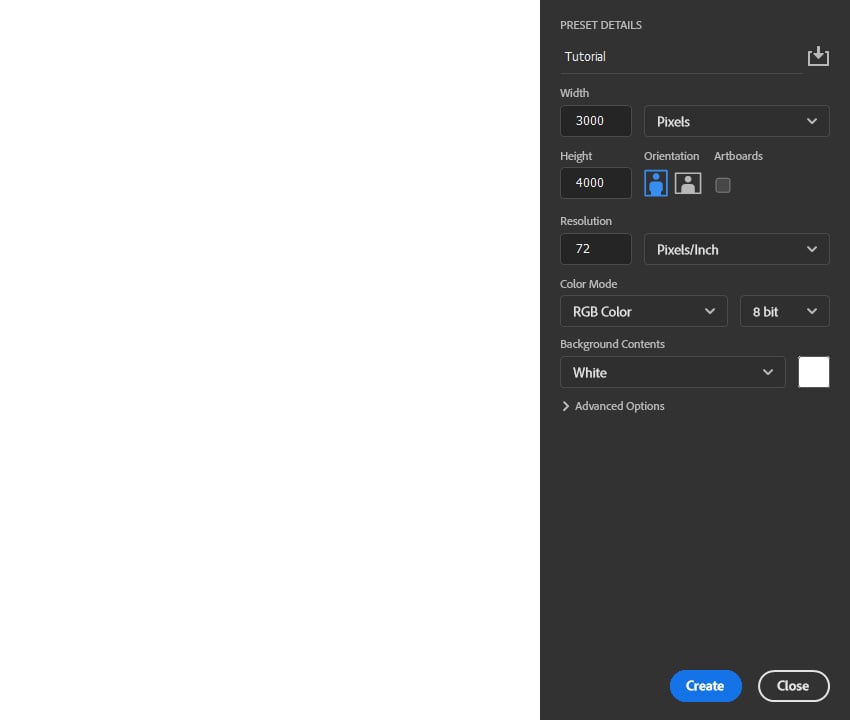
Let's start a new document for our Photoshop film frame. Go to File > New and set the Width to 3000 px, Height to 4000 px, and Resolution to 72 px/in.


2. How to Make a Frame in Photoshop
Step 1
In this section, we are going to create a retro film frame. Choose the Rectangle Tool (U), click anywhere inside the canvas to create a new rectangle shape layer, and set the Width to 450 px and Height to 4000 px. Then, set the Fill Solid Color to #e5e5e5, and position this layer so it is aligned with the left edge and vertical center of the canvas. Name this layer Frame.


Step 2
Choose the Rectangle Tool (U) again, click anywhere inside the canvas to create a new rounded rectangle shape layer, and set the Width to 255 px, Height to 150 px, and Radius to 25 px. Then, set the Fill Solid Color to #000000 and position this layer as shown below. Name this layer Temp.


Step 3
Press Control-J to duplicate this layer, and using the Move Tool (V), position this new layer below. Repeat this step until you fill the complete frame.


Step 4
Control-click on the current layer thumbnail to make a selection of this layer, and Control-Shift-click on the layer thumbnails of all remaining Temp layers to make a selection of them all. Then, select the Frame layer, and go to Layer > Layer Mask > Hide Selection to hide the selected area of the layer and reveal the rest. Lastly, select the Temp layer and Shift-click on the Temp copy 8 layer to select all the layers between. Right-click on any of them, and choose Delete Layers to delete them.


Step 5
Right-click on this layer and choose Blending Options. Then, select and check the Bevel & Emboss style and use the settings below:


Step 6
Right-click on this layer and choose Blending Options again. Then, select and check the Drop Shadow style and use the settings below. Next, click on the plus icon of the Drop Shadow layer style tab to duplicate this style, select the bottom one, and use the settings below.


Step 7
Press Control-Shift-N to create a new layer, and name it Frame_Texture. Set the foreground color to #e5e5e5, go to Edit > Fill, and set the Contents to Foreground Color, Mode to Normal, and Opacity to 100%.


Step 8
Right-click on this layer and choose Convert to Smart Object. Then, go to Filter > Noise > Add Noise, and set the Amount to 5%, Distribution to Uniform, and check the Monochromatic option. Then, go to Filter > Blur > Gaussian Blur, and set the Radius to 1 px.


Step 9
Double-click to edit the Add Noise filter blending options, and set the Opacity to 75%. Then, Double-click to edit the Gaussian Blur filter blending options, and set the Opacity to 50%. Lastly, press Control-Alt-G to make a clipping mask.


3. How to Add Text to a Film Frame in Photoshop
Step 1
In this section, we're going to add text to the film frame. Choose the Horizontal Type Tool (T), setting the Font to Retro Grade, Font Size to 75 px, Alignment to Left, Text Color to #808080, and Tracking to 100. Click anywhere inside the canvas, and type the text "Retro Film Frame" (or whatever text you want). Next, go to Edit > Transform > Rotate 90° Counter Clockwise to rotate the text, and position it as shown below:


Step 2
Now you can use the same method to create more text layers. Here is my result:


4. How to Add a Photo to a Retro Film Photoshop Effect
Step 1
In this section, we're going to add a photo to the film frame in Photoshop. Select the Background layer, choose the Rectangle Tool (U), click anywhere inside the canvas to create a new rectangle shape layer, and set the Width to 2550 px and Height to 4000 px. Then, set the Fill Solid Color to #ffffff, and position this layer so it aligns with the right edge and vertical center of the canvas. Name this layer Photo Placeholder.


Step 2
Now go to File > Place Embedded, select the image from the link, and click Place. Adjust the Width and Height of the image to fit the Photo Placeholder layer. Then, press Control-Alt-G to create a clipping mask, and name this layer Photo.


Step 3
Go to Filter > Noise > Add Noise, and set the Amount to 5%, Distribution to Uniform, and check the Monochromatic option. Set the Opacity of this layer to 90%.


5. How to Add Screen Elements
Step 1
In this section, we're going to add screen elements. Select the Photo layer in the Layers panel, choose the Line Tool (U), set the Stroke Solid Color to #000000, Stroke Width to 4 px, and click anywhere inside the canvas and drag to create a new line shape layer with the Width of 400 px. Then, Shift-click on the start of the horizontal line to create a vertical line with the Height of 400px, and get one corner of the border. Lastly, position it as shown below:


Step 2
Press Control-J to duplicate this layer. Then, press Control-T to bring up the transform options, and rotate and position this new layer accordingly to another corner. Repeat this process twice more to make a border in each corner of the photo.


Step 3
Name this layer Border_1, and name the other line layers accordingly. Set the Stroke Solid Color of the top two borders to #bfbfbf and the bottom two to #ffffff. Lastly, set the opacity of all the border layers to 75%.


Step 4
Choose the Horizontal Type Tool (T), setting the Font to Retro Grade, Font Size to 75 px, Alignment to Left, Text Color to #ffffff, and Tracking to 100. Then, click anywhere inside the canvas, and type the text "-3...2...1...0...1...2...3+" (or whatever text you want), and position it as shown below. Change the Opacity of this layer to 75%.


Step 5
Repeat this process to add more text layers. Feel free to use a different text color if the text blends with the photo.


6. How to Add a Film Grain in Photoshop
Step 1
In this section, we're going to create a film grain Photoshop overlay. Select the top layer in the Layers panel, and press Control-Shift-N to create a new layer Then, set foreground color to #000000, go to Edit > Fill, and set the Contents to Foreground Color, Mode to Normal, and Opacity to 100%. After that, go to Filter > Filter Gallery > Texture > Grain and enter the settings below:
- For the first grain filter, set the Intensity to 50, Contrast to 50, and Grain Type to Regular.
- For the second grain filter, set the Intensity to 40, Contrast to 50, and Grain Type to Vertical.


Step 2
Now go to Image > Adjustments > Levels and set the Shadow Input Level to 15 and Highlight Input Level to 105. Change the Blending Mode of this layer to Screen.


Step 3
Select the layer below, and press Control-Shift-N to create a new layer. Set the foreground color to #000000, go to Edit > Fill, and set the Contents to Foreground Color, Mode to Normal, and Opacity to 100%. After that, go to Filter > Filter Gallery > Texture > Grain, and set the Intensity to 60, Contrast to 50, and Grain Type to Vertical.


Step 4
Now go to Filter > Blur > Motion Blur, and set the Angle to 90° and Distance to 50 px. Then, go to Layer > Adjustments > Levels, and set the Shadow Input Level to 35 and Highlight Input Level to 55.


Step 5
Change the Blending Mode of this layer to Screen, and set the Opacity to 50%. Then, Control-click on Layer 1 to select both layers at the same time, and press Control-E to merge them into one layer. Next, press Control-T to bring up the transform options and set the Width and Height to 250%. Lastly, change the Blending Mode of this layer to Screen, and name it Film Overlay. Feel free to use the Move Tool (V) to position the layer as you like.


7. How to Add a Paper Texture
Step 1
In this section, we're going to add a paper texture. Go to File > Place Embedded, select the texture from the link, and click Place. Adjust the Width and Height of the image so the paper covers the canvas. Then, change the Blending Mode of this layer to Screen, and name it Texture.


Step 2
Double-click on this layer, and in the newly opened file, press Control-Shift-U to desaturate this layer and Control-S to save the changes. Close this file and go back to the original file. Then, Right-click on the Texture layer, and use the settings below:


You Made It!
Congratulations, you've succeeded! You've now learned how to create a film frame in Photoshop and how to add a film grain. Here's our final Photoshop film frame result:


5 Film Frames and Overlays From Envato Elements
4 Retro Film Frames Stories Overlays


Check out this set of realistic retro film frames and overlays. You can place your photo, story, or design in just a few moments. They are included in both PSD and PNG formats, so just pick the one you prefer.
11 Vertical Instagram Post Film Frame Overlay


There are 11 high-resolution PNG files in this package. You can use this film frame and overlay collection to create cool film effects with just a few clicks.
16mm Film Elements Overlays


Here you can find 18 vintage film frames, with additional effects like burns, dust, and grain. You can also combine these elements to create unique variations.
4 Retro Film Frames Stories Overlays


Choose from various shapes and colors of film frames with this set. It includes both horizontal and vertical frames, so you're covered for both landscape and portrait images.
9 Film Frame Overlays for Instagram Stories


These film frames are in the Instagram story size and aspect ratio, which will save you a lot of time if you're planning to upload your film-framed photos to Instagram. They are also of high quality and are easy to use.
Did you like this tutorial on how to make a film frame in Photoshop? Then you may also like:


 By
By


