


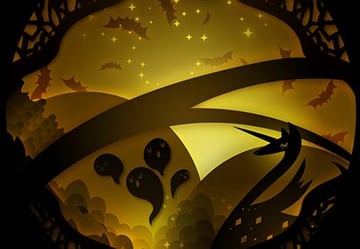
Create this stunning layered paper cutout illustration using Adobe Photoshop! This unique style is fun and can be used in a variety of ways.
This tutorial will teach you how to do paper cutout Photoshop illustrations in Adobe Photoshop from scratch. However, if you're short on time or need something right now, check out this Paper Cutout Photoshop Action from Envato Elements!


Fan of video tutorials instead? The Envato Tuts+ YouTube channel will become your favourite channel! Here's a new video tutorial on how to do a paper cutout in Photoshop:

What You'll Learn in This Paper Cutout Effect Tutorial
In this tutorial, I'll teach you how to make this decorative and intricate construction paper texture Photoshop image from scratch and what things you need to consider when creating it. Topics we cover will include:
- How to create a paper cutout illustration from scratch using Adobe Photoshop
- How to do paper cutout Photoshop effects and digitally cut out the shapes that you'll be using for your image
- How to create a paper cut Photoshop action to apply the cutout paper effect
- How to add a construction paper texture in Photoshop using blend modes
What You'll Need
To follow along with this tutorial, you'll need your own version of Adobe Photoshop. We'll also be using stock images from Envato Elements to help us create the tropical island shapes. Click on the links below to download them.


1. How to Create a Composition for the Paper Cutout Illustration
Step 1
Let's start by creating a new document. In this tutorial, we will be using the dimensions below. Once you're happy with the size of your document, click the create button.
- Width: 1920 pixels
- Height: 1080 pixels
- Resolution: 72 dpi


Step 2
Create a new layer in the Layers panel and rename it "window 01".


Step 3
Now let's create our composition by first determining the shape of our top layer. This layer is the most important as it will affect the shapes and sizes of all the layers below. At this stage, we will work in greyscale for simplicity.
Begin by creating the initial window shape using the Pen Tool (P). Click and drag using the mouse to create a curved outline.


Step 4
Once you are happy with your shape, right-click on the outline you've created and choose Fill Path. Use the Contents dropdown menu and choose Color.


Step 5
Using the Color Picker, choose black #000000 and then click OK to continue. This will fill the outside area of the shape you have created, leaving a window in the middle.


Step 6
Next, just grab the tropical vector shapes from your stock images and place them on top of the window layer to create an interesting composition. You can also create your own tropical shapes using the brush tool if you want.
Fill the shape layers with the same colour as the window layer so that they match.


Step 7
Once you are happy with the composition, go to the Layers panel and select all the layers. Once they are selected, right-click and select Merge Layers. This will create your first window layer.


Step 8
Create a new layer in the Layers panel and rename it "window 02". Make sure that this layer is below the window 01 layer.


Step 9
From there, just repeat the steps above, using the Pen Tool (P) and then choosing Fill Path to create the initial window. Use the tropical shapes for each layer to make your image look more interesting.
You can also try using other shapes as well, such as a beach chair, clouds, or boats sailing in the background.


Step 10
Make sure to use a lighter shade of grey when choosing the colours for each window layer (going from darker colours at the top to lighter colours towards the bottom). This will allow you to see the composition of your construction paper background more clearly.


2. How to Create a Seamless Craft Paper Texture Pattern
Step 1
To create your seamless craft paper textures, first we need to create a new document in Photoshop with a 200 x 200 px canvas.


Step 2
Select Layer > New Fill Layer > Solid Color. You can name the layer "Paper Color" and then click OK.


Step 3
The Color Picker window should now appear. Set the colour to #f5f5f5 and click OK.


Step 4
Select Layer > New > Layer and name the layer "Texture", and then click OK.


Step 5
Use the Fill Tool (G), set the colour to #f8f8f8, and then fill the "Texture" layer.


Step 6
With the "Texture" layer selected, go to Layer > Smart Objects > Convert to Smart Object to convert the layer into a Smart Object.


Step 7
Select Filter > Filter Gallery and in the new window that appears, under Texture, select Texturizer. Apply the following settings:
- Texture: Sandstone
- Scaling: 100%
- Relief: 4


Step 8
In the Layers panel, double-click on the Filter Blending Options icon. In the Blending Options window, set the Opacity to 50%.


Step 9
Select Filter > Filter Gallery, and under Brush Strokes, select Spatter. Apply the following settings:
- Spray Radius: 10
- Smoothness: 5


Step 10
In the Layers panel, double-click on the top filter blending options icon. In the Blending Options window, set the Opacity to 50%.


Step 11
Select Filter > Noise > Add Noise. Apply the following settings:
- Amount: 2%
- Distribution: Gaussian
- Monochromatic: Checked


Step 12
In the Layers panel, double-click on the new top filter blending options icon. In the Blending Options window, set the mode to Linear Burn and lower the Opacity to 30%.


Step 13
Set the blending mode for the "Texture" layer to Multiply.


Step 14
Select all the layers and then right-click > Merge Layers.


Step 15
Go to Select > Select All to make a selection of the entire texture image.


Step 16
Go to Edit > Define Pattern to open the Pattern Name dialogue box. Name the pattern "Paper Texture" and then click OK.


3. How to Create a Paper Cutout Effect Photoshop Action
Step 1
Now we will learn how to add a construction paper texture in Photoshop by creating an action. Once the action has been created, it will allow you to change the look of any shape that you create in Adobe Photoshop quickly and easily, with just the click of a button.
Return to the Paper Cutout Composition file and navigate to the Actions panel or go to Window > Actions. Make sure that the "window 01" layer is selected, and click on the Create New Action button in the Actions panel.


Step 2
Once you've clicked on the Create New Action button, you'll be prompted to fill in a few options first. These settings can be useful when creating your new Photoshop action and can help you identify it more quickly.
- Name: Paper Cutout Effect
- Set: Default Actions
- Function Key: None
- Color: None


Step 3
Once you're happy with the initial action settings, you can click on the Record button. After you click on this button, everything that you do in Photoshop will be recorded as part of the action. The small button on the Actions panel will also change to a red dot to let you know that you are recording.


Step 4
Now that we are recording and our Photoshop action is set up, it's time to start editing our Blending Options to change the look of our shapes.
Select the top layer "window 01" and then click on the Add Layer Style button at the bottom of the Layers panel. From the menu, select Blending Options.


Step 5
In the Layer Style window, select Bevel & Emboss and choose the following options:
- Style: Inner Bevel
- Technique: Smooth
- Depth: 100%
- Direction: Up
- Size: 1 px
- Soften: 2 px
- Angle: 90°
- Use Global Light: Checked
- Altitude: 30°
- Gloss Contour: Linear
- Highlight Mode: Linear Light
#ffffff - Opacity: 40%
- Shadow Mode: Linear Light
#ffffff - Opacity: 40%


Step 6
Select Inner Shadow and choose the following:
- Blend Mode: Overlay
#ffffff - Opacity: 45%
- Angle: 90°
- Use Global Light: Checked
- Distance: 3 px
- Choke: 0%
- Size: 3 px


Step 7
Select Inner Glow and choose the following:
- Blend Mode: Linear Light
- Opacity: 10%
- Noise: 0%
- Technique: Softer
- Source: Edge
- Choke: 0%
- Size: 144 px
- Contour: Linear
- Range: 50%
- Jitter: 0%


Step 8
Select Pattern Overlay and choose the following:
- Blend Mode: Normal
- Opacity: 75%
- Pattern: Paper Texture
- Angle: 0°
- Scale: 100%
- Link with Layer: Checked


Step 9
Select Drop Shadow and choose the following:
- Blend Mode: Multiply
- Opacity: 70%
- Angle: 90°
- Use Global Light: Checked
- Distance: 4 px
- Spread: 0%
- Size: 10 px
- Contour: Linear
- Noise: 3%
- Layer Knocks Out Drop Shadow: Checked


Step 10
To finish your Photoshop action, simply go to the Actions panel again and click on the Stop button to finalize your paper texture action.


Step 11
With the paper cutout effect Photoshop action completed, it's really easy to change the texture of all the layers that we have created.
Simply select the layer you want to change, choose the "Paper Texture" action that you created, and press the Play button.


4. How to Change the Colour of the Paper Cutout Effect
Step 1
Once you have finished using the paper cut Photoshop action on your whole illustration, it is time to colour it in. Select the layer whose colour you want to change in the Layers panel. From there, click on the Add Layer Style button at the bottom and select Blending Options.


Step 2
Choose Color Overlay and set the Blend Mode to Linear Burn with 100% Opacity.


Step 3
Click on the colour box and then choose the colour you want to use with the Color Picker. Once you click OK, the colour will be applied.


Step 4
Repeat the steps above to colour the other layers in your composition to complete the illustration. You can use all sorts of combinations and colours to create, for example, a red or green construction paper texture. Check out some of the examples below for some inspiration.


Awesome! You're Finished!
Congratulations! And that's how you can create a paper texture cutout effect using Adobe Photoshop.
I hope you found this tutorial helpful and that you've learned some new tips and tricks that you can use for your own projects. See you next time!


Top 5 Paper Effects From Envato Elements
Want to create cool paper cutout Photoshop effects, but short on time? Then head on over to Envato Elements, where you can download many different construction paper texture effects that you can use and customise. Here are five of my favourites.
Paper Cutout Photoshop Action (ATN, ABR, ASL, PAT, PDF)


Create colour paper texture illustrations quickly and easily! With just a few simple clicks, you can create a variety of different styles such as a ripped edge, a clean-cut edge, or zig zags. This pack features nine different actions and 54 different layer styles to choose from, including a green construction paper texture.
Paper Cutout Text Effects (PSD, PDF)


Here's another super easy colour paper texture cutout text effect that you can use for your own projects and designs! This pack features eight easily editable PSD templates with easy editing via smart objects, at 300 dpi with a size of 2560 x 2000 pixels. Create a paper cutout text effect in Photoshop quickly and easily.
Papercut Text Effect (PSD)


Create clean headlines, website banners, posters, flyer designs, and more with this cutout text effect Photoshop template. This pack features a high-quality PSD file that is 300 dpi and 3000 x 2000 pixels.
Paper Kingdom Illustrator Graphic Styles (AI, EPS, PNG)


Paper Kingdom is designed to be used with Adobe Illustrator. Create cute and fun illustrations in just a few clicks using the premade scenes available or using the assets to create your own construction paper background! This package includes 26 Illustrator graphic styles, 260 seamless paper textures, 320 vector shapes, a vector alphabet, and five premade compositions.
Fabric Kingdom Illustrator Edition (AI, EPS, PNG)


Create cute and fun illustrations using Fabric Kingdom! This pack uses the most popular fabric textures for your projects and designs. Inside, you'll find 14 graphic styles with seamless textures, over 280 stitch brushes, over 500 vector illustrations, and an original vector alphabet.
I hope you've enjoyed this tutorial on how to add a construction paper texture in Photoshop. If you'd like to learn more cool Photoshop skills, we've got more tutorials for you:

 Create an Illuminated Digital Paper Cut-Out Scene in Adobe Illustrator


 How to Create a Summer Vacation Illustration in Adobe Illustrator


 How to Create a 3D Paper Cut-Out Text Effect in Adobe InDesign


 How to Create a 3D Paper Cut Text Effect in Adobe Photoshop


 How to Create an Embossed Paper Logo Mockup in Adobe Photoshop


 How to Create a Pressed Paper Logo Mockup in Adobe Photoshop
 By
By


