


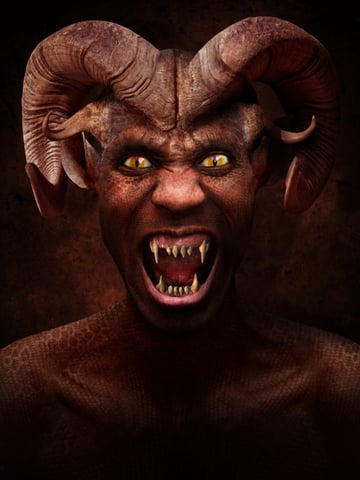
Mythical creatures have been part of legend and folklore since the dawn of time. These imaginary creatures are often hybrids, or a combination of two or more animals such as a centaur (human and horse) or a minotaur (human and bull).
In this tutorial we'll take inspiration from these fantastical creatures and transform a portrait into a terrifying horned beast. You'll discover how to blend animal and human anatomy, then add convincing skin textures to really pull off the effect. Let's get to it…
Resources
I’ve supplied some files in the “source" folder, but you’ll also need the following resources.
- Model
- Elderly man
- Ram
- Rino
- Ox
- Crocodile one by doc
- Crocodile two
- The large version of this iguana
- The large version of this cat
Not all these images are free, but here’s an abundance of free web resources if you wish to source you’re own.
Before we Start
Every image starts life as a concept before it can be realized. Before we get started, I’d like to show you how I approach a typical illustration brief. If you’re working commercially, you’ll probably be commissioned because your style fits the brief. Depending on your working relationship, sometimes just an email or phone call is sufficient before you commence work.
Some clients or art directors may ask for a preliminary rough concept for approval – It’s here that you need to use your judgement on whatever to spend hours comping elements together which could well be rejected. At this point I was undecided on how to approach the teeth, because finding suitable stock images was proving difficult. It wasn’t until later that I decided to use a 3D render.


Step 1
Open the model image. Set the Pen Tool (P) to Paths and draw a closed path around the model’s head and shoulders, excluding the hair.
Remember, you can fine-tune your path at any time by holding the Command key to access the Direct Selection Tool (A) to adjust individual direction/anchor points as required.
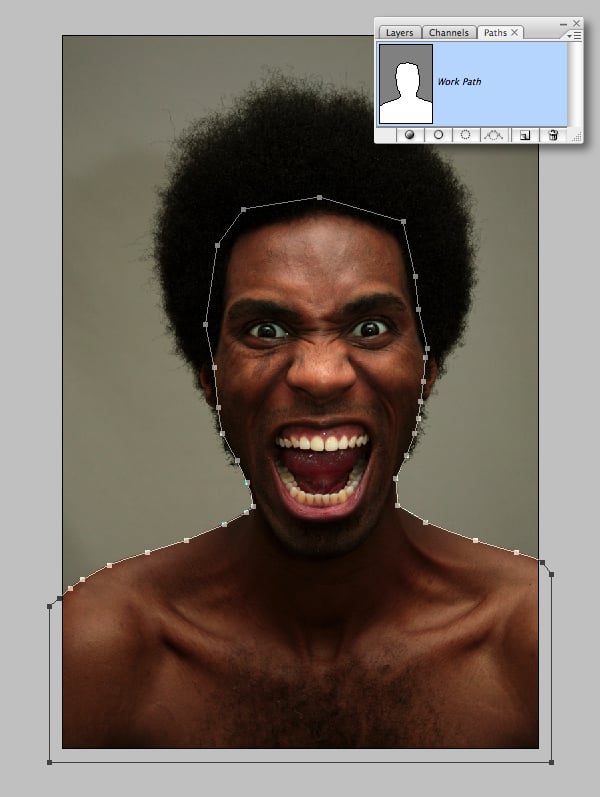

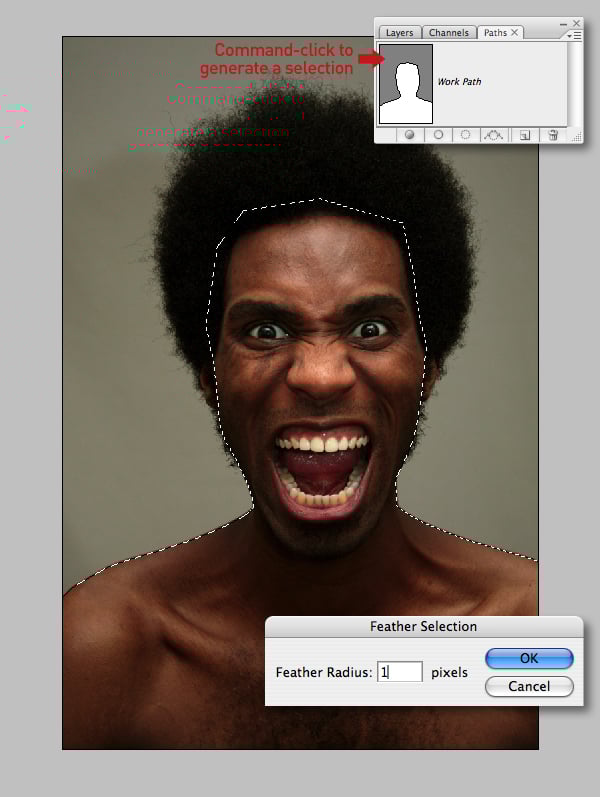
When you’re done Command-click your path thumbnail to generate a selection. Next, hit Option + Command + D and enter a Feather Radius of 1 px and Copy to the clipboard.

Step 2
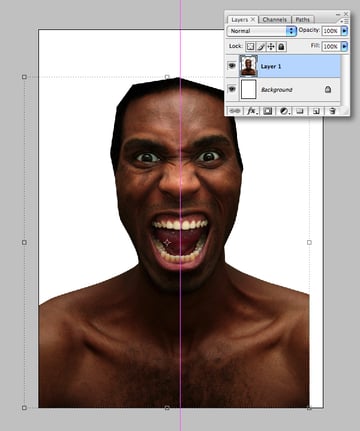
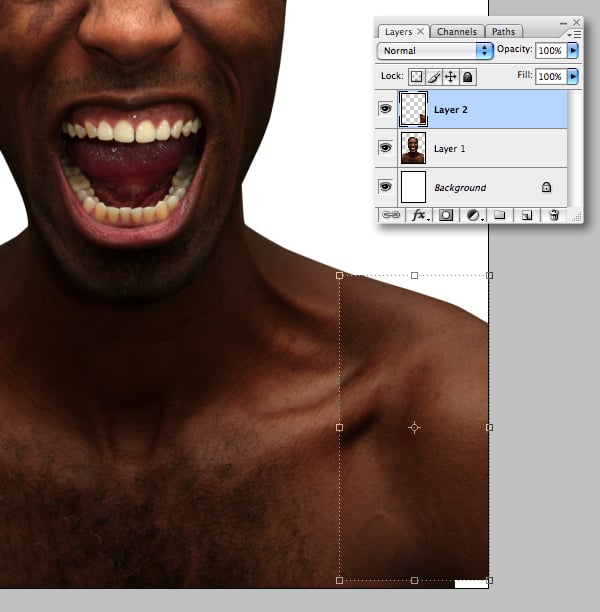
Create a new portrait document 24 cm x 32 cm. Set the Resolution to 300 dpi, the Color Mode to RGB and the Background Contents to White.


Paste your selection as a new layer, then Hit Command + T, resize and position to a central guide. Don’t worry about the gap on the right – we’ll fix that next.

Step 3
Make a rectangular selection from the left shoulder, then hit Command + J to float as a new layer. Go to Edit > Transform > Flip Horizontal and position as shown. Ignore the small white space at the bottom, we’ll clone that later.

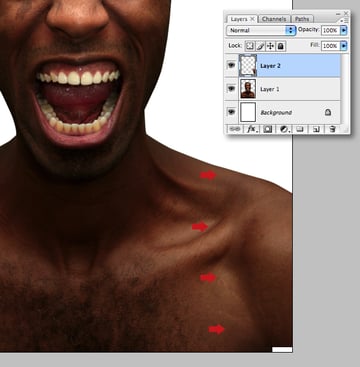
Now use a large, soft-edged Eraser (E) to carefully blend the top layer as indicated.

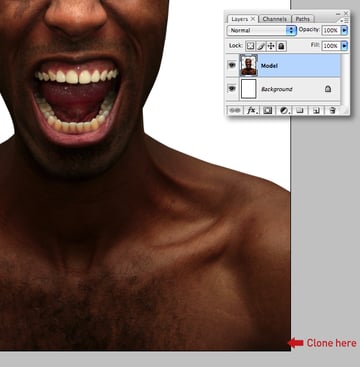
Set the Clone Tool (S) to Current Layer and use a medium, soft-edged brush to fill the white gap at the bottom. Now name the layer “Model."

Step 4
Open the elderly man image, then draw a fairly loose path to encompass the eyebrows and forehead. Create a path-based selection, Feather by 1 px and Copy.
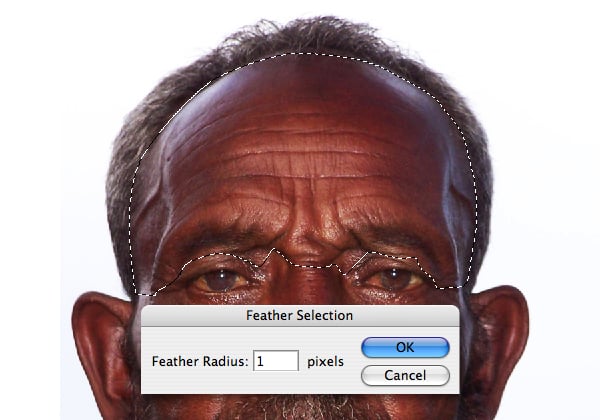
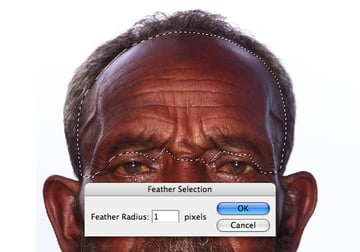
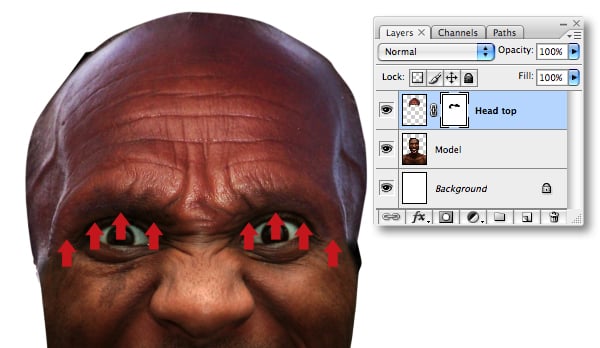
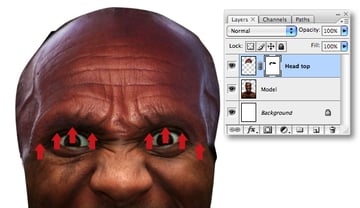
Paste the selection as a new layer in your working file, then resize and label it “Head top." Add a layer mask, grab the Brush Tool (B) and blend the eyebrows into the underlying layer using a black, soft-edged brush.
Step 5
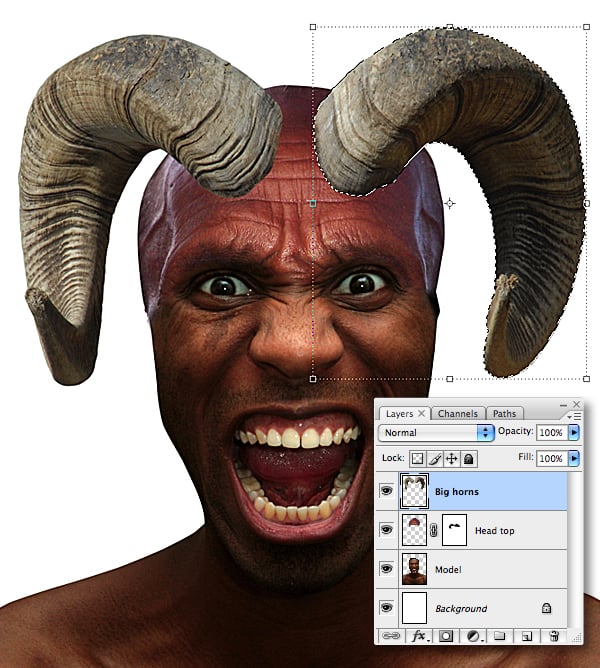
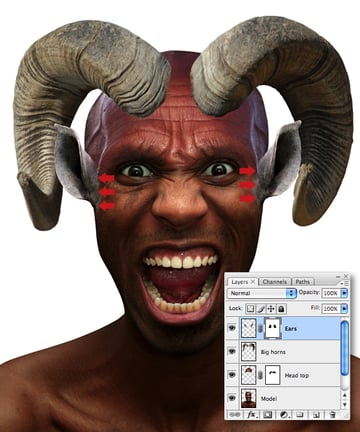
Open the ram image. Draw a path around both horns, select, Feather and Copy.


Paste as a new layer and name it “Big horns." Resize and Transform by rotating over the forehead. Now drag a rectangular selection using the Marquee Tool (M) to cover the right hand horn. Next, select the Move Tool (M) and use the arrows on your keyboard to nudge right to increase the space between them.

Step 6
Open the rhino image. Zoom in and isolate the ear using a path, load the path as a selection, Feather and Copy.
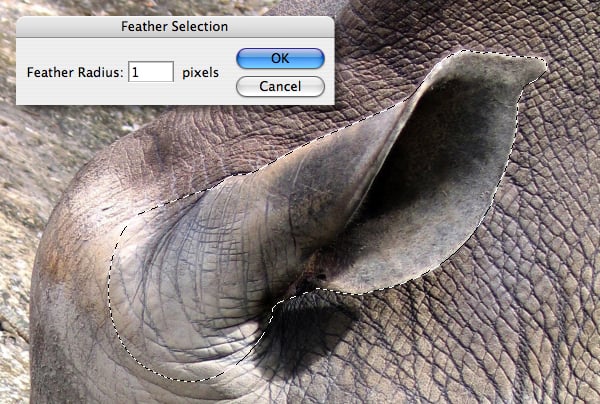
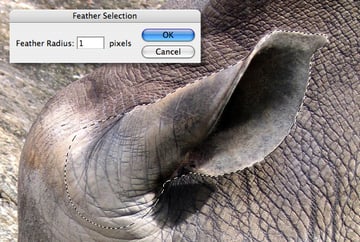
Paste as a new layer, then resize, rotate and position to the left. Duplicate the layer, then Flip Horizontal for the right ear. Human ears generally align with the eyes, but as this creature is a hybrid, we’ll position them higher to overlap the horns. When you’re happy with their positioning, target the upper layer and hit Command + E to Merge Down. Name the resulting layer “Ears."
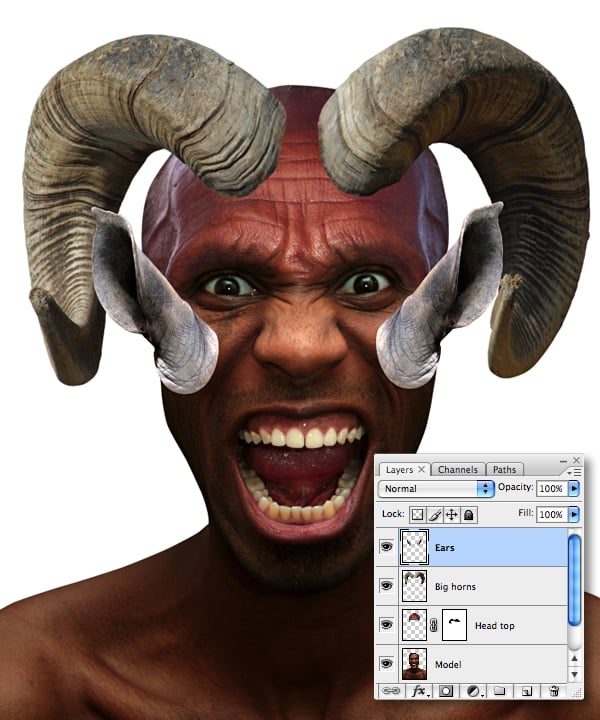
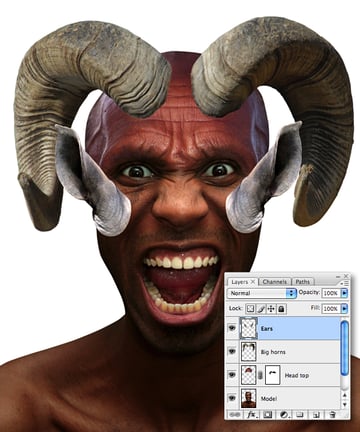
Add a mask, then blend both ears into the creature’s cheeks using a selection of hard and soft-edged brushes at different opacities.

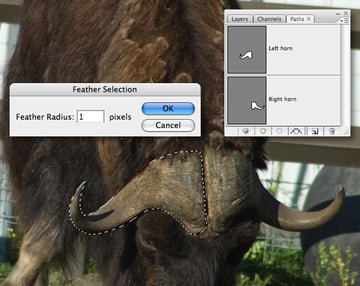
Step 7
Open the ox image, then isolate each horn on a separate path. Load the left horn as a selection, Feather and Copy.

Paste as a new layer, then resize, rotate and position over the left temple.
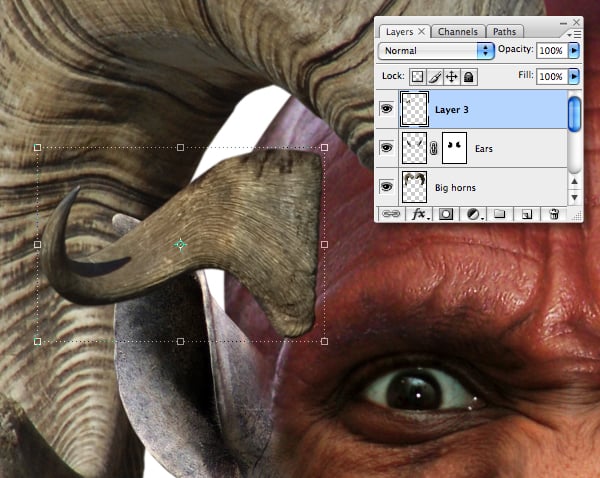
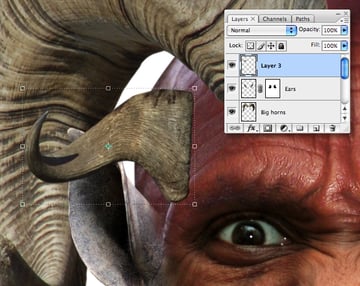
Add the right horn, position then Merge Down. Add a mask and use the same technique as the ears to blend them into the creature’s temples. Name this layer “Small horns."

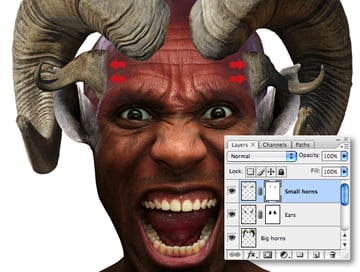
Step 8
Revisit the ox image and use the Lasso Tool (L) to roughly select the central horn root. Copy > Paste as a new layer above the “Big horns" and label it “Big horns centre." Resize, rotate and position centrally, then add a mask and carefully blend it into the horns.


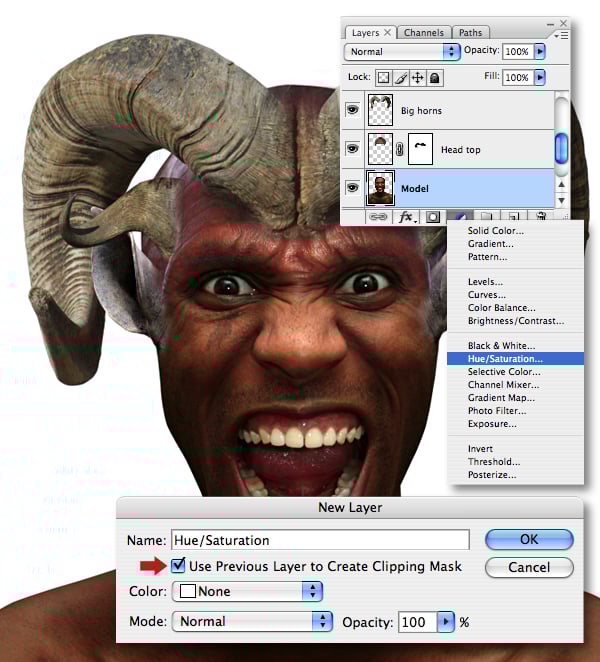
Step 9
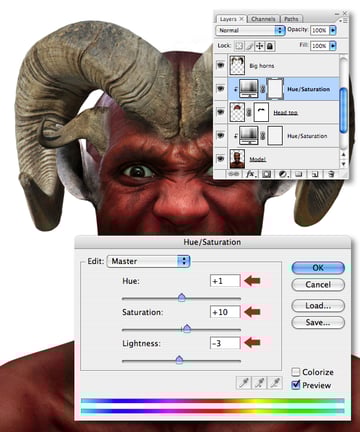
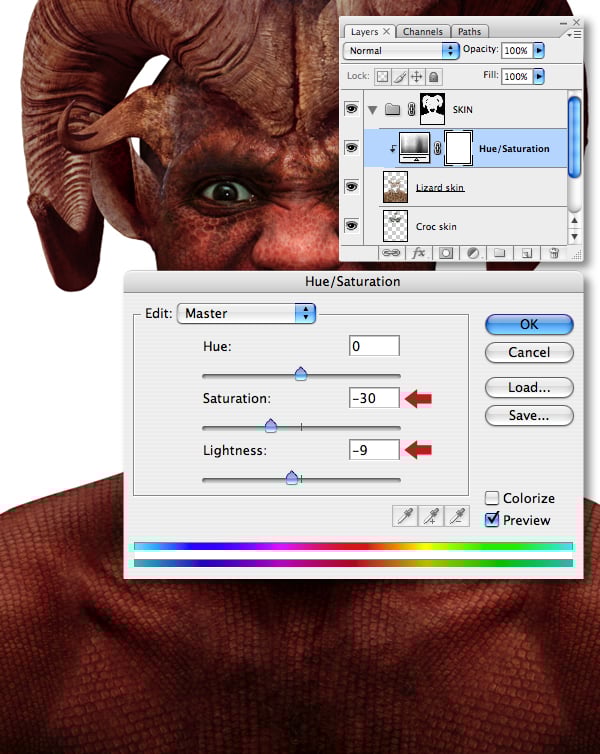
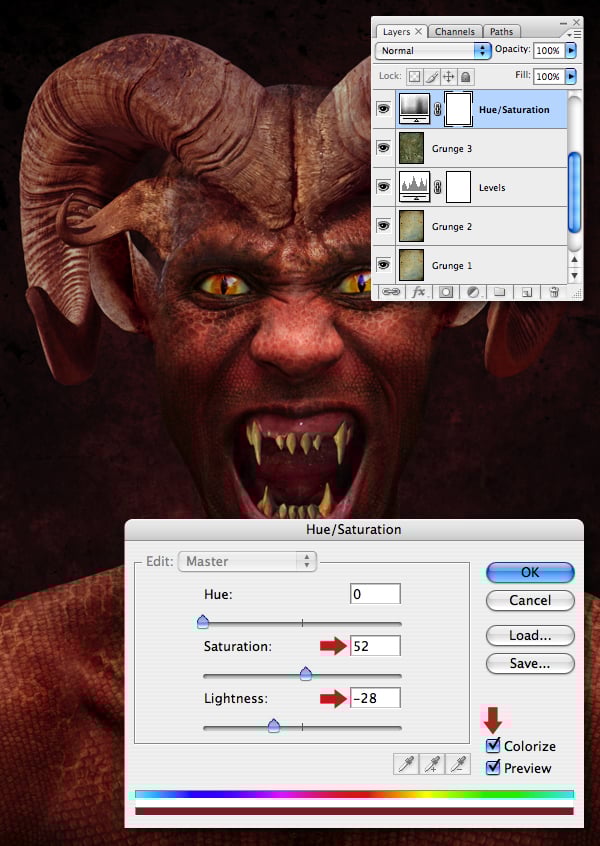
Target the “Model" layer and press Option while selecting Hue/Saturation from the Create New Fill or Adjustment layer menu. In the next window, check the Use Previous Layer to Create Clipping Mask option and hit OK.

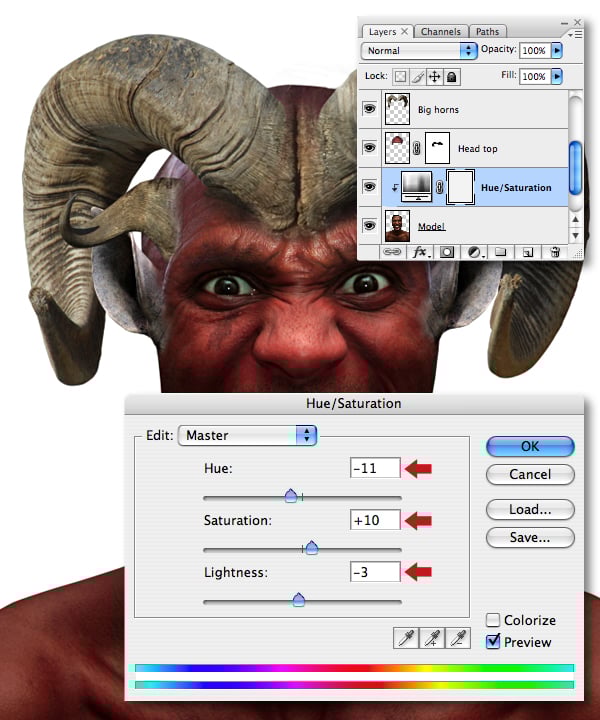
Now enter the settings as below.
Step 10
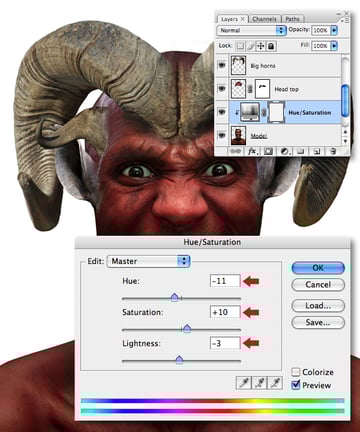
Next, we’ll harmonize the color value and tonal range of the upper layers. At this point we’re not concerned with the lighting – we just require the different elements to blend senselessly.
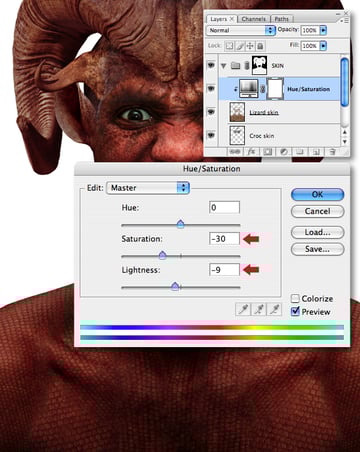
Use the same technique to clip a Hue/Saturation adjustment to the “Head top" layer using the settings below.

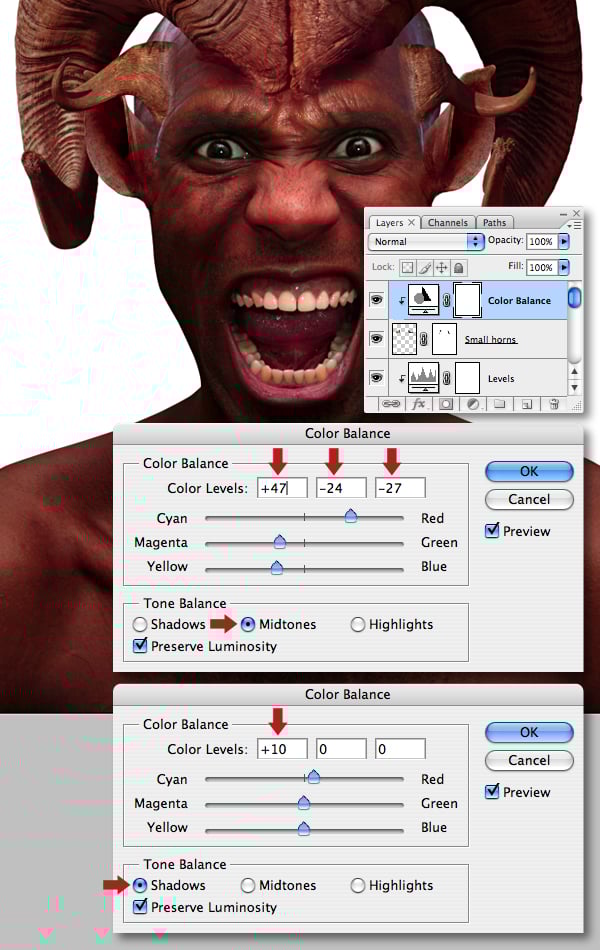
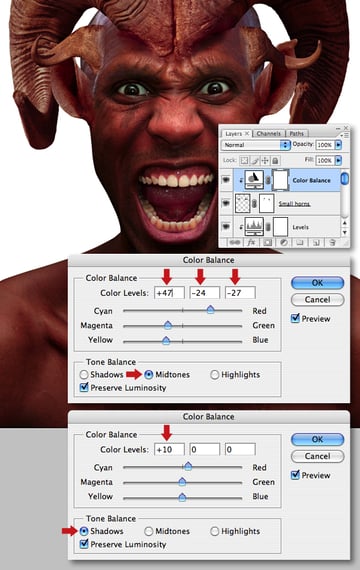
Step 11
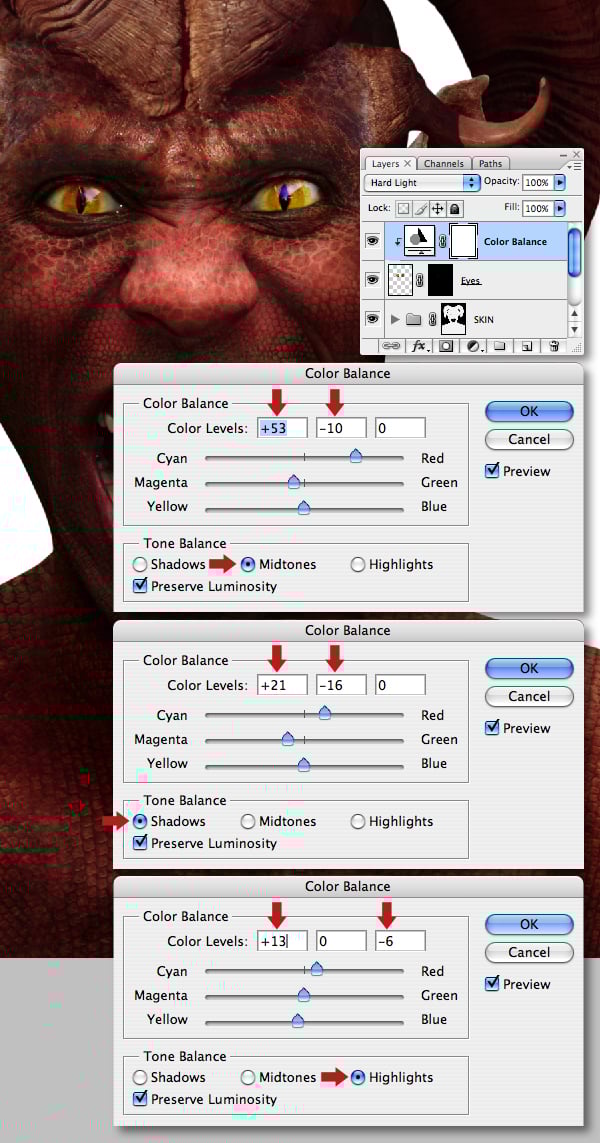
Clip a Color Balance adjustment to the “Big horns" layer, then set the Midtone and the Shadow sliders as shown.
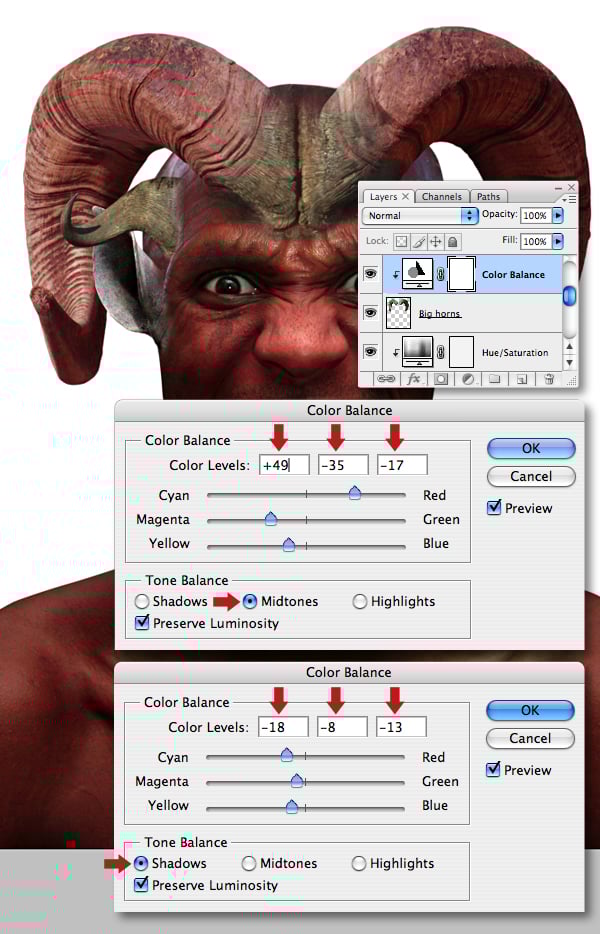

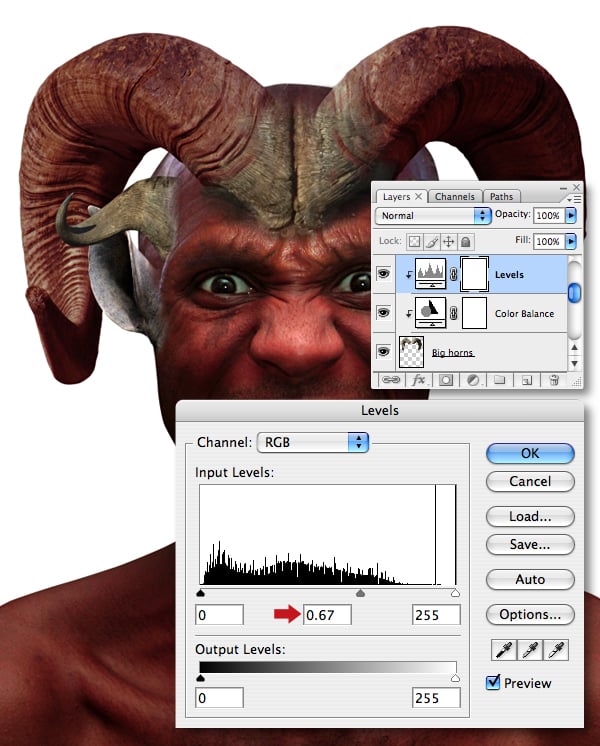
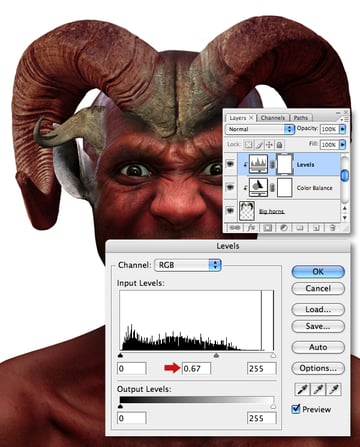
We now need to add another adjustment layer to the “Big horns" layer. First, target the Color Balance adjustment layer thumbnail, then clip a Levels adjustment to it and set the midpoint Input slider to 0.67.
Step 12
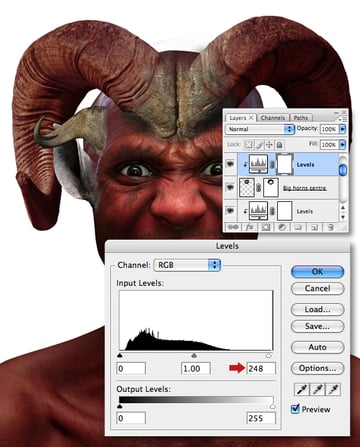
Now clip another Levels adjustment, this time to the “Big horns centre" layer and set the whitepoint Input slider to 248.

Step 13
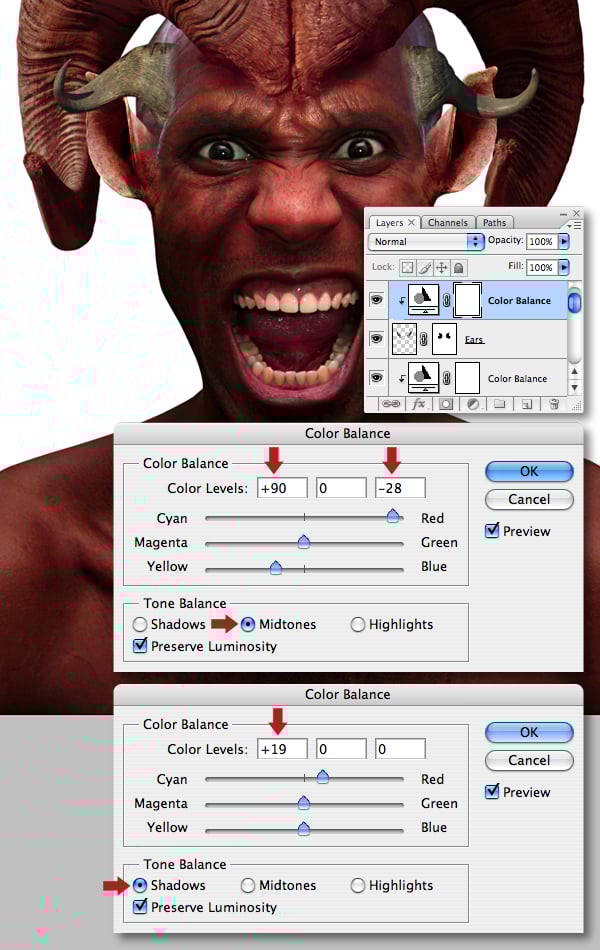
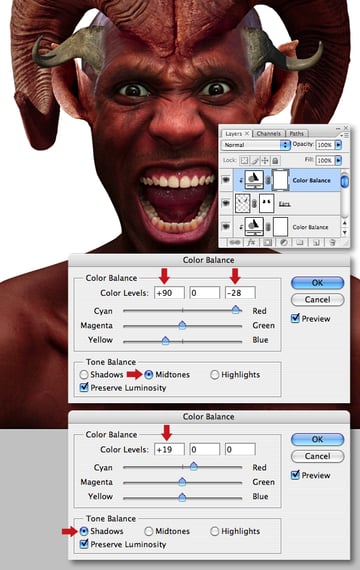
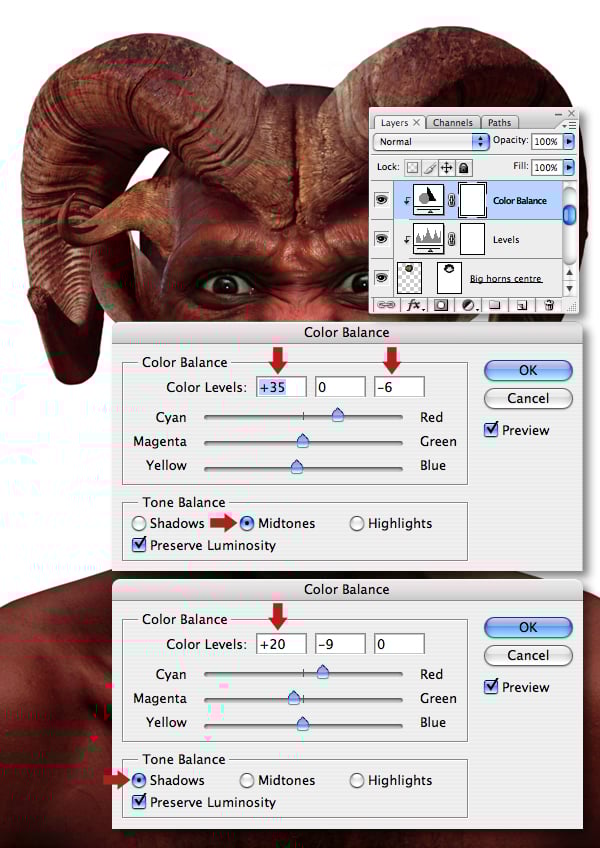
Clip a Color Balance adjustment to the same layer, then set the Midtone and the Shadow sliders as below.


Step 14
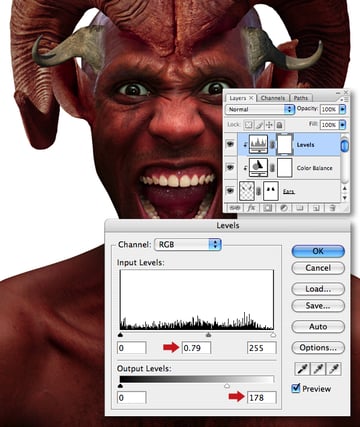
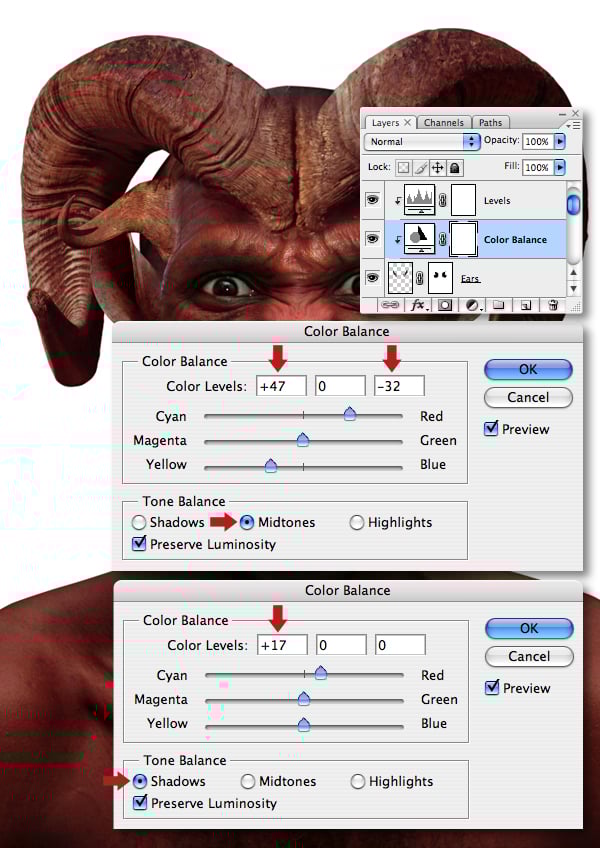
Clip a Color Balance adjustment to the “Ears" layer. Now adjust the Midtone and Shadow sliders as shown.
Now Clip a Levels adjustment to the same layer and adjust the midpoint Input slider to 0.79 and the whitepoint Output slider to 178.

Step 15
Clip a Color Balance adjustment to the “Small horns" layer and set the Midtone and the Shadow sliders as below.
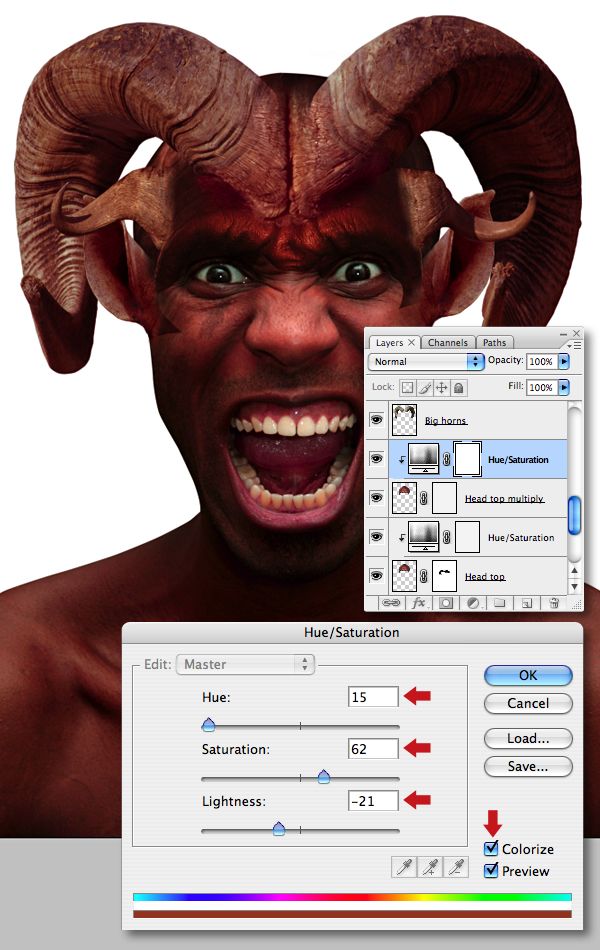
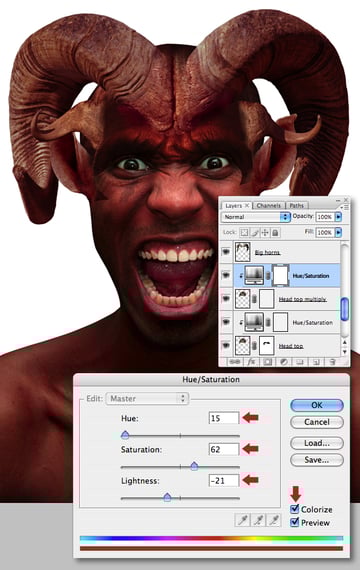
Step 16
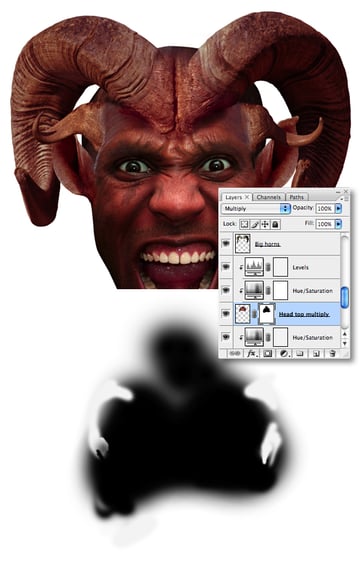
Now we’ll refine the top edges of the head a little. Shift-click the “Head top" and it’s “Hue/Saturation" layer thumbnails and drag them into the Create new layer icon to duplicate them. Rename the bottom duplicate “Head top multiply" and set its Blend Mode to Multiply. Next, double-click the duplicate “Hue/Saturation" layer thumbnail to alter its settings. Now check the Colorize option and adjust as below.
Clip a Levels adjustment to the “Hue/Saturation" duplicate and set the whitepoint Output slider to 157.

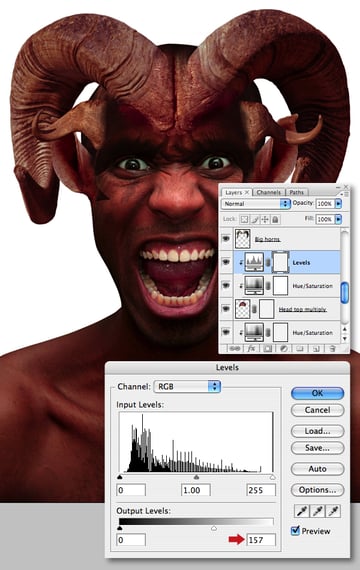
Add a mask to the “Head top multiply" layer and hide the central part, leaving the outer edges intact. My mask is shown at the bottom of the screengrab as a guide.

Step 17
The tonal and color range of all these layers should now amalgamate. If not, tweak any of the adjustment layers accordingly. I felt the Color Balance of the “Big horns centre" needed a slight modification.

I also tweaked the Color Balance of the “Ears." Remember, adjustment layers are non-destructive and can be altered at any point during the image creation process.
To keep things organized, we’ll add all theses floating layers into their own group folder. Target the top “Color Balance" thumbnail, then Shift-click the bottom “Model" thumbnail (this will also highlights the in between layers). Now choose New Group from Layers in the fly-out menu (top right) on the Layers palette, then in the next window name it “CREATURE."

Step 18
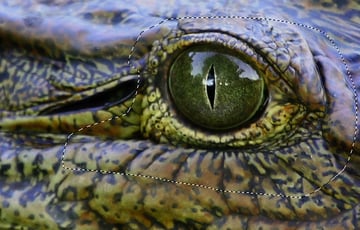
We’ll now begin to incorporate some animal textures. Open the first crocodile image and roughly create a selection around the eye and surrounding skin using the Lasso Tool (L) then Copy.

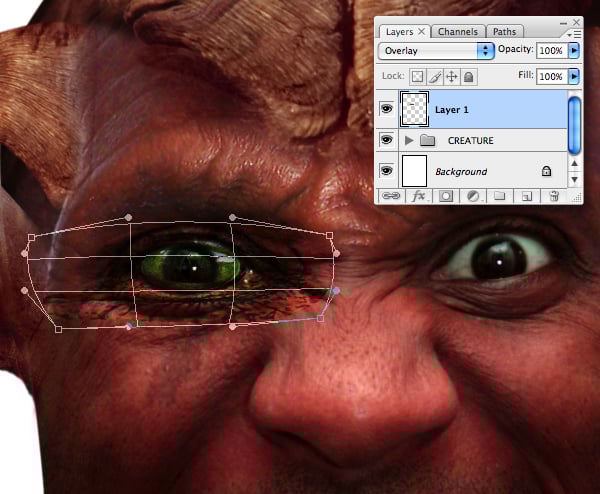
Paste the selection as a new layer above the “CREATURE" folder, move it into position and resize/squash (changing the Blend Mode to Overlay will help positioning). Now use the Transform > Warp function to pull it into shape. We’ll eventually be using a different eyeball, so just concentrate on getting the eyelids to match.

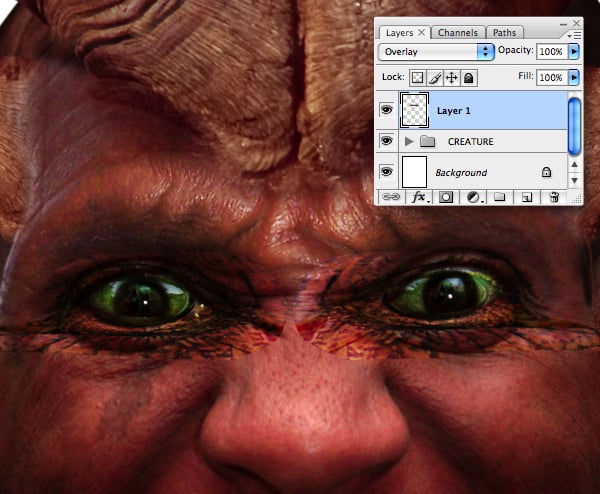
Duplicate the layer and Flip Horizontal. Move the duplicate over the right eye and Transform/Warp to fit – remember facial features are always asymmetrical. When your done Merge Down the upper layer.

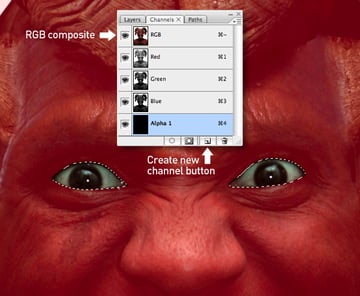
Disable the visibility of the new layer, then zoom in and draw two closed paths for the eyeballs. Load the path as a selection and Feather by 2 px.
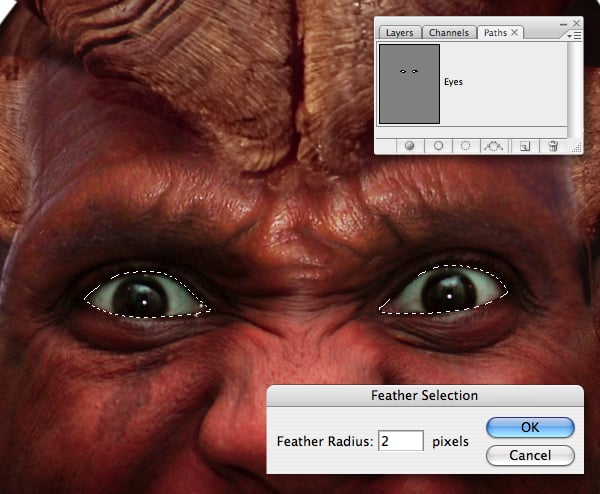

We’ll now store this selection within an Alpha Channel. Switch to your Channels tab and click on the Create new channel button. Set your Foreground to white and with the selection still active hit Delete. In order to continue working, highlight the top RGB composite channel and switch back to your Layers tab.
We’ll be using this soft-edge selection more than once throughout the tutorial, so saving it within an Alpha Channel is good practice.

Enable the visibility of the new layer and with the selection remaining active hit Delete.


Step 19
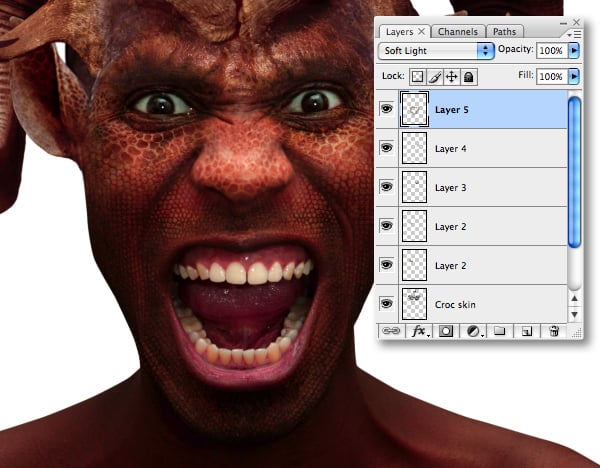
Open the second crocodile image, then make a large, rough selection of skin beneath the eye and Copy.
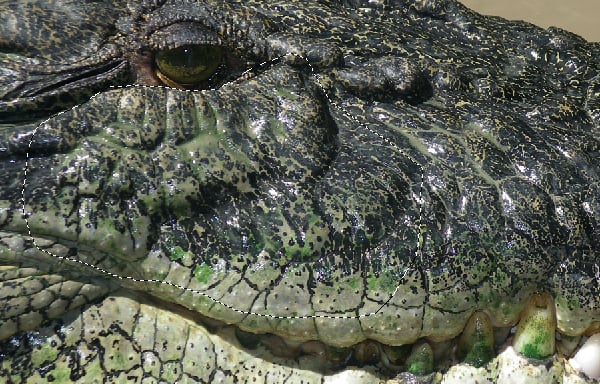

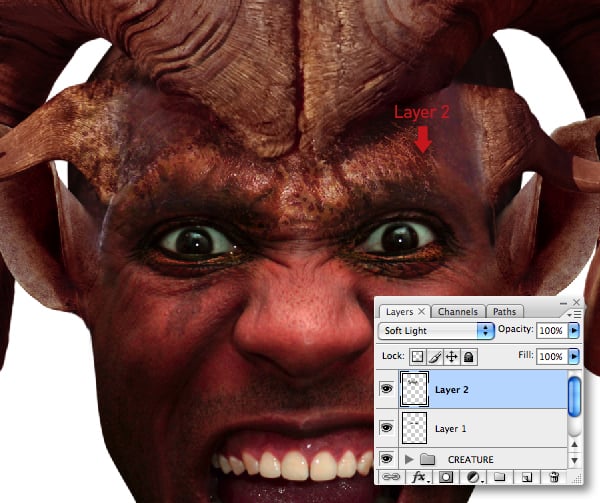
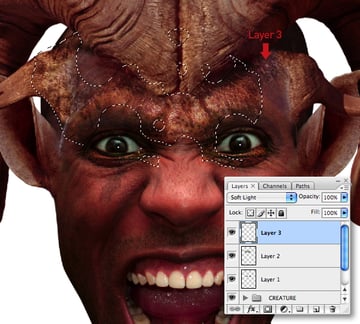
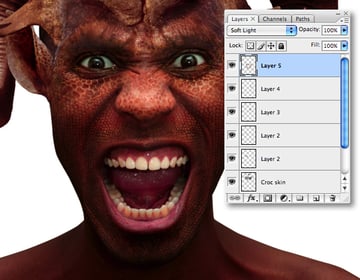
Paste the selection at the top of the layer stack and resize/position over the forehead. Set the Blend Mode to Soft Light. Now gently blend the hard edges using a soft Eraser.

Paste a smaller, different skin selection from the crocodile and set this layer to Soft Light and also blend the edges. To remove any overlaps, Command-click the lower layer to generate a selection, target the new layer and hit Delete.
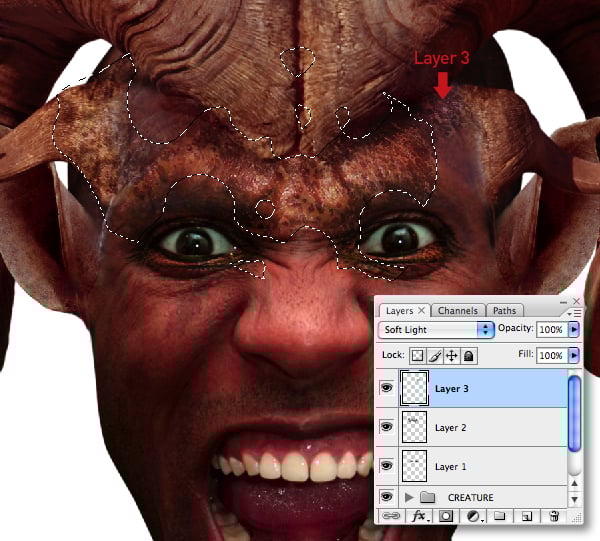
Continue adding further crocodile skin layers using the same technique to build up the effect. Now grab the Eraser Tool (E) and use a medium, soft-edged brush to remove unwanted areas.
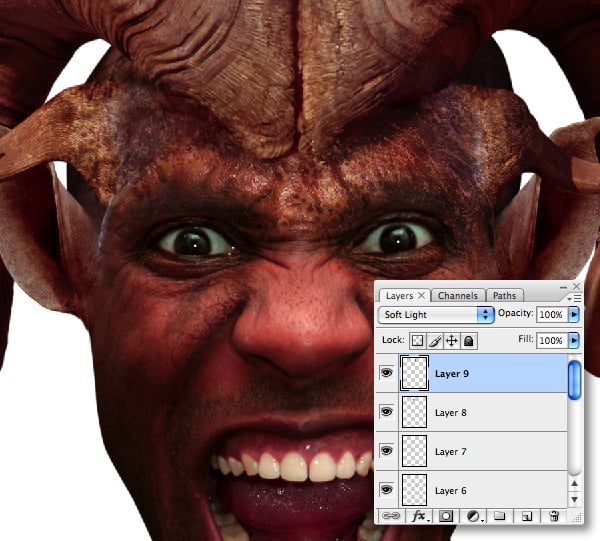

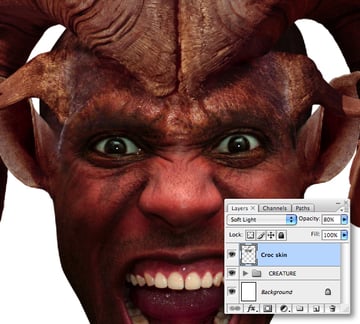
When you’re done, target the uppermost layer and Merge Down each layer in turn, including the first skin layer that was added around the eyes. This composite layer should automatically be set to Soft Light. Name the merged layer “Croc skin" and lower its Opacity to 80%.

Step 20
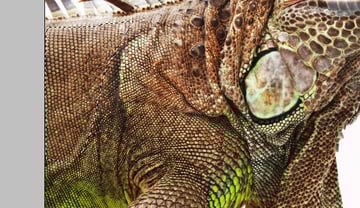
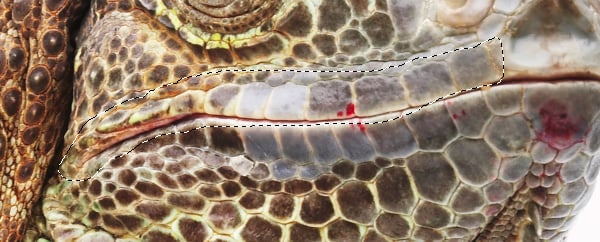
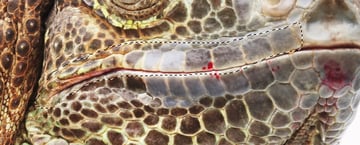
Now we’ll add some reptilian skin. Open the iguana image, roughly select the lower jaw area and Copy.
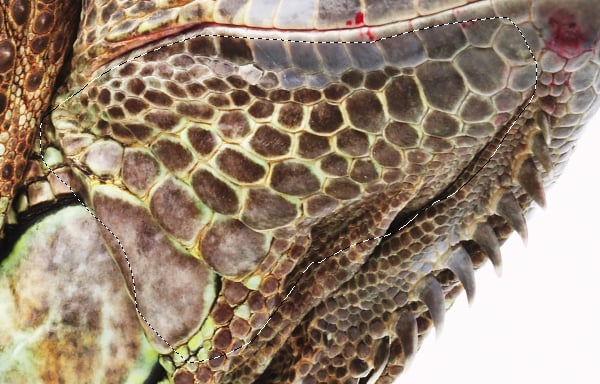
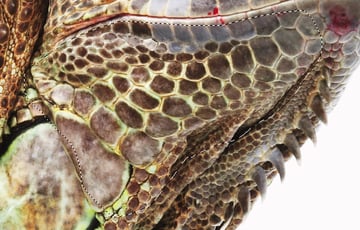
Paste at the top of the layer stack, then set the Blend Mode to Soft Light and erase the hard edges. Now position under the creature’s left eye and Transform/Warp to fit.


Revisit the iguana and roughly lasso the scales from its flank and Copy.
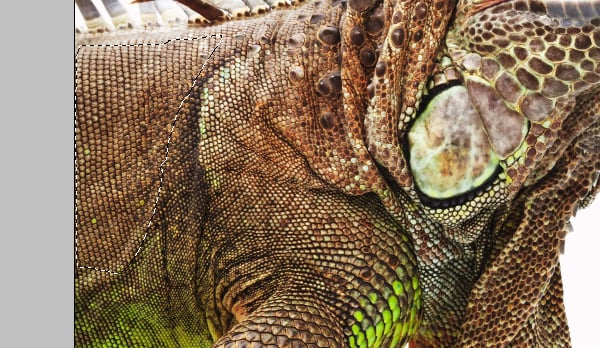
Paste the selection around the creature’s lower left cheek, erase the hard edges, then set its Blend Mode to Soft Light. Transform/Warp, then use the same technique as you did with the crocodile skin (Step 19) to remove overlapping areas.
Continue to add/duplicate further scale layers using the same work flow until the entire face is covered apart from the lips. If at this stage you find you’ve too many layers, use the Merge Down command to keep things manageable.
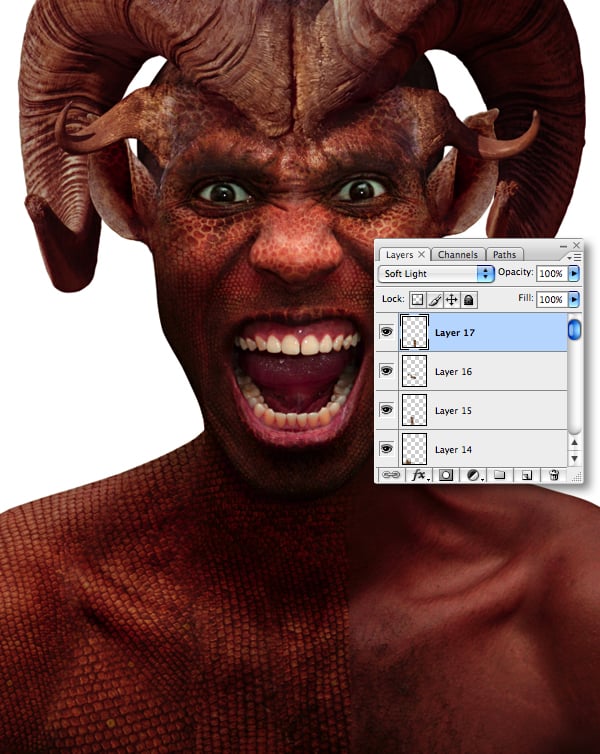
Switch to the iguana again and select the upper lip area and Copy.
Paste the selection and set to Soft Light. Apply the Warp Arc preset at -90 degrees, then Transform using freeform Warp mesh to follow the lower lip. Erase the hard edges, then duplicate for the upper lip and Transform/Warp again.


Step 21
With the face complete, it’s time to move onto texturing the rest of the creature. Use the same iguana flank selection (slightly enlarged) to build cover the left side of the creature’s body using the same techniques. Remember to erase areas the overlap the face.

When you’re done Merge Down each layer in turn, then duplicate/Flip Horizontal for the opposite side and erase any overlaps.


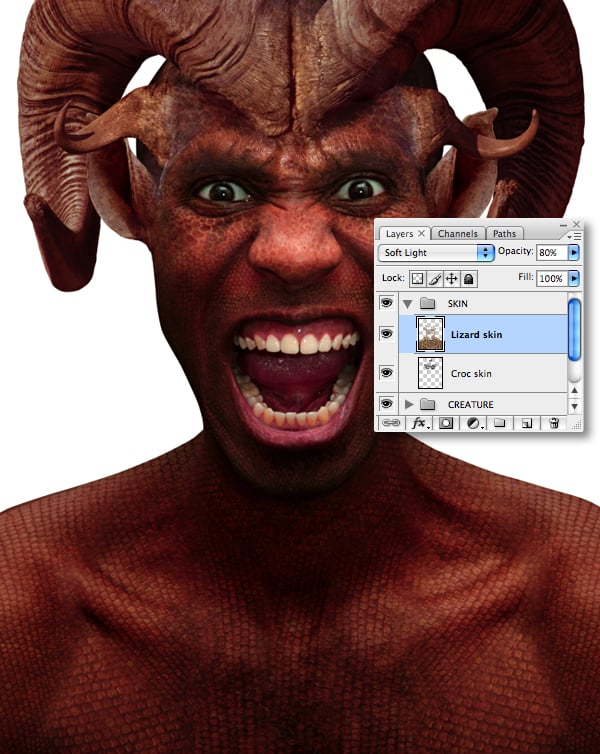
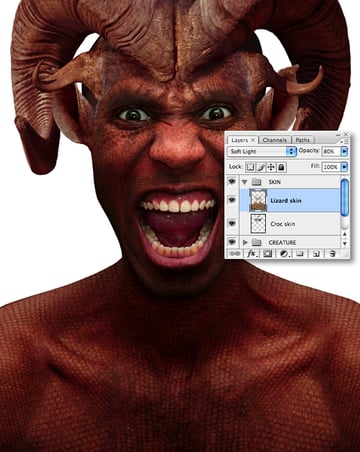
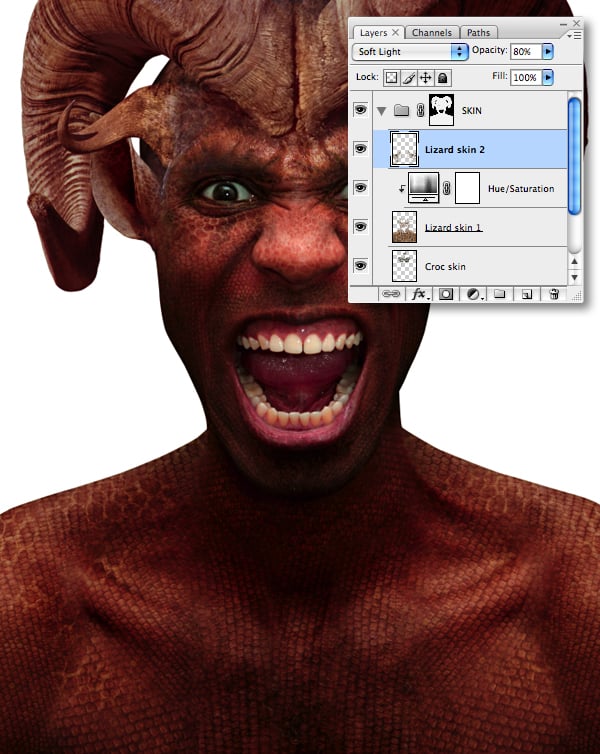
Merge the remaining lizard textures into a single layer and label it “Lizard skin." This layer should now be set to Soft Light and 80% Opacity. Finally, add the “Lizard skin" and “Croc skin" into a group folder called “SKIN."
Step 22
Because both skin texture layers are set to Soft Light, any areas that overlap onto the white background are invisible. Because we’ll be adding the background later, these need to be removed.
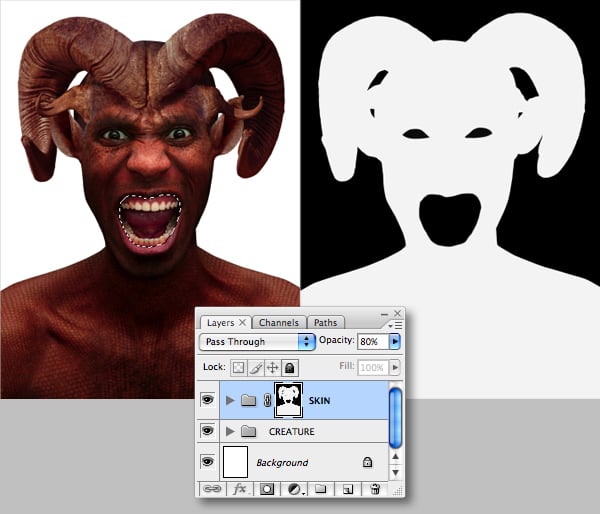
First, generate a layer-based selection from the “Model" layer, then switch to your Channels tab. Add a new channel and fill the active selection with white. Now fill further areas with white using selections from the “Head top," “Big horns," “Ears" and “Small horns" layers.

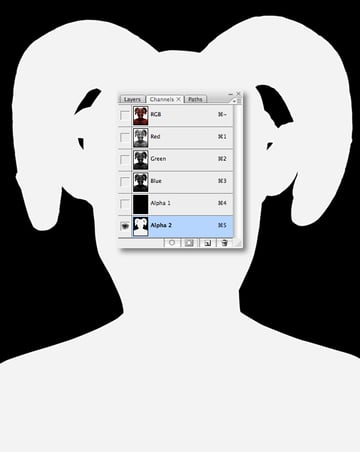
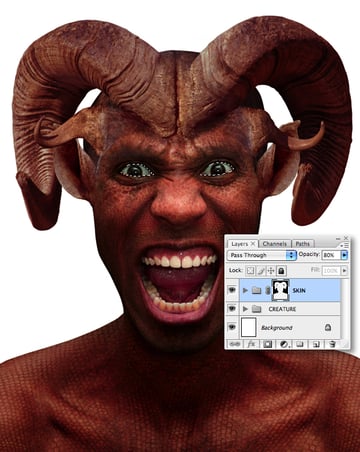
Generate a selection from the new channel, then target the top RGB composite channel. Switch back to the Layers tab and with the “SKIN" folder highlighted choose Layer > Layer Mask > Reveal Selection. Next, load a selection from “Alpha 1" (the eyes) and also fill with black – just in case any textures were mistakenly placed here.

Now draw a closed path just inside the lips, generate a path-based selection and Feather by 2 px.
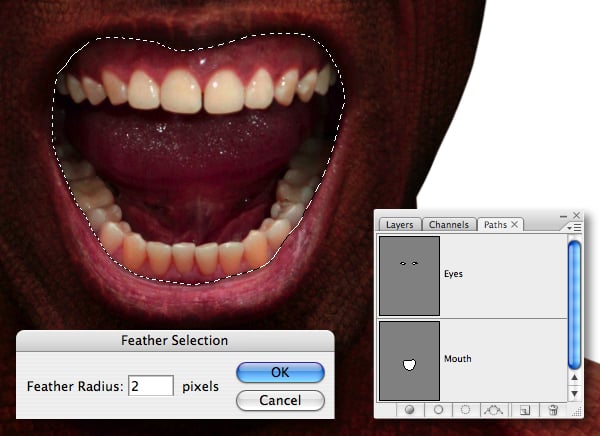

Add a new channel and fill the selection with white.
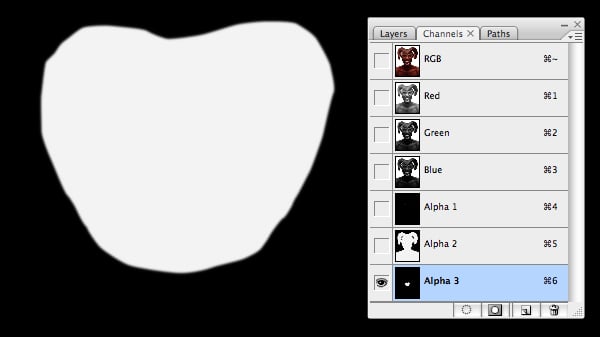
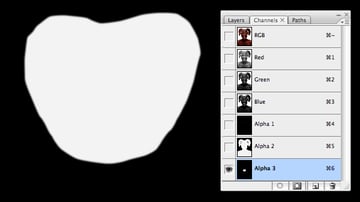
Make a selection from the channel and fill with black on the “SKIN" mask as well. My mask is shown in isolation on the right.

Step 23
With the texturing of the creature’s skin complete, scrutinize the image and apply any adjustments – I felt the scales needed a tweak, so I clipped a Hue/Saturation adjustment to the “Lizard skin" layer.
At this point feel free to add more skin layers; I added some larger scales (sourced from the iguana’s lower jaw) and placed them over the creature’s torso with a Blend Mode of Soft Light at 80% Opacity.

Step 24
Now let’s give our creature some menacing eyes. Open the cat image, then roughly lasso the left eye and Copy.
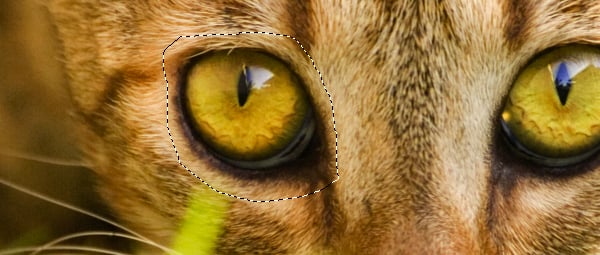
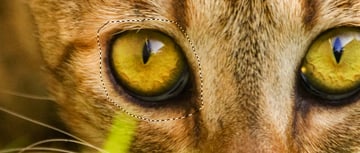
Paste at the top of the stack, then drop its Opacity to around 40% to align it precisely over the existing left pupil.
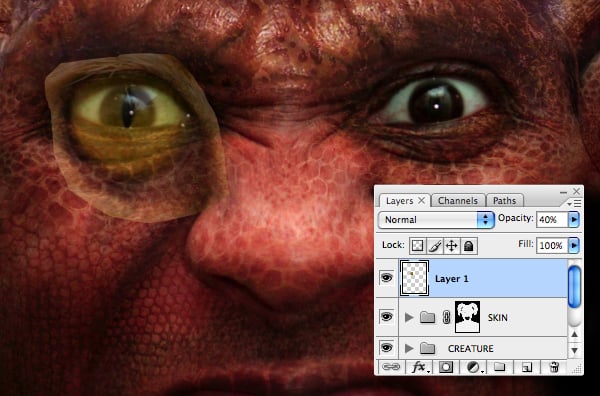

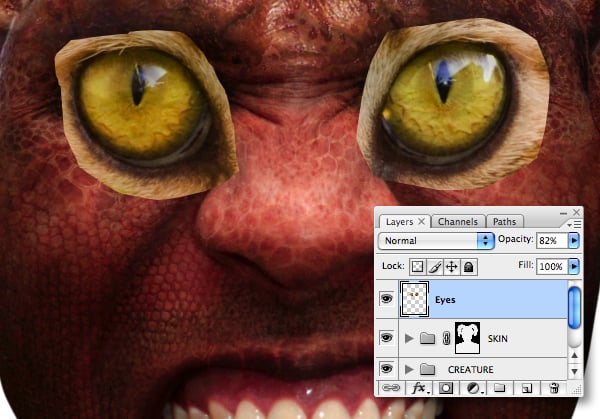
Now Copy > Paste the cat’s right eye and use the same method to position. Once you’re happy, set both layers to 100% and merge. To allow a little of the human eye to show through, drop the layer slightly to 82%, then label it “Eyes."

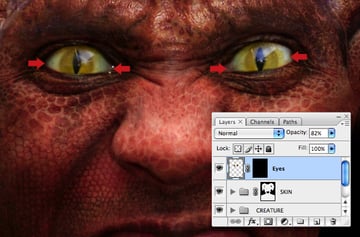
Generate a selection from “Alpha 1" (the eyes), then go to Layer > Layer Mask > Reveal Selection. Now use a small, soft-edged brush at a low Opacity to reinstate the corners of the original eyes as indicated.

Clip a Color Balance adjustment to the “Eyes" and use the settings below to make them more pronounced.

Step 25
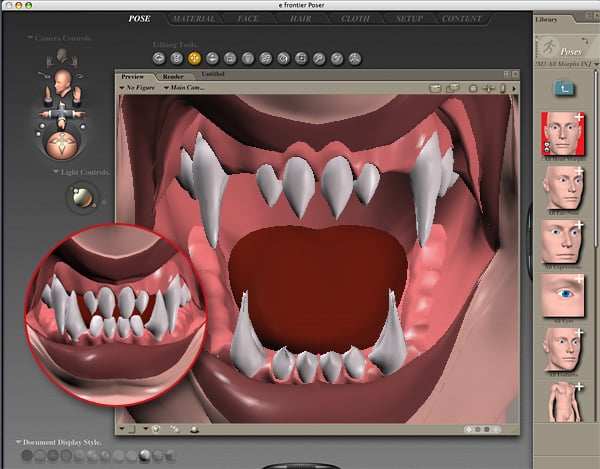
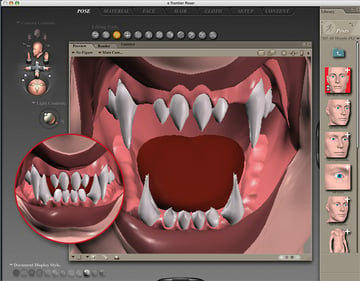
Finding the right image for the teeth proved a bit of an obstacle, so I opted to use Poser. I used the M4 model and Injection Morphs, both available from Daz3D.
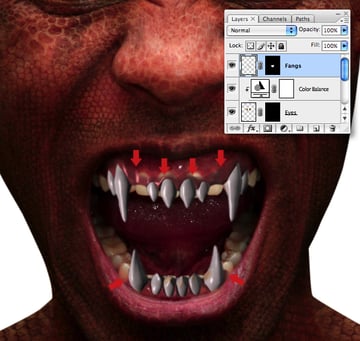
When creating a fantastical creature it’s always worth studying animals in the natural world. The inset in the screengrab below shows how the mouth would appear closed – the bottom fangs slot into the gaps between the upper incisors, much the same as a wolf or dog.
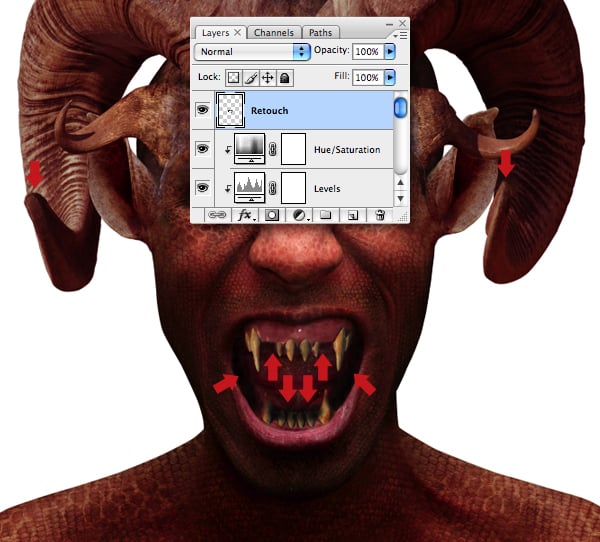
Import “Teeth.psd" from the “source" folder as a new layer at the top of the stack and label it “Fangs."


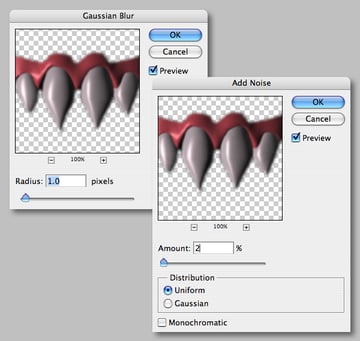
To reduce the 3d rendered appearance, go to Filter > Blur > Gaussian Blur and enter 1.0 px. Now use the Filter menu again to choose Noise and enter 2% and check the Uniform option.

Now we’ll selectively modify the color of the gums. Go to Image > Adjustments > Replace Color, in the next window click on the darker gum area as indicated. Next, set the Fuzziness slider to 103 and adjust the Replacement sliders.


Load a selection from “Alpha 3" (the mouth), target the “Fangs" layer and select Layer > Layer Mask > Reveal Selection. Now grab a small, soft-edged brush and modify the mask by hiding the areas as indicated. Don’t worry about revealing parts of the original teeth, as you’ll fix this later.

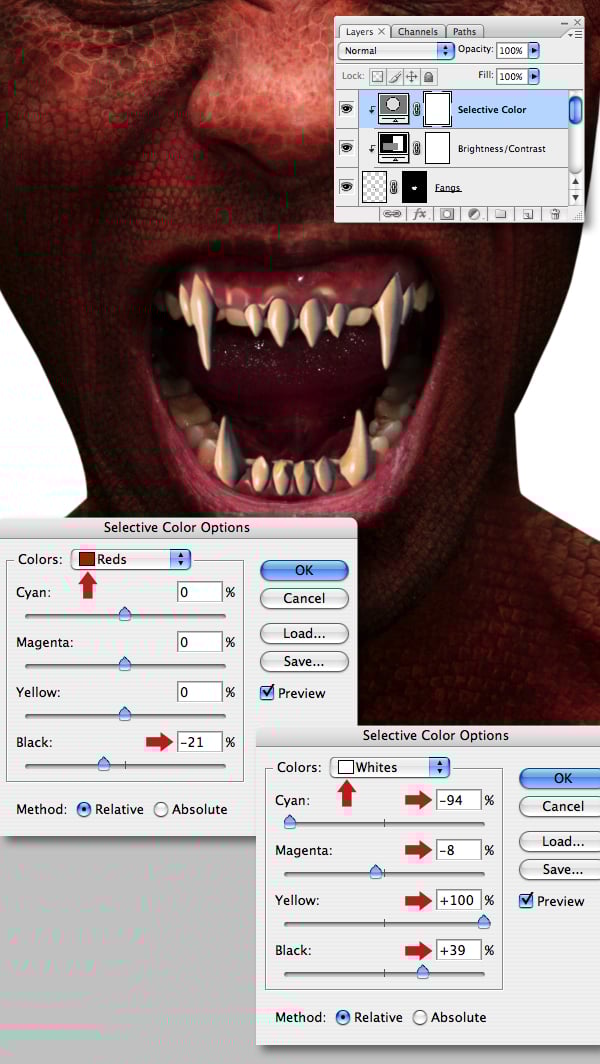
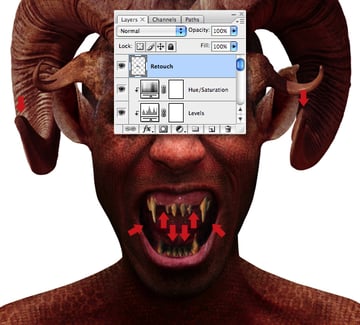
Now clip a Brightness/Contrast adjustment the “Fangs" layer and increase the overall Brightness setting.


The teeth now look too white, so clip a Selective Color adjustment and adjust the Red and White sliders.

Step 26
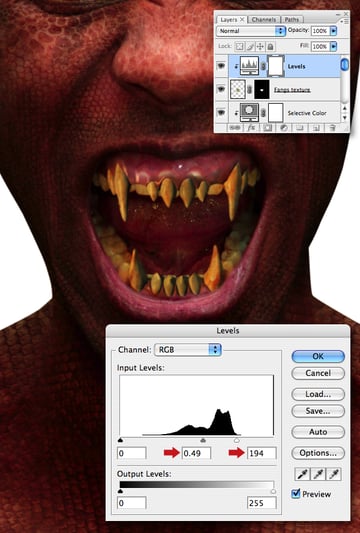
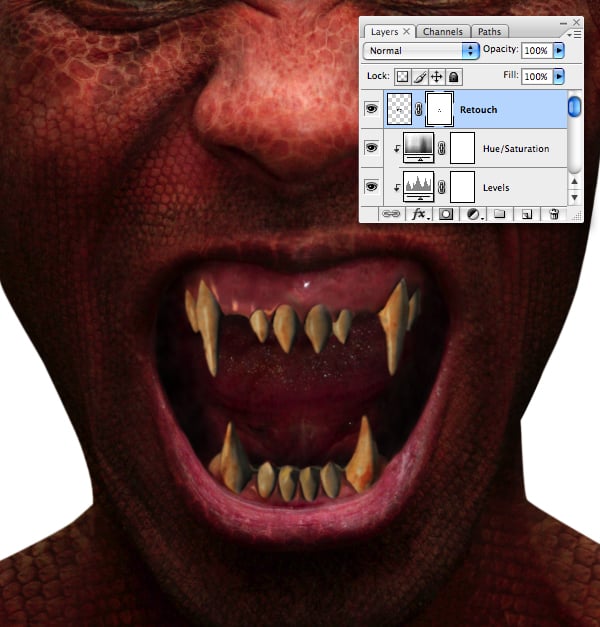
Our creature’s teeth now need some added grime. Open “Texture_1.jpg"" from the “source" folder and Copy > Paste a small area large enough to cover the teeth and gums at the top of the layer stack. Name this layer “Fangs texture."
Set the Blend Mode to Multiply, then use the Clone Tool (S) set to Current Layer to remove/add the blemishes as required. Now soften the layer by giving it a Gaussian Blur of 2 px.
Add a mask as you did in earlier using a selection from “Alpha 3," then paint out the gum areas as shown at the bottom of the screengrab.


The teeth are now begining to blend with the rest of the image, but still need a little more work. Clip a Levels adjustment to the “Fangs texture" layer and set the Input Levels.

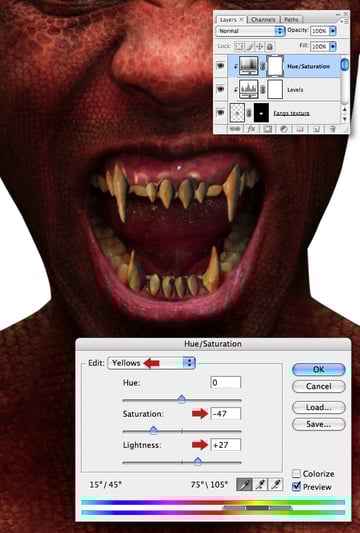
Now clip a Hue/Saturation adjustment and edit the Yellow Saturation and Lightness sliders.

Step 27
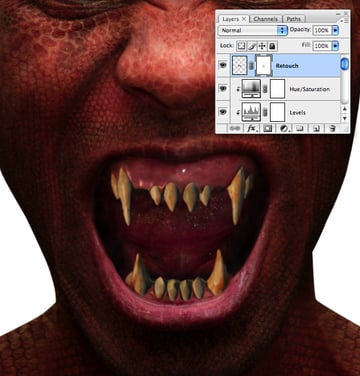
Add a layer at the top of the stack and label it “Retouch." Set the Clone Tool (S) to Current & Below and also to sample adjustment layers. Now generate a selection from “Alpha 3" and clone over the original teeth. Don’t worry if you’re cloning overlaps the 3D teeth, we’ll sort that next. Also, repair the damage on the tips of the large horns by cloning within a selection from “Alpha 2."
Add a mask and hide any retouch overlaps by painting within a selection from your “Fangs" layer.
Step 28
To keep things tidy add all your loose layers (apart from “Retouch") into a new group folder called “EYES/TEETH."
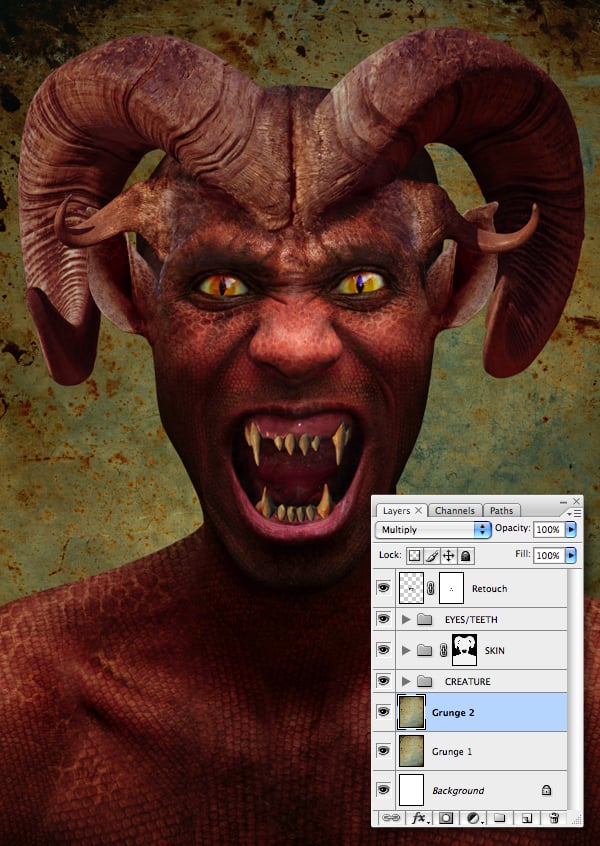
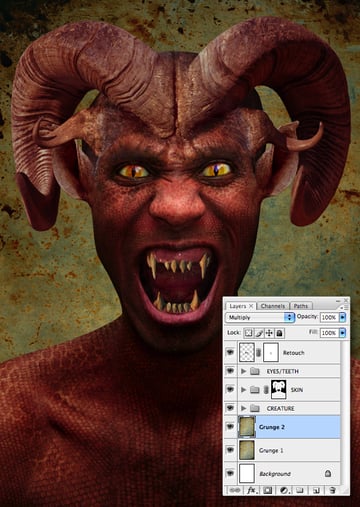
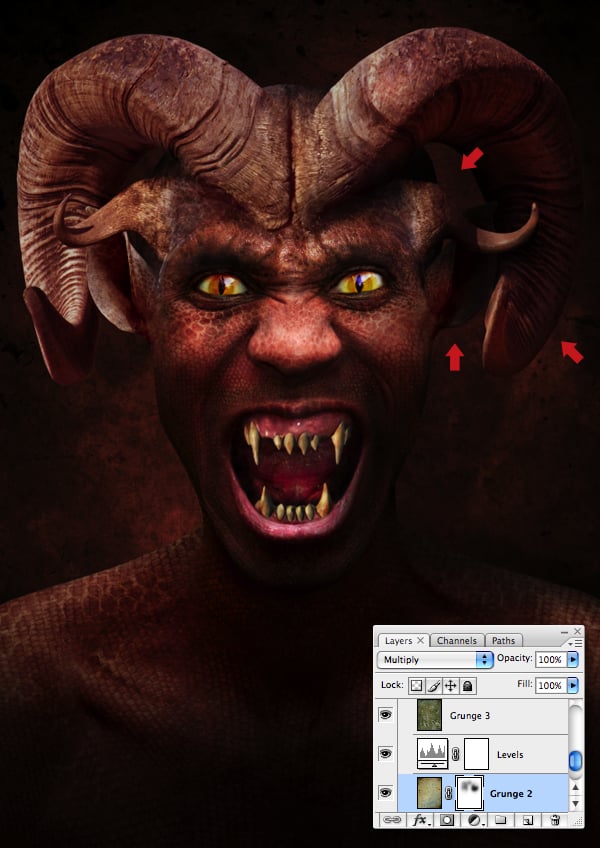
Now we’ll overlay some textures to build up the background. Open “Texture_1.jpg"" again and Shift-drag its layer thumbnail above the “Background" layer and name it “Grunge 1." Duplicate this layer, set its Blend Mode to Multiply and rename it “Grunge 2."
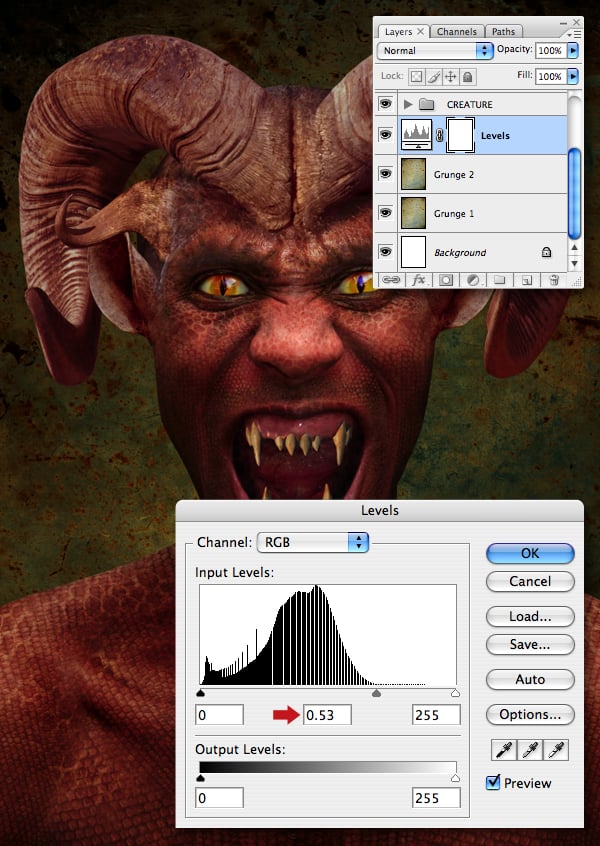
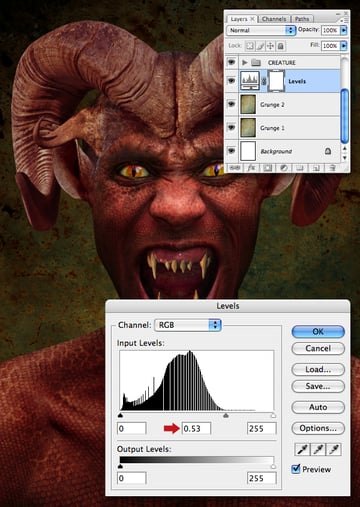
Next, add a normal (unclipped) Levels adjustment above your two grunge layers and set the Input midtone slider to 0.53.
Shift-drag “Texture_2.jpg"" (also from the “source" folder) above the adjustment layer and name it “Grunge 3." Next, add a Hue/Saturation adjustment, check Colorize and use the Saturation and Lightness settings below.

Add a Color Balance adjustment layer (again unclipped) to bring the background tones more in keeping with the creature.


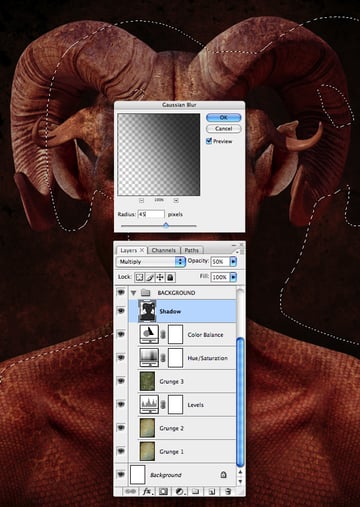
To add some dimension we’ll cast a shadow from the creature. Add a new layer and name it “Shadow." Generate a selection from “Alpha 2" and fill with black, then set the Blend Mode to Multiply and add a Gaussian Blur of 45 px. Now use the Transform’s Distort function to pull the layer content down and right. (I’ve made a selection from the shadow for clarity in the screenshot). You can now organize these layers by placing them within a group folder called “BACKGROUND."

Step 29
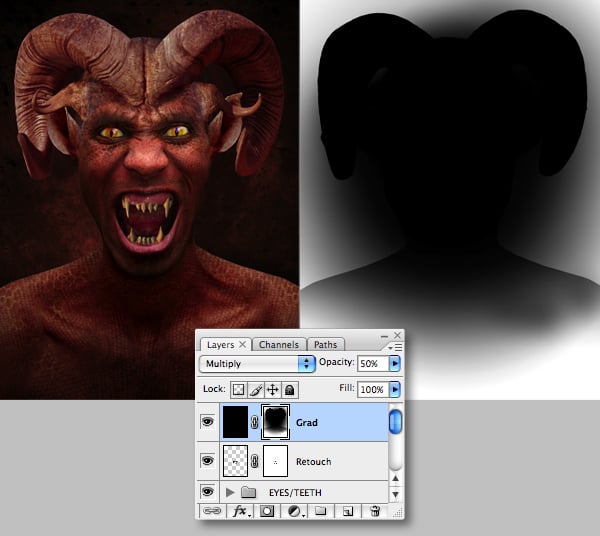
The background is now complete, so next we’ll concentrate on the lighting. Add a layer at the top of the stack, fill it’s entire content with black and label it “Grad". Change the Blend Mode to Multiply and drop the Opacity to 50%. Add a mask, select black as your Foreground color, then grab the Gradient Tool (G) and choose the Foreground to Transparent preset. Now Shift-drag a Radial Gradient from the creature’s nose down to the bottom of the canvas.
Next, generate a selection from “Alpha 2" and Shift-drag a Linear Gradient from the creature’s nose to collarbone. My mask is shown in isolation below.
Step 30
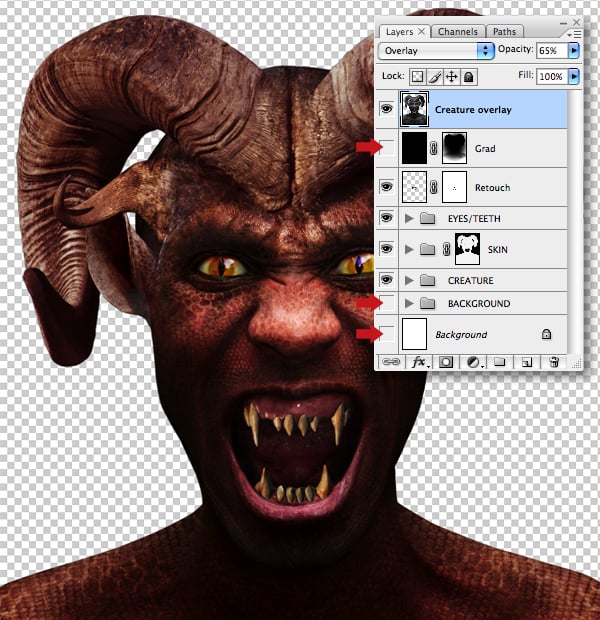
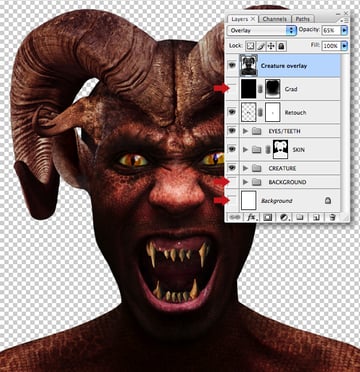
Disable the visibility of the “Background" and “Grad" layer, as well as the “BACKGROUND" folder. Drop an empty layer at the top of the stack and choose Image > Apply Image, then hit OK in the next window. You’ll now have a composite of just the creature. Hit Shift + Command + U to desaturate, then set its Blend Mode to Overlay and Opacity to 65%. Finally, name the layer “Creature overlay."
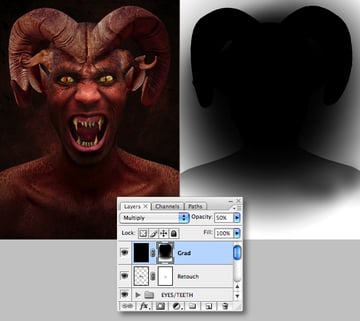
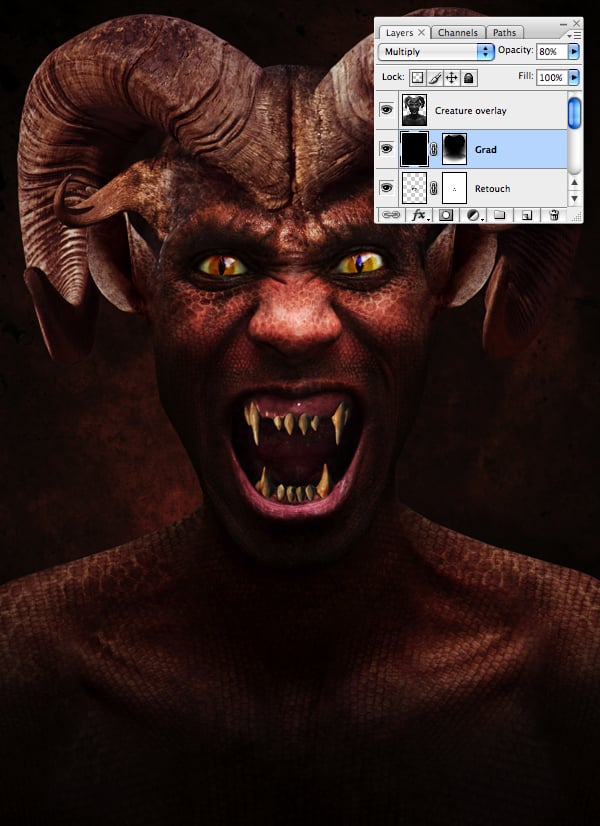
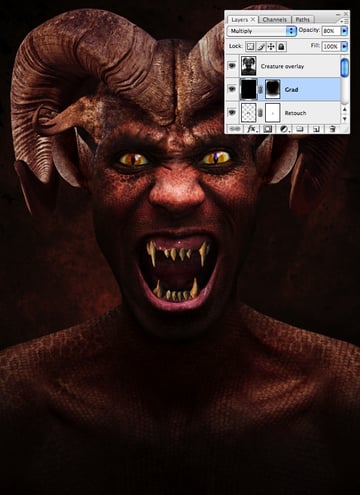
The figure now has better contrast, but the bottom areas seem a little too light. To fix this, increase the Opacity of the “Grad" layer to 80%.
Step 31
Now we’ll add some shadows to the creature. Add a new layer at the top of the stack, set it’s Blend Mode to Multiply and label it “Shadows." Load a selection from “Alpha 2" and paint your shadows using a variety of black, soft-edged brushes at various opacities. It’s important to use the existing image lighting as a guide. You can also paint within selections from the “Big horns," “Small horns" and “Ears" layers.
Next, add a mask and again paint freehand and within channel/layer selections on areas you want to hide. I’ve shown this layer with its mask on a white background (for clarity) in the screengrab. Finally, reduce the Opacity of the layer to taste – I used a setting of 90%.


Step 32
Next, we’ll accentuate selective highlights. Add a new layer at the top of the stack and set it’s Blend Mode to Overlay. Apply the same techniques as you did with the shadows to add specular highlights, but work at a low Opacity using a white brush to slowly build up the effect. I’ve shown this layer over a black background in normal Blend Mode (for clarity below). Also this layer didn’t require masking.

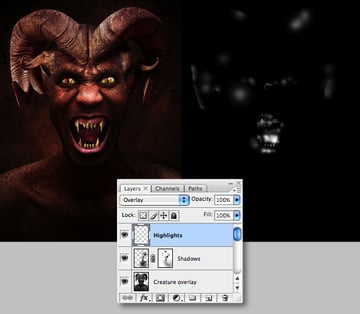
Step 33
We’re almost done, but first place all your loose layers into a group folder called “ADJUSTMENTS." Now sit back and scrutinize your work and carry out any final adjustments. I decided the creature was a little too dark, so I reduced the Opacity of the “Creature overlay" layer to 30%. Finally, I reinstated some background detail around the right side if the creature’s head with a mask on the “Grunge 2" layer.

Conclusion and Scope
I hope you've enjoyed this tutorial. Once you've mastered these techniques, why not concoct your own mythical creature! I'd especially like to thank the following Deviant artists for allowing me to use their stock: Ahrum Stock, Pirated Pictures and Salsola Stock.
 By
By


