


In this tutorial I'm going to show you how to create a couple of detailed goldfish using Adobe Illustrator. I'll be showing your how to create a simple scale effect and then how to create a bulging effect around the abdomen. Finishing off with a quick way to create some stylized bubbles. So let's get on with it!
Step 1
I'm going to start by using two stock images of goldfish. I could use the same reference of a fish and mirror a duplicate, however I want some difference between the fish so I don't look as if I've taken the easy/lazy approach to this illustration. I got my two stock images from PhotoDune which you can purchase here and here.
I've cropped the images in Adobe Photoshop and then created a New document in Adobe Illustrator and File > Placed them on the canvas. I've needed to flip across one of the images of the fish and slightly rotated them so they are facing in the same direction. This is so it's easier to render them in the same way.

I've then set up my Layers panel as shown below, with the "BG" containing a white fill Rectangle (M) set to Opacity 50%.

Step 2
I'll be using the colors from the Basic CMYK palette. Use the Pen Tool (P) to trace around the shape of the fish.

Step 3
I'm going to start creating a basic scale. Draw an even circle with the Ellipse Tool (L) and then with the Direct Selection Tool (A) bring in the left sides anchor point slightly. I've then increased the height of the shape using the Free Transform Tool (E).

Step 4
Duplicate the shape twice and bring in the left side in steps, each with a lighter shade of orange as shown below.

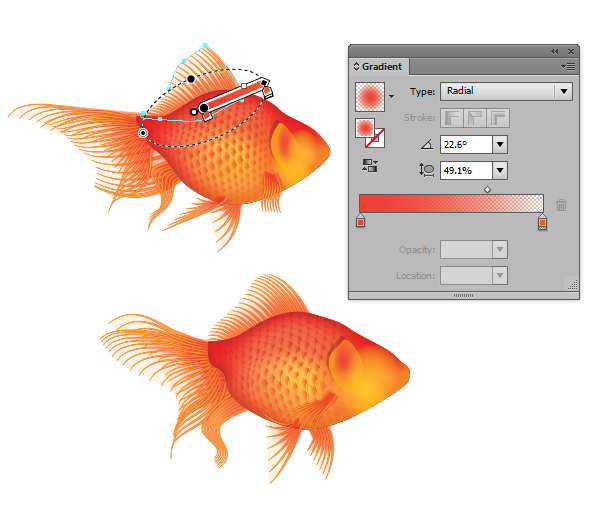
Then for the top scale, I've applied a transparent radial gradient via the Appearance panel and placed the source of the gradient to the right with the Gradient Tool (G).

Step 5
With the Pen Tool (P), draw an arc along the left hand side of the shape with a lighter shade of orange and place it on top of all the other shapes. Then draw a circle behind the shapes and apply a transparent dark brown gradient set to Blending Mode Multiply, Opacity 20%. A black gradient would create a dirty look on top of the scales, where as a brown will enhance the orange tones.

Step 6
Now to create a multitude of scales to cover the fishes body. Thankfully we don't have to create each one individually, we can use the Effects > Distort & Transform > Transform effect. I've Grouped up the shapes for the scale (Ctrl + G) and then applied the Transform effect with the below settings.

Once you've clicked on OK, apply another Transform effect. Before you access the second effect settings, it will ask if you wish to modify the current settings or add a new effect. Select Add New.

Step 7
Now that we have our scales, it's time to make them bulge and contract around the body of the fish. To do this, select the scales and go to Object > Envelope Distort > Make with Mesh. You can specify how many rows and columns you wish your mesh to have and in this case I've went for 8 by 6. Click on OK once done.

Step 8
As a helpful guide, I've drawn around the main area where the stomach is bulged on the fish.

This will then be laid on top of the mesh and locked at a low Opacity so I can see where abouts I'm emphasizing the body.

Step 9
I start by using the Direct Selection Tool (A) to select rows of the mesh and decreasing the height. You can see this above and below the fish's outline.

Step 10
Then with the Direct Selection Tool (A), I've selected specific points on the fish to pull out the handle bars and curve them to create a bulge. I've brought them inwards to create more condensed scales and even curved them around the head/gills of the fish where there are no scales.

Do this for both of the fish. Don't duplicate the same mesh as the scales will bulge and contract in different ways.

Step 11
Duplicate the overall shape of the fish and then use these to create a Clipping Mask (Ctrl + 7) with the meshes.

Step 12
Duplicate the basic fish shape again and apply the below settings in the Appearance panel. For the brush, I've used a previously created "Blend Brush 1"/"Linear Centre" from my Jellyfish tutorial set to Stroke Weights 60pt, 14pt, 40pt and 6pt from top to bottom. This will create an inner glow effect which is 100% vector! Include this shape within your Clipping Mask once done.

Step 13
I've finished off the blend brush style with a transparent radial gradient moved to the front of each fish. This will help merge the scales from around the gills to the head without a hard edge showing.

Step 14
Time to add another style on top of the scales and blend brush shapes. This time, I've used all fills with transparent radial gradients. You'll need to modify each one separately for the fish as they are a slightly different shape. The blue gradient is placed mainly over the back of the fish to take out some of the hard red/orange shade. The red gradients help shape the tail and top of the head of the fish and the orange helps to add a golden shine.

Step 15
I've then added two Ellipses (L) over the bulge of the body set to Blending Mode Color Dodge, Opacity 80% to emphasis the bulge.

Step 16
Draw a shape for the side of the head/gills with the Pen Tool (P). I've applied the below settings in the Appearance panel to help merge their look into the face of the fish.

The shadow effect to the side of the gill has be created using the Transform effect with the below settings.

Step 17
I've then added two transparent radial gradients around the bottom right of each gill filled in two Ellipses (L). This will help the gill look as if it's part of the fishes body and not detached.

Step 18
Now to begin work on the many fins. I've draw two lines with the Pen Tool (P) at the beginning and end of the top fin. I've then applied a tapered Profile, "Width Profile 4".

Select both strokes and then create a Blend (Ctrl + Alt + B). Go to Object > Blend > Blend Options to modify the Spacing to Specified Steps and the value to 20. Although this will be the right setting for this fin, it will vary for the others, so use your own judgment where you see fit.

Step 19
The fin as it is is a bit too straight, let's add a wave effect to it. Draw a curved line along the middle of the fins and then select the line and the blend and go to Object > Blend > Replace Spine. The blend will then follow the path of the curve you've just created.

Follow this process for each of the other fins.

Step 20
Using the Pen Tool (P), draw around the edges of the fins using the blends as a guide. Group them with the corresponding blends (Ctrl + G).

Place the fins behind the fish where applicable and only have the necessary fin showing on top. This is so it hides any awkward looking edges of the bottom of the blends.

Step 21
I've then applied the below settings in the Appearance panel to each one of the blends, using the "Width Profile 4" Profile.

Step 22
Set the shapes behind the blend to Opacity 10% and then duplicate the shapes.

Place the duplicates on top of the blends and apply a transparent radial gradient towards the base of the shape where it meets the body of the fish. Set these shapes to Blending Mode Color Burn, Opacity 80%.
Step 23
From the same Jellyfish tutorial, use the circular blend brush to draw along the bottoms of the blends where they meet the body to help merge them into the colors used. I've drawn these on using the Paintbrush Tool (B).

Step 24
To create the eyes, I've drawn a circle using the Ellipse Tool (L) and used the settings below. From top to bottom the Offset Path settings and Transform effects are as follows:
- Offset: -6.5pt, Transform: H: 1, V: 1
- Offset: -6.5pt, Transform: H: 1, V: 1
- Offset: -3.5pt, Transform: H: 1, V: 1
- Offset: -1pt

Use the same settings for the other eye, although the circle may be a slightly different ratio.

Step 25
Use the "Width Profile 1" Profile to draw on a subtle shadow around the eye and a mouth. Set these to Blending Mode Multiply.

Step 26
Then use the circular blend brush to draw highlights on the nose, bottom lip, eye and gill. Set these to Blending Mode Color Dodge.

Then add the same brush with a lower Opacities to other part of the body to help emphasis the curves of the abdomen and enhance the bulge on the fish.

Step 27
Using the same brush, add orange strokes around the bulge and face. Set these to Blending Mode Multiply, Opacity 80%.

Step 28
Group all the elements of each fish together (Ctrl + G).

Then select one fish and go to Object > Transform > Reflect and choose to mirror it Vertically. Click on OK and then move your fishes into place using the Free Transform Tool (E).

Step 29
We have a little problem... zoom into the scales, eye and gill of the reflected fish.

You'll need to modify the Transform effects and gradient placements of each of the elements. Thankfully, with the scales you'll only need to modify the position of one scale to affect the whole illustration.

Select the mesh and click on Edit Contents. This will allow you modify the scale shapes.

Step 30
Time to draw some bubbles! I'm aiming for a more cartoon/detailed style with my illustration, so realism isn't a major issue. You can create a basic bubble Graphic Style with a collection of gradients, mainly radial ones to be applied to an Ellipse (L).

Then you can draw several of them through out your composition!

Step 31
I'm going to add a subtle background by filling several circles created with the Ellipse Tool (L), with transparent radial gradients. Then I've changed the Blending Mode to Multiply and Opacity to 10%.

Step 32
I've finished off the illustration by distorting the gradients by drawing a wavy line behind the fish with the circular blend brush. I've used a white stroke color and set it to Opacity 40%.

Conclusion
After using the Artboard Tool (Shift + O) to crop my artboard, I've now finished my fishy illustration. Envelope Distort is a great tool to work with and can help create depth to shapes and textures you couldn't before in the past. It's worth trying to experiment with it to see what effects you can create.
 By
By


