
In this second part of the tutorial, I'll show you how to demolish a pillar realistically into thousands of various sized chunks using RayFire in 3ds Max.
Preview

1. Scene Set Up
Step 1
Open 3ds Max.


Step 2
Go to Create > Standard Primitives > Plane and create a
ground plane on the perspective view port as shown in the following image.


Step 3
Go to Create > Standard Primitives > Box and create a wall
structure on the ground plane.


Step 4
Go to Create > Standard Primitives > Sphere and create a ball
on the ground plane.


Step 5
With Auto Key button turned on, animate the position of the ball in
such a way that it should pass through the wall from 0 to 15 frames.


2. Wall Fragments
Step 1
Go to Create > RayFire.


Step 2
Go to RayFire > Open RayFire Floater. It opens the RayFire
floater window.


Step 3
With the wall selected, go to Dynamic/ Impact Objects window under Objects
tab and click on Add. It will add the wall object in the list.


Step 4
With the ball and plane selected, go to Static & Kinematic Objects
window and click on Add button to add the selected objects in the list.


Step 5
Go to Fragments tab and set the Fragmentation type to Voronoi-Uniform
and Iteration to 10. Click on Fragment to break the wall
into pieces.


Step 6
Once again, go to Object tab and click on Clear button to remove all dynamic objects from the Dynamic / Impact Objects list.


Step 7
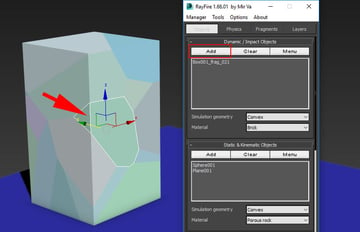
Select the indicated chunk of the wall and click on Add button to add the selected objects in the list.
This chunk is chosen because this is the
chunk which will be hit by the ball and broken into smaller chunks.


Step 8
With the rest of the chunk selected, go to Static & Kinematic Objects window and click on Add button to add the selected chunks in the list. These chunks will remain unaffected by the hit.


3. Wall Demolition Simulation
Step 1
Go to Physics tab and under Demolition Properties, turn on Demolish Geometry option.


Step 2
Since the Demolish Geometry option is set to ON, so the Preview
option will not work. Hence, click on Bake button.


Step 3
You'll see that the ball has further broken the chunk but in bigger
fragments.


Step 4
To make the broken fragments more detailed and smaller, you need to
decrease the Material Solidity value to 0.1.


Step 5
Now start the simulation once again by pressing the Bake button. This time you'll see more detailed and smaller fragments.


 By
By


