


In part 3 of the "Warrior" tutorial series, Ranjit Rhana will take you through the process of UVMapping the character using Headus UVlayout and Maya, and give you an overview of his sculpting workflow using Zbrush.
Step 1
In this part of tutorial, I'm gonna start with the UV layout of the character, here I'm working with Headus UVLayout for unwrapping, but you can choose any application for it. To start, run Headus UVLayout, click on the "Load" button and select the .obj file we exported from the Zbrush in the last part.

Step 2
Click on the "Display" button, and select "Free" from the window that comes up. Now you'll be able to navigate freely in the viewport of Headus UVLayout.


Step 3
Press "2" on the keyboard. Now since the model is symmetrical I'm gonna turn the "Symmetry" option on, so click on the "Find" button highlighted below.

Step 4
Click on the center segment of the model as shown below. And then press "Spacebar" on the keyboard.


Step 5
Now you'll notice half of the model turns grey in color, now whatever you do on the one side will automatically happen on the other side of the model as well. This function of turning the symmetry ON, only works if model is symmetrical.


Step 6
Now navigate near the neck area and place the mouse pointer on the segment where you want to cut the head, and press "C" on the keyboard. This will cut through the whole loop of the neck.


Step 7
Press "Enter" on the keyboard (make sure the mouse pointer is on the head first,) and the head will separate from body.


Step 8
Using the same technique, cut and separate the head again as shown below and press "D" on the keyboard to drop the mesh into the UVLayout Editor. (Again make sure your mouse pointer is over the part of the mesh you wish to drop, before pressing D.)


Step 9
Press "1" on the keyboard, and you'll enter the UVlayout editor window. Press "Shift+D" on the keyboard and then press "Spacebar", let the UV shell adjust and then press "Spacebar" again.


Step 10
Since we've turned Symmetry on, if you put the mouse pointer over one half of the UV shell and press "S" on the keyboard the opposite half will automatically become symmetrical. At some places where UV's are getting tangled, you can fix them manually by pressing "Ctrl" on the keyboard and moving it using the middle mouse button.


Step 11
This is what you gonna get after fixing the face’s UV's.


Step 12
Using the same techniques separate the other areas of the body according to the UV layout you wish to make for your model. In case of my model, I’ve separated it as shown in the image below.


Step 13
A view from back.


Step 14
This is the result I have in the UV layout editor after flattening the UV's, save the file.


Step 15
One done, Export the model back into Maya.


Step 16
Now in Maya, go to Window>UV Texture Editor to open the UV texture editor.

Step 17
This is what you gonna see in the UV texture editor. As you can see the UV's shells match the result we had in UVLayout.


Step 18
Arrange all the UV shells in the texture page, make sure you don’t have any of the UV shells overlapping and all the shells should be arranged in the upper right quadrant of UV texture editor. Once done, export the model out of Maya as an .obj.


Step 19
And Import it back into Zbrush.

Step 20
Now navigate to the "Texture Map" options in the Tool menu, and click on the "New from UV check" button. Once the model gets imported into Zbrush the UV's gets flipped vertically.

Step 21
Zbrush is gonna check the UVlayout of the model and generate a texture map based on the UVlayout. If you have any problems with the UV's (i.e., overlapping etc.) Zbrush will highlight them in red, as shown in the image below.


Step 22
If you have overlapping, take your model back into Maya and fix the problem there, and then bring it back to Zbrush. Check the UV's again by clicking on "New from UV check".


Step 23
Once you are sure your UV layout is good enough, go to "Polygroups" in the Tool menu and click on "Auto groups with UV".

Step 24
Zbrush will then create polygroups according to the UVlayout. Now you’ll be able to hide/unhide parts of the mesh by Pressing "Ctrl+Shift" on the keyboard and clicking on the created polygroups.


Step 25
Now press "Ctrl + Shift" on the keyboard and click on the face, to start adding details to it. Also press "X" to turn on Symmetry, on the X-axis.


Step 26
Select the "ClayTubes" brush and change the alpha from square to circular (Alpha 06). I find ClayTubes, a great brush for defining volumes.

Step 27
Keep using the "Smooth" brush (by pressing 'Shift', while using any brush) while defining the volumes. And this is where it’s at after adding some detail to the face.


Step 28
Now I’m going add eyeballs to the mesh, select "Sphere3D" from the Tool menu and convert it to "Polymesh 3D". The Sphere will replace the Face model on the canvas.


Step 29
So select the Face model from the "Quick Pick" menu to get it back.


Step 30
Now from the "SubTool" options in the Tools menu, click on the "Append" button and select the Sphere from the Quick Pick menu.

Step 31
Select the "Sphere" from the SubTool menu and click on the "Activate Edit Opacity" button on the tool bar as highlighted in the image below. Now everything on the canvas accept the selected mesh (sphere) will become transparent.


Step 32
Select the "Transpose" tool (Move, Scale, Rotate) and arrange the eyeball in the proper place.


Step 33
Fix the area around eye.


Step 34
Click on the "Clone" button (highlighted in the image below,) make sure the "Sphere" is selected in the SubTool list. Now you’ve created a clone of the selected SubTool in your quick pick menu. Append it using the same procedural as in step 30.

Step 35
Now go to "Deformation" in the Tools menu and click on the "Mirror" button, make sure only "X" is highlighted on the button, as shown below.

Step 36
Now that you have both eyeballs placed inside the head, start giving the face more detail.


Step 37
After few steps.


Step 38
Select the "Pinch" brush, this is a very good brush for defining the edges, as in our case for edges of the lips.


Step 39
After defining the edges of the lips.


Step 40
Using the "Claytubes" brush again, add some strokes for the beard.


Step 41
Once you’ve added enough strokes for the beard, select the "Magnify" brush.

Step 42
Use the Magnify brush to increase the length of beard, as shown in the image below.


Step 43
Detailing on the ear. For continuous, more precise brush strokes you can turn on the "Lazy Mouse" option by pressing "L" on the keyboard or from the "Stroke" menu.


Step 44
Press "Ctrl+shift" and click on the canvas. The head will now be hidden and body will appear on the canvas. Start sculpting the body same way.


Step 45
These are some of the reference images I’ve used for the body.


Step 46
And this is what I got after sculpting more detail on the body.


Step 47
Here is a view of the back.


Step 48
Here is the result after I did some more detailing on the head.


Step 49
For the hair select "Alpha 44 or 45" with a "Standard" brush. Press "L" on the keyboard or turn on "Lazy Mouse" from the stroke menu, and add more detail to the beard.

Step 50
Here’s the head after some more detailing.


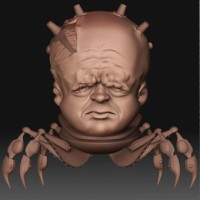
Step 51
And this is what I got by the end of this part of the tutorial.


 By
By


