
Modern icons are real eye candy. In this tutorial you'll learn how to create a professional level Hard Drive icon with shading and lighting the techniques. You will use the the Path Finder Tool, Free Transform and some basic effects, such as Gaussian Blur and Inner Glow.
Step 1
Start with a 512 x 512 pixel artboard. Select a neutral color from the swatches, then with the rectangle tool, draw a rectangle with the following dimensions: Width 460px, Height 400px.


Step 2
With the Free Transform tool, drag one of the top corners while holding the Command and the Shift keys. (this command may be tricky. Start dragging, then press and hold the keys). This will allow you to taper the shape like in the picture.


Step 3
With the rectangle selected, go to Effect > Stylize > Round Corners. Set the radius value to 8px.


Step 4
Duplicate this shape. You can drag it up with the Option key pressed (for extra accuracy, also hold the Shift key). Fill this shape with a lighter gray.


Step 5
Draw a 455 px wide and 60 px tall rectangle. Send it to the back of the other two shapes: Right click Menu > Arrange > Send to Back (or Control + Left Square Bracket).


Step 6
Now taper it like the first rectangle. Drag the bottom corners while holding the Command + Shift keys.


Step 7
With the rectangle selected, go to Effect > Stylize > Round Corners. This time set the radius to 12px.


Step 8
Expand the objects appearance by selecting everything and then going to Object > Expand Appearance.


Step 9
Fill the top plate with a diagonal linear gradient.


Step 10
Fill the middle shape with a horizontal linear gradient. See the picture for the right values.


Step 11
At this point you need to fix some of the paths. Add an anchor point where the picture indicates and move it to align with the top shape. It will be easier if Smart Guides are on (View > Smart Guides). Do this on both sides.


Step 12
Delete the top anchor points of this shape on both sides.


Step 13
Fill the hard disk "body" part with a linear gradient, like in the picture.


Step 14
Now apply an inner glow effect to this shape. Effect > Stylize > Inner Glow.


Step 15
This is going to be the first of several highlights on this tutorial. First copy/paste in place (Command + f ) the top plate. Then remove the fill color and add a 2px white stroke to the copy.


Step 16
You need to cut off a portion of this shape. Select the top points and delete (with the delete button on the keyboard). Now expand the selection to turn this stroke into a filled shape. Object > Expand.


Step 17
With the Delete Anchor Point Tool, delete the points indicated in the picture and re-arrange the others. Repeat this procedure on both sides. Change this shape's opacity to 60%.


Step 18
Make two new copies of the top plate (copy/paste it in place two times) and use the Free Form Transform tool to make the foremost one taller, but less wide.


Step 19
Extract one shape from another using the Pathfinder tool. The resulting shapes will get a linear gradient like in the picture.


Step 20
Duplicate the "body" part (copy/paste in place) and add a linear gradient according to the picture. Then send it backward (Command + Left Square Bracket) until the unwanted part is properly hidden below the other shapes. This shape will act like a shadow being cast by the top plate on the "body" part.


Step 21
Now you'll draw the top plate's embossed details. First create a Rectangle of 135px Height x 315px Width and an ellipse of 250px Height x 315px Width.


Step 22
With the Free Transform Tool, taper them into the desired shape. Use Command + Shift while dragging.


Step 23
Select the rectangle and apply a Round Corners effect (Effects > Stylize > Round Corners) with the Radius of 10px. Expand it's appearance (Object > Expand Appearance).


Step 24
Duplicate the ellipse, creating a smaller one inside it. Move this new ellipse about 3 pixels up (just use the up arrow key on the keyboard).


Step 25
Select both the bigger ellipse and the rectangle. Weld them using Path Finder.


Step 26
Adjust the corner point to get a smooth curve here.


Step 27
Instead of repeating the last step on both sides, to get a symmetrical shape, you'll cut this shape in half, mirror it and then weld the two halves. Start by adding an anchor point to the top line, right in the center, then select all the points from the right side and delete them (with the delete key on keyboard).


Step 28
Now duplicate this path, reflect it (Object > Transform > Reflect) and weld the two halves using Path Finder. You will need to drag the path with Smart Guides on to have a proper alignment. This is important because if the points aren't perfectly aligned, the paths won't weld.


Step 29
Duplicate this path (copy/paste in place) and apply an offset path effect with the value of -5 pixels (Effects > Stylize > Offset path).


Step 30
Move the copy up a little and slightly squeeze it, like in the picture. Expand it's appearance (Object > Expand Appearance).


Step 31
Select both shapes and extract them using the Path Finder. The result will be two distinct shapes.


Step 32
Make two copies of the remaining ellipse, one slightly smaller and the other considerably smaller. Arrange them as in the picture. You are done with the other shapes for now, ungroup them and fill each with a distinct color.


Step 33
Select the two bigger ellipses and extract one from another using the Path Finder. The resulting shape will be an outlined ellipse. Fill it with a distinct color.


Step 34
Repeat the process with the smaller ellipses. Duplicate, resize/adjust, extract (you may need to arrange the objects order, as the newer, bigger ellipse will now be on top of the smaller one. Just send it backward one time and it should be fine).


Step 35
Time for some painting. Select the bigger ellipse and fill with a radial gradient, like in the picture.


Step 36
Select the next ellipse and fill it with the same gradient. Adjust the radius.


Step 37
For the last ellipse, make some adjustments to the gradient values and radius.


Step 38
The last shape will also be filled with a radial gradient. This one is a little tricky because you need to manually place it on the exact center of the shape.


Step 39
Now duplicate this shape and add an Offset Path effect with the value of 0.5px (Effects > Stylize > Offset Path).


Step 40
Fill the copy with a linear gradient.


Step 41
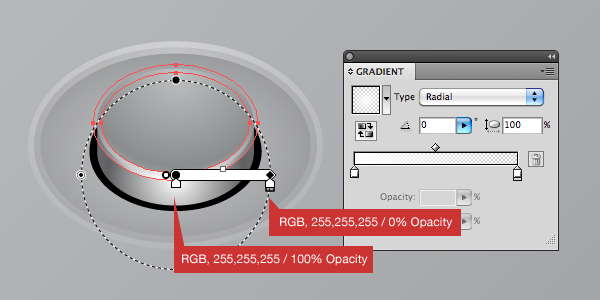
Now you'll create more highlights. Select the bigger ellipse and duplicate it (copy/paste in place). Remove the fill and add a 2px white stroke.


Step 42
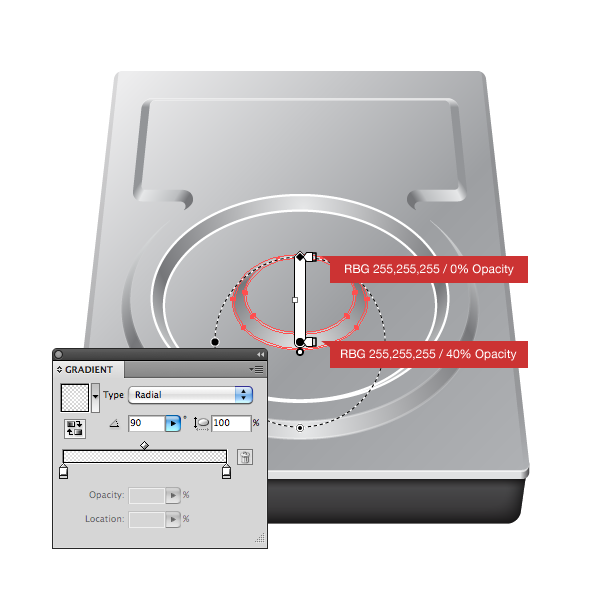
Now expand it's appearance. The highlight is filled with a radial gradient that goes from 100% opaque white to 0% opaque white. If the gradient handler doesn't appear, try ungrouping the object prior to applying the gradient. Pay attention to the radius size.


Step 43
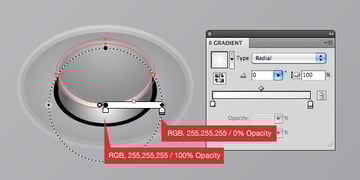
Repeat the process with the other two ellipses.


Step 44
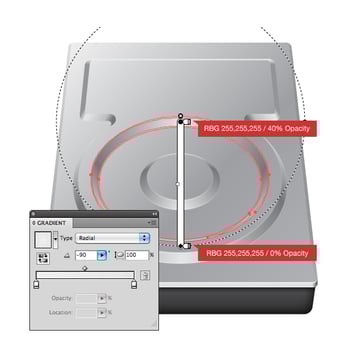
The final highlight, like the shape beneath it, is a little tricky. Once again, pay attention to the radius size and shape.


Step 45
Using the pen tool, draw a shape like this on the bottom left edge of the "body".


Step 46
Now fill it with a linear gradient.


Step 47
Duplicate and reflect it (Object > Transform > Reflect). Group both shapes, align them in the center of the artboard and finally send them backwards until they're behind the shadow.


Step 48
Start the bolts by drawing an ellipse with the same height and width of the central ellipse.


Step 49
Resize down and place it on the bottom right corner of the top plate. Fill the ellipse with a radial gradient.


Step 50
Duplicate (copy/paste in place), remove the fill color and add a 1px white stroke.


Step 51
Expand this shape and fill with a radial gradient. You can use the Eyedropper tool to pick the gradient from any other highlight.


Step 52
Make two smaller copies of the ellipse. Place one slightly above the center and the other slightly below.


Step 53
Now fix the bottom Ellipse's path. Add an anchor point where indicated, then move the two top points to match the left and right points of the top ellipse. Remember, Smart Guides are your friend.


Step 54
Duplicate the top ellipse, paint it black and send it behind the shape we just edited.


Step 55
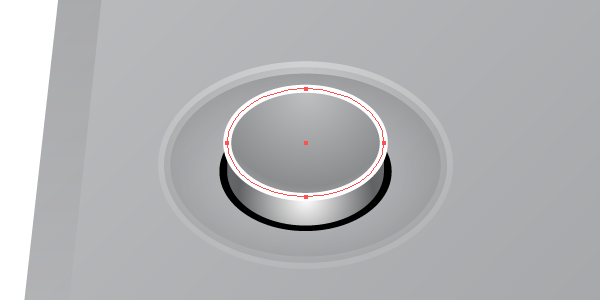
Time to paint the bolt. Pay attention to the gradient's values and radius.


Step 56
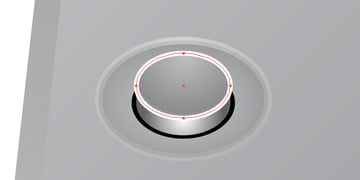
The bolt needs a highlight too. You should be familiar with the process by now.
Step 57
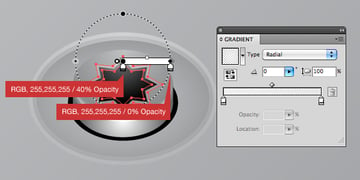
Create a star shape with the following values.


Step 58
Place it in the exact center of the bolt, resize and squeeze it down a little.


Step 59
Add a highlight this edge. The process is the same.


Step 60
The bolt is done. Group everything and drag copy to the right corner. To drag a copy, just drag the object while holding Option. Holding the Shift key also locks the dragging direction.


Step 61
Group this pair of bolts and duplicate them two times. Place one pair right above the hard disk drive's center and the other at the top. Resizing them one pair at a time will allow the bolts to have the size needed to match the icon angle.


Step 62
For the front LED, first draw a small circle of 20px x 20px.


Step 63
Fill the circle with a radial gradient with the following values.


Step 64
Now duplicate this circle, making the copy smaller. Place it slightly above the center.


Step 65
Fill the new circle with a radial gradient:


Step 66
Apply an Inner Glow effect (Effect > Stylize > Inner Glow) with the following values:


Step 67
Now draw a small ellipse inside the top circle and fill it with a linear gradient.


Step 68
Duplicate the big circle, but no paste in place this time. Instead, drag it down while holding Option and also Shift to lock the drag direction.


Step 69
Fill the copy with a solid color blue and set it's opacity to 65.


Step 70
Apply to it a Gaussian Blur (Effects > Blur > Gaussian Blur) with the value of 3.0px.


Step 71
For the hard disk drive's shadow, just duplicate the top plate shape (drag while holding Option + Shift to lock direction) and send it behind all other shapes.


Step 72
Resize it down a little and fill it with black.


Step 73
Apply a Gaussian Blur (Effects > Blur > Gaussian Blur) with the value of 8.0px.


Step 74
For the hard disk label, draw a black rectangle with 155px width and 60px height. The left edge of the rectangle needs to be in the exact center of the artboard, so you may need to put a guide there to assist you positioning it.


Step 75
You'll need the Serial ATA logo. A vector version can be found at Seeklogo. I stripped the "S" from it in order to get a better visual composition. Place it inside the rectangle.


Step 76
Using the Rectangle tool, draw a bar code and put some dummy text below it. Pay attention to the alignment and spacing. When you're done, expand the text (Object > Expand).


Step 77
Now duplicate the black rectangle by dragging it down while holding Option + Shift, fill it with white and then send it behind the black rectangle.


Step 78
Select all the label's elements and squeeze them a little on top, bottom and right.


Step 79
Taper the top right corner of the label. With the Free Transform tool selected, start dragging the corner, then press and hold Command and also Shift to lock the drag direction.
Step 80
Now select both rectangles (rectangles only) and apply Round Corners effect (Effect > Stylize > Round Corners) with the value of 4px.


Step 81
Fill the black rectangle with a linear gradient. Also set the highlight (white rectangle) opacity to 75% and everything else (Sata logo, barcode and dummy text) to 45%.


Step 82
The Icon is almost done. Optionally you can add some highlights to the top plate's sides. The technique is the same as we used for the other highlights: Stroke, expand and fill with the same old radial gradient.


Conclusion
I hope you enjoyed the lesson. More than teaching how to draw a particular icon, this tutorial contains techniques that once mastered, will allow you to create high-quality icons and Illustrations.


 By
By


