


In this tutorial, we'll explain how to create a 3D milk bottle. We'll also cover how to create and apply a cute cow label to it. Let's have some fun with this one!
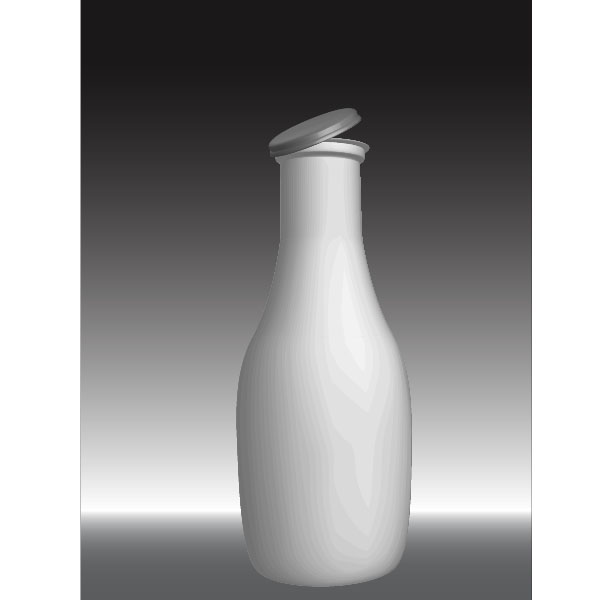
Final Image Preview
Below is the final image we will be working towards. Want access to the full Vector Source files and downloadable copies of every tutorial, including this one? Join Vector Plus for just 9$ a month.

Step 1
Open up a new document and draw a rectangle with the Rectangle tool (M). Fill it with a gray to white to black linear gradient and set the gradient highlight towards the bottom.

Step 2
Select the Pen tool (P) and start drawing half of a bottle. We need only the outline. Make sure the fill is set to none and the
stroke to white with 1pt. You can use a reference image if you have trouble with drawing a bottle.

Step 3
Draw another small shape that is half of an outline of a bottle cap. Make sure that both paths are separate.

Step 4
Select the bottle path with the Selection tool (V) and go to Effect > 3D > Revolve. Apply the following options: -5, -26,
and 3. Also, set 45 degrees for the Perspective. Click OK and voila, the milk bottle.

Step 5
Repeat Step 4 with the cap path. Change the stroke color to a light grey and apply the settings shown below.

Step 6
This is what the bottle should look like at the moment. Not bad for a small few steps.
Step 7
On to the label. We want to create a funky looking cow. So let's start with the outline. Start drawing an outline of a
cow from the back. We need two legs and some hips on a big back.

Step 8
Create a polygon shape and fill it with black. This will be the black color spots for the cow.

Step 9
Select the shape,then go to Effect > Distort & Transform > Roughen and apply the settings shown below.

Step 10
Repeat Step 9 and add many more black spots. Make sure that some overlap the cow outline. Select all the black spots and expand their appearance (Object > Expand).

Step 11
Select all black shapes and the cow outline, then select the Divide option in the Pathfinder Palette. Next, choose the Direct
Selection tool (A) and start deleting all the overlapping black shapes.

Step 12
This is the main cow shape that we have so far. Let's move on to the other elements.

Step 13
Select the Pen tool (P) and start drawing an udder like shape. Fill it with a nice pink and set the stroke to black.

Step 14
Draw a tail like shape and add it to the cow. I kept it as simple as possible since I want to achieve a cartoon look.

Step 15
Go on and draw the face. It is a front on face so no need for difficult shapes. Fill the face with the same black spots as
the body, just like we did in Step 9-11.

Step 16
Draw some funky looking hair on top and place it above the face shape. Then add some overly big eyes. I used circles here.

Step 17
Start adding the details to the eyes. We need an eye color (one circle) and a pupil (another smaller circle with black
fill). Then add on top another white circle acting as a reflection. Repeat this with the second eye.

Step 18
Add some sickle shapes to the eyes.

Step 19
A cow needs some horns and some lips. Draw those shapes with the Pen tool (P). I filled them with a light pink.

Step 20
Add some nostrils and other details. After all the shapes have been added, the cow head should look similar to the image below.

Step 21
Group all the head shapes together (Command + G) and place them behind the body.

Step 22
I added some grass, some blue sky and some simple clouds to complete the label. You can let your creativity flow and use
totally different shapes here.

Step 23
A label needs some information. I chose Helvetica Neue LT as my favored font.

Step 24
Outline the text by selecting it and pressing Command + Shift + O. Then select both the label and the outline text and drag
them into the Symbol Palette.

Step 25
Go back and select the milk bottle shape. Since we didn't expand the appearance, we can easily modify it. Open the
Appearance Palette and double-click the 3D Revolve line. This will open the 3D Revolve Palette. Click on Map Art on the right
and go to Surface Nr 6. Choose the "labelwithtext" symbol from the Symbol drop down and place it towards the bottom.
Check the box Shade Artwork. This will render it with a slight shadow on the label. Check Preview to see if the label
is placed in the correct position.

Conclusion
This is the end result. No bad for a vector bases program. You can easily change the label or give the bottle another color. It
doesn't have to be a milk bottle. I hope you had fun with this tutorial!
Subscribe to the Vectortuts+ RSS Feed to stay up to date with the latest vector tutorials and articles.
 By
By


