
One of the best things about Photoshop is that it allows us to conjure up practically anything our imaginations can conceive. In this tutorial, you'll combine several stock images to create a surreal and magical circus photo manipulation. Let's get started!
Tutorial Assets
You'll find some files in the "source" folder. You'll also need the following stock images and brushes to complete this tutorial.
- Sky 1
- Sky 2
- Elephant 1 (medium version)
- Elephant 2 (medium version)
- Elephant 3
- Bicycle (medium version)
- Wood texture 1 (small version)
- Wood texture 2
- Clown 1 (medium version)
- Clown 2 (medium version)
- Ringmaster (medium version)
- Dog
- Juggler (564x848px version)
- Juggling balls (medium version)
- Baboon (medium version)
- Balloon
- Aeroplane (medium version)
- Fire
- Pelicans
- Fire brushes
- Cloud brushes
- Light brushes
Step 1
Set your Background color to # 7cbecb. Create a new document 21cm x 29.7cm with the Resolution at 300dpi, the Color Mode in RGB and change the Background Contents to Background Color. This will be your project file for this tutorial.


Step 2
Open the first sky photo and drag its layer thumbnail into your project file to create a new layer. Hit Cmd/Ctrl + T to access Transform, then enlarge beyond your canvas and position as shown. Name this layer "Clouds 1".
Add a layer mask, then press D to reset your Foreground color to black. Set the Gradient Tool (G) to Foreground to Transparent and Linear in the Options bar, then Shift-drag a gradient indicated by the length and direction of the arrow to hide the top half. Now use a large, soft-edged Brush (B) to blend further. My mask is shown at the bottom of the screenshot for clarity.


Step 3
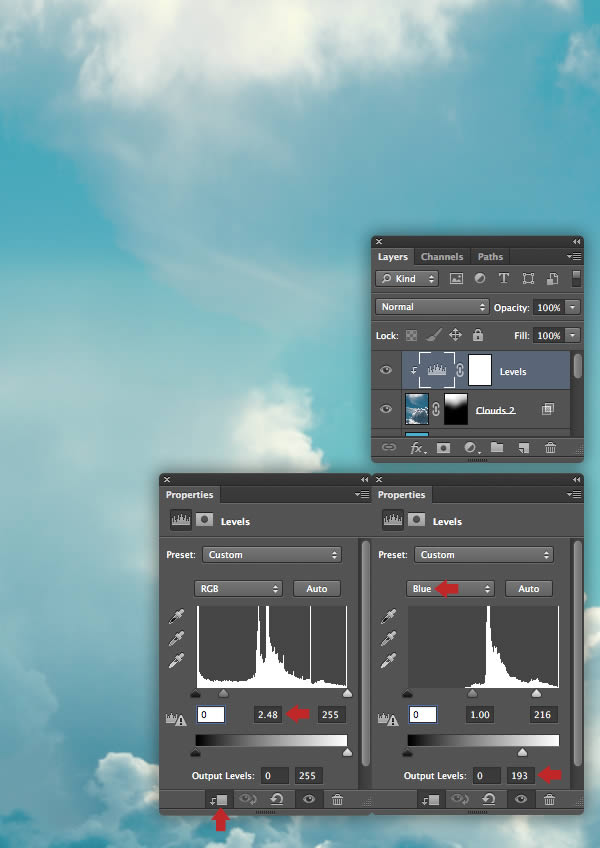
Ensure the new layer is active, then choose Levels from the drop-down Create new fill or adjustment layer icon (situated at the foot of the Layers tab). In the next window activate the clipping icon to limit the adjustment to the target layer and apply the following settings.


Step 4
Clip another adjustment to the same layer, but this time choose Color Balance and copy these settings.


Step 5
Place a new layer above the last adjustment and label it "Sky grad". Change your Foreground color to # 48b0d2, then Shift-drag a Foreground to Transparent Linear gradient over the top quarter of sky.
Now change the Blend Mode to Multiply and lower the Opacity to 51%. To reduce the banding effect of the gradient, choose Filter > Noise > Add Noise and apply the following settings


Step 6
Add the second sky as a top layer and name it "Clouds 2". Enlarge, stretch vertically and position at the top of your canvas.
Now double-click the layer thumbnail to access the Blending Options window and Opt/Alt click, drag (to split) the top left Grey Blend If slider to 249.


Step 7
Add a mask to this layer, then use a large, soft-edged Brush (B) to hide the bottom half.


Step 8
Clip a Levels adjustment to the "Clouds 2" layer and modify as shown.

Step 9
Now place an unclipped (to affect all layers) Selective Color adjustment at the top of the layer stack, then increase the Yellow to +3 and the Black to +31.


Step 10
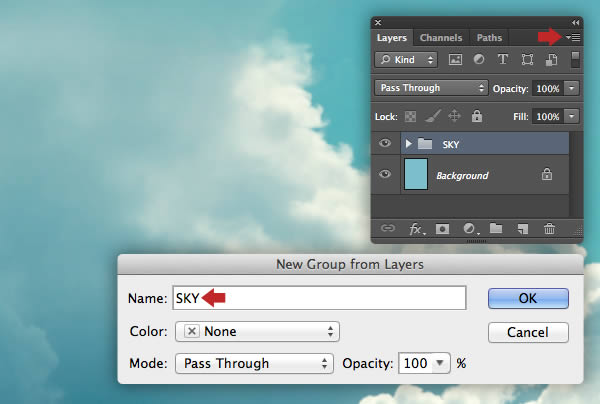
Highlight the Selective Color adjustment layer thumbnail, then Shift-click to highlight the "Clouds 1" layer thumbnail (this will highlight the in-between layers too). Now choose New Group from Layers from the top-right fly-out menu and name it "SKY" in the following window.

Step 11
Add the "3D_render.psd" from the "source" folder as a new layer and label it "Tightrope". Hit Cmd/Ctrl + T to access Transform, click the Warp button in the Options bar, then choose the Arc preset and drag the control point down.


Step 12
Now clip a Color Balance, then a Levels adjustment to the "Tightrope" layer.


Step 13
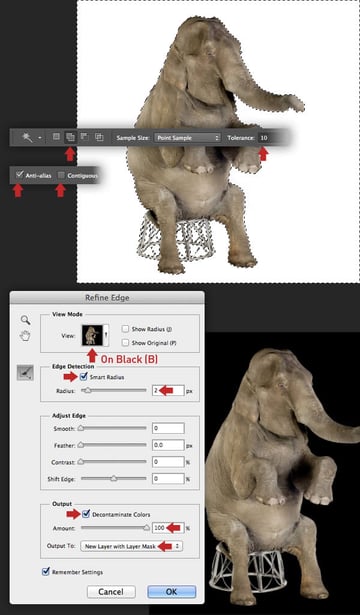
The next stage is to isolate the first elephant. As this has been shot on a white background this will be fairly straightforward.
Set the Magic Wand Tool (W) to Add to selection, the Tolerance to 10 and uncheck Contiguous in the Options bar. Click on the background, then hit Shift + Cmd/Ctrl + I to Inverse the selection.
Click the Refine Edge button in the Options bar and in the following window choose On Black (B) from the drop-down menu to give the best preview of removing the background. Now set the Smart Radius to 2px, the Decontaminate Colors to 100% and choose Output to New Layer with Layer Mask from the drop-down menu.

Step 14
You'll now see a duplicate masked layer and the visibility of the original layer disabled. At this point your mask may need some small refinements. To do this, first place a middle layer filled with black to reveal any remaining white. Now zoom in and use a 3px Brush (B) at around 50% Hardness to clean up your mask as required.
When you're satisfied, drag the mask thumbnail into the trash icon at the foot of the Layers tab and click Apply in the following window. We'll be extracting quite a few images throughout this tutorial, so it's good practice to save layered versions.


Step 15
Add the extracted layer to your working file at the top of the stack and label it "Elephant 1". Access Transform > Flip Horizontal and resize/position centrally. To remove any edge halos, go to Layer > Matting > Defringe and enter 1px in the following window.
Now clip a Hue/Saturation adjustment and copy these settings for the Master, Reds and Yellows.


Step 16
Clip a Levels adjustment to the same layer and modify the RGB and Blue sliders as shown.


Step 17
Finally, clip a Selective Color adjustment to the same layer, select the Neutrals and increase/reduce the Cyan/Black respectively.


Step 18
The next stage is to add a different head. Open the second elephant, switch to the Paths tab and you'll a pre-made one. Click the dotted circle icon to generate a selection, set the Lasso Tool (L) to Subtract, then drag a selection around the body and Copy to the Clipboard.


Step 19
Paste the selection to create a new top layer, Defringe by 1px and label it "Elephant 2". Now Transform to fit the new head over the body.


Step 20
The next task is to blend the head with the body. First, clip a Levels adjustment to the "Elephant 2" layer and apply the following settings.


Step 21
Now use an assortment of hard and soft Brushes (B) to mask both layers. My masks are shown in isolation for clarity.


Step 22
Our performing elephant now needs a unicycle, which we'll assemble from this bicycle. First, use the same Magic Wand (W) and Refine Edge settings as you did for the first elephant.


Step 23
Place blue contrasting middle layer below the extracted layer. Now modify the mask with a small hard-edged Brush (B) to fix areas which may have been missed by the Refine Edge command.


Step 24
As we only require a unicycle, continue to mask the parts not required as shown.


Step 25
Apply the mask to your extracted bicycle layer, then place it below all the elephant layers and Defringe by 1px. To keep things organized place all the elephant layers into a group folder and name it "ELEPHANT LAYERS".
Target the bicycle layer, then Lasso (L) a selection around the saddle and press Shift + Cmd/Ctrl + J to cut it to a new layer. Repeat this for the pedal, then duplicate, flip horizontal, Transform and reposition to create the left pedal. Move the left pedal layer at the bottom, then reposition the other bicycle parts. Finally, place all these layers into another folder called "BIKE LAYERS".


Step 26
Duplicate the "BIKE LAYERS", folder, then press Cmd/Ctrl + E to merge the duplicate and rename it "Bike layers merged". Switch off the visibility of the original "BIKE LAYERS" folder, then clip a Levels adjustment to the "Bike layers merged".


Step 27
Use the same process to create a merged duplicate of the "ELEPHANT LAYERS" folder. Rename it "Elephant layers merged", then disable the visibility of the "ELEPHANT LAYERS" folder.


Step 28
Over the next few steps we'll fix the elephant's legs. This stage is fairly involved and will require quite a few layers. Start by opening your second extracted elephant and Cmd/Ctrl-click to create a layer-based selection. Now remove the rest of the elephant from the selection with the Lasso Tool (L).
Copy > Paste twice to create the new legs above the "Elephant layers merged" layer and Transform/position them to match the pedals of the bicycle. Now mask both layers to bend the hard edges.


Step 29
The next stage is to mask the "Elephant layers merged" layer to remove any overlaps.


Step 30
Lasso (L) and copy selections from different body parts of the "Elephant layers merged" layer and position them above the new legs. Transform, Warp and mask them to build up the knee and thigh for both legs. Some layers will work better if you press Cmd/Ctrl + I to Invert the mask to black, then paint back the required area with a soft Brush (B).


Step 31
As a final touch, select and add the tail from this elephant and position below all your patch layers. Press Cmd/Ctrl + U and Desaturate a little, then press Cmd/Ctrl + L and darken with Levels.
You can also duplicate the toenails from the new feet and place them over upper ones. All my patch layers are shown at the bottom of the screenshot. To keep your layers organized it's a good idea to place these layers into a new folder called "ELEPHANT PATCH LAYERS".


Step 32
The next stage is to create the balance pole. Open the first wood texture and use the Rectangular Marquee Tool (M) to select a thin strip. Copy > Paste at the top of the layer stack, then duplicate and Shift-drag to the right.


Step 33
Use a small Eraser (E) to Blend the left edge of the duplicate, then hit Cmd/Ctrl + E to Merge Down. Add a rectangular selection from the second wood texture and resize/position to slightly overlap the first one.
Cmd/Ctrl-click the lower layer thumbnail to create a layer-based selection, then press Shift + Cmd/Ctrl I to Inverse the selection. Make sure the new layer is active, then press delete to remove the excess.
Now change the Blend Mode of the top layer to Multiply and reduce the Opacity to 52%.


Step 34
Create another layer-based selection, then place a new layer at the top in Multiply Mode at 78% Opacity. Set your Foreground color to # 81631a and Shift-drag a very short Linear Gradient (G) within the selection to make a soft shadow.


Step 35
Merge both wood textures and the gradient to a single layer and label it "Pole". Now apply a small Arc Warp preset, resize if necessary, then mask the elephant's feet as shown.


Step 36
We'll now begin to add the other circus performers. Use the same technique to select and apply the Refine Edge command on the first clown.


Step 37
Place a black filled middle layer, then use an assortment of Brushes (B) to refine the mask around the hair.


Step 38
Apply the mask, then add as a new top layer, name it "Clown 1" and Defringe by 1px. Use the top right fly-out menu to choose Convert to Smart Object to preserve the pixel quality, then Resize/flip horizontal and position on the right side of the pole.
Now clip a Hue/Saturation and Levels adjustment to this layer and copy the following settings.


Step 39
Open the second clown and use the same selection/Refine Edge technique.


Step 40
Tidy up and Apply the mask to the extracted layer. We want the white bands on the umbrella to be slightly translucent, so choose Select > Color Range, select the white stripes and apply these settings.


Step 41
With the selection still active, click the Add layer mask icon at the foot of the tab. Now use a white Brush (B) to carefully paint back the clown's head.


Step 42
Apply this second mask, then place as a new layer, Defringe by 1px and name it "Clown 2". Convert to a Smart Object, then position in the foreground. Zoom in and you'll notice the white areas of the umbrella are now semi-transparent.
Next, clip a Hue/Saturation/Levels adjustment to the "Clown 2" layer.


Step 43
Make an Inversed selection and apply the following Refine Edge command to the ringmaster.


Step 44
Apply the mask to the extracted top layer, then place at the top of the layer stack and Defringe by 1px. Convert to a Smart Object, then resize and position on the other side of the pole.
You'll notice the ringmaster's stance need some modification to fit the angle of the pole. To do this, choose Layer > Rasterize > Rasterize Smart Object. Now cut each boot to a new layer, Transform/reposition, then use a small Eraser (E) to blend the layers together.


Step 45
Merge the boots back to the body, convert back to a Smart Object and label it "Ringmaster". Now modify with a Hue/Saturation and Levels adjustment.


Step 46
The background on the dog photo is too complex to remove with the previous techniques. The easiest way is to use a combination of the Quick Selection Tool (W) and the following Refine Edge settings.


Step 47
Modify the mask as required and Apply it. Now roughly Lasso (L) the left ear and press Cmd/Ctrl + J to copy to a new layer. Flip and reposition over the right ear, then apply a slight Warp and mask both layers.


Step 48
Place as a new top layer, Definge by 1px, convert to a Smart Object, resize/position over the hoop and name it "Dog". Add a mask, then paint within layer-based selection from the "Ringmaster" to hide part of the rear foot as circled.


Step 49
Use the Magic Wand (W) and Refine Edge technique on the juggler.


Step 50
Place a middle blue fill contrast layer, then modify the mask as required.


Step 51
Add as a new top layer, Defringe by 1px, convert to a Smart Object, resize/position over the elephant's head and label it "Juggler". Now modify with a Hue/Saturation and Levels adjustment.


Step 52
Open the juggling balls, grab the Elliptical Marque Tool (M) and Shift-drag a selection over the first ball. Use the arrows on your keypad to nudge the selection as required, then press Shift + F6 to open the Feather window and enter 1px. Copy the Selection to the Clipboard.


Step 53
Paste to create a new layer, then use the same technique to Copy > Paste the second ball. Highlight both ball layers and reduce them in size. Now duplicate, flip, rotate some so they're not identical. When you're happy, merge them to a single layer and name it "Balls".
Next, modify the "Balls" layer with a Hue/Saturation and Levels adjustment.


Step 54
To extract tricky subjects, such fur on plain backgrounds it's best to use a channel, or density mask.
Open the baboon and choose Image > Calculations. In this instance, both Blue channels set to Linear Burn produce the best contrast as a starting point for our mask. You'll also need to select New Channel from the Result pull-down menu.


Step 55
Switch to the Channels tab and you'll see the new channel ("Alpha 1") sitting at the bottom and the visibility of the other channels disabled.
The next stage is to produce a clean silhouette. Set the Burn Tool (O) to: Range: Shadows, Exposure: 50% and use a medium, soft-edged brush to darken the inner pixels.


Step 56
Set the Dodge Tool (O) to: Range: Highlights, Exposure: 65% and use a medium, soft-edged brush to bleach the edge pixels.
To see the channel in relation to the image, switch on the top RGB composite. To make viewing easier, double-click the channel mask icon, then click the color chip to change the default red and alter the Opacity to suit.


Step 57
Grab the Brush Tool (B) and carefully paint with black and white to clean up your channel mask.
By default, white acts as selective areas, so hit Cmd/Ctrl + I to Invert your channel to negative. Making a reverse channel may also reveal tiny imperfections which can be fixed easily. Now Cmd/Ctrl-click your channel mask thumbnail to generate a selection.


Step 58
Target the top RGB channel, then switch back to the Layers tab. With the selection still active, access the Refine Edge command and apply the following settings.


Step 59
Apply the mask, add as a top layer, then convert to a Smart Object and Defringe by 1px. Rezize/position as shown and label it "Monkey"
Now clip a Levels adjustment and copy these settings to increase the contrast.


Step 60
To make our scene convincing we need some shadows. Place a new layer called "Figure shadows" below the "Clown 1" layer, then change the Blend Mode to Multiply.
Sample a dark gray from your composition, then use a small, soft-edged Brush (B) at a low Opacity, then at full strength to add shadows as circled. If you overdo this part, mask off any excess.
For a natural looking shadow, choose Filter > Noise > Add Noise, copy these settings and finally, choose Filter > Blur to soften slightly.


Step 61
Add all the animals and people (except the elephant) into a folder called "PERFORMERS" and the remaining ones into another folder called "ELEPHANT/BIKE".


Step 62
Open the balloon and use the Color Range method to select the sky, then check the Invert button.


Step 63
Now apply the following Refine Edge settings.


Step 64
A new feature since CS5 is the ability to edit masks in a similar way to the Refine Edge feature. Double-click your newly created mask thumbnail to open the Properties tab and click the Color Range button and apply the following settings in the Refine Mask window.


Step 65
Apply the new mask, add the layer above the "SKY" folder and label it "Balloon". Defringe by 1px and Convert to a Smart Object. Rezize and position as shown, then clip a Levels adjustment to increase the contrast.


Step 66
Open the aeroplane and use the Color Range method to select the sky, then check the Invert button.


Step 67
Now apply the following Refine Edge command.


Step 68
Opt/Alt-click your mask thumbnail to view it full screen, then use the Dodge and Burn Tools (O) to clean it up. Remember to leave areas, such as the cockpit glass and smoke gray as they'll appear semi-transparent when placed over the sky.


Step 69
Apply the mask, then add the layer above the last adjustment and name it "Plane". Defringe by 1px, then resize and position as shown.
Open the layer's Blending Options window and Opt/Alt click, drag (to split) the top left Grey Blend If slider to 204. Finally, mask the end of the smoke trail as shown at the bottom of the screenshot.


Step 70
Now clip a Levels adjustment to the "Plane" layer and copy these settings.


Step 71
To remove the dark color cast from the smoke, clip another Levels adjustment to the same layer with these settings. To limit the effect, target the adjustment mask thumbnail and hit Cmd/Ctrl + I to Invert it to negative. Now use a white, soft-edged Brush (B) to paint over the required area.


Step 72
Add a new layer above the last adjustment, change the Blend Mode to Hard Light and label it "Trail". Set your Foreground color to white, then use an assortment of cloud brushes to create some additional smoke.
Now, reduce the layer's Opacity to taste (mine's at 59%) and mask with an angled Foreground (black) to Transparent Linear Gradient (G).


Step 73
To reduce the whiteness of the smoke, clip a Photo Filter adjustment to the "Trail" layer. Reduce the Density at 45%, then click (to change) the color chip to # eae97c.


Step 74
To keep things tidy, place these floating layers into a folder called "SKY OBJECTS".


Step 75
At this stage, I thought it would be great to add some flames around the ringmaster's hoop. To do this, first select the "fire ring 2459" brush tip from these fire brushes.
Add a new layer called "Fire 1" in Hard Light Mode. Set your Foreground color to white, hover the brush over the ring and adjust its size accordingly. Stamp at full strength, then mask as required. Now apply the "Fire Style.asl" from the "source" folder.


Step 76
To make the flames more realistic, Lasso (L) a rough selection as indicated from this fire image and Copy > Paste as a new layer, then resize and use the Arch Warp preset to distort it. Name this layer "Fire 2" and mask it as required.
Duplicate the "Fire 2" layer and rename it "Fire 3". Reposition/Transform the layer content slightly and modify its mask accordingly. Next, open the Blending Options window and split the right half of the left Blend If Grey slider to 123.


Step 77
Next, I decided to add a subtle rainbow over the clouds. To do this, first, place a new layer beneath "Clouds 1" and name it "Rainbow".
Set the Gradient Tool (G) to Linear, select the Transparent Rainbow preset and Shift-drag a very short gradient as indicated by the length and direction of the arrow. Now apply an Arc Warp Preset and click the Warp Orientation button to reverse it.


Step 78
Rotate, resize and move the rainbow into position over the clouds, then change the Blend Mode to Screen.


Step 79
Open the pelicans, then use the Color Range method to select the sky and check the Invert button.


Step 80
Switch to the Channels tab and with the selection still active click the Save selection as channel icon at the foot of the tab. Now use the Dodge and Burn Tools (O) to create a clean silhouette.


Step 81
Load the channel as a selection, target the top RGB composite channel and Copy > Paste as a new layer above the "PERFORMERS" folder. Convert to a Smart Object, flip horizontal, then position bottom right.
Now clip a Levels and Color Balance adjustments with the following settings.


Step 82
Place a new layer called "Painted clouds 1" below the "ELEPHANT/BIKE" folder and use the cloud brushes to paint some additional white and very pale yellow clouds. Repeat this on another layer ("Painted clouds 2") above the "PERFORMERS" folder.


Step 83
Follow the same technique to introduce some magical wisps around the circus characters with some of these light brushes.


Step 84
To further the magical effect, place another layer, this time in Color Mode and paint some more wisps with some brighter hues (# f369f8, # f6f842 and # 9df827) at 35% Opacity.


Step 85
Add a new layer at the top of the stack. Set the Clone Stamp Tool (S) to Current & Below and fix any small flaws in your composition. You can also clone within layer-based selections as well.


Step 86
Now we'll add some overall sharpening. Hit Cmd/Ctrl + Shift + Alt + E to create a merged top layer. Go to Filter > Other > High Pass and enter 2px in the following window. Now change the Blend Mode to Overlay to render the gray invisible. Name this layer "High pass"


Step 87
Create another top merged layer and label it "Blurred". Choose Filter > Blur > Gaussian Blur and enter 6px. Add a mask, then use a large, black soft Brush (B) to bring the central characters back into focus.
Finally, generate a layer-based selection from the "Birds". Go to Select > Modify > Contract by 1px and fill with black on the mask to refocus them.


Conclusion and Scope
Now you've completed this tutorial, why not conjure up your on magical composition; remember the only limit to what you can create is your imagination!

 By
By


