
In this tutorial, you'll create an organic style green website with Adobe Illustrator. This tutorial shows you how to create illustrative vector graphics and apply this to web design layouts. Let's get started!
Introduction
A little while ago I wrote a tutorial entitled Use Adobe Illustrator to Create a Clean Website Layout which was met with much fanfare with equally notable opposition. That tutorial was directed towards people just getting started in Illustrator. It eventually made it to the front page of Digg as well.
To set things off on the right foot let me take a moment to point out the obvious… this website design can be created in Photoshop too! However, the purpose of this advanced tutorial is to explain how to use Adobe Illustrator to design a website. Let me also distinguish design from front end coding. While I'll show you how to design the website in Illustrator, this could be taken further (with the use of standards based XTHML/CSS) to make the design function.
Without further ado, here's how to make a green landscape website in Adobe Illustrator.
You can find the Source files in the directory labeled 'source' that came in the files that you downloaded. You may wish to look through them briefly before we begin.
Step 1
Make a new document with a width of 1160px and a height of your choosing. Set the Color Mode to RGB. You can leave the Raster Effects at High 300ppi since our design doesn't make much use of raster effects.


Step 2
I prefer to work with a browser in the background so I can get a better idea of what the final design will look like once it's complete.


Step 3
The proportions of the browser screens are not the same as the 1160px document so you'll simply use the Direct Selection Tool (A) and click and drag over the area highlighted in red. Then, using the Direct Selection Tool again (without deselecting anything) click on one of the points you selected and drag everything over to the black line on the right, which is your document size.


Step 4
A website with a width of 960px or smaller will work well for the majority of a websites visitors. Our document is setup to 1160px width to compensate for people with larger monitors who may stretch the browser window open wider. The space between the blue vertical guides measures 960px and represents the area all of your main content should stay in between. Anything outside these guides has the potential to be out of view for some visitors.


Step 5
This step is essential for creating a legible site. Make SURE you know what the website looks like when viewed at 100% zoom. You don't have to work at 100% zoom but you need to be aware of what the website looks like when it's viewed at actual size (100%). To change the zoom you can click in the lower left hand corner of your document window.

Step 6
The first step is to create the rolling hills. Draw an ellipse using the Ellipse Tool (L).

Step 7
Duplicate the Ellipse and overlap them.

Step 8
Merge the two shapes in the Pathfinder using the Subtract from Shape Area option. Duplicate the shape, make it a little smaller and move it to the right and down as shown below.


Step 9
Select both shapes and go to Object > Blend > Blend Options. Select Specified Steps from the drop down, enter a value and click OK.


Step 10
Go to Object > Blend > Make. You can adjust the blend if you are not happy with the results by going to Object > Blend > Blend Options…


Step 11
Go to Object > Envelope Distort > Make with Warp… Select Arc from the drop down and change the sliders to create a pleasing arc. Click OK when you are done.


Step 12
In order to further manipulate the shapes we'll need to expand them by going to Object > Expand. Click OK.


Step 13
Now that your shape is expanded you can make it look more like a hill. Using the Pen Tool (P) draw another shape that follows the contour of the stripes.


Step 14
First use the Pathfinder to trim off the areas of the hills that are extra. Layer both shapes on top of each other and give them a lush gradient.


Step 15
Place the hill to slightly overlap the blue guide. This will suggest that the hills continue farther to the left when the website is viewed at an average browser size.
Make other hills using the same technique. Experiment with adjusting the spacing and size of the shapes and arc to create a little variety.


Step 16
Draw a simple arc shape that will become a road on the hills. Give it a subtle grey gradient too.


Step 17
Below I've varied the horizontal flip of the hills to give a little variance to the piece. Also notice that both the hill on the left and the hill on the right extend just past the blue guide.


Step 18
Next we'll create the sky. Ultimately, this is set up so that when coded using XHTML/CSS the sky will repeat indefinitely on both the left and right side, no matter how large the browser screen is stretched.
Create a light colored gradient and place it behind the hills.


Step 19
I sometimes find it more effective to fine tune a gradient by going to Edit > Colors > Recolor Artwork… Now you'll be able to select each color (top circle) and move the slider around to get just the color you're looking for (bottom circle). The changes you make are viewable in real-time, before you press OK, so make sure your Live Color dialog box is not covering the object you're recoloring.


Step 20
Next we'll add small details to the hills and roads. I've decided to make some blocky cars. When broken down to their simplest shapes, cars are very easy to create. Start off by drawing the basic shape your car will take on. Use this shape as a guide.


Step 21
Depending on what look you're going for, you may not have to make everything perfectly symmetrical. The cars I'm creating are somewhat whimsical so the shapes have an arbitrary quality about them. Next, draw in the roof.


Step 22
Draw the hoods, windshield and bumper.


Step 23
Draw the side of the car.


Step 24
Draw the windows and a couple ellipses for the wheels. That's it!


Step 25
Duplicate the car and change the color to mix it up. The fact that the car is arched also helps it fit well with the arched road.


Step 26
Using the Pen Tool draw a basic bird shape. Duplicate and flip the same shape to quickly create a volume of birds.

Step 27
We'll create the clouds in the sky by first drawing a rectangle using the Rectangle Tool (M).


Step 28
Using the Warp Tool (Shift + R), warp the rectangle until you get it looking more like a cloud. It may be easier to warp the rectangle more fully if you adjust the size of the warp area. Accomplish this by either double clicking on the tool or holding down Option + Shift, then click and drag to change the size.

Step 29
After you're done making the overall cloud shape, you may notice that warping an object tends to give it an abundance of additional points. These additional points make the shape more complex than we need it to be. Simplify the number of points the shape has by going to Object > Path > Simplify. Adjust your Curve Precision until the shape becomes smoother.


Step 30
Using the Direct Selection Tool, you can adjust the points and nodes to more accurately reflect any shape you're trying to create.


Step 31
Use the Pencil Tool (N) to draw a random mountain shape. Because of the continuous nature of drawing with the pencil tool, it is sometimes more difficult to close the path when you are done drawing the shape. To easily close a path hold down the Option key before you finish.


Step 32
Objects that are farther away from the viewer do not need as much detail. Make buildings by merging simple rectangles using the Pathfinder.


Step 33
Arc the building by going to Object > Envelope Distort > Make with Warp… Select Arc from the drop down and enter values that look good to you.


Step 34
This is what your artwork should look like right now. As you can see, as object get farther away they become lighter. Use this knowledge when creating your layout. This really helps give the design a natural quality.


Step 35
Using the Star Tool draw a triangle. To adjust the number of points that a star has use the Up and Down Arrows while you draw the shape. While you're drawing the shape, once it has 3 points, hold down the Shift key to make the triangle's base perfectly horizontal.

Step 36
Draw an ellipse and merge it with the bottom edge of the triangle.

Step 37
Give the shape a green gradient.

Step 38
Use small triangles inside the main tree area to give it a little more detail. Use a rectangle for the base of the tree.

Step 39
Duplicate and vary the size of the trees to create a forest.

Step 40
Adjust the Opacity of an ellipse to create a stylized shadow for each tree.


Step 41
Again, using the Pencil Tool draw an organic shape to create a rock.


Step 42
Deselect the main rock shape and draw other abnormal shapes that will become moss and shadows. Use the Pathfinder to Divide the shapes and get rid of the unnecessary leftovers.


Step 43
This is what you should be left with.


Step 44
Place the rocks randomly throughout the design and give them a shadow as you did for the trees.


Step 45
Create a leaf shape using the Pen Tool.


Step 46
Giving the leaf variations in color will add to its realism. Using the Pencil Tool (N), draw a shape that looks like mine below. Use the Pathfinder Palette and break-up the leaf into sections. Delete the leftover shapes that aren't part of the leaf.


Step 47
Select each section of the leaf and give it a subtle color change to simulate light hitting each part of the leaf.


Step 48
Draw a very narrow ellipse that will become the leaf's stem.

Step 49
Use the Warp Tool to mold the ellipse into something more natural looking.

Step 50
Give the leaves and stems a color change to break up the monotony of the leaves. Go to Edit > Colors > Adjust Color Balance… then move the sliders to your liking.


Step 51
Place the leaves in a cluster in the corner of the design.


Step 52
Add the sites title to the top section. If your title will be written using a standard font like Helvetica, you're pretty much done with this step. If your title will not use a system font then feel free to enhance it with effects like a drop shadow or a beveled edge for example.

Step 53
This is what the completed header of the website looks like. Observe how the main content is kept between the blue guides which measures 960px wide.


Step 54
Create the main content section of the site. I decided to create an earth friendly theme so blue was a suitable choice for this design.


Step 55
Using the Pencil Tool create a tall icicle shape.


Step 56
Give the icicle shape an inner glow to add depth to it by going to Effect > Stylize > Inner Glow… Draw similar smaller icicle shapes and place them beneath the larger shape. You don't have to give these other shapes inner glows.


Step 57
Use the Pencil Tool to create some small rocks to add interest to the waterfall.

Step 58
We'll use a scatter brush to build up a mass of bubbles. Draw an ellipse and drag it to the Brushes Palette. Select New Scatter Brush and press OK. If your Brushes Palette is not visible, then go to Window > Brushes.


Step 59
Set the Size, Spacing and Scatter to random and adjust the sliders. It's important to adjust both the black and grey triangles so your shapes are random enough.


Step 60
With the Pen Tool selected, click the scatter brush you just made and draw a line. Change the line weight to vary the size of the circles or double-click the scatter brush for more options.
To further edit the circles simply expand the line by going to Object > Expand Appearance.


Step 61
Use the Pen Tool to draw some fish shapes.


Step 62
Place the rock that you drew earlier at the bottom of the page to create a footer.


Step 63
Use the scatter brush you used for the bubbles to create a texture for the footer. To make the texture confined within the rectangle area of the footer simply draw a rectangle over the bubble shape, select the bubbles and rectangle and press Command + 7 to create a mask. Or, use the Intersect shape areas in the Pathfinder to eliminate the bubbles outside of the rectangle area.


Step 64
My navigation can easily be reproduced using CSS. Keep this in mind when you create yours too. Any text that uses a font that is not a system font will need to be an image. It is now customary and preferred to use CSS whenever possible and not images.


Step 65
Create some elements that can enhance the layout using simple shapes.

Step 66
I've decided that I want the image to be inset within the text. To do this select the item that will be inset and go to Object > Text Wrap > Make. Go back to Object > Text Wrap > Text Wrap Options to adjust the space between the items and the text.


Step 67
Make the form input fields by using a rectangle, rounding the corners, giving it an outside stroke and finally a subtle gradient fill. All of these effects are easily modifiable by double-clicking on each effect in the Appearance Palette.


Step 68
Create a button by again drawing a rectangle, giving it rounded corners a slight gradient and a drop shadow.

Step 69
Add any other elements to complete your design.

Step 70
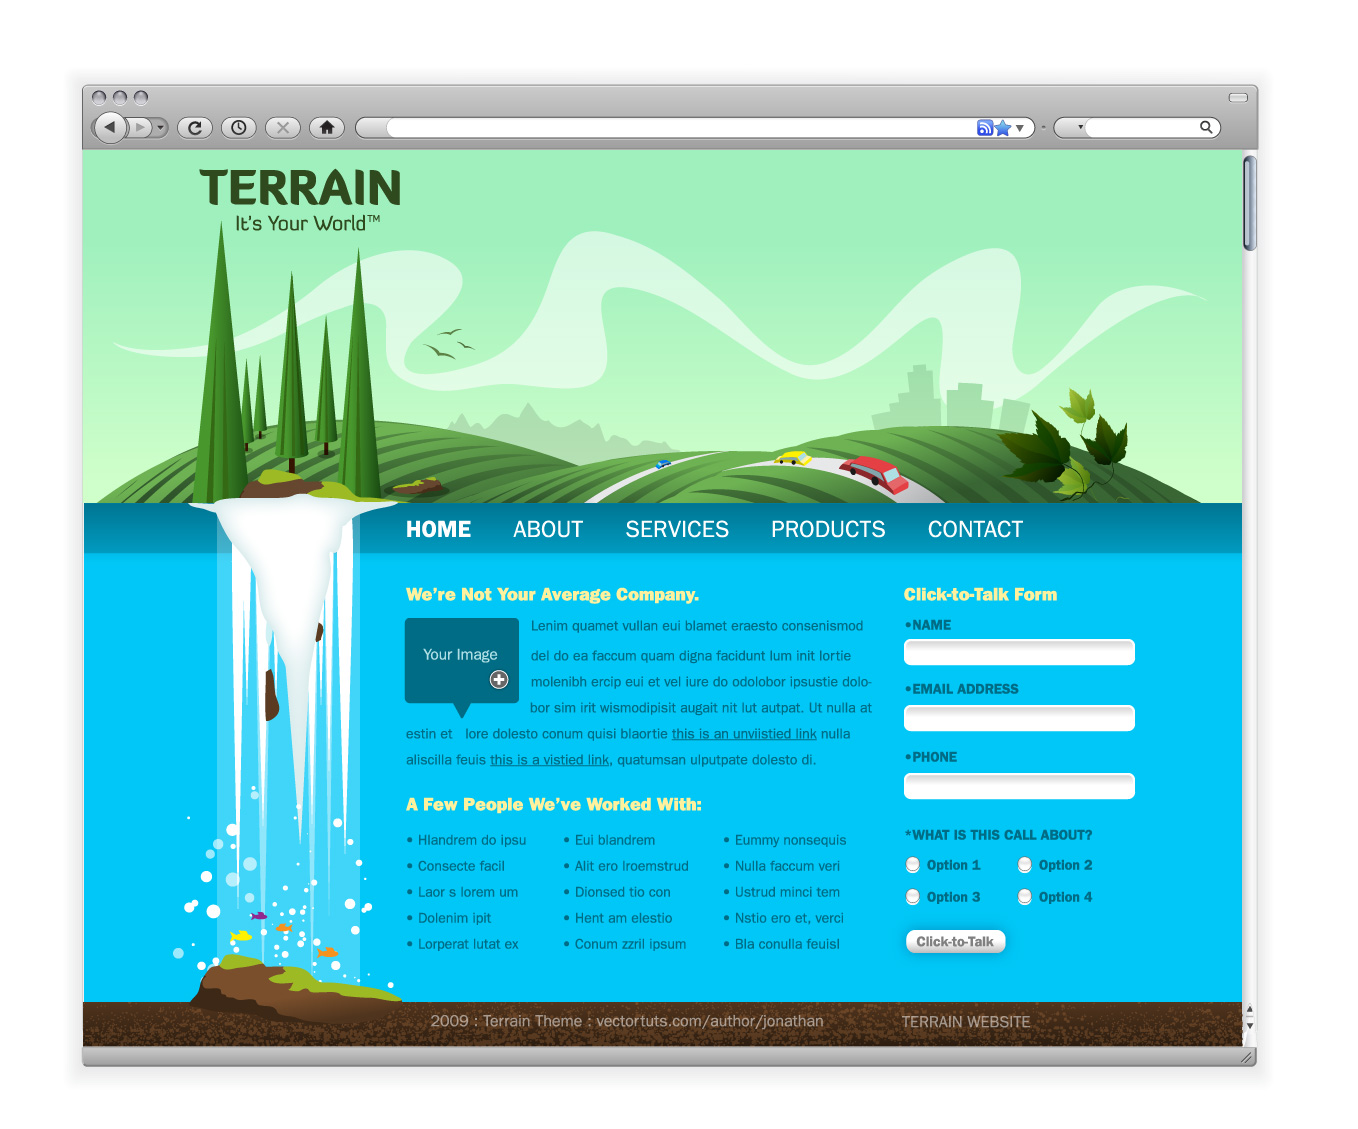
This is what the final design looks like. Notice how all the critical information is kept within the blue guides. The footer will also repeat using CSS.


Conclusion
You've just learned how to create a green landscape website in Adobe Illustrator. Vector style website designs can set a site apart by giving it a unique look. Get started with your own design and see what you can come up with! The final image is below or you can view a larger version here.
 By
By


