


In this tutorial I'm going to show you the inspiring process of drawing a Vampiress and her Voodoo-pet in a vintage portrait illustration with grungy elements in Adobe Illustrator. We will move step-by-step from sketch to the final vector colored image using custom brushes, gradients and the Pen Tool. Ready? Let's get started!
1. Turn Your Sketch into Vector Outline Using Custom Brush
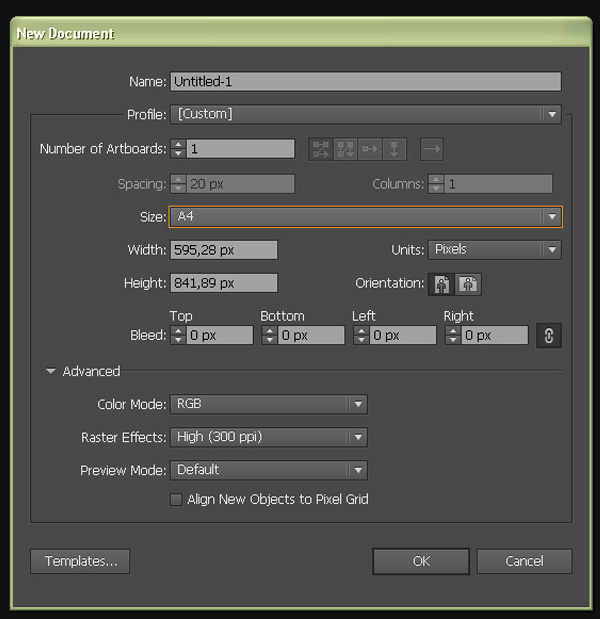
Step 1
Create a New Document of A4 size, Color Mode: RGB.
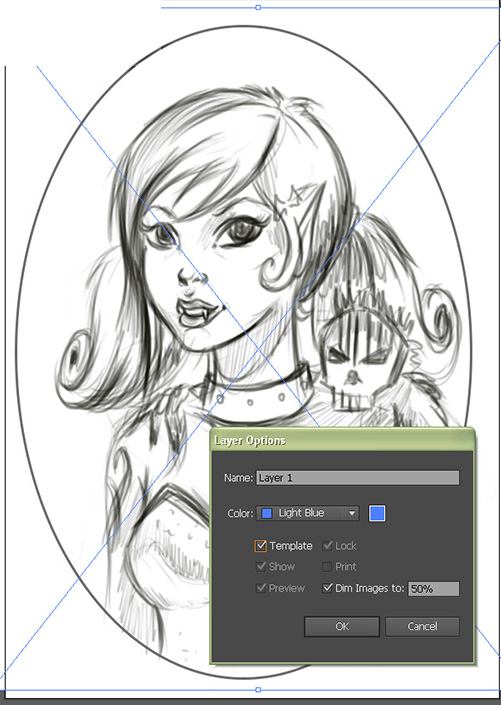
File > Place your sketch in the middle of the artboard. Double click on the layer and select the Template check box. As you may notice, Dim images option is checked by default – it makes the image more transparent and it will be easier to create an outline above it. Lock the sketch layer and create a new one.
Step 2
It's time to make the outline for our sketch. For this purpose we will create our own brush. Choose the Ellipse Tool (L) and create a small extended ellipse with black fill. Drag and drop it on the Brushes panel (Window > Brushes) and choose Art Brush in the pop-up window.

Choose Tints in Colorization Method and leave other options as default. This way we'll be able to recolor the whole outline or its separate parts in different colors.

I'll be using the Paintbrush Tool (B) to draw the outlines, however if you've not got a steady hand, you could use the Pen Tool (P). We can adjust some options of Paintbrush for more convenience. Double-click on the Paintbrush Tool (B) and set Fidelity to 4 and Smoothness to 2% in order to make our line more flowing and smooth.
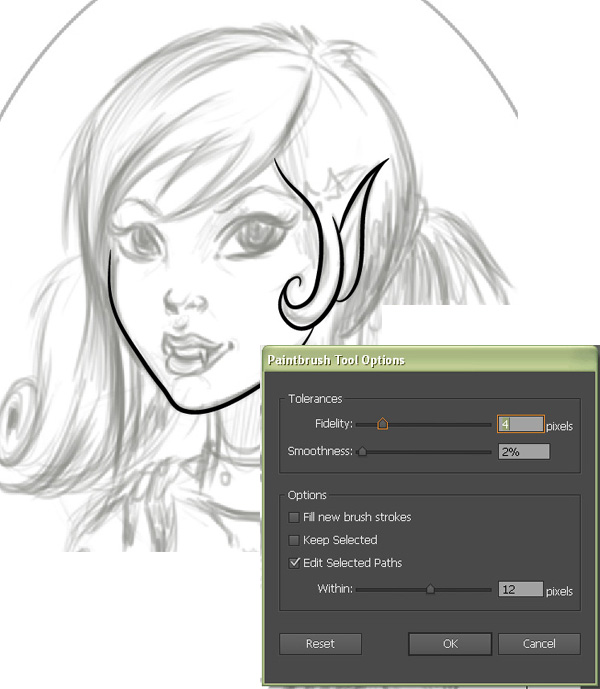
Play with the Stroke Weight – make the strokes, which show the outer lines of the image more thick and small inner strokes more thin. I usually vary Stroke Weights from 1px to 0.25px: this helps to show the perspective of our image and to highlight the details. I add a lot of thin and short strokes to give the image a vintage engraving-like look. The good thing about the Paintbrush stroke is that you can always adjust the line by moving anchor points with Direct Selection Tool (A) and by adding/deleting anchor points with Pen Tool (P).
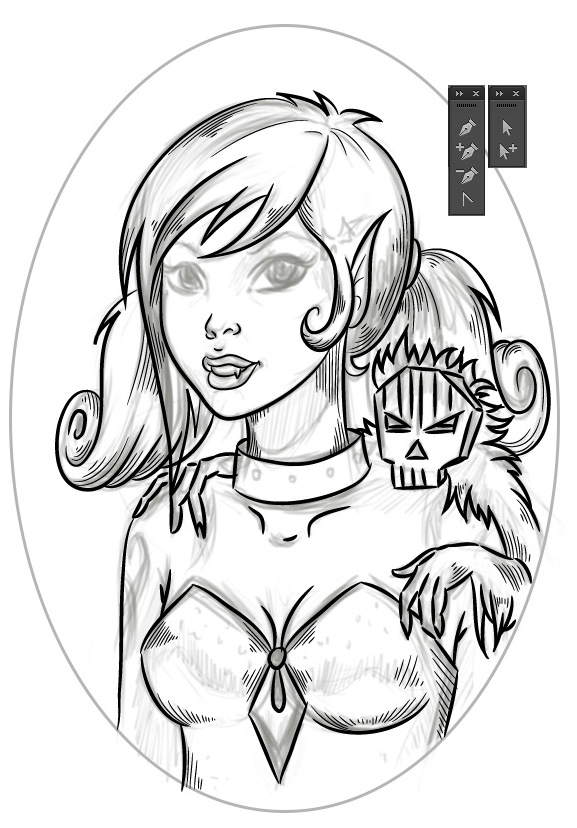
Tip: If you want to resize your image together with your outline, don't forget to check the Scale Strokes & Effects box, which you can find in Edit > Preferences > General.

2. Make Her Eyes Enchanting Using Blending Modes and Gradients
Step 1
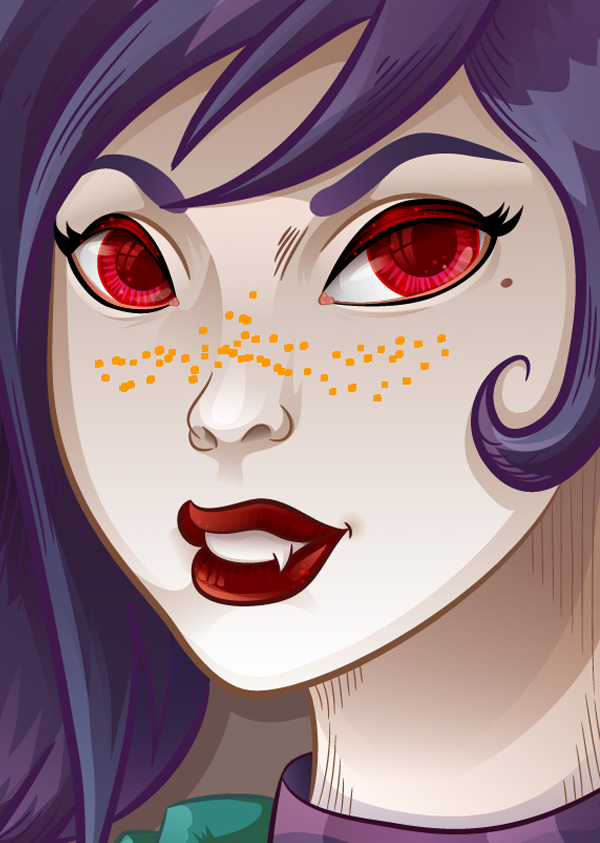
I always start detailing and coloring portraits with the eyes. Eyes are the mirror of the soul. The most important thing in any portrait is creating a vivid glance which is able to enliven the character. If you manage to capture the character's individual features in his eyes and make them bewitching for the viewer – you'll succeed in making good portraits.
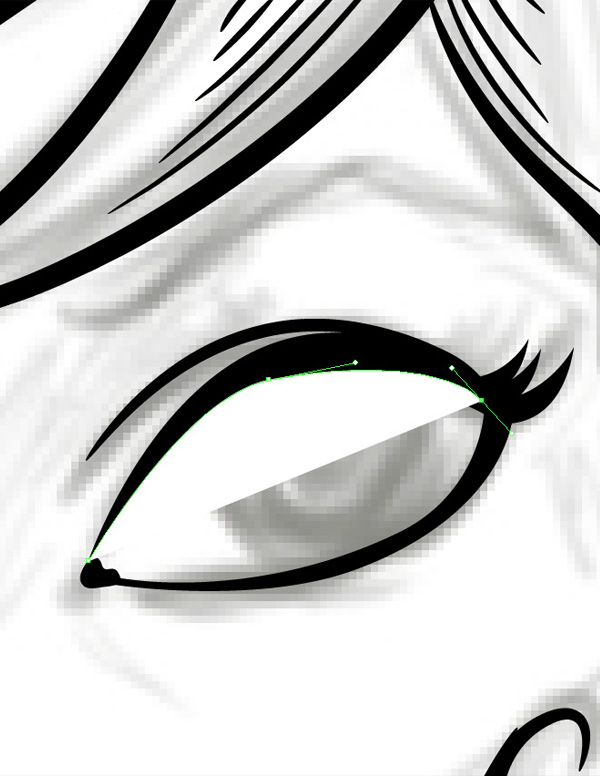
Let's give her a true vampiric look! Take the Pen Tool (P), set fill color to black and draw a curve line making the upper eye-lid.

Step2
Add a few more curves for the lower eye-lid and eye-lashes, using Pen Tool (P). Try to use less anchor points and edit your lines by moving the handles of anchor points keeping your lines neat and smooth. There is a great tool which I use for editing my line art: Convert Anchor Point Tool (Shift + C). It turns an anchor point either to corner (if you click on anchor point) or to smooth line (click and drag the handle) and is used to move the anchor handles separately.

Step 3
Now change the fill color to white, draw a shape, which will form the eye-ball and send it to back (Control + Shift + [). Make a copy above this shape (Control + C > Control + F) with no stroke and no fill, we will need it later.
Step 4
Let's move on and draw an iris. Take the Ellipse Tool (L), draw a circle, holding down Shift button and set fill color to red to give it a predatory look.
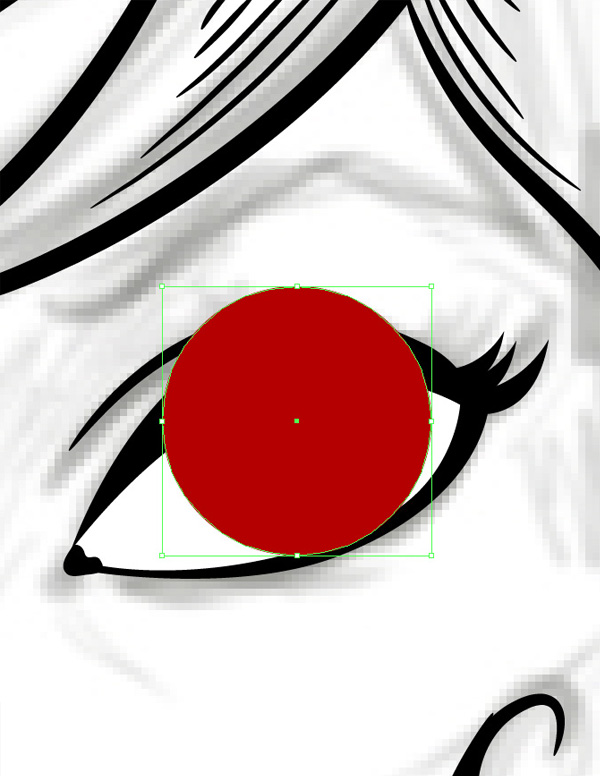
Draw a smaller circle inside and make its color darker to form a pupil. You can add the same color to the top of the iris using Gradient Tool (G), to make the colors merge into each other.

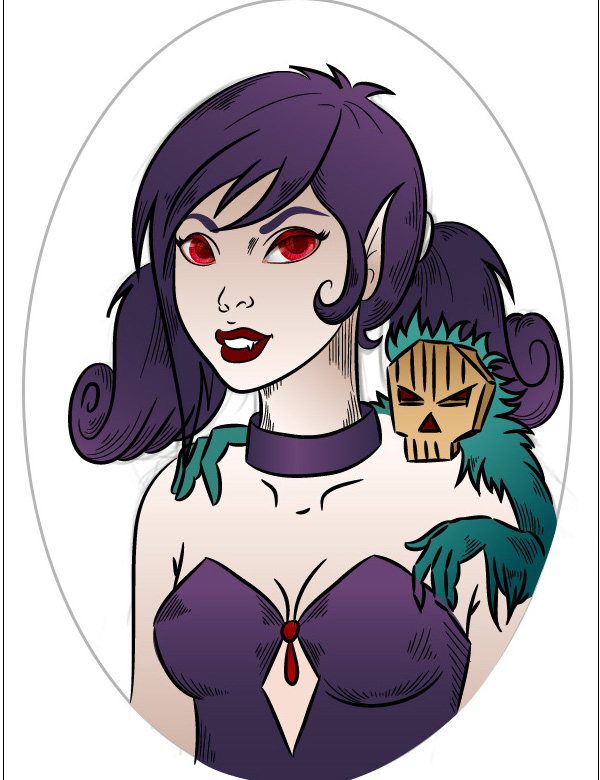
Add a zig-zag round shape using Pen Tool (P), fill it with linear gradient from lilac to black and change Blending Mode to Screen in the Transparency panel (Window > Transparency) to make the eyes more bright and glowing.

Let's make a highlight in the eye: draw a drop shape using Pen Tool (P) and fill it with linear gradient from brown to black, setting the Blending Mode to Screen.

Continue adding as many details and reflections to the eye as you like to make it more whimsical and vivid.

Step 5
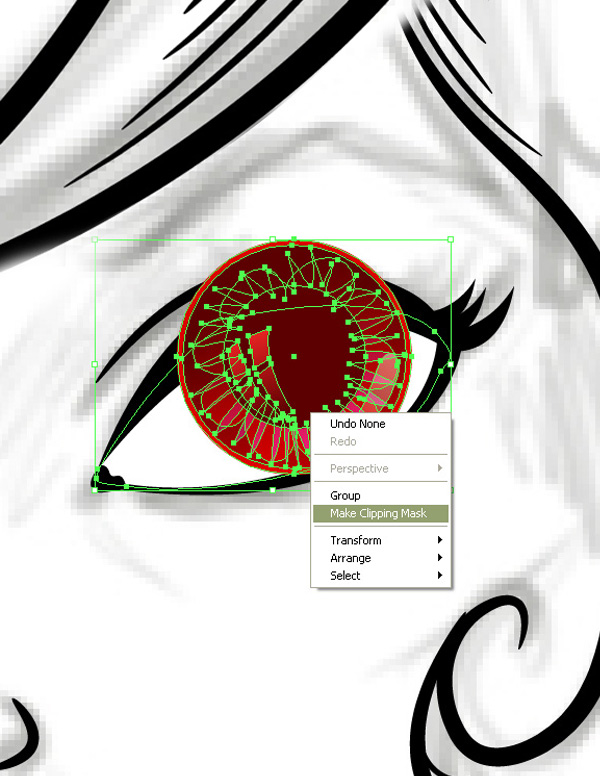
Select and Group all parts of the iris (Control + G). Under the iris-group we have a duplicate of the eye-ball shape with no stroke and no fill. Choose this copy and bring it to front (Control + Shift + ]). Select both iris-group and this shape, right-click on them and make a Clipping Mask (Control + 7). Now the iris is inside the eye.
Step 6
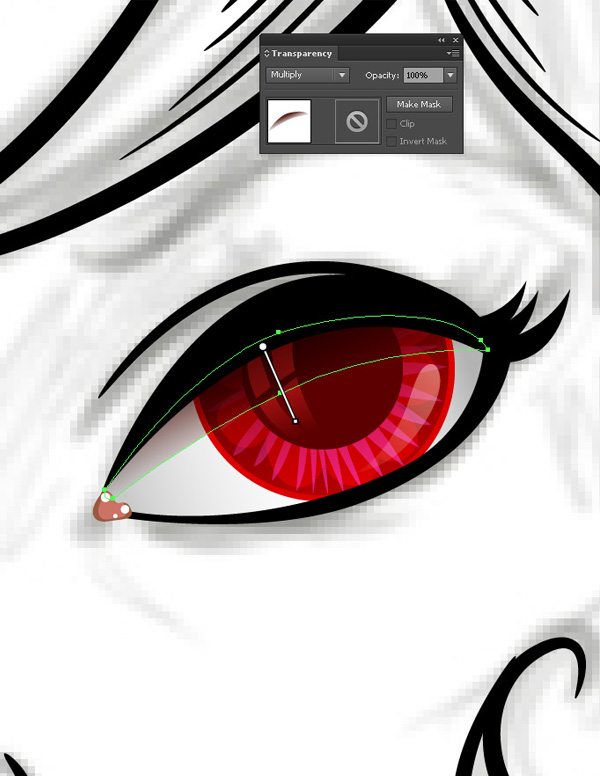
Let's add some shadows to the eye-ball. Select the lower white shape and apply a three-colored linear gradient with light-gray color on its ends and white color in the middle, as shown on the screen shot. This way we will form a shadow in the corners of the eye.

Step 7
Draw a half-moon shape under the upper eye-lid using Pen Tool (P), set Blending Mode to Multiply and apply a linear gradient to form a shadow. As you can see, you can add volume to objects very easily using such technique.
Step 8
Let's add more details to the upper eye-lid to make the eyes more detailed and glittering. Draw some small round sparks using Ellipse Tool (L) with radial gradient on the eye-lid and on the iris, setting the Blending Mode to Screen.

Step 9
Let's form the second eye in the same way, starting from shaping the eye-lids, the eye-ball and adding the iris.

You can copy and paste the iris-group which we already made for the first eye to speed up your work. Place it on the second eye and use the Clipping Mask. Don't forget to add some minor, but important details to both eyes – highlights and reflections in order to "water" the eyes.


3. Color The Parts of The Vampiress Using Pen Tool and Separate Shapes
Step 1
Let's start coloring our image. Create New Layer and place it under the layer with the outline. Add separate shapes for her face, neck and body using Pen Tool (P) and filling them with flat skin colors.

Draw separate shapes for body, hair, dress and other objects.

Step 2
At this step we will use gradients so that our image will look more alive and realistic. Choose a face shape and apply linear Gradient (G) to it, the upper part of which will be slightly darker. This will form a shadow under the Vampiress's bangs. Remember to keep the overall tone of her skin light, because she is a vampire, pale and cold. Hence, no romantic blush on her cheeks this time.

Add gradients to other parts as well, turning darker points of gradients to the places which are supposed to be in shadow.
Step 3
Now we are ready to add some highlights and shadows to the areas around the eyes in order to emphasize them and to make her face more dimensional. Draw a shape on the upper eye-lid using Pen Tool (P), fill it with linear gradient and apply Blending Mode Screen to it. This will form a highlight.
Now add a shadow next to the inner corner of the eye. Fill the shape with linear gradient, set Blending Mode to Multiply. Continue adding shadows and highlights around the eyes to make them more pop up.

Step 4
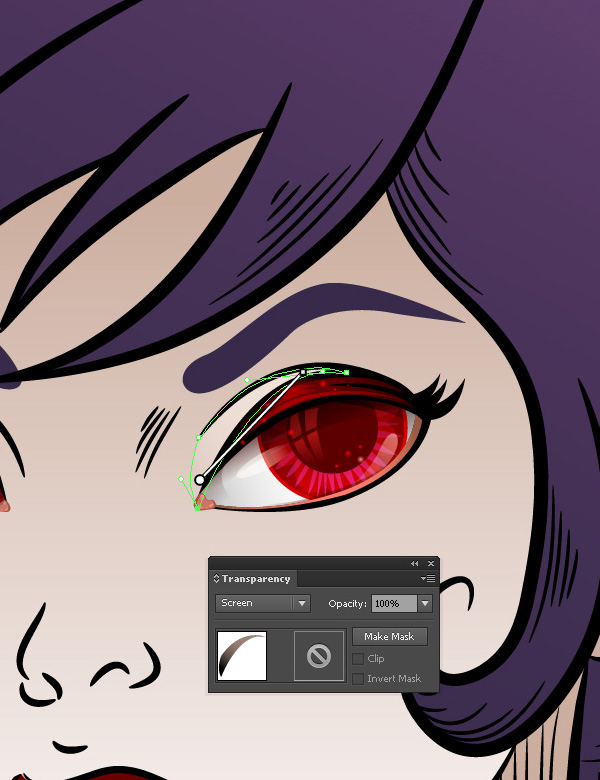
Add details to the lips and nose using the techniques described above to add depth to the image. Add sparks, shadows and highlights.


After finishing up with face and add details to her hair, dress and Voodoo-pet.


The more details you draw, the more interesting and fancy your image will look.

4. Add Special Details Using Scatter Brush
Step 1
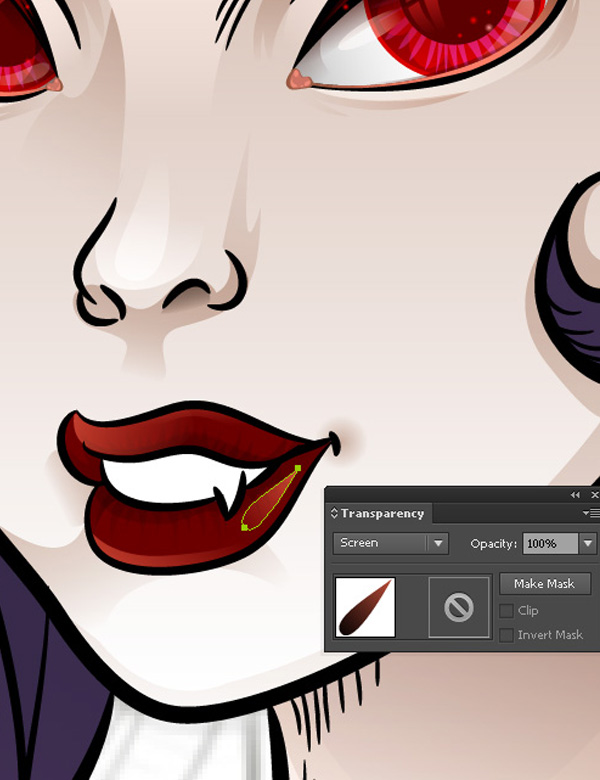
At this step I decided to add some freckles and spots to the girl's face to make it more cute. For this purpose, draw a small spot (size of a freckle) with Ellipse Tool (L), drag and drop it to the Brushes panel, choose Scatter Brush and play with options, setting them to Random, as shown on the screen shot.
Step 2
Draw a few lines with the Paintbrush Tool (B) using the newly created brush. You can change size, scatter and spacing of the freckles at any moment by returning to the brush options from the Brushes panel.

Step 3
Select the brush strokes and go to Object > Expand to turn our paths into separate objects.
Step4
If you are using Adobe Illustrator CS6, you may face a problem at this step: after Expanding each object may have a square Clipping Mask which makes it hard to recolor. In order to fix that, go to Object > Path > Clean up, select all the check-boxes in the pop-up window and hit OK.

Step 5
Now you can make some freckles slightly darker or lighter to give them realistic look.

5. Make Stylish Vintage-Looking Background
Step 1
Now it's time to add a background to our image. Create New Layer above the sketch layer. Take a Rectangle Tool (M) and draw a rectangle shape filled with radial gradient from light-brown in the middle to dark-brown.

Step2
Draw a vertical rectangle shape at the left side of the artboard, set its Blending Mode to Multiply and copy the shape to the right side by holding Alt + Shift and dragging the shape.

Select both vertical shapes and go to Object > Blend > Make. Then choose Object > Blend > Blend Options and set Specified Steps to 8.

Step 3
Draw an oval using Ellipse Tool (L) and fill it with dark-brown radial gradient.

Step 4
At this step I added a pattern made of simple repeating shapes to give the frame a textured look. I duplicated the oval and used a Clipping Mask to place the texture inside.
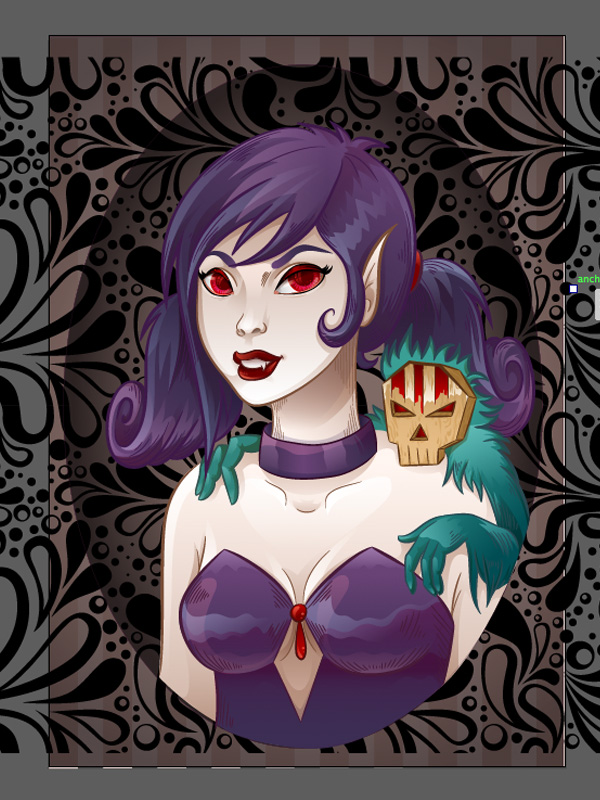
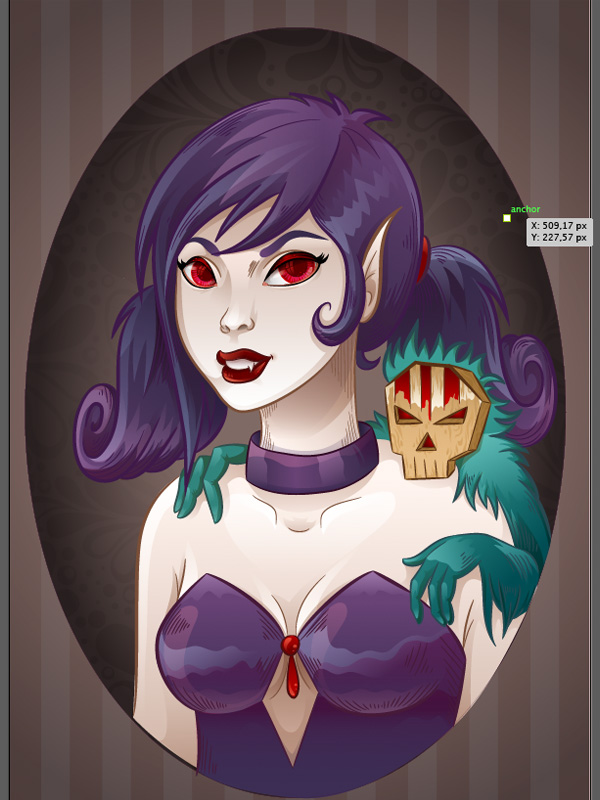
Move on and add a frame by duplicating the oval to back twice (Control + C > Control + B > Control + B). Make the lower copy slightly larger and use Blend (Alt + Control + B) to make a smooth color mixing from lighter brown in the middle (upper oval copy) to darker brown at the edge (lower oval copy).

Step 5
To make your work more neat and easy to edit, gather all parts of the Vampiress into separate sub-groups (Hair, Eyes, Dress, etc…) and put them into a Clipping Mask so that all the sub-groups can be found inside.

Step 6
Time to add some grungy effects to the background to make our image more old-fashioned. For this purpose we are going to use some nice brushes. Go to Window > Brushes, hit the Brush Libraries Menu button and choose Artistic > Artistic_ChalkCharcoalPencil in the folding menu.

Draw horizontal and vertical lines with Paintbrush Tool (B) by holding Shift to make them straight and forming a frame. Use several different Charcoal textured brushes from the list to make the frame more grunge-looking. You can add more small strokes in the corners.

When you are satisfied with the result, choose all the textured strokes and go to Object > Expand in order to turn them into objects. Edit them with Eraser Tool (Shift + E) by erasing some parts and adding more blank points and scribble strokes.
Finally, select all the parts of the grungy frame, group them and set Blending Mode to Multiply.

Step 7
Last but not least thing that I want to do here is to adjust the colors a bit, to make them more saturated and to level the overall tone of the picture. Actually, this is quite easy and at the same time very flexible option. All you have to do is to create a rectangle on the top of the image (I put it on the separate layer above all other layers), fill it with linear gradient from beige to pale lilac and set Blending Mode to Overlay. That's it! You can make the colors of your gradient fill more bright and saturated or change the opacity of the rectangle to make it more transparent. Adjust it to your taste and it will give your image nice look.

Great Job! You've Completed Your Artwork Successfully!
A few final strokes – and you're finished. The Vampiress vintage portrait is ready. I hope you've discovered some new useful Adobe Illustrator tricks from this tutorial and it will help you in your future projects. Good luck!

 By
By


