


This tutorial is another collaboration with a very good friend Ciursa Ionut. In this web design tutorial we will create a portfolio web layout using fabric textures. You will be taken through the process of designing the logo using Adobe Illustrator, creating spotlights for the "services" area and how to apply textures to the layout in a subtle way that will increase the quality of the final result. Let's get started!
Tutorial Assets
The following assets were used during the production of this tutorial.
Introduction
In this tutorial we will use the 960 Grid System. Download it and unzip the archive file. Then open the “960_grid_12_col.psd” file in Photoshop.
The 12 red columns that you see is the grid that we are going to use. You can hide the red bars by clicking on the eye icon of the “12 Col Grid” layer. This PSD file contains some guides as well, which will be very useful. To activate them go to View > Show > Guides, or use the shortcut Command/Ctrl + ;. I usually hide the red bars and activate the guides whenever I need them.
Also, smart guides are very useful when designing web layouts. Activate/deactivate them by going to View > Show > Smart Guides. They will help you align each layer depending on the position of other layers.
During this tutorial you will be asked you to create shapes with certain dimensions. When you create a shape you will see its exact width and height in the Info panel (Window > Info).
Now that we covered the basics of using the 960 Grid System, we can move on to creating the actual web layout. Let’s get started!
Step 1: Setting up the document
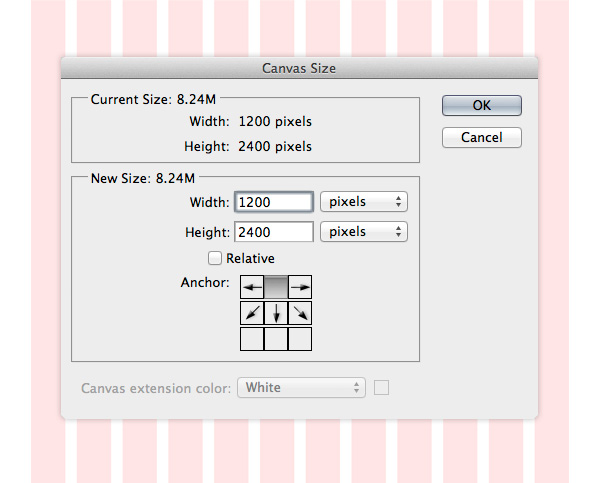
Open the "960_grid_12_col.psd" file in Photoshop. Then go to Image > Canvas Size and set the width to 1200px and the height to 2400px. This will give us enough space to work with.
Step 2: Creating the header of our web layout
Create a new group and name it "Header". Select the Rectangle Tool (U) and create a rectangle with the dimensions 1200px by 520px and the color #595e61. Name this layer "header bg", right-click on it and select Convert to Smart Object.
Go to Filter > Noise > Add Noise and use the settings from the image below. This will create a nice subtle texture.


Download this pack of fabric patterns and open the .PAT file in Photoshop. Then double-click on the "header bg" layer to open the Layer Style window and add a Pattern Overlay effect with the settings from the image below and a pattern from the pack you downloaded.


Step 3: Creating the navigation background
Select the Rectangle Tool (U) and create a rectangle at the top of your document with the height 120px and the color #000000. Name this layer "navigation bg". Set the Fill of this layer to 20%, double-click on it and use the settings from the image below for Inner Shadow.


Now we will add a circle to the "navigation bg" layer to make room for the logo later on. Select the Ellipse Tool (U) and click on the "Add to shape area (+)" button from the option bar above your image.
Click on the vector mask of the "navigation bg" layer to make it active. Then using the Ellipse Tool, hold down the Shift key and create a circle in the middle of the navigation bar with the radius 140px. Take a look at the following image for reference.


Step 4: Creating a dotted line pattern
Create a new document (Command/Ctrl + N) with the dimensions 3px by 1px. Zoom in as much as you can. Then select the Rectangular Marquee Tool (M) and create a square selection as you see in the following image. Create a new layer and fill the selection with white.
Hide the "Background" layer by clicking on its eye icon. Then hit Command/Ctrl + D to deselect. Save your pattern by going to Edit > Define Pattern. Give your pattern a name and click OK.


Go back to your web layout document. Select the Line Tool (U) and set the Weight to 1px. Then hold down the Shift key and create a horizontal line at the bottom of your navigation bar.
Set the Fill of this layer to 0% and the Opacity to 20%. Double-click on this layer to open the Layer Style window and add the pattern you created earlier.
Now we need to erase the area of the dotted line that goes over the circle. Use the Rectangular Marquee Tool (M) to select that area. Then go to Layer > Layer Mask > Hide Selection.


Step 5: Adding gradients to the header background
Use the Rectangular Marquee Tool (M) to create a selection as you see in the image below (1). Then go to Layer > New Fill Layer > Gradient and use the settings from the following image (2).
Click on the mask of this layer to make it active. Then select a black soft brush (B) and paint with it over the area where the gradient covers the navigation bar circle (3). Set the opacity of this layer to 3% (4).


Now we will add a radial gradient at the bottom of the header background. Hold down the Command/Ctrl key and click on the thumbnail of the "header bg" layer to load a selection of it. Then go to Layer > New Fill Layer > Gradient and use the settings from the image below (1).
With the Gradient Fill window still opened, click on your image and drag down. Set the blend mode of this layer to Soft Light 40%.


Step 6: Adding subtle grunge brushes to the header background
Download this pack of brushes and open them in Photoshop. Create a new group and name it "brushes". Then create a selection of the "header bg" layer (hold down the Command/Ctrl key and click on its thumbnail). Make sure that the "brushes" layer is active and go to Layer > Layer Mask > Reveal Selection. Now everything we put inside this group will be visible only over the header area.
Create a new layer inside this group. Set the foreground color to white. Select the Brush Tool (B) and use some of the brushes you downloaded to add a subtle grunge effect to the header. Create a new layer for each brush you use and adjust the opacity of each layer. Then set the blend mode of the "brushes" group to Soft Light. Take a look at the following image for reference.


Step 7
Select the Line Tool (U), hold down the Shift key and create a horizontal line with the Weight 1px and the color #50565a. Name this layer "1px line" and put it at the bottom of the header area.
Duplicate this layer (Command/Ctrl + J), select the Move Tool (V) and hit the up arrow key on your keyboard to move it one pixel up. Change the color of this line to #8e9496.


Step 8: Creating the logo
To create the logo we will use both Adobe Photoshop and Illustrator. First, we will create the text and a circle with dashed stroke in Illustrator and then we will complete the logo using Photoshop.
Fire up Adobe Illustrator and create a new document. Select the Type Tool (T) and write "My Folio". Put each word in a separate object. The font that I used is called Akzidenz-Grotesk Condensed Medium Italic.


Select the two text objects using the Selection Tool (V) and go to Object > Expand. This will make the text layers editable so we can modify the anchor points.


Select the word "My" and move it down to connect the bottom area of the letter "Y" with the top area of the letter "F".


Use the Direct Selection Tool (A) to select the anchor points from the bottom of the "Y" letter, as you see in the image below. Then hit the Backspace key to delete them.


Use the Pen Tool (P) to reconstruct the bottom area of the letter "Y" and connect it to the "F" letter. Make sure that you close the path. Take a look at the following image for reference.


Now we need to create a circle with a white dashed stroke. Select the Ellipse Tool (L), hold down the Shift key and create a circle with no Fill and a 1pt white Stroke. Then go to the Stroke panel (Window > Stroke) and use the settings from the following image.
Change the color of the text to white. I added a grey rectangle underneath all objects in order to see the text and the circle.


Finishing the logo in Adobe Photoshop
Go back to Photoshop, create a new group and name it "Logo". Then select the Ellipse Tool (U) and create a circle with the dimensions 125px by 125px and the color #2e3134.
Name this layer "circle", double-click on it to open the Layer Style window and add a Pattern Overlay effect using the following settings. The leather pattern that I used is from the pack you downloaded at the beginning of this tutorial.


Copy the text objects from Illustrator, go back to Photoshop and paste them as a smart object. Use Free Transform (Command/Ctrl + T) to change the size of this layer and put it in the center of the dark circle. Add a Color Overlay effect to this layer using the color #f4f4f4.


Copy the dashed circle from Illustrator and paste it in Photoshop as smart object. Use Free Transform (Command/Ctrl + T) to change the size of this layer and put it in the middle of the dark circle. Name this layer "dashed circle" and set its opacity to 60%.


Duplicate the "dashed circle" layer (Command/Ctrl + J). Use Free Transform (Command/Ctrl + T) to change the size of this layer until it reaches the curved edge underneath the logo. Name this layer "bottom border".
Use the Rectangular Marquee Tool (M) to select the upper area of the circle as you see in the image below. Then go to Layer > Layer Mask > Hide Selection. This will leave a dotted curved line underneath the logo, just like we want.


Step 9: Adding the navigation
Create a new group and name it "Navigation". Select the Type Tool (T) and write the name for your navigation menu items using the font Oswald and the color white. Spread your navigation items equally in the left and right hand side of the logo.


Creating the style for the active menu item
Select the Rounded Rectangle Tool (U) and set the Radius to 4px. Then create a rounded rectangle underneath one of our navigation items with the height 32px and the color black.
Set the Fill of this layer to 25%, double-click on it to open the Layer Style window and use the settings from the following image.


Step 10: Creating the "Featured" area
Create a new group and name it "Featured". Select the Type Tool (T) and write the name of your project using the font Oswald with the size 22pt and the color white. Put this layer in the left hand side of the layout and at 50px underneath the navigation bar.


Select the Line Tool (U) and create a horizontal line with the width 300px. Set the Fill of this layer to 0% and the Opacity to 50%. Double-click on this layer and add the dotted line pattern that you created earlier in this tutorial.
Use the Type Tool (T) to add a block of text underneath the horizontal line. Use the font Helvetica with the color white and the size 13pt. Go to the Character panel (Window > Character) and set the leading (the distance between lines of type) to 24 pt to make the text more readable.


Creating a "Read More" button
Create a new group and name it "button". Select the Rectangle Tool (U) and set the Radius to 4px. Then create a rounded rectangle underneath the block of text with the size 110px by 30px and the color #9ca2a6. Name this layer "button".
Duplicate the "button" layer (Command/Ctrl + J) and move this new layer underneath the original one. Select the Move Tool (V) and hit the down arrow on your keyboard once to move this layer one pixel down. Set the opacity of this layer to 50%.
Duplicate the previous layer (Command/Ctrl + J) and change its color to #54585b. Move this layer one pixel down and set its opacity to 100%.
Now you should have three "button" layers. Double-click on the top one to open the Layer Style window and use the settings from the image below. The color that I used for the Stroke effect is #54585b.


Hold down the Command/Ctrl key and select the two "button" layers from the bottom. Right-click on one of them and select Convert to Smart Object.
Double-click on this layer to open the Layer Style window and use the settings from the following image for Gradient Overlay. This will add a subtle 3D effect to the button.


Hold down the Command/Ctrl + Shift keys and click on the thumbnail of the "button" smart object and then on the vector mask of the "button" layer. This will create a selection of the entire button. Create a new layer and fill the selection with white. Hit Command/Ctrl + D to deselect.
Right-click on this layer and select Convert to Smart Object. Then go to Filter > Noise > Add Noise and use the settings from the image below. Set the blend mode of this layer to Multiply 25%.


Now select the Type Tool (T) and write "Read More" on your button using the font Oswald with the size 15pt and the color white. Double-click on this layer to open the Layer Style window and use the settings from the following image for Drop Shadow.


Step 11: Adding an image slider
Create a new group and name it "image slider". Select the Rectangle Tool (U) and create a rectangle with the dimensions 620px by 300px. Name this layer "image_holder", double-click on it to open the Layer Style window and use and use the setting from the following image for Outer Glow.
Open an image in Photoshop that you want you feature in this area and move it into your web layout document using the Move Tool (V). Name this layer "image" and put it over the "image_holder" layer. Then right click on it and select Create Clipping Mask. Now your image will be visible only over the area of the "image_holder" layer.


Creating the image slider arrows
Select the Custom Shape Tool (U), right-click on your image and select one of the arrow shapes. Then create an arrow in the right hand side of your image slider using the color #e2e6e8.
Name this layer "right arrow", double-click on it to open the Layer Style window and use the settings from the following image. Right-click on this layer and select Convert to Smart Object. Then set its opacity to 40%.
Duplicate this layer (Command/Ctrl + J) and name the new one "left arrow". Then go to Edit > Transform > Flip Horizontal. Move this arrow in the left hand side of the web layout. Take a look at the following image for reference.


Creating the navigation bullets for the image slider
Create a new group and name it "navigation bullets". Select the Ellipse Tool (U), hold down the Shift key and create a circle with the dimensions 10px by 10px and the color #4d5357. Name this layer "navigation bullet".
Duplicate this layer (Command/Ctrl + J) a few times and arrange them as you see in the image below.
Select the Ellipse Tool (U) again and create a smaller circle in the middle of a navigation bullet to indicate the active image. For this circle use the color #9ca2a4.


Step 12: Creating "Services" area
Create a new group and name it "Services". Select the Rectangle Tool (U) and create a rectangle with the height 450px and the color #fafafa.
Name this layer "services bg", right-click on it and select Convert to Smart Object. Then go to Go to Filter > Noise > Add Noise and use the settings from the following image.
Double-click on this layer to open the Layer Style window and use the settings from the following image for Inner Shadow and Outer Glow.


Select the Line Tool (U) and drag a horizontal line at the bottom of the "services" area using the color #d2d2d2. Name this layer "1px line".
Duplicate this layer (Command/Ctrl + J) and change the color of the new line to white. Then move this layer 1px up.


Step 13: Adding the content for the "Services" area
Select the Type Tool (T) and write the word "Services" with the size 38pt and the color #5b656a. Put this layer in the left hand area of the web layout and at 40px underneath the "featured" area.


Create a new group and name it "web design". Create another group inside this one and name it "spotlights". We will design a 3D-looking room with some spotlights over an image.
Select the Rectangle Tool (U) and create a rectangle with the dimensions 300px by 100px and the color #3b444a. Name this layer "border", right-click on it and select Convert to Smart Object.
Go to Go to Filter > Noise > Add Noise and use the settings from the image below. Then double-click on this layer to open the Layer Style window and use the settings from the following image for Gradient Overlay.


Now I will show you how to create the 3D-looking room. First, select the Rectangle Tool (U) and create a gray rectangle with the dimensions 286px by 86px and put it in the center of the "border" rectangle. This is a temporary layer that will help us create the walls.


Select the Rectangle Tool (U) and create a rectangle with the height 22px and the color #434f57. Make sure this layer does not go over the gray rectangle. Name this layer "floor", double-click on it to open the Layer Style window and use the settings from the following image.


Create a new rectangle with the dimensions 240px by 64px and the color #3b4851. Name this layer "front wall" and position it as you see in the image below. Ten add a Gradient Overlay effect to this layer.


Using the Direct Selection Tool (A), select the upper right hand corner of the "floor" layer and move it to the left. Then select the upper left hand corner and move it to the right. Take a look at the following image for reference.


Create a rectangle in the left hand side of the 3D room with the color #39444b. Use the Direct Selection Tool (A) to reposition the bottom right hand corner of this rectangle, as you see in the image below. Double-click on this layer to open the Layer Style window and use the settings from the following image.
Duplicate this layer (Command/Ctrl + J) and move it to the right. Then change the angle of the Gradient Overlay to 0.


Create a new rectangle at the top of the 3D room using the color #505e67. Name this layer "ceiling" and use the Direct Selection Tool (A) to adjust the bottom corners like you did for the "floor" layer. Double-click on this layer to open the Layer Style window and use the settings from the following image.


Now you can delete the gray rectangle you added at the beginning of this step. Below you can see how my "3d room" group looks like.

Right-click on the "3d room" group and select Convert to Smart Object. Then go to Go to Filter > Noise > Add Noise and use the settings from the following image.
Double-click on this layer to open the Layer Style window and use the settings from the image below.


Step 14: Creating the spotlights
Create a new group and name it "top lights". Then select the Ellipse Tool (U) and create a white circle, as you see in the image below. Right-click on this layer and select Convert to Smart Object. Then go to Filter > Blur > Radial Blur and use the settings from the image below. Name this layer "light 1".
Create a new circle, bigger than the previous one. Name this layer "light 2" and convert it to smart object. Then apply a Radial Blur Filter with the same settings.
Repeat the process one more time with a bigger circle. Name this layer "light 3". Take a look at the following image for reference.
Group the three "light" layers together and set the opacity of each one as follows:
- "light 1" - 70%
- "light 2" - 50%
- "light 3" - Soft Light 40%
Duplicate the group two times and arrange your spotlights as you see in the image below.
Hold down the Command/Ctrl + Shift keys and click on the thumbnail of each "light" layer to select them. Then go to Layer > New Adjustment Layer > Hue & Saturation and use the settings from the following image. This will add a subtle blue color to the lights.
Some of the lights might go over the border of the 3D room. To correct this, hold down the Command/Ctrl key and click on the thumbnail of the "3d room" layer. Then click on the "top lights" group to make it active and go to Layer > Layer Mask > Reveal Selection.


Create a new group and name it "floor lights". Then use the Ellipse Tool (U) to create three ellipses as you see in the image below. Convert each layer to a smart object. Then add a Gaussian Blur filter and a Noise filter to each layer. Set the opacity of these layers to 40%.
Then you can add an image in the middle of the 3d room that represents the design service you added. I used the Webdesign Tuts+ logo.


Step 15
Select the Rectangle Tool (U) and create a white rectangle with the dimensions 300px by 210px underneath the spotlights area. Name this layer "content bg", double-click on it to open the Layer Style window and use the settings from the following image for Outer Glow.


Select the Pen Tool (P) and create a triangle shape using the color #d1d6da, as you see in the image below. You can activate the guides to help you create this shape.
Name this layer "top triangle", double-click on it to open the Layer Style window and use the settings from the following image. The color that I used for the Stroke effect is #c5cace.


Select the Type Tool (T) and add the content for this service box. For the headline use the font Oswald with the size 20pt and the color #747d82.
For the block of text use the font Helvetica Regular with the size 13pt and the color #5f6c74. Also, set the leading of this text layer to 24pt from the Character panel.
Create a new black dotted line pattern just like you created the white one at the beginning of this tutorial. Then use the Line Tool (U) to drag a horizontal line between the headline and the block of text. Set the Fill of this layer to 0% and apply the pattern you created.
Copy the "Read more" button from the "featured" area (right-click on its group and select Duplicate Group). Then move the new button underneath the block of text from the "services" area. Take a look at the following image for reference.


Step 16
Duplicate the "web design" group two times and arrange the new columns as you see in the image below. Then replace the headlines and the images that are under the spotlights.


Step 17: Creating the "Portfolio" area
Create a new group underneath the "Services" group and name it "Portfolio". Then select the Rectangle Tool (U) and create a rectangle with the height 590px and the color #f1f1f1 underneath the "services" area.
Name this layer "portfolio bg", right-click on it and select Convert to Smart Object. Go to Filter > Noise > Add Noise and use the settings from the following image. Then double-click on this layer to open the Layer Style window and apply one of the fabric textures you downloaded.


Select the Type Tool (T) and write "Portfolio" in the upper left corner of this area. I used the font Oswald with the size 38pt and the color #5b656a.


Step 18: Adding the portfolio items
Create a new group and name it "images". Then select the Rectangle Tool (U) and create a rectangle with the dimensions 180px by 140px. Name this layer "image_holder".
Duplicate this layer (Command/Ctrl + J) and move the new rectangle to the right at 10px distance from the first one. Continue to duplicate this layer until you create a grid like you see in the image below.


Open some images that you want to showcase in the "portfolio" area. Drag each image over one "image_holder" layer, right-click on the layers of the images and select Create Clipping Mask. This will put an image inside each rectangle.
In the image below there are two columns where I did not add any images. We will use that area to add a detailed portfolio item.


Step 19: Adding a detailed portfolio item
Create a new group and name it "active project". Select the Rectangle Tool (U) and create a rectangle over the two columns that have no images using the color #595e61.
Select the Rectangle Tool again and create an image holder with the dimensions 330px by 160px. Open an image that you want to display in this area and put it over the "image_holder" layer. Right-click on the "image" layer and select Create Clipping Mask.
Select the Type Tool (T) and add some content to this area. For the headline use the font Oswald with the size 22pt and the color white. For the block of text use the font Helvetica Regular with the size 13pt and the color #fafafa.


Duplicate one of the previous "Read more" buttons and put it underneath the block of text from the "active project" area.
Create a new group and name it "close button". Select the Rectangle Tool (U), hold down the Shift key and create a square with the dimensions 20px by 20px and the color #484c4f. Put this rectangle in the upper right corner of the "active project" area.
Select the Line Tool (U) and create two diagonal lines to form an "X" shape. Hold down the Shift key to drag a line at 45°.


Step 20: Creating the "Blog" area
Create a new group and name it "blog". Select the Rectangle Tool (U) and create a rectangle with the height 340px underneath the "portfolio" area using the color #fafafa.
Right-click on this layer and select Convert to Smart Object. Go to Filter > Noise > Add Noise and use the settings from the image below.
Select the Line Tool (U) and create a horizontal line at the top of this rectangle using the color #d2d2d2. Duplicate this layer (Command/Ctrl + J) and move the new line one pixel down. Change the color of this line to white.


Step 21: Adding blog posts
Select the Type Tool (T) and write "Blog" in the upper left corner of this area using the font Oswald with the size 38pt and the color #5b656a.
Create a new group and name it "post #1". Select the Rectangle Tool (U) and create an image holder with the dimensions 180px by 140px. Open an image that you want to display in this area and drag it over the "image_holder" layer. Right-click on the "image" layer and select Create Clipping Mask to make it visible only over the area of the "image_holder" layer.
Select the Type Tool (T) and add some content next to the image. For the headline use the font Oswald with the size 22pt and the color #747d82. For the block of text use the font Helvetica Regular with the size 13pt and the color #5f6c74. Also, set the leading of this paragraph to 24pt. Then add a "Read more" button underneath the block of text.
Duplicate the "post #1" group and move the new one to the right. Then you can change the image and content for this new blog post.


Step 22: Creating the "Footer" area
Create a new group and name it "footer". Duplicate the "header bg" layer (Command/Ctrl + J) from the "Header" group and move it at the bottom of the layout, underneath the "Blog" area. Name this layer "footer bg".


Hold down the Command/Ctrl key and click on the thumbnail of the "footer bg" layer to select it. Then go to Layer > New Fill Layer > Gradient and use the settings from the image below. While the Gradient Fill window is still opened, click on your image and move the gradient up, as you see in the following image.
Set the blend mode of this layer to Soft Light 40%.


Select the Line Tool (U) and create a horizontal line at the top of your "Footer" area using the color #50565a. Name this layer "1px line".
Duplicate this layer (Command/Ctrl + J) and move it one pixel down. Then change the color of this line to #8e9496.


Step 23: Creating the "About" area
Now we will split the footer into three columns: "About", "Twitter" and "Contact".
Create a new group and name it "about". Select the Type Tool (T) and write "About me" at the top of the first column. Leave a distance of 40px between the top edge of the "footer" area and this text layer.
Select the Line Tool (U) and create a horizontal line underneath the headline. Set the Fill of this layer to 0% and the opacity to 50%. Then apply to this layer the white dotted line pattern that you created in this tutorial.
Use the Type Tool (T) to add a block of text underneath the dotted line using the font Helvetica Regular and the color #fafafa. Set the leading of this paragraph to 24pt from the Character panel. Then add a "Read more" button underneath the block of text.


Step 24: Creating the "Follow me" area
Create a new group and name it "follow me". Then add a headline and a couple of tweets in this area. Use the same dotted line to separate the blocks of text.
Add a "Read more" button underneath the tweets. Select the Type Tool (T) and change the text into "Follow me".
Download this set of Twitter birds and move a couple of them into your web layout document, underneath the "follow me" area. Add a Drop Shadow effect to these bird layers using the settings from the image below.


Step 25: Creating the "Contact" area
Create a new group and name it "Contact". Then add a headline to this area and a dotted line underneath it.
Use the Rectangle Tool (U) to create the contact form, as you see in the following image. Fill each rectangle with the color #eff0f0. Then add an Inner Glow and a Stroke effect to each rectangle layer. The color that I used for the Stroke layer style is #4d5254.
Select the Type Tool (T) and write inside each rectangle what it represents (name, subject, email, message).
Add a "Read more" button button underneath the Contact Form and change the text to read "Send".


Step 26: Adding the "Copyright" area
Create a new group and name it "Copyright". Then select the Rectangle Tool (U) and create a black rectangle as you see in the image below. Name this layer "copyright bg" and set its the blend mode to Overlay 20%.


Select the Line Tool (U) and create a horizontal line at the top of the rectangle you created earlier. Set the Fill of this layer to 0% and the Opacity to 35%. Then apply the dotted line pattern that you created in this tutorial.
Select the Type Tool (T) and add a copyright statement in the middle of the dark rectangle. Use the font Helvetica Regular with the size 12pt and the color #b1b5b7.


Final Result
We're finished. Below you can see the final result of this tutorial. Click on the image to see the full-size version.
I hope you enjoyed this tutorial and you learned some new things for designing web interfaces. Leave any comments or questions you have in the comments section below.

 By
By


