
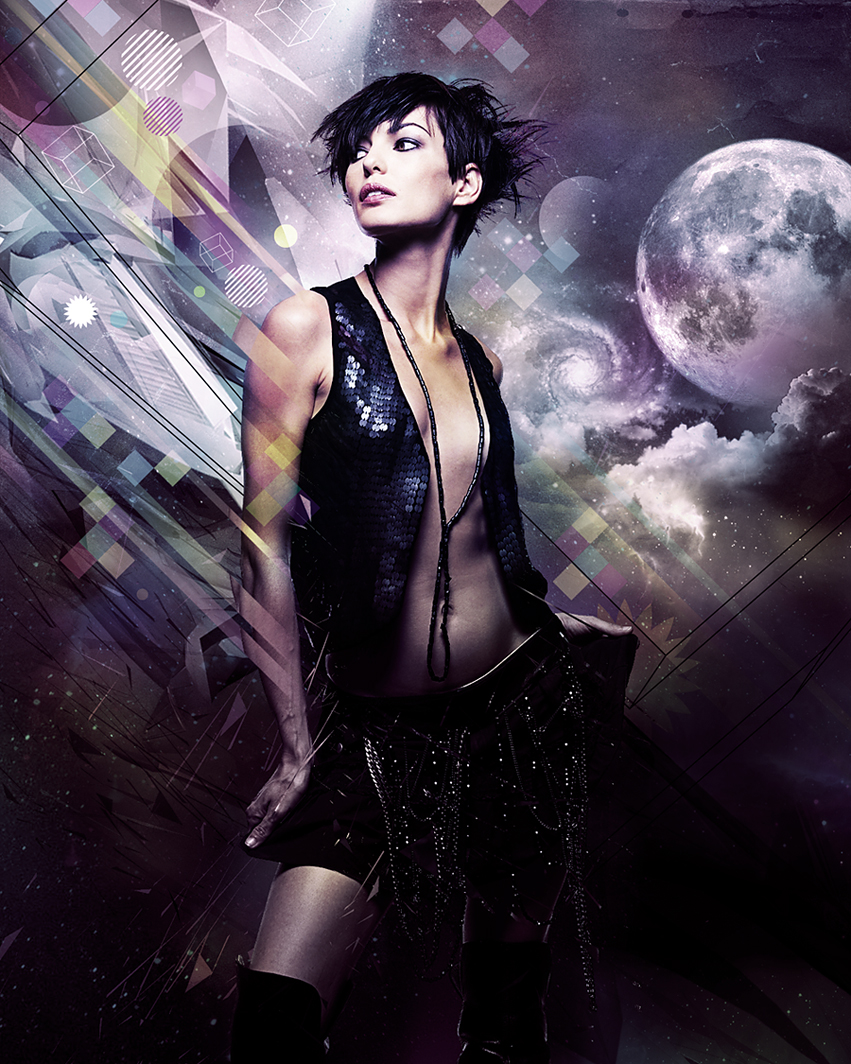
In this tutorial, I'll show you how to transform a fashion photograph into a unique, multi-layered Photoshop illustration. You'll be using 3D renders, custom space and cloud brushes, as well as throwing in some cool 3D vectors as Smart Objects for good measure.
Before we begin, I would like to thank Katanaz for allowing me to use the model image. She also has more great images over at her deviant stock account.
3D Objects
I‘ve supplied some abstract 3D renders in the "source" folder, but it's fairly simple to create your own shapes – and you don't need to be a 3D expert to get great results. I imported some existing models into Cinema 4D and dropped in some deformers to get the effects shown below in a matter of minutes.
Also, if you're using the Extended versions of Photoshop, you could even import your models as 3D layers.


Step 1
Start by opening the model image, we're now going to isolate the figure by creating a density mask. Duplicate the Blue channel (which holds the most contrast) by dragging its thumbnail into the Create new channel icon.
Now increase the contrast of the channel by pressing Command + L to access the Levels and set the Input Level midpoint to 0.43 and the whitepoint to 224.


Step 2
By using a moderate Levels adjustment, we've retained the models' hair detail. Now select the Burn Tool (0) set to Midtone Range and 100% Exposure to darken the outer edge of the figure, avoiding the hair.


Step 3
Select the Brush Tool (B) and fill in the figure using a hard-edged black brush.


Step 4
By default it's the white areas which act as channel selections, so hit Command + I to Invert the channel. Command-click the channel thumbnail to generate a selection, then target the top RGB composite channel and switch to your layers palette.


Step 5
With the selection still active press Command + J to float a new layer and name it "Model normal." Now load the "Fashion_swatches.aco" swatches from the "source" folder. Select "Solid black" as your foreground color, target your "Background" layer, then hit Option + Delete to fill the canvas.
You'll now notice a slight halo around the model – this is because when it was copied as a new layer some of the white surrounding pixels were included. Fix this by targeting the layer and choosing Layer > Matting > Remove White Matt, then repeat selecting Defringe and entering a value of 3px.


Step 6
Unlock the "Background" layer by double-clicking its thumbnail and renaming it "Solid." Open "Black_paper.jpg" from the "source" folder and Shift-drag its layer thumbnail as a new layer above the "Solid." Label it "Paper" and set its Opacity to 80%. As both files share the exact pixel dimensions, Shift-dragging pin registers the new layer to the canvas.
Next, hold Option while choosing Levels from the drop-down. Create a new fill or adjustment layer by clicking the icon at the foot of the palette. In the next window check Use Previous Layer to Create a Clipping Mask. Now set the Input Level midpoint to 0.56 and the whitepoint to 201. Finally, add the "Solid" and the "Paper" layers into a new group folder labelled "BACKGROUND."


Step 7
Open the "Metal_plate.jpg" image from the "source" folder and Shift-drag a new layer at the top within the folder. Name it "Grunge," then set the Blending Mode to Overlay and drop the Opacity to 80%.


Step 8
Let's add some more texture by Shift-dragging "Cover.jpg" from the "source" folder as a new layer. Name it "Book 1," then set the Blending Mode to Soft Light. Add a layer mask, then hit D on your keyboard to reset the default black and white foreground/background colors. Now Shift-drag a Foreground to Background Linear Gradient (G) from the bottom of the canvas.
Intensify the texture by duplicating the layer, then dropping the Opacity to 30% and naming the layer "Book 2."


Step 9
Switch to your channels, then open "Creases.jpg" from the "source" folder, Select All (Command + A), and Copy to the clipboard. Back in your working file switch to your channels palette and add a new channel by clicking on the Create new channel icon at the foot of the palette. Now Paste and position as shown using the Move Tool (V).


Step 10
Generate a selection from the white channel areas by Command-clicking its thumbnail, then target the RGB composite channel. Switch to your layers palette, add a new layer above "Book 2," label it "Creases," and set the Blending Mode to Hard Light.
Now set your foreground color to the "Blue grey" swatch and hit Option + Delete to fill the active selection.


Step 11
Add another layer within the folder and name it "Circle grad," then select "Bright blue" as your foreground and "Bright pink" as your background colors. Now Shift-drag a Radial Gradient from the center of the canvas, drop the layers' Opacity to 80% and change the Blending Mode to Multiply.


Step 12
Reset your foreground/background colors to default. Add a new layer and label it "Bottom grad," then Shift-drag a Foreground to Transparent Linear Gradient from the bottom of the canvas. You can now drop the layers' Opacity to 85% and set the Blending Mode to Multiply.


Step 13
Place the "Model normal" layer within a new folder labelled "MODEL." Now duplicate the layer and set the Blending Mode to Overlay. Duplicate that layer and set the Blending mode to Soft Light – remember to label your new layers accordingly.


Step 14
Now sharpen the girl by duplicating the "Model soft light" layer and naming it "Model high pass." Choose Filter > Other > High Pass and enter a Radius of 3.7 px. You can now adjust the level of sharpening in two ways; by lowering the layer opacity, or by using a Soft Light or Hard Light Blending Mode to either increase or decrease the sharpening – I left the Blending Mode as Soft Light.


Step 15
Set your foreground to "Bright pink" and background to "Bright blue." Create a new layer by selecting Gradient from the drop-down. Click the create new fill or adjustment layer icon, then in the next window click the arrow next to the Gradient to select the Foreground to Background preset. Now use the following settings: Style of Linear, Angle at 90 degrees, and Scale of 100%.
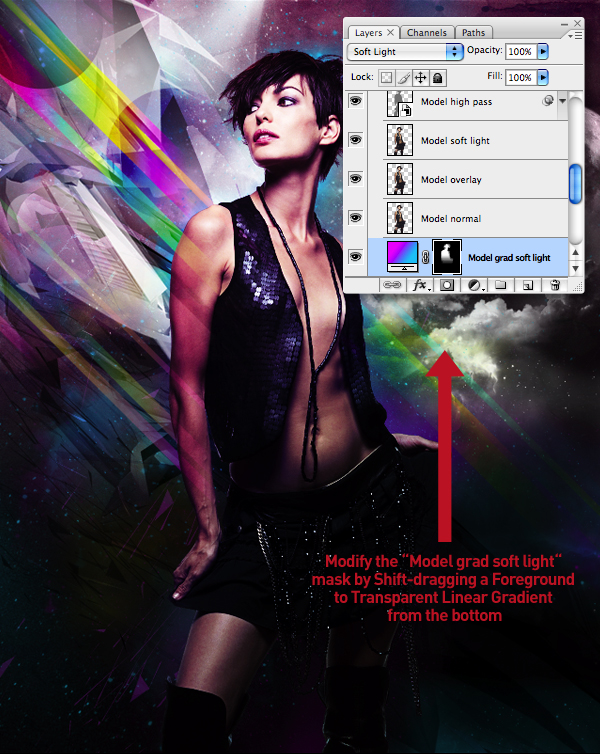
Position the layer at the bottom within the "MODEL" folder, set the Blending Mode to Soft Light and rename it "Model grad soft light." Finally, drop the Opacity of the original "Model normal" layer down to 53%.


Step 16
Command-click the "Blue copy" channel thumbnail to generate a selection, then go Select > Modify > Expand by 12 px. Now ensure the "Model grad soft light" layer is targeted and go Layer > Layer Mask Reveal Selection.


Step 17
Target the layer mask and go Filter > Blur > Gaussian Blur and enter a Radius of 8.6 px.


Step 18
Add another Gradient Fill at the top of the stack within the "MODEL" folder using the same preset as Step 15, but setting the Angle to -33.69 degrees and the Scale to 69%. Now set the layers' Blending Mode to Color, the Opacity to 22%, and name it "Model grad color."


Step 19
Generate a selection from the "Blue copy" channel again, ensure the "Model grad color" layer is targeted and go Layer > Layer Mask > Reveal Selection.


Step 20
Now to add some motion effects; duplicate the original "Model normal" layer, position at the top within the folder and rename it "Model motion blur." Rotate the layer content 45 degrees clockwise, then use the Single Row Marquee Tool to create a horizontal selection across the canvas, just below the models' naval.
Now hit Command + T to Transform and stretch upwards well beyond the height of your canvas. Finally, deselect, then rotate the layer 45 degrees anti-clockwise.


Step 21
Move the layer content so it snaps back to its original position. Now set the Blending Mode to Soft Light and lower the Opacity to 70%. Add a layer mask, ensure you have the default foreground/background colors set, then Shift-drag a 45 degree Foreground to Background Linear Gradient on the mask as shown.


Step 22
Revisit your "BACKGROUND" folder, add a new layer at the top and name it "Bottom grad." Shift-drag a short, vertical Linear Gradient using the Foreground to Transparent preset, then set the Blending Mode to Multiply and drop the Opacity to 85%.
Next, add a mask to the "Creases" layer and use a small, soft-edged, black brush to erase behind the model.


Step 23
Load the space and cloud brushes, then add a new folder beneath the "MODEL" folder and label it "SKY EFFECTS."
Add a layer within the new folder and label it "White 1," set your foreground color to white and use the brushes as shown – remembering to flip and rotate them as you work to avoid repetition. You can build up the cloud effects on another layer – this also keeps things flexible, as you can erase areas if you overdo it.


Step 24
Continue to paint on additional layers, but this time using the "Bright blue," "Bright yellow," and "Bright pink" swatches. Keep them all on individual layers and experiment with different layer opacities to suit. Also, feel free to add more white layers as required.


Step 25
Drag/drop "Planet.psd" from the "source" folder in above the cloud layers, then set the Blending Mode to Linear Light. Add a mask, then a 45 degree Linear Gradient as shown.
Next, clip a Hue/Saturation adjustment layer, checking the Colorize option and using these settings: Hue of 256, Saturation at 0, and Lightness of +29.


Step 26
Generate a selection from the "Blue copy" channel again, target the "SKY EFFECTS" folder and go Layer > Layer Mask > Reveal Selection.


Step 27
Add a new folder below the "MODEL" and name it "SHATTER EFFECTS." Shift-drag "Shatter_1.psd" from the "source" folder as a new layer and set its Blending Mode to Screen.
As I mentioned at the start of the tutorial, feel free to experiment with importing your own 3D renders, or even using 3D layers if using Photoshop Extended.
Now clip a Hue/Saturation adjustment layer to it, check Colorize and use these settings: Hue of 295, Saturation of 58, and Lightness at -42. Next, set the Blending Mode of the adjustment layer to Hard Light.


Step 28
Now drop in "Shatter_2.psd" and "Shatter_3.psd," but change their Blending Modes to Multiply.


Step 29
Mask the folder with a selection from "Blue copy" channel as previous, then paint out any stray shapes on the mask as required.


Step 30
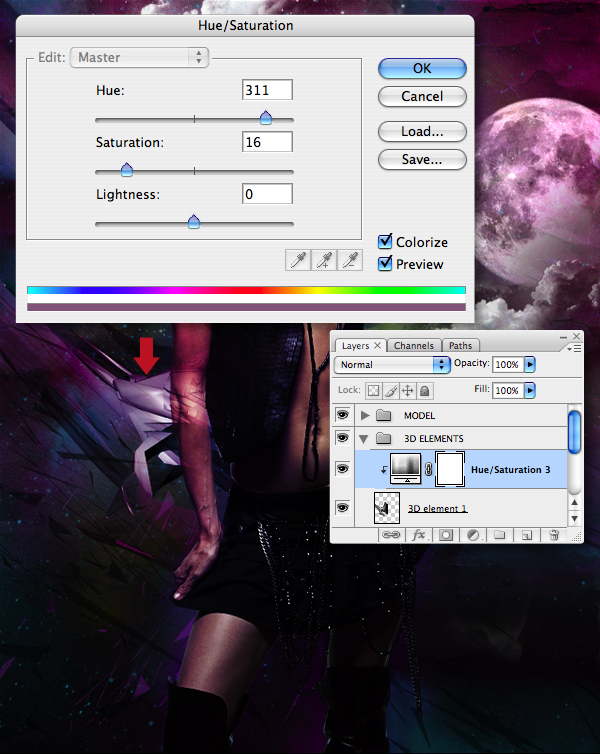
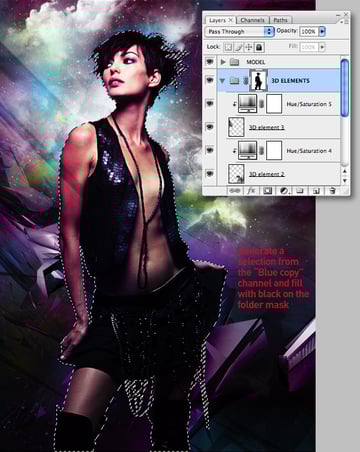
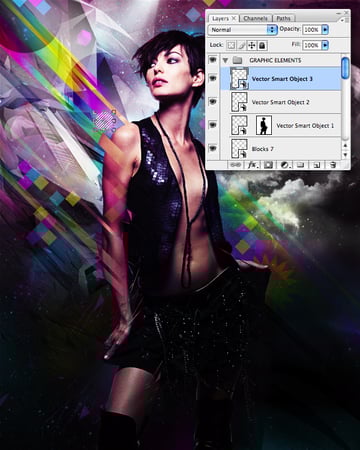
Add a new folder below the "MODEL" and label it "3D ELEMENTS." Drag/drop "3D_1.psd" from the "source" folder into the folder and Transform/position as shown, then set the Blending Mode to Hard Light. Again you can experiment using your own 3D renders or 3D layers.
Next, clip a Hue/Saturation adjustment layer to it, checking Colorize and using these settings: Hue at 311, Saturation at 16, and Lightness at 0.
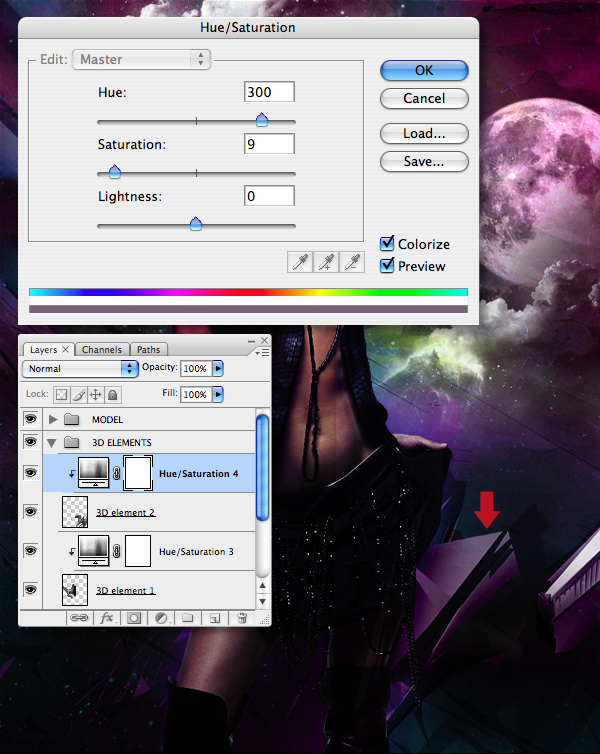
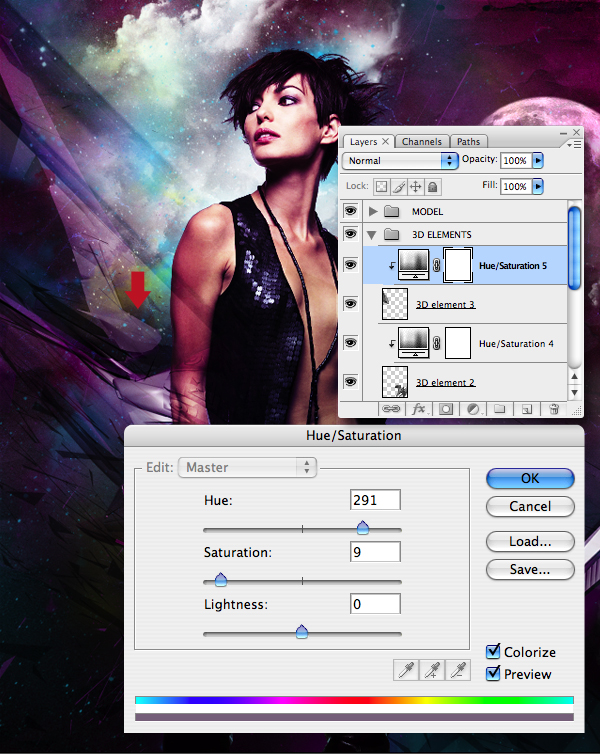
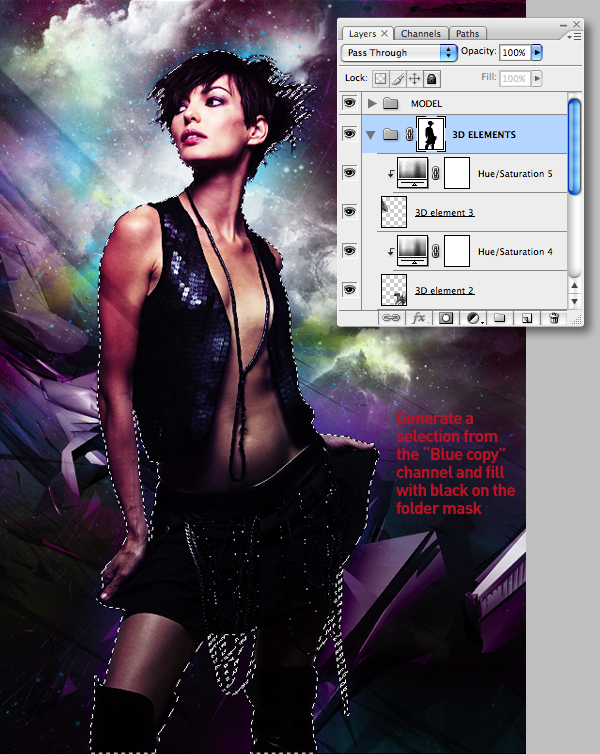
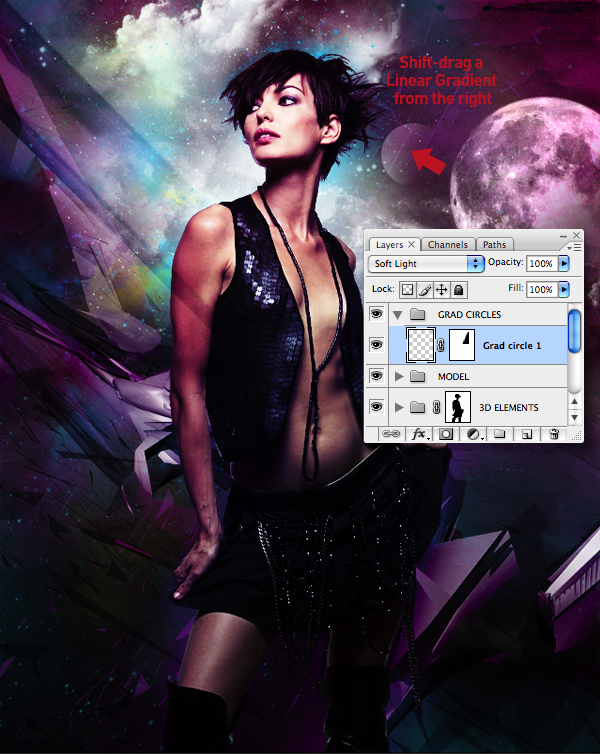
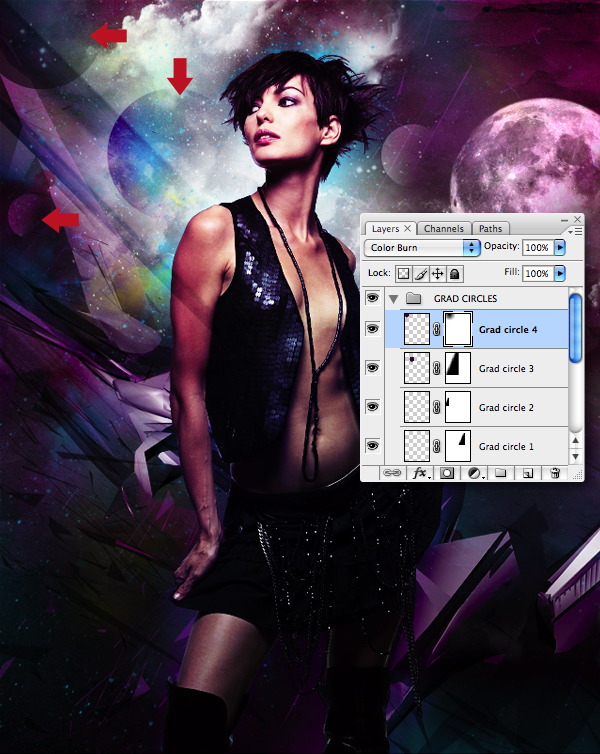
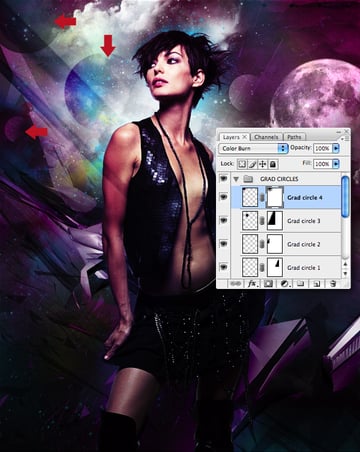
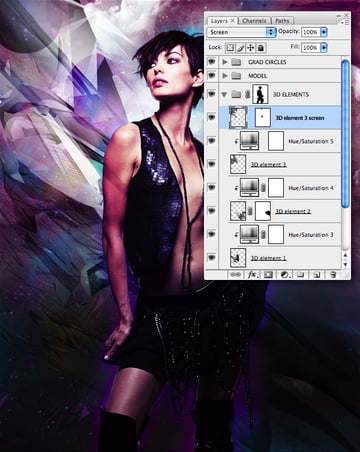
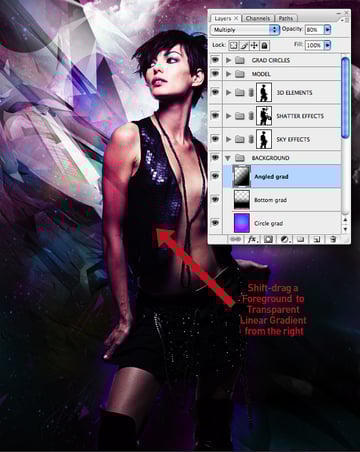
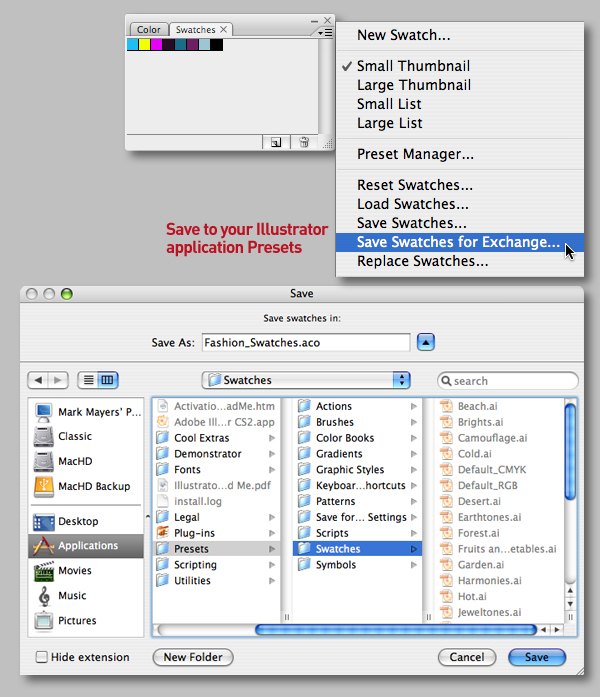
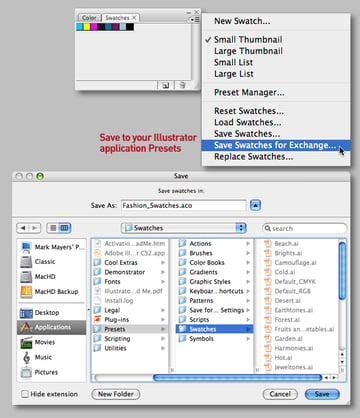
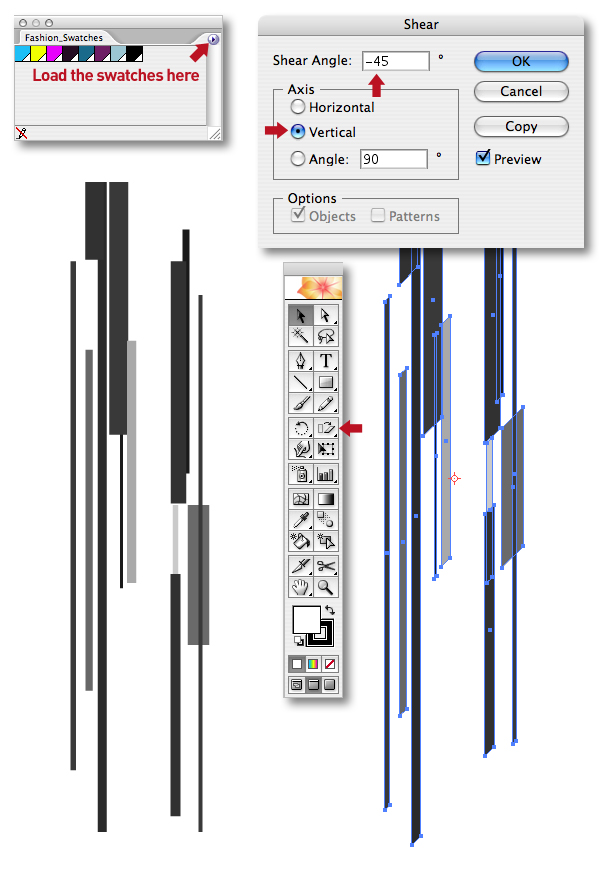
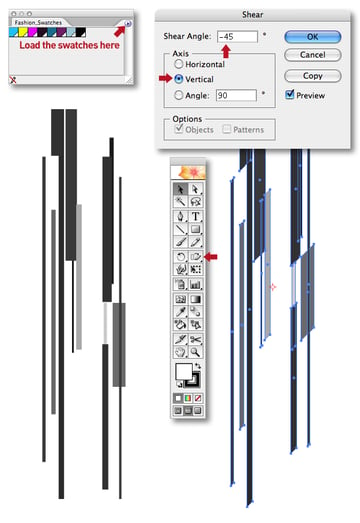
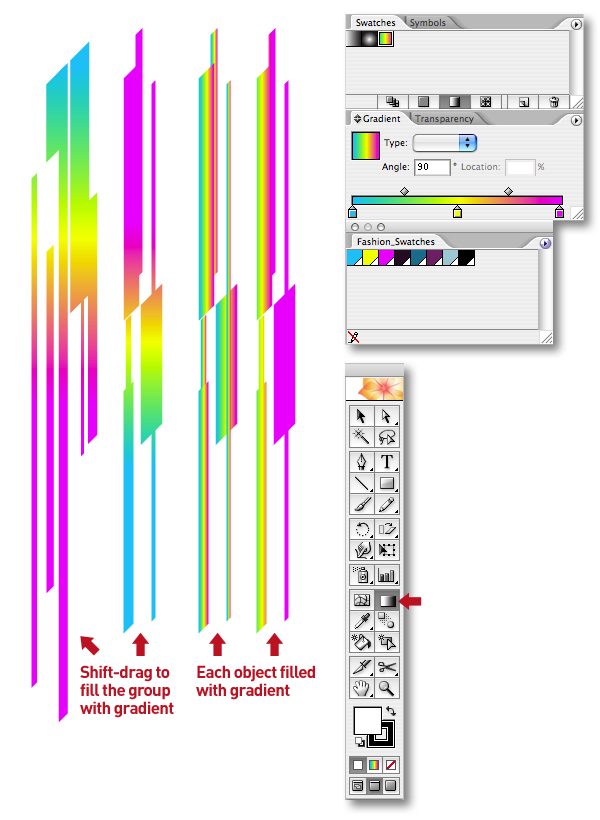
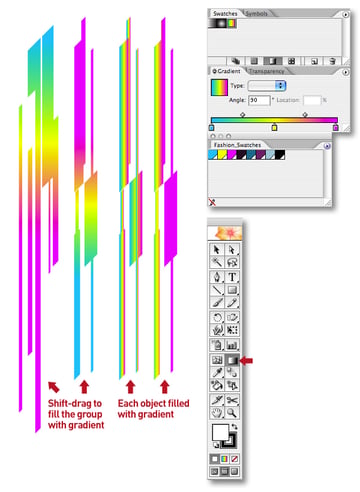
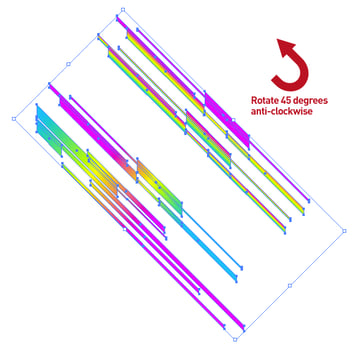
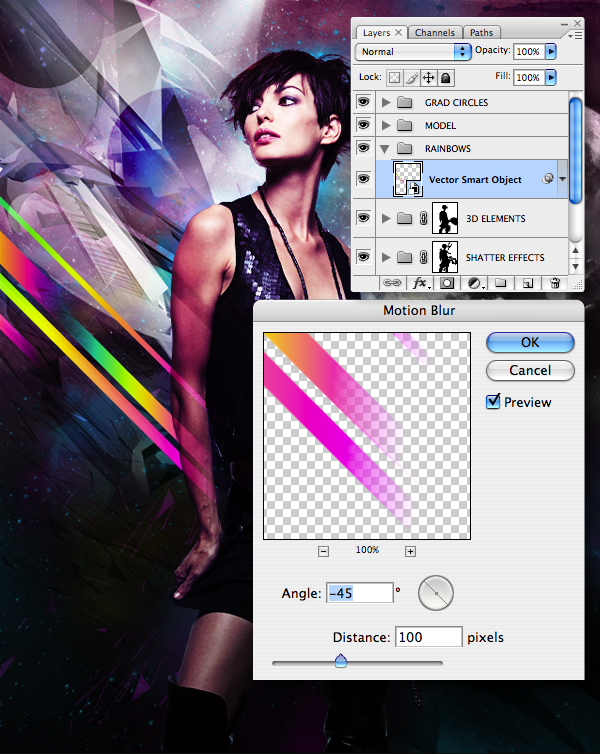
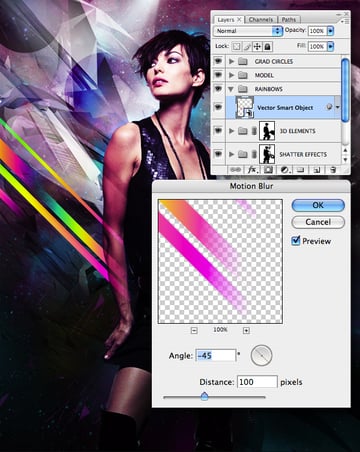
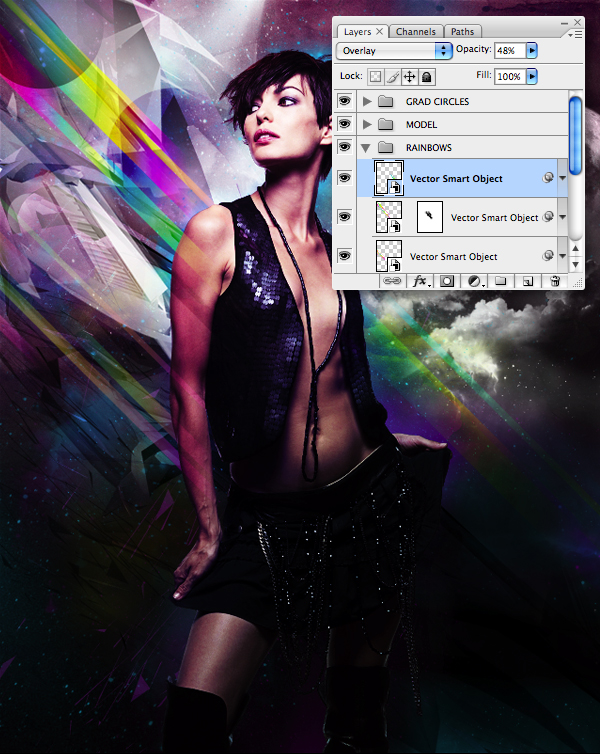
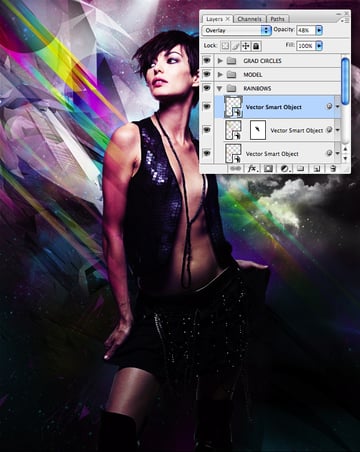
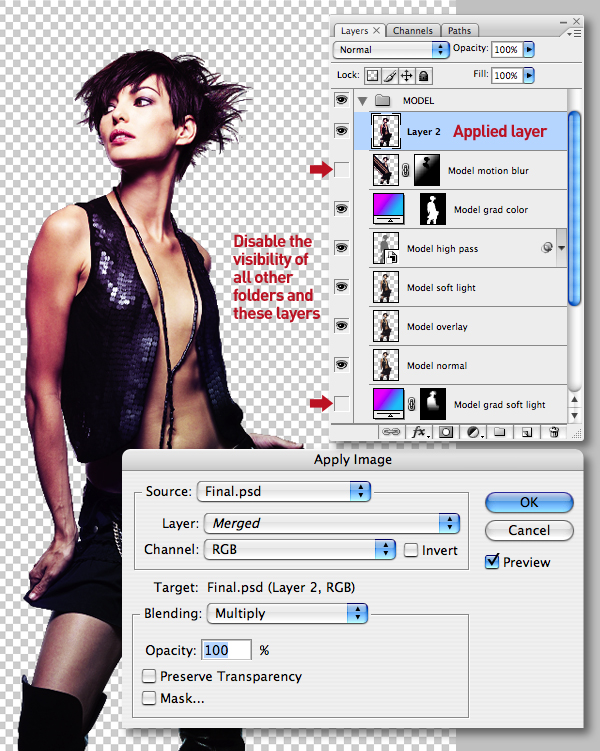
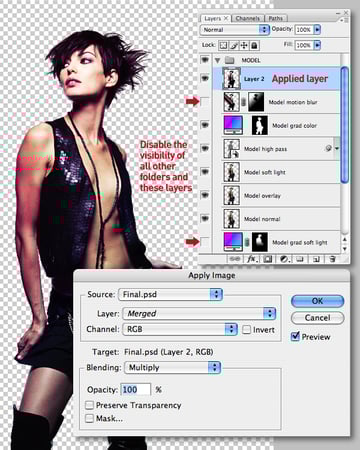
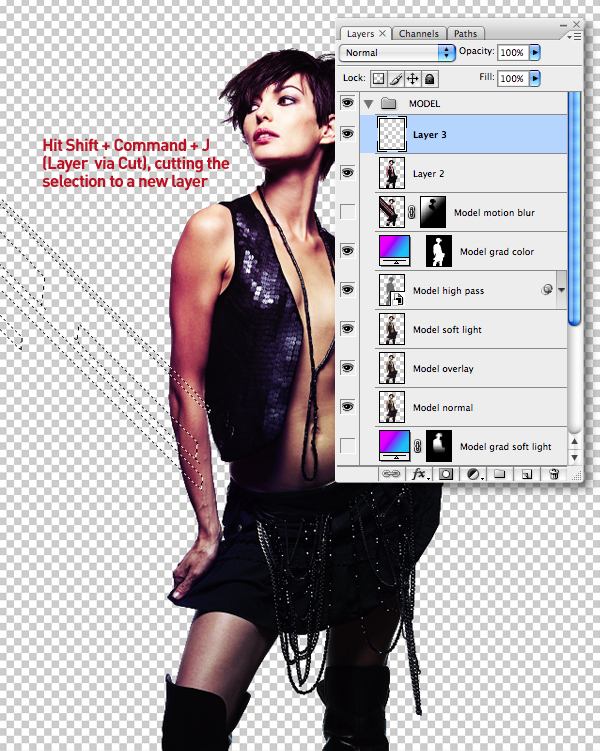
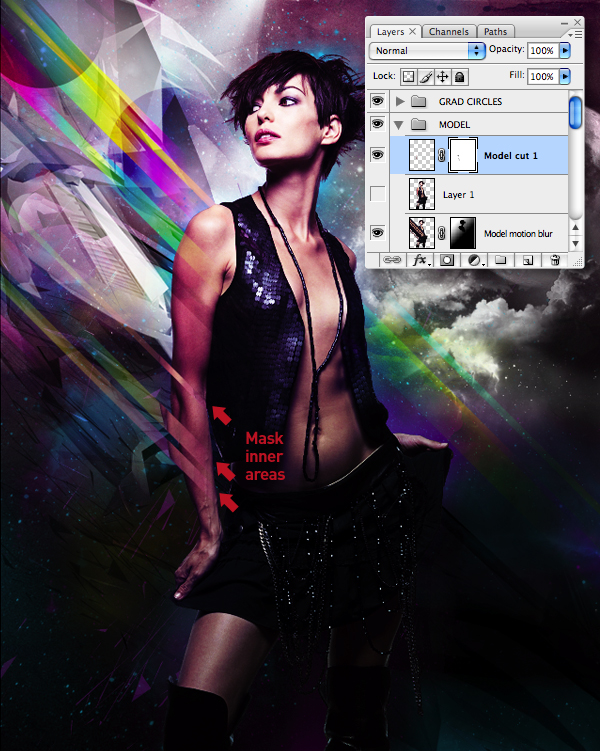
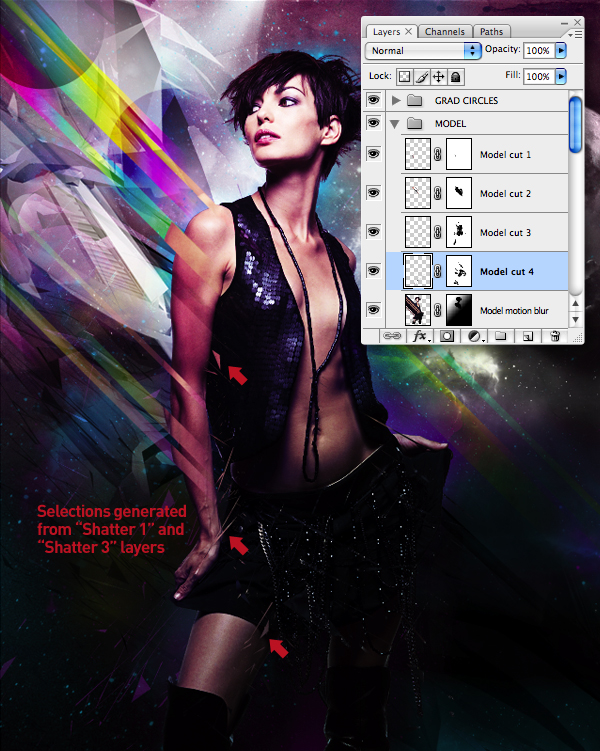
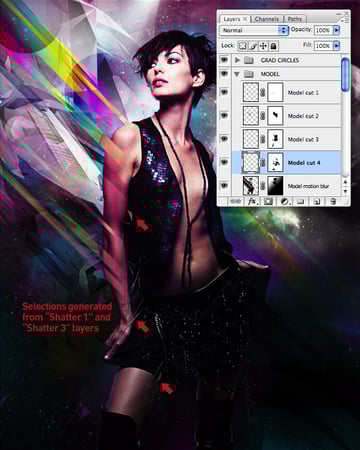
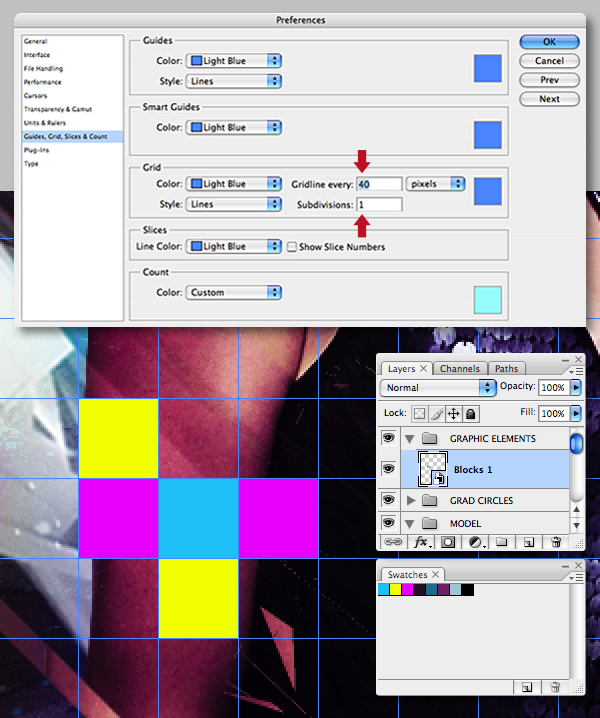
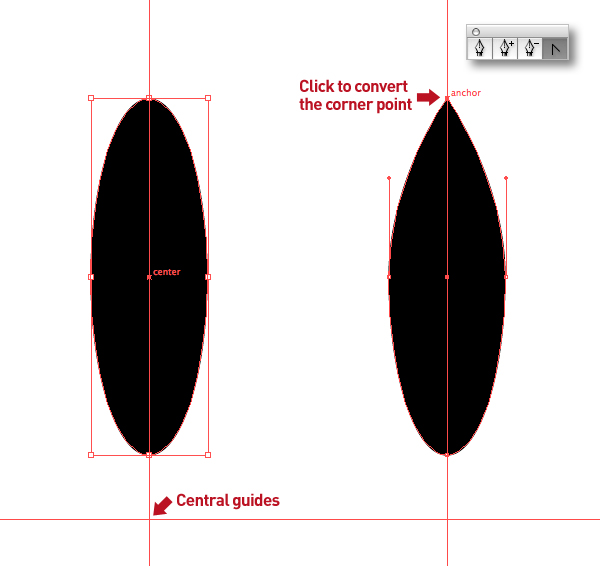
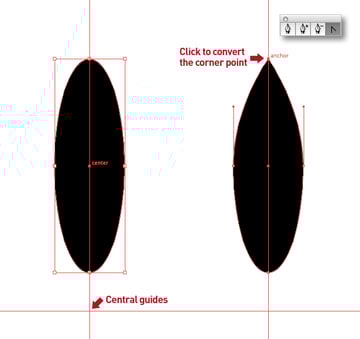
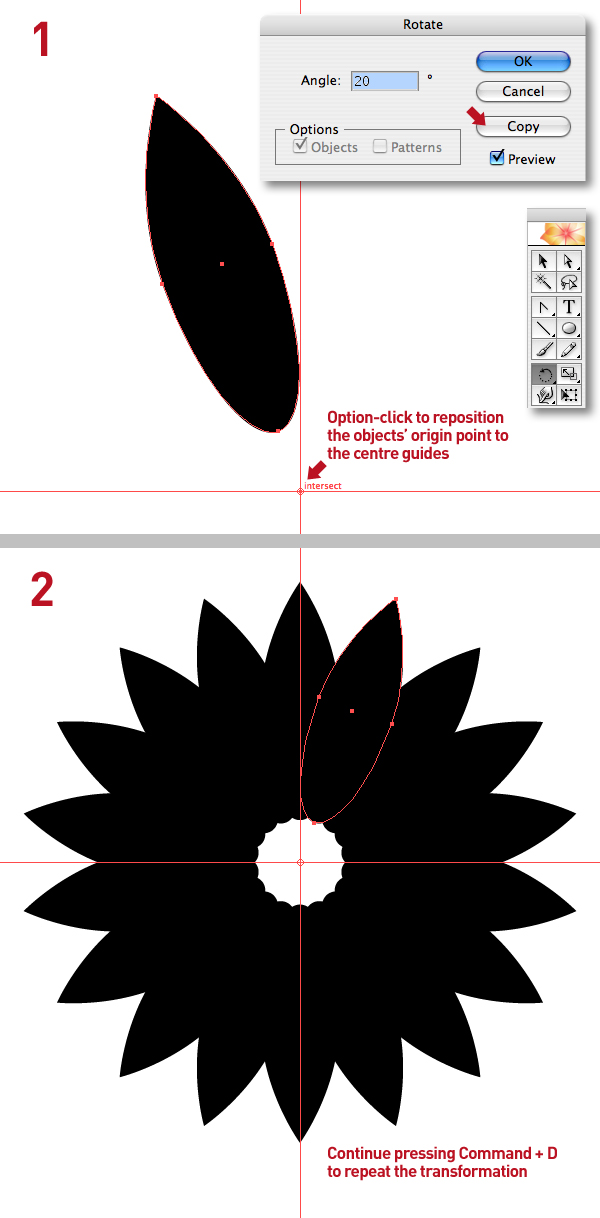
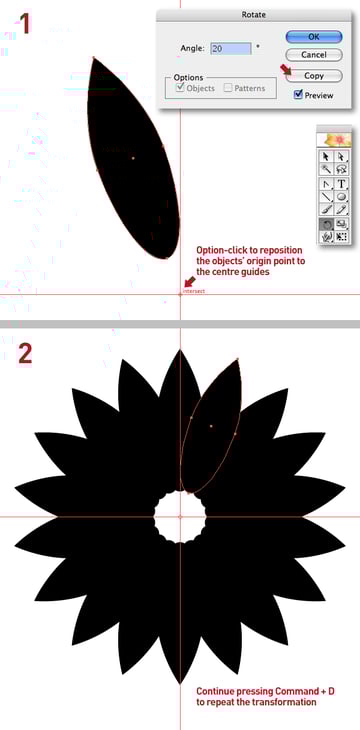
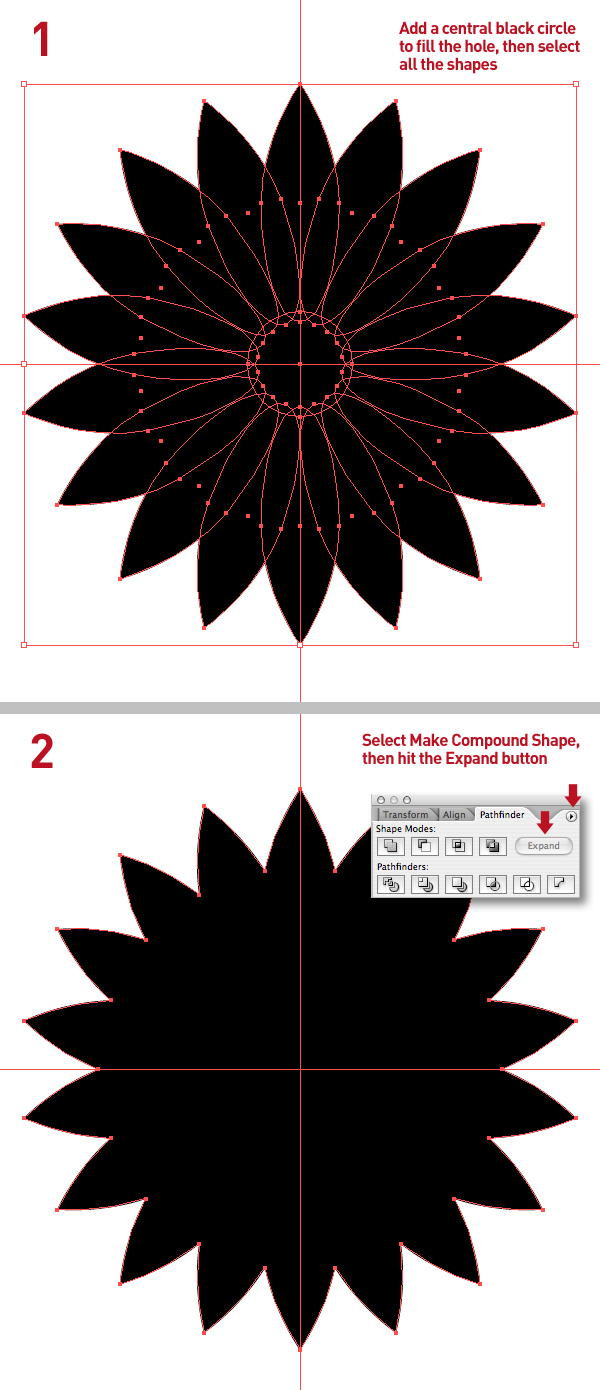
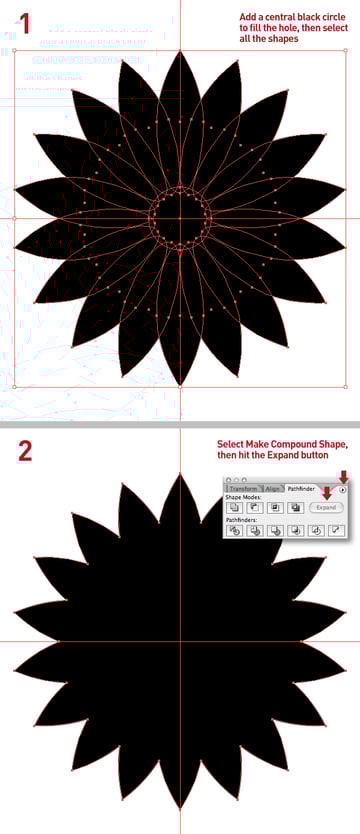
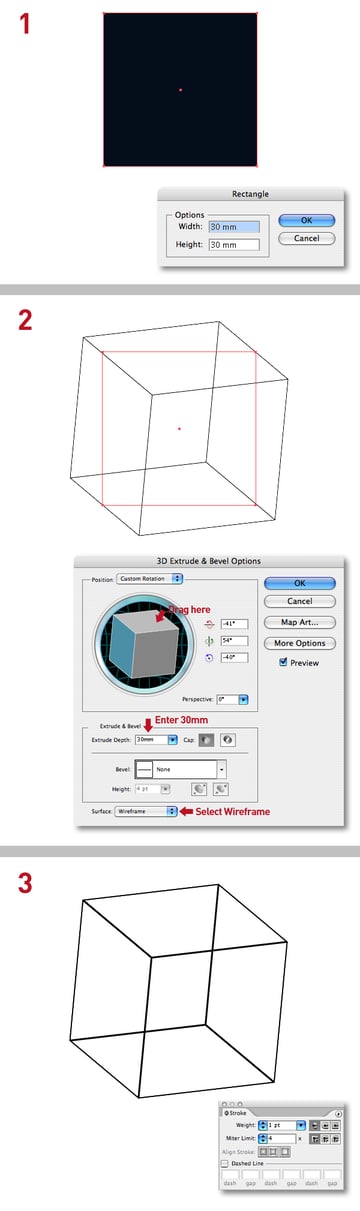
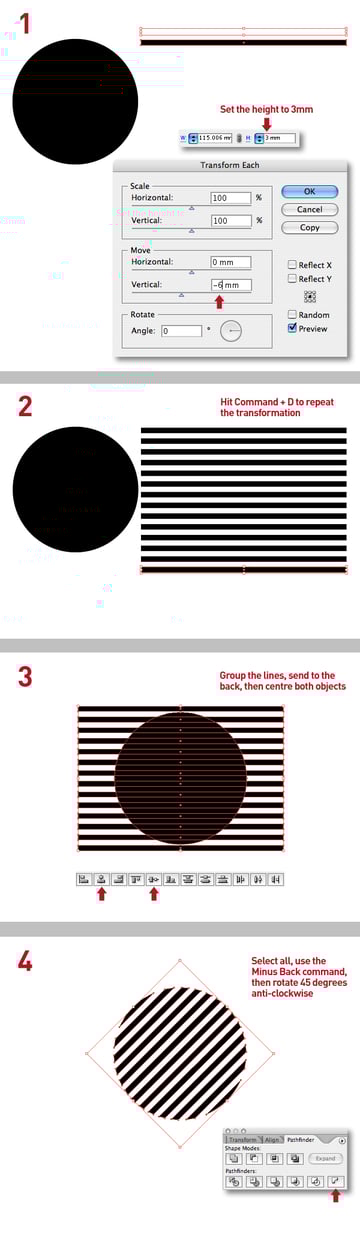
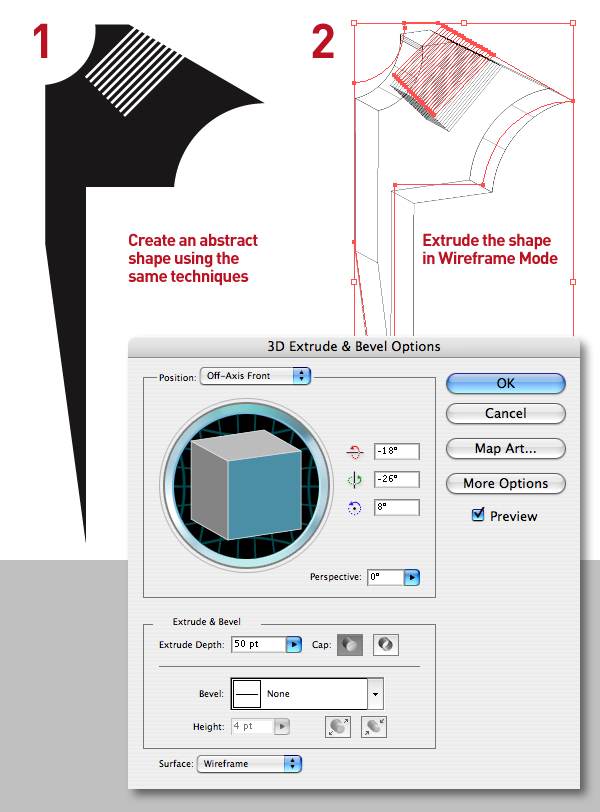
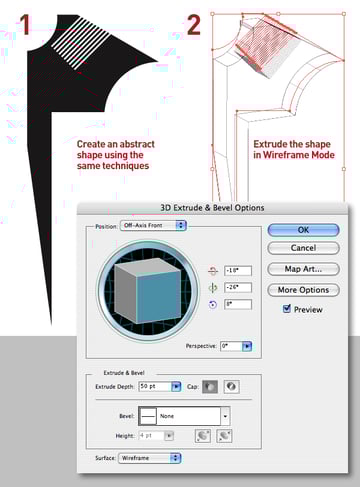
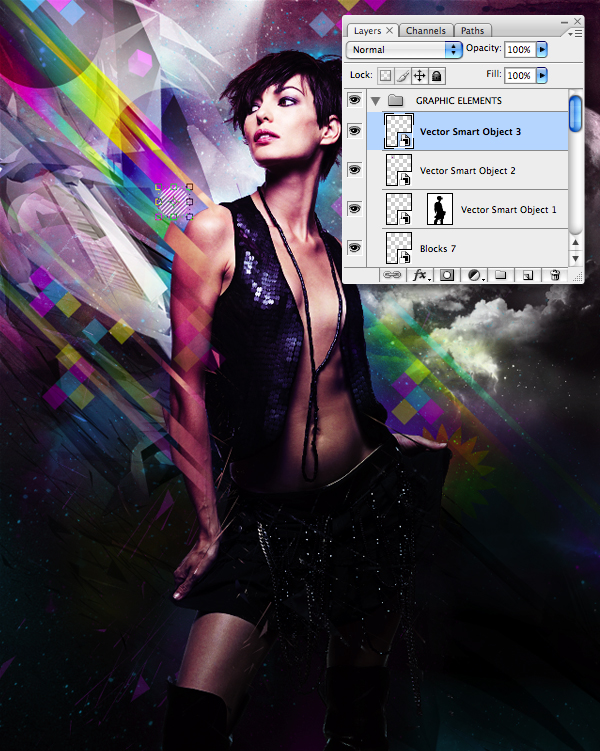
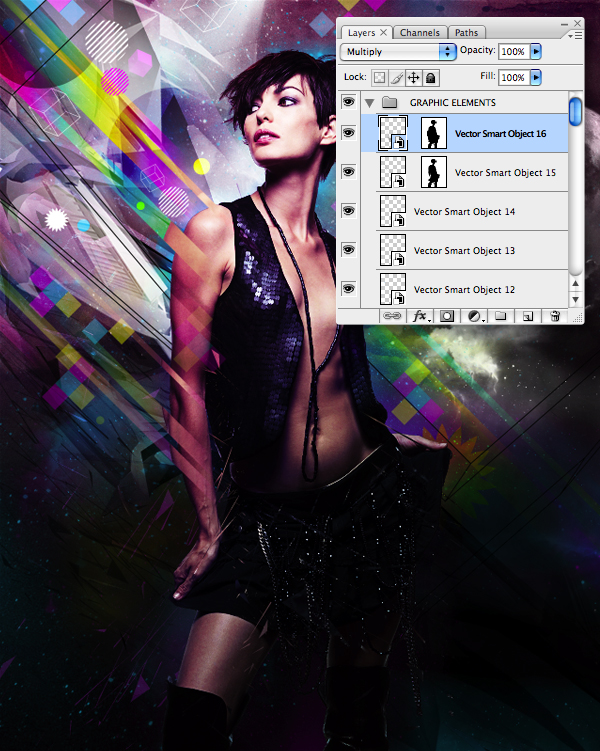
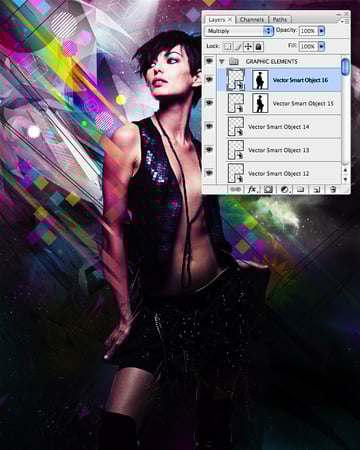
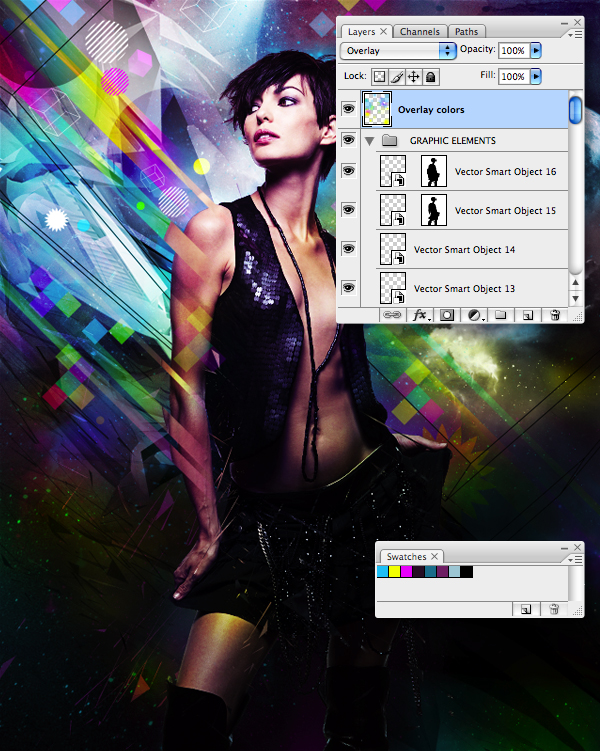
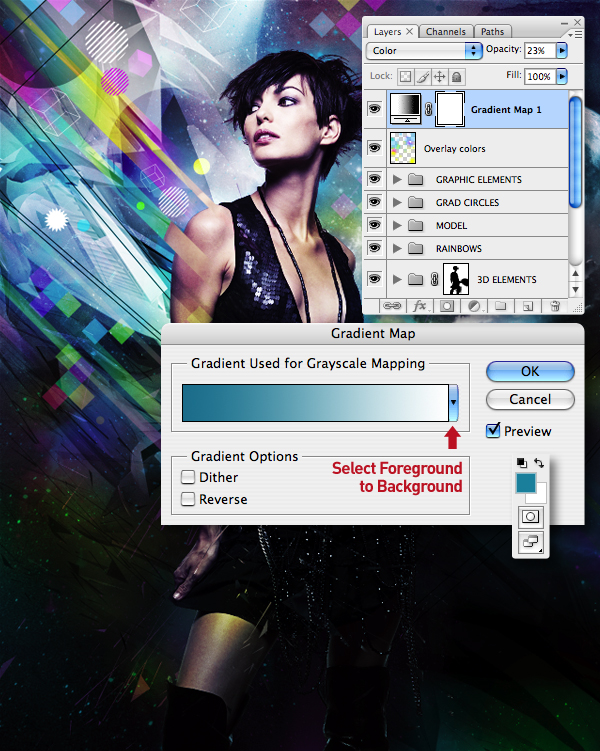
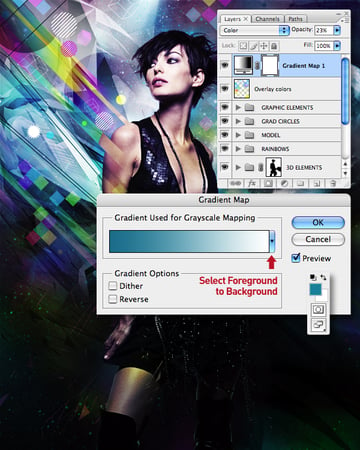
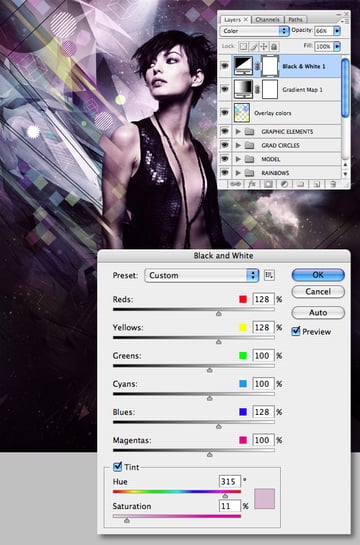
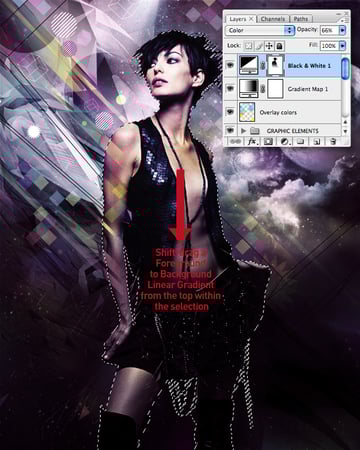
Follow the same technique for "3D_2.psd," clipping a Hue/Saturation adjustment layer again, with these settings: Hue at 300, Saturation at 9, and Lightness at 0. Repeat using "3D_3.psd" with these settings: Hue at 291, Saturation at 9, and Lightness at 0. Now mask the folder with a selection from the model as previous. Add another folder above the "MODEL" and label it "GRAD CIRCLES." Drop in a new layer, label it "Grad circle 1" and set its Blending Mode to Soft Light. Then Shift-drag a circular selection using the Elliptical Marquee Tool (M) and fill with white. Now add a mask and Shirt-drag a 45 degree, black to white Linear Gradient from the right-hand side. Add further white circular fills on new layers and mask as previous. Now create more circles on separate layers and fill with the "Dark purple" swatch. Try using different Blending Modes such as Overlay and Color Burn on the purple fills – also remember to label these new layers. The great thing about Photoshop is that a layered image is always in a state of flux, so let's carry out some modifications. First, change the Blending Mode of the "Circle grad" layer to Screen and drop the Opacity to 20%. Now adjust the Opacity of the "Bottom grad" layer to 90%. I also changed the Blending Mode of "3D element 1" to Soft Light, "3D element 2" to Multiply. Then flipped "3D element 2" and duplicated "3D element 3," changing its Blending Mode to Screen and repositioned it top-left. Darken the right of the composition by adding a new layer at the top of the stack within the "BACKGROUND" folder and label it "Angled grad." Now with black set as your foreground color, Shift-drag a 45 degree Foreground to Transparent Linear Gradient across from the right as shown. Set the Blending Mode to Multiply and lower the Opacity to 80%. In the next few steps we'll be using Illustrator to create some graphics, but first you need to save your swatches so they're compatible with Illustrator. Use the drop-down menu on the swatches palette to select Save Swatches for Exchange and give them a memorable name. Next, navigate to your Swatches folder (within Illustrator's Presets) and save them. Launch Illustrator and load your Exchange swatches. Now draw some random strips using the Rectangle Tool (M), their color being irrelevant at this stage. Select a group, then double-click the Shear option under the Scale Tool (S), and use the settings shown. Continue to create a variety of grouped shapes using the same techniques. It's worth mentioning here that these shapes can be made into excellent Illustrator brushes. Create a new Gradient using the "Bright blue," "Bright yellow," and "Bright pink" swatches. Now color the shapes by either clicking the selected group with the swatch highlighted, or Shift-dragging the Gradient Tool (G) for a varied effect. You can find these shapes (Elements.ai) as well as the others you'll be using later in the "source" folder. Select all the shape groups and rotate 45 degrees anti-clockwise. Copy and Paste the first group as a Smart Object into a new folder labelled "RAINBOWS" below the "MODEL" folder. Now Transform and position as shown. Next, add a Motion Blur with an Angle of -45 degrees and a distance of 100 px. Remember because the layer is Smart, so is the filter. Copy and Paste the rest of the Illustrator shapes as Smart Objects and give them the same Motion Blur. Now set their Blending Modes to either Lighten, Hard Light or Overlay. Also adjust their opacities to suit, then add any layer masks as required. Now revisit the "Model hard light" layer within the "MODEL" folder and modify the mask by Shift-dragging a Foreground to Transparent Linear Gradient from the bottom of the canvas. Disable the visibility of all folders, apart from the "Model grad color," "Model high pass," "Model soft light," "Model Overlay" and "Model normal" layers within the "MODEL" folder. Now add a new layer at the top of the stack within the "MODEL" folder and select Image > Apply Image. You'll now have a merged copy of the model. Generate a selection from the first Smart Object (within the "RAINBOW" folder) by Command-clicking its thumbnail. Now target the applied layer from the previous step and hit Shift + Command + J (Layer via Cut) to create a new layer from the selection. Enable the visibility of all your folders except the applied layer. Now label the cut layer from the previous step "Model cut 1," then offset it by tapping the arrow keys on your keyboard equal amounts up and left. Finally, add a layer mask and gently paint over the inner areas using a soft-edged brush. Repeat the previous step using selections from your remaining Smart Objects to cut new layers from the applied layer. Feel free to use selections from other layers too, and label them accordingly – I used some of the "Shatter" layers, again adding masks as required. When you've finished cutting selections from the applied layer, it can be deleted. Enable your Grid by pressing Command + Quote key, then go to your Preferences, select Guides and set a Gridline every 40 px with a Subdivision of 1. Create a new folder at the top of the stack and name it "GRAPHIC ELEMENTS." Add a new layer within the folder and label it "Blocks 1." Now use the Rectangular Marquee Tool, snapping to the grid to create clusters of colored squares with the "Bright blue," "Bright yellow" and "Bright pink" swatches. Next, select Layer > Smart Objects > Convert to Smart Object. Continue adding further block clusters on separate layers, label them and convert into Smart Objects. Now set their Blending Modes to either Lighten or Hard Light and adjust the opacity of each layer to taste. Finally, rotate all these layers 45 degrees and reposition as shown. Switch back to Illustrator, create a new document and pull in some central guides. Hit Command + U to enable Smart Guides, then draw an oval with the Ellipse Tool (L) and position as shown. Select the Convert Anchor Point Tool and click on the top point (or Option-click the point if the Pen Tool is highlighted). Select the Rotate Tool (R), then Option-click over the central guides to reposition the object's origin point. This also opens the Rotate dialogue box, enter an Angle of 20 degrees and click Copy. Keep pressing Command + D to repeat the transformation until you have a completed flower shape. Add a central circle to fill the hole, then select all. Now choose Make Compound Shape, then hit the Expand button in the Pathfinder palette. Now to create some 3D wireframe boxes. Select the Rectangular Tool and click anywhere on your artboard, in the next dialogue box enter 30mm in both fields. Next, go to Effect > 3D > Extrude & Bevel. Drag within the preview window for a custom rotation, or select one of the presets in the drop-down menu. Now enter 30mm in the Extrude field and select Wireframe from the Surface drop-down menu. When you're happy with the preview, click OK. Finally, go to Object > Expand Appearance and give the object a stroke of 1 pt. To create the next shape, first draw a circle with a diameter of approximately 70mm, then a long rectangle with a depth of 3mm (the width is irrelevant as long as it's wider than the circle). Now with the rectangle selected, press Command + Shift + alt + D to bring up the Transform dialogue box. Now enter -6mm in the Vertical Move field and press Copy. Continue pressing Command + D until you have a depth deeper than the circle. Group the lines, then press Command + Shift + Left Bracket key to send to the back. Select all, then centrally align both objects. Now hit the Minus Back command in the Pathfinder palette and finally rotate the shape 45 degrees anti-clockwise. Draw an abstract shape then cut away areas using the Pathfinder command. Now extrude a wireframe using the same techniques as before, but experiment with different settings. Begin to Copy and Paste your Illustrator shapes as Smart Objects into the "GRAPHIC ELEMENTS" folder, adding masks as required. Try out different Blending Modes, such as Overlay, Screen, etc...also, adjust their opacities to taste. Build up the effect with more Smart Object layers using the wireframe cube and abstract shape. Again, experiment with different Blending Modes and levels of Opacity. Add a new layer above all the folders and label it "Overlay colors." Set the Blending Mode to Overlay and accentuate areas with a large, soft-edged brush using the "Bright blue," "Bright yellow," and "Bright pink" swatches. Set the foreground to "Mid blue" and background to white. Create a new layer by selecting Gradient from the drop-down. Click the new fill or adjustment layer icon, then in the next window click the arrow next to the Gradient to select the Foreground to Background preset. Next, set the Blending Mode to Color and drop the Opacity to 23%. Tone down the overall saturation by selecting a Black & White adjustment layer and using a Custom preset as shown, picking #e0c7da in the Tint box. Now set the Blending Mode to Color and drop the Opacity to 66%. Reinstate some color by generating a selection from the "Blue copy" channel, set your foreground colors back to default and Shift-drag a Foreground to Background Linear Gradient from the top of the Black & White adjustment mask and you're done. I hope you've enjoyed this tutorial and discovered some new techniques that you can apply on your own images! You can view the large version here.

Step 31

Step 32

Step 33
Step 34

Step 35
Step 36

Step 37

Step 38
Step 39
Step 40
Step 41

Step 42
Step 43
Step 44

Step 45
Step 46

Step 47

Step 48
Step 49

Step 50


Step 51
Step 52
Step 53
Step 54

Step 55

Step 56
Step 57
Step 58
Step 59

Step 60
Step 61

Step 62

Conclusion


 By
By


